


Simple Object Access Protocol (SOAP) can be used to build web services that support interoperability between different platforms and technologies. REST (an acronym for Representational State Transfer) is another popular way of building lightweight APIs that can run over HTTP. As an open-source query language, GraphQL promises a more potent way of accessing information than SOAP or REST alone.
This article aims to provide a comprehensive overview of the evolution of wеb APIs, exploring thе transition from SOAP to REST, and finally to GraphQL. It will delve into thе motivation behind еach architectural style, and their characteristics, benefits, and drawbacks. By understanding the progression from SOAP to REST and thе emergence of GraphQL, developers can makе informed decisions when choosing the right API design for their projects.
If you're to work with the code examples discussed in this article, you need the following installed in your system:
- Visual Studio 2022
- .NET 8.0
- ASP.NET 8.0 Runtime
If you don't already have Visual Studio 2022 installed on your computer, you can download it from here: https://visualstudio.microsoft.com/downloads/.
In this article, I'll examine the following points:
- SOAP, REST, and GraphQL and their benefits
- The key differences between SOAP, REST, and GraphQL
- The benefits and drawbacks of SOAP, REST, and GraphQL
- How to use each of these tools in enterprise apps
After gaining this knowledge, you'll build three applications: one each using SOAP, REST, and GraphQL.
What Is Simple Object Access Protocol (SOAP)?
Simple Object Access Protocol (SOAP) is a communication protocol for data exchange in a distributed environment that allows different applications to interact with one another over a network by leveraging XML as the message format. You can take advantage of SOAP to build interoperable web services that work with disparate technologies and platforms. The structure and content of XML messages, as well as a set of communication guidelines, are outlined in a SOAP document.
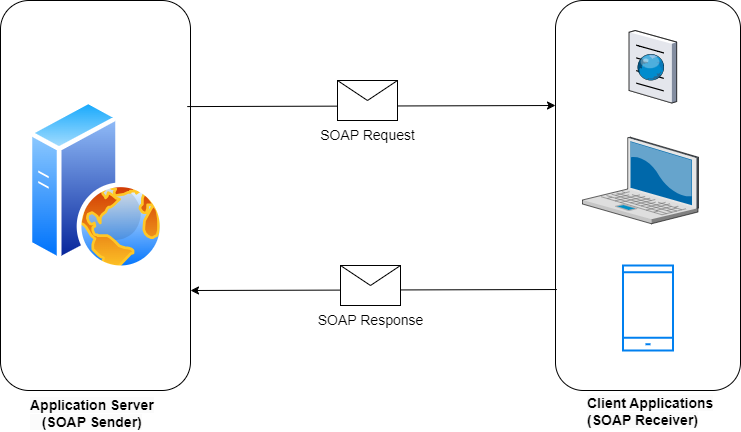
Note that ASP.NET Core doesn't have any built-in support for SOAP. Rather, the .NET Framework provides built-in support for working with ASMX and WCF. Using third-party libraries, you can still build applications that leverage SOAP in ASP.NET Core. Figure 1 demonstrates how SOAP works.
Anatomy of a SOAP Message
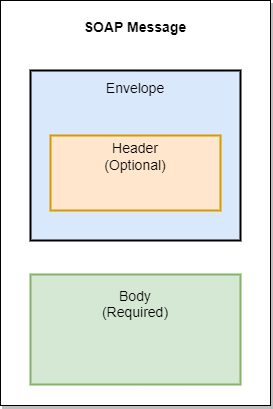
A SOAP (Simple Object Access Protocol) message is an XML-based structure used to exchange information between web services across diverse networks and platforms. A typical SOAP message is comprised of several elements that define the message's structure, content, and optional features. SOAP messages are designed to be extensible, neutral, and independent of any specific programming model or transport protocol, typically HTTP or HTTPS.
A typical SOAP message comprises four key elements, as shown in Figure 2.
- Envelope
- Header (optional)
- Body
- Fault
This next snippet is how the structure of a typical SOAP message looks:
<?xml version="1.0"?>

<soap:Envelope xmlns:soap="http://www.w3.org/2003/05/soap-envelope/";
       soap:encodingStyle="http://www.w3.org/2003/05/soap-encoding";>

<soap:Header>
       <!-- SOAP Header (Optional) -->
</soap:Header>

   <soap:Body>
       <!-- SOAP Body -->
    <soap:Fault>
       <!-- SOAP Fault -->
    </soap:Fault>
  </soap:Body>
</soap:Envelope>
SOAP Envelope
Every SOAP message is encapsulated inside a root element called SOAP Envelope. It defines the XML namespace and contains two mandatory child elements: the SOAP Header and the SOAP Body.
<soap:Envelope xmlns:soap="http://www.w3.org/2003/05/soap-envelope/";
       soap:encodingStyle="http://www.w3.org/2003/05/soap-encoding";>
SOAP Header
The SOAP Header is an optional element that contains additional information or metadata about the SOAP message, such as authentication credentials, security tokens, or routing instructions.
<soap:Header>
     <!-- Optional SOAP Header elements -->
</soap:Header>
SOAP Body
The SOAP Body represents the main body of the SOAP message, which contains the data or parameters for the method being sent to the web service. It should be noted that the SOAP Body element is mandatory. It can have one or more child elements that represent the actual payload and one or more fault elements in the event of an error.
<soap:Body>
     <!-- SOAP Body content -->
</soap:Body>
SOAP Fault
During the processing of a SOAP message, an optional element called SOAP Fault can be used to convey error or fault information back to the client in case of errors or exceptions that occur during the process.
<soap:Fault>
  <!-- Fault details -->
</soap:Fault>
Example SOAP Request and Response
The format of a typical SOAP request looks like this:
POST /<host>:<port>/<context>/<database ID> HTTP/1.0
Content-Type: text/xml; charset=utf-8

<?xml version="1.0"?>
<env:Envelope xmlns:env="http://schemas.xmlsoap.org/soap/envelope/";>

<env:Header>
</env:Header>

<env:Body>
</env:Body>

</env:Envelope>
The following code snippet illustrates how a typical SOAP request looks:
POST /ProductPrice HTTP/1.1
Host: www.example.org
Content-Type: application/soap+xml;
charset=utf-8
Content-Length: nnn

<?xml version="1.0"?>
<soap:Envelope xmlns:soap="http://www.w3.org/2003/05/soap-envelope/";
 soap:encodingStyle="http://www.w3.org/2003/05/soap-encoding";>

  <soap:Body xmlns:m="http://www.abcxyz.org/product";>
    <m:GetProductPrice>
        <m:ProductCode>HP_Envy_i9</m:ProductCode>
    </m:GetProductPrice>
  </soap:Body>
</soap:Envelope>
The format of a typical SOAP response looks like this:
HTTP/1.0 200 OK
Content-Type: text/xml; charset=utf-8
<?xml version="1.0"?>

<env:Envelope xmlns:env="http://schemas.xmlsoap.org/soap/envelope/";>

  <env:Header>
  </env:Header>

  <env:Body>
</env:Body>
</env:Envelope>
And here's how a SOAP response to the above SOAP request looks:
HTTP/1.1 200 OK
Content-Type: application/soap+xml;
charset=utf-8
Content-Length: nnn

<?xml version="1.0"?>
<soap:Envelope xmlns:soap="http://www.w3.org/2003/05/soap-envelope/";
 soap:encodingStyle="http://www.w3.org/2003/05/soap-encoding";>

<soap:Body xmlns:m="http://www.abcxyz.org/product";>
    <m:GetProductPriceResponse>
        <m:Price>6500.00</m:Price>
    </m:GetProductPriceResponse>
</soap:Body>
</soap:Envelope>
WSDL, UDDI, and Binding
This section provides a brief overview of the WSDL and UDDI. It also briefly discusses SOAP binding.
Web Services Description Language (WSDL)
Web Services Description Language, or WSDL, is a language based on XML used for the purpose of describing and locating web services. A standard format is used to describe an interface to a web service that includes operations, inputs, output parameters, and the message format.
Universal Description, Discovery, and Integration (UDDI)
Universal Description, Discover, and Integration, or UDDI, represents a platform-independent registry intended to provide a standard mechanism for service discovery, registration, and versioning to enable organizations to publish and discover web services on the internet.
A UDDI registry is independent of any platform intended to provide a standard mechanism for the discovery, registration, and versioning of services, thereby enabling businesses to publish and discover web services on the internet. The key components of the SOAP architecture work together to define a standardized message format for exchanging structured data between applications using different transport protocols.
SOAP Binding
SOAP binding defines how SOAP messages are transmitted using transport protocols, such as HTTP, SMTP, or TCP. This document specifies the message format, SOAP encoding style, and binding rules that must be followed when sending messages over SOAP.
SOAP Web Services Architectural Components
The SOAP web services architecture thrives on the synergy among the following three components, as shown in Figure 3:

- Service provider: This is the component that provides the web service and encompasses the application itself, the platform on which the application executes, and the middleware.
- Service requester or the service consumer: This component is responsible for requesting a resource from the service provider and, similar to the service provider, it encompasses the application, the platform, and the middleware.
- Service registry: This is an optional component that resides in a central location so that service providers can publish service descriptions and the service requesters or service consumers can look up those service descriptions.
Strategies for Building a SOAP Service
To build a SOAP service, you can use any of the following: WCF connected service, third-party libraries, or manual implementation. Let's have a look.
WCF Connected Service
A Connected Service in Windows Communication Foundation (WCF) represents a feature in Visual Studio that facilitates the use of and access to web services, including SOAP-based services. Using it, you can create client code capable of communicating with a web service seamlessly.
Third-Party Libraries
You can also create SOAP services using third-party libraries such as Apache CXF, JAX-WS (Java API for XML Web Services), and Spring-WS (Spring Web Services). You can also leverage Windows Communication Foundation (WCF) for building SOAP services in .NET environment.
Manual Implementation
SOAP messages can be manually constructed and processed using programming languages that support XML parsing and SOAP protocols, such as C# or Java. To do this, follow these steps:
- Define the service interface, operations, messages, and bindings in the WSDL document.
- Leverage the programming language of your choice to implement the service logic.
- Use XML parsing libraries or manually handling XML serialization and deserialization for SOAP messages is the option.
- Keep an eye on the HTTP server for SOAP requests and responding appropriately.
DataContract and ServiceContract
In SOAP, DataContract and ServiceContract are key concepts used to define the structure of data and the operations supported by the service.
DataContract
In a DataContract, the terms and conditions used in the data exchange between data providers and consumers are outlined along with the format, structure, quality, semantics, etc. It's typically defined using XML Schema Definition (XSD) or a similar language in SOAP. These could be complex types that are passed between service operations. You should decorate your classes or structs with the DataContract attribute to indicate that they are serializable and understandable by the service provider and the service consumer. Leverage the DataMember attribute to decorate the properties or methods of classes or structs that should take part in the serialization process.
Here's an example of a typical data contract:
[DataContract]
public class MyClass
{
    [DataMember]
    public int Id { get; set; }

    [DataMember]
    public string Text { get; set; }
}
ServiceContract
SOAP web services expose operations and methods through the ServiceContract that specifies the set of available operations, their input parameters, and return types, i.e., the type of the return values. A ServiceContract consists of an interface or class implemented in the server-side code and acts as a blueprint for service implementation, specifying the operations clients can invoke.
An OperationContract represents an individual operation within a ServiceContract and specifies the operation name, input parameters, and output types. You must apply the OperationContract attribute to a service operation to indicate that clients can access the operation.
The following code snippet illustrates a service contract:
[ServiceContract]
public interface IMyDemoService
{
    [OperationContract]
    string GetText(int id);
}
Implement a SOAP Service in ASP.NET Core
In this section, I'll examine how to build a SOAP service in ASP.NET Core. The section that follows outlines the series of steps needed to create a new ASP.NET Core Web API project in Visual Studio.
Create a New ASP.NET Core 8 Project in Visual Studio 2022
You can create a project in Visual Studio 2022 in several ways. When you launch Visual Studio 2022, you'll see the Start window. You can choose “Continue without code” to launch the main screen of the Visual Studio 2022 IDE.
To create a new ASP.NET Core 8 Project in Visual Studio 2022:
- Start the Visual Studio 2022 IDE.
- In the “Create a new project” window, select “ASP.NET Core Web API” and click Next to move on.
- Specify the project name as SOAP_Demo and the path where it should be created in the “Configure your new project” window.
- If you want the solution file and project to be created in the same directory, you can optionally check the “Place solution and project in the same directory” checkbox. Click Next to move on.
- In the next screen, specify the target framework and authentication type as well. Ensure that the “Configure for HTTPS,” “Enable Docker Support,” “Do not use top-level statements,” and the “Enable OpenAPI support” checkboxes are unchecked because you won't use any of these in this example.
- Remember to leave the Use controllers checkbox checked because you won't use minimal API in this example.
- Click Create to complete the process.
A new ASP.NET Core Web API project is created. You'll use this project to build the SOAP service in ASP.NET Core.
Install NuGet Package(s)
So far so good. The next step is to install the necessary NuGet Package(s). To install the required package into your project, right-click on the solution and then select Manage NuGet Packages for Solution…. Now search for the package named SoapCore in the search box and install it. Alternatively, you can type the commands shown below at the NuGet Package Manager Command Prompt:
PM> Install-Package SoapCore
You can also install this package by executing the following commands at the Windows Shell:
dotnet add package SoapCore
Create the Data Contract
To create the data contract, create a new class named Customer in a file called Customer.cs and write the following code in there:
  [DataContract]
  public class Customer
  {
      [DataMember]
      public int Id { get; set; }
      [DataMember]
      public string FirstName { get; set; }
      [DataMember]
      public string LastName { get; set; }
      [DataMember]
      public string Address { get; set; }
  }
Create the CustomerRepository
The CustomerRepository class extends the ICustomerRepository interface and implements its methods, as shown in the code given in Listing 1.
Listing 1: The ICustomerRepository interface
    public interface ICustomerRepository {
      public Task < List < Customer >> GetCustomers();
      public Task < Customer > GetCustomer(int id);
    }

    public class CustomerRepository: ICustomerRepository {
      private readonly List < Customer > customers =
      new List < Customer > () {
          new Customer() {
              Customer_Id = 1, FirstName = "Rob",
              LastName = "Miles", Address = "Boston, USA"
          },

          new Customer() {
              Customer_Id = 2, FirstName = "Lewis",
              LastName = "Walker", Address = "London, UK"
          },

          new Customer() {
              Customer_Id = 3, FirstName = "Carlton",
              LastName = "Kramer", Address = "New York, USA"
          }
      };

      public async Task < List < Customer >> GetCustomers() {
        return await Task.FromResult(customers);
      }
      public async Task < Customer > GetCustomer(int id) {
          return await Task.FromResult
              (customers.FirstOrDefault(x => x.Customer_Id == id));
      }
    }
Create the Service Contract
To create a service contract, create an interface called ICustomerService and write the code given in Listing 2 in there. The CustomerService class extends the ICustomerService interface and implements its methods. Once you've created the ICustomerService interface, create a new class named CustomerService and write the code given in Listing 2 in there.
Listing 2: The ICustomerService interface
[ServiceContract]
public interface ICustomerService
{
    [OperationContract]
    Task<List<Customer>> GetCustomers();

    [OperationContract]
    Task<Customer> GetCustomer(int id);
}

public class CustomerService : ICustomerService
{
    private readonly ICustomerRepository _customerRepository;
    public CustomerService(ICustomerRepository customerRepository)
    {
        _customerRepository = customerRepository;
    }
    public async Task<List<Customer>> GetCustomers()
    {
        return await _customerRepository.GetCustomers();
    }
    public async Task<Customer> GetCustomer(int id)
    {
        return await _customerRepository.GetCustomer(id);
    }
}
Configure the SOAP Service
Lastly, you should configure your SOAP service to run it. To do this, add ICustomerRepository and ICustomerService instances to the container using the following code snippet:
builder.Services.AddScoped<ICustomerService, CustomerService>();
builder.Services.AddScoped<ICustomerRepository, CustomerRepository>();
This enables you to use dependency injection to retrieve these instances at runtime. The complete source code of the Program.cs file is given in Listing 3 for your reference.
Listing 3: Configuring SOAP endpoints in the Program.cs file
using SOAP_Demo;
using SoapCore;

var builder = WebApplication.CreateBuilder(args);

// Add services to the container.
builder.Services.AddScoped<ICustomerService, CustomerService>();
builder.Services.AddScoped<ICustomerRepository, CustomerRepository>();
builder.Services.AddControllers();

var app = builder.Build();

// Configure the HTTP request pipeline.
app.UseRouting();
app.UseAuthorization();
app.MapControllers();

app.UseEndpoints(endpoints =>
{
    _ = endpoints.UseSoapEndpoint<ICustomerService>("/CustomerService.asmx",
        new SoapEncoderOptions(), SoapSerializer.XmlSerializer);
});

app.Run();
Create the SOAP Client
You'll now create a simple Console application to consume the SOAP service you created earlier. The SOAP client application consumes the SOAP service and displays the data retrieved at the Console window.
You can create a project in Visual Studio 2022 in several ways. When you launch Visual Studio 2022, you'll see the Start window. You can choose “Continue without code” to launch the main screen of the Visual Studio 2022 IDE.
To create a new Console Application Project in Visual Studio 2022:
- Start the Visual Studio 2022 IDE.
- In the Create a new project window, select Console App, and click Next to move on.
- Specify the project name as SOAP_Cient and the path where it should be created in the Configure your new project window.
- If you want the solution file and project to be created in the same directory, you can optionally check the Place solution and project in the same directory checkbox. Click Next to move on.
- In the next screen, specify the target framework you’d like to use for your console application.
- Click Create to complete the process.
Once your Console application is ready, you can follow these steps to add a reference to your SOAP service into the client application.
- Right-click on the client application and select Add → Service Reference, as shown in Figure 4.
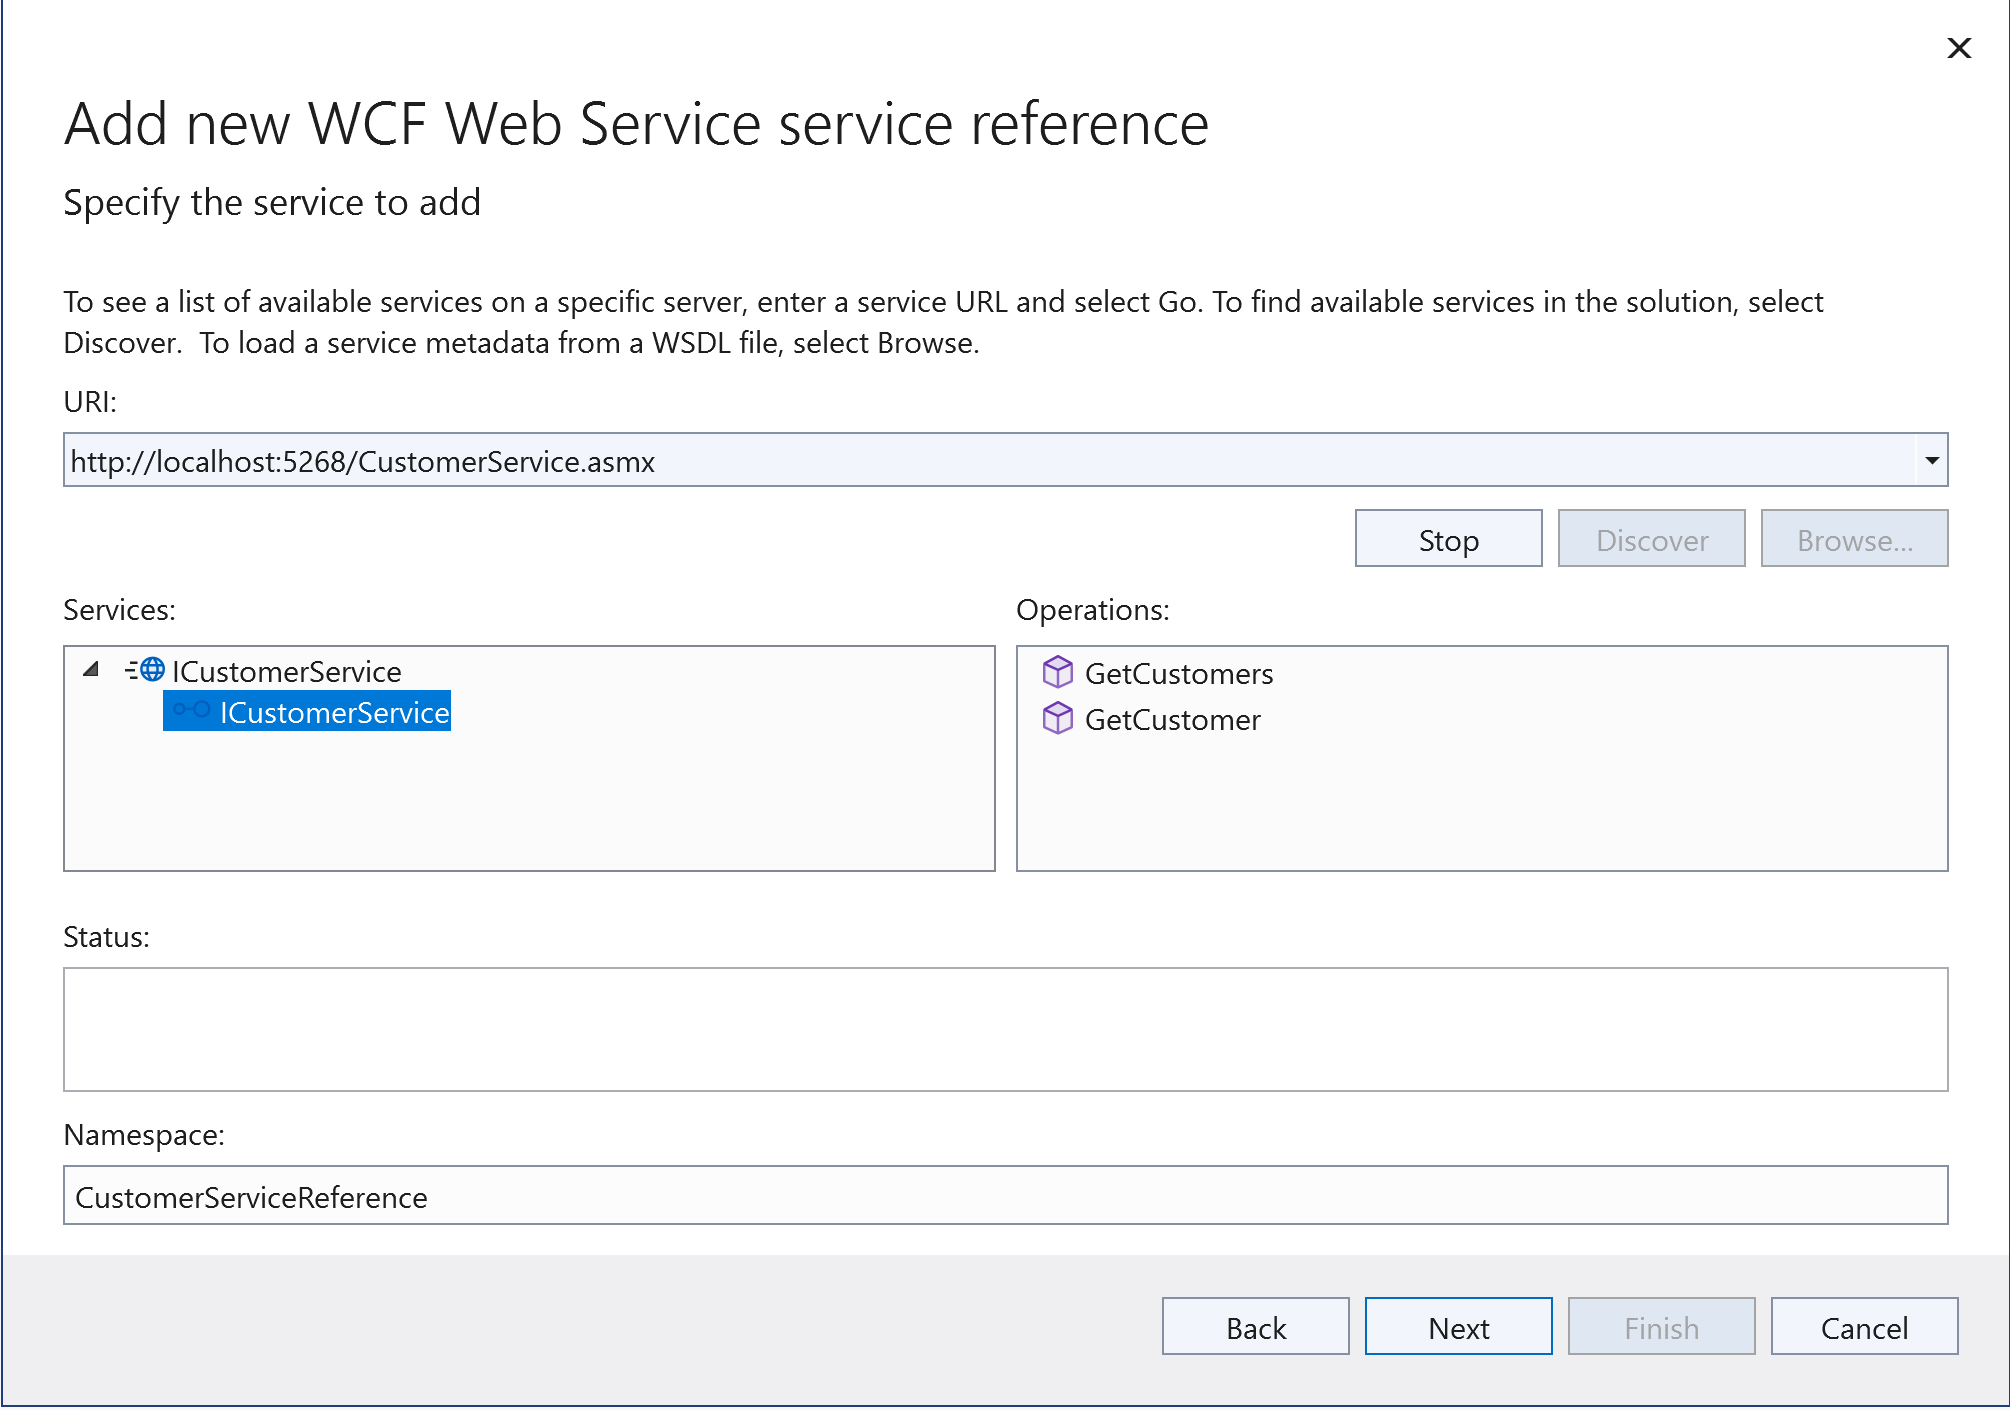
- Click on Next three times and let the default selections be used for this example.
- Click on Submit to initiate the add reference process.
Once the reference to the SOAP service has been added successfully, the following screen will be displayed, as shown in Figure 5.
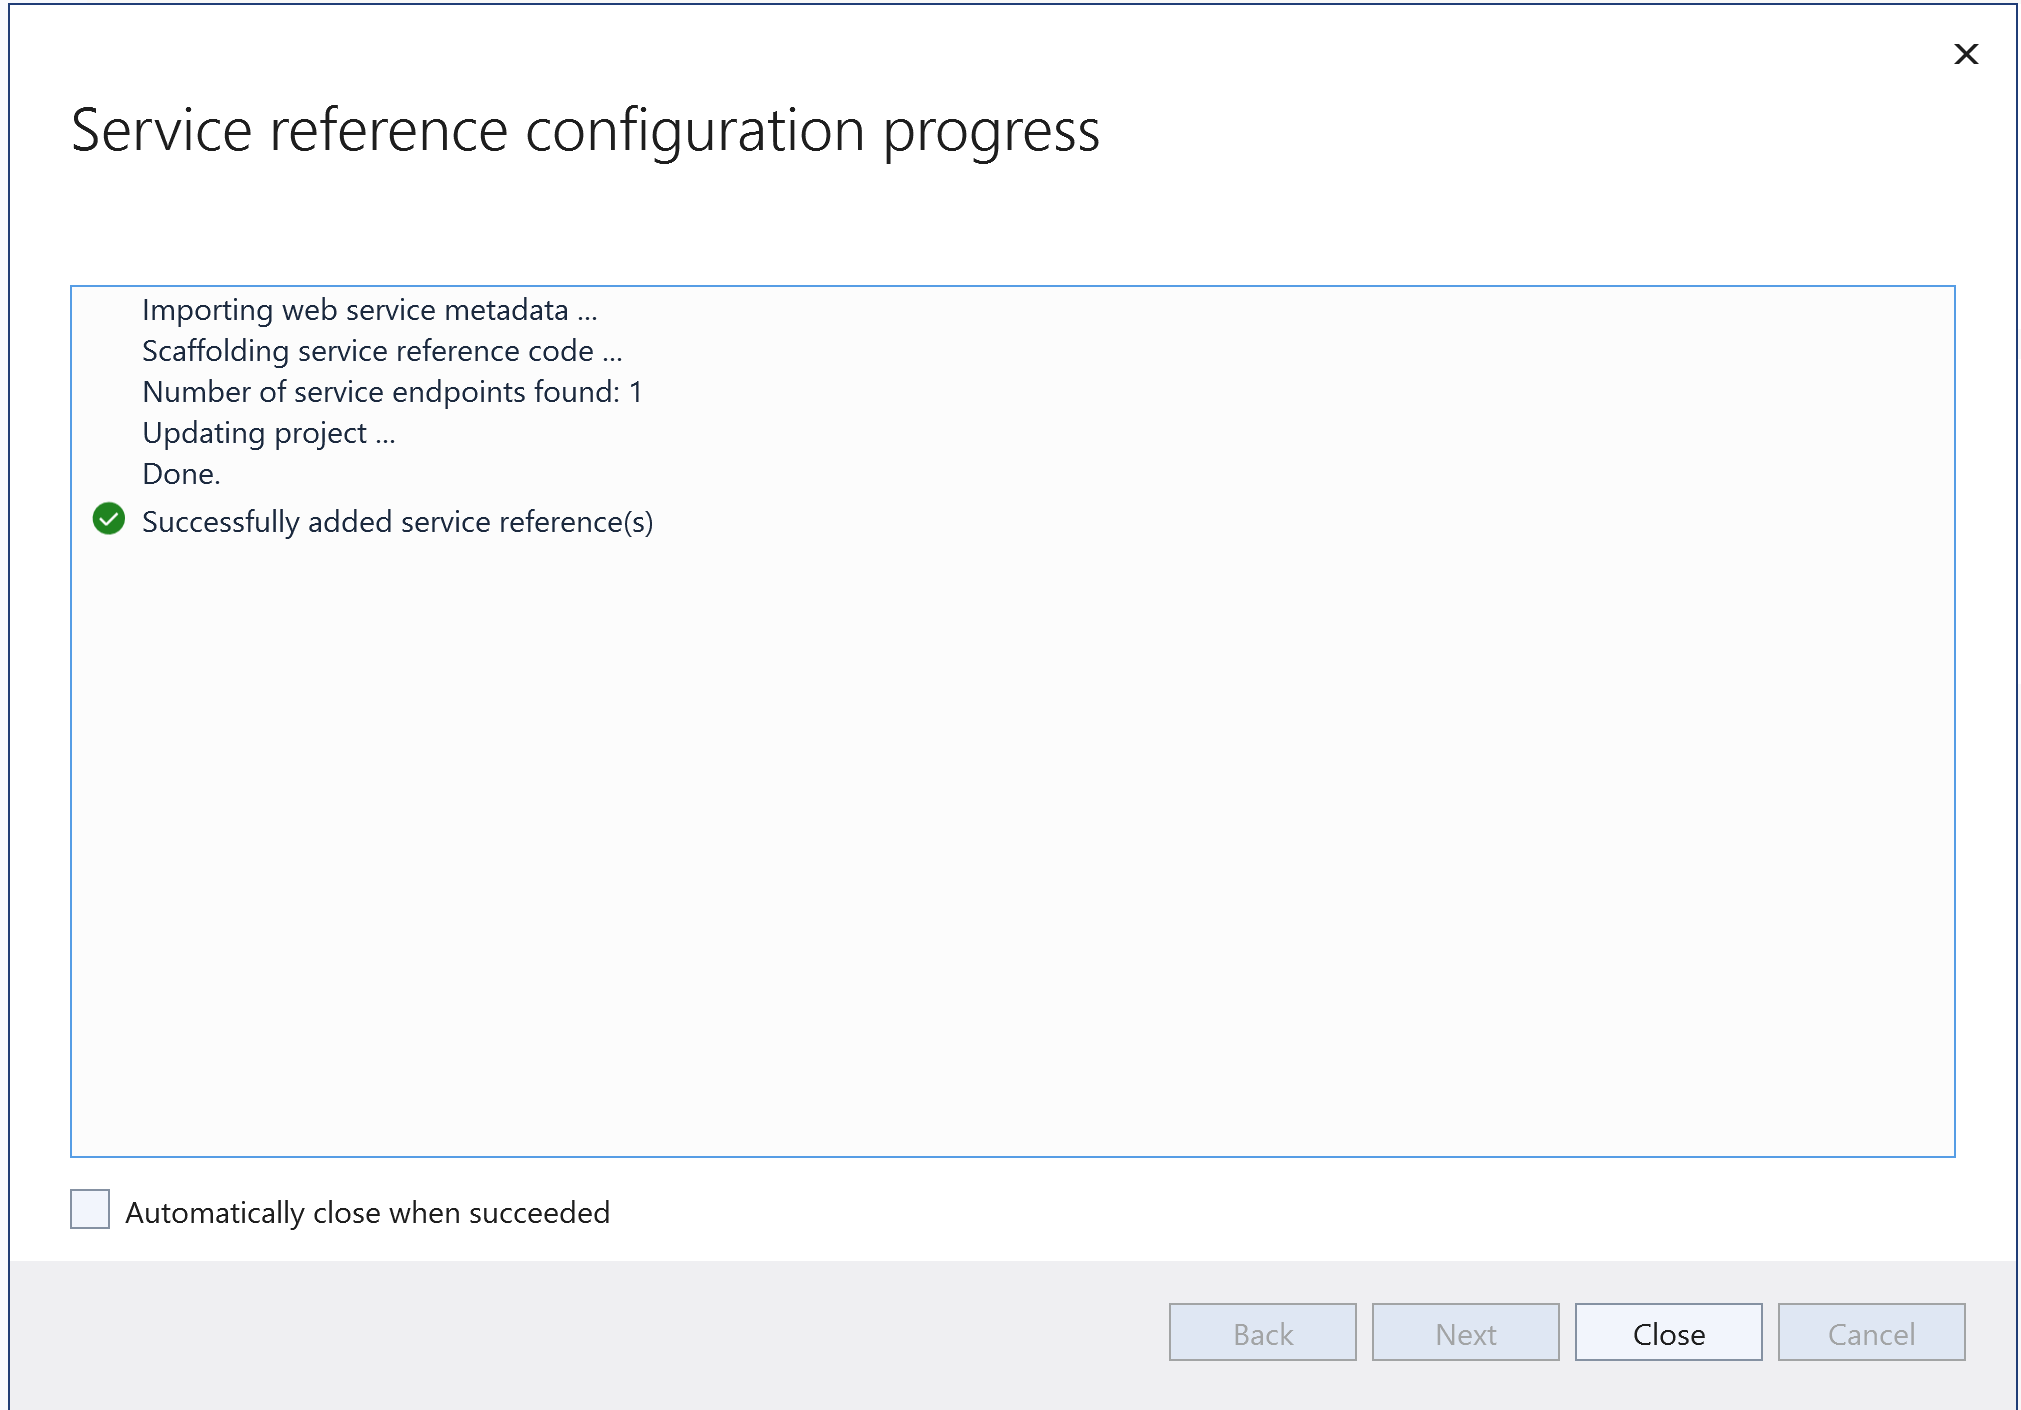
You'll observe that a file named References.cs has been added to the client application. You can now write the following piece of code to invoke the GetCustomers service operation asynchronously.
ICustomerService soapServiceChannel =
    new CustomerServiceClient(CustomerServiceClient.EndpointConfiguration.
    BasicHttpBinding_ICustomerService_soap);
var response = await soapServiceChannel.GetCustomersAsync();
The following code snippet shows the complete source code of the Program.cs file of the client application.
using CustomerServiceReference;

ICustomerService soapServiceChannel =
    new CustomerServiceClient(CustomerServiceClient.EndpointConfiguration.
      BasicHttpBinding_ICustomerService_soap);
var response = await soapServiceChannel.GetCustomersAsync();

foreach (Customer customer in response)
    Console.WriteLine(customer.FirstName);
When you run the application, the first names of the customers will be displayed at the console window.
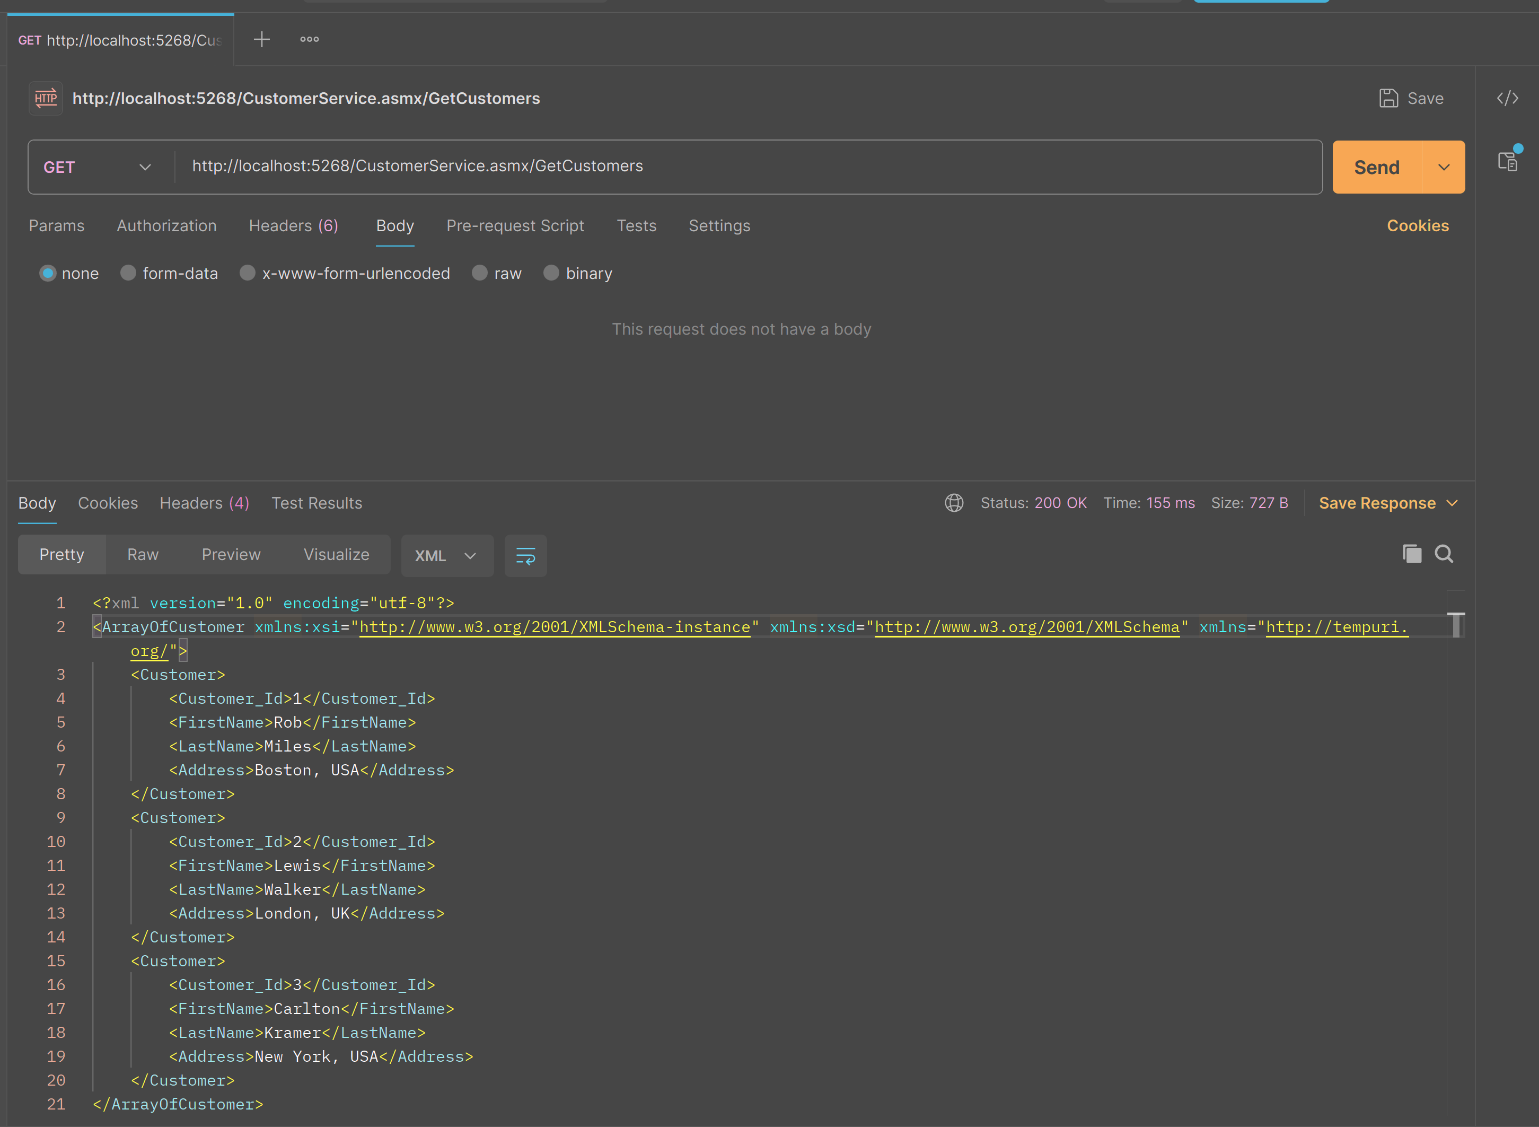
Call the SOAP Service from Postman
You can also call the GetCustomers service operation using Postman, as shown in Figure 6.
From SOAP to REST
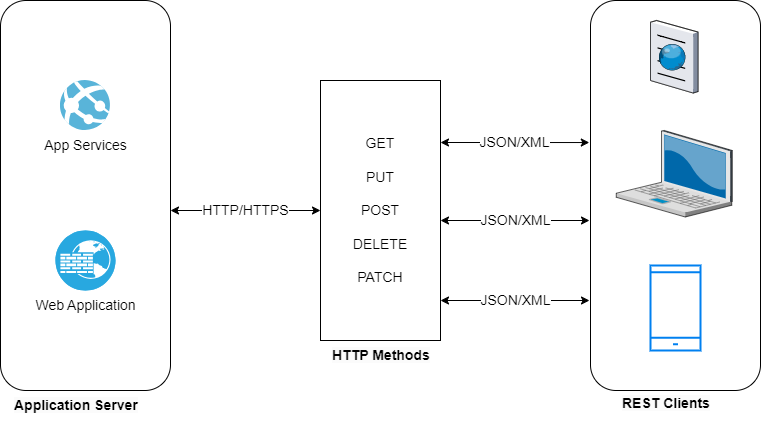
Representational State Transfer (REST) is a lightweight, and scalable approach to build web services that can run over HTTP. It's often used for building distributed systems and APIs due to its simplicity, flexibility, and wide adoption among developers. REST is a set of architectural constraints.
RESTful systems adhere to a set of constraints that standardize the communication between components, enhancing scalability and performance. By leveraging HTTP methods such as GET, PUT, POST, and DELETE, REST enables the creation of well-defined and predictable APIs. This approach allows loose coupling between client and server, promoting flexibility and ease of maintenance in distributed systems.
This not only promotes reliability and resilience, but also allows scalability and efficient communication between components. Figure 7 shows a typical REST-based application at work. By understanding the principles of REST, developers can design robust and flexible systems that are scalable and high performant.
Resources
A fundamental tenet of REST is resources, which are distinguished by unique URLs and may be managed via conventional HTTP methods such as GET, POST, PUT, and DELETE. This approach allows clients to access and modify representations of these resources through well-defined interfaces. Resources can be represented in various formats, allowing more flexibility in how data is manipulated and transferred.
Common Misconceptions about REST
In this section, I'll examine a few common misconceptions related to REST among the developer community.
REST Is a Protocol
It should be noted that REST is not a standard or a protocol. Representational State Transfer (REST) refers to an architectural style and a set of architectural constraints used for developing networked applications that defines a set of guidelines and principles for developing web services that are scalable, maintainable, and loosely coupled.
REST Is Only Used for Web Services
Although REST was originally designed for creating web services, it can also be used for other types of applications such as mobile apps or IoT devices. As long as the principles of statelessness, client-server architecture, and resource-based communication are followed, any type of application can be built using REST.
REST Requires the Use of HTTP
Although HTTP is commonly used in conjunction with REST due to its widespread adoption and support for various request methods, it's not a requirement. The principles of resource identification and manipulation are applicable to any network protocol.
Every API that Uses HTTP Is Automatically Considered RESTful
No, not actually. Just because an API uses HTTP doesn't mean it follows the principles of REST. A genuinely RESTful API should adhere to all the constraints set out by the architectural style, including statelessness, caching, uniform interface, etc.
URLs Must Contain Nouns Only
Another misconception about REST is that it can only be used with HTTP. Although RESTful APIs typically use HTTP as the underlying protocol, REST itself is not tied to any specific protocol and can be implemented over other protocols like CoAP or WebSocket.
Key Principles of REST
There are several key principles that underpin REST architecture, which are listed in this section. By adhering to these key principles, developers can design scalable, reliable, and efficient web services that meet the demands of today's applications as far as performance and flexibility is concerned.
Resource-Based
In REST, a resource is an object, data, or service that a client may access across a network, usually the internet, using a specified URL. Resource identifiers in a RESTful system are known as URIs (Uniform Resource Identifiers), and they are conceptual entities or data representations. In a RESTful architecture, you can identify resources using URIs. Resources are concepts that can be represented in any format such as HTML, XML, JSON, etc.
Code on Demand
A RESTful architecture provides support for an optional feature that allows code to be downloaded and executed as applets or scripts to extend client functionality. The number of features that need to be pre-implemented is reduced, simplifying the client experience. The ability to download features after deployment improves the extensibility of the system. By delivering executable code to the client, the server may enhance the client's capability via the code on demand feature. When you fill out any registration form on a site, your web browser alerts you if there are errors. For example, when you fill in a registration form, your browser displays any errors while you type, such as incorrect SSN numbers, email addresses, etc.
Stateless
REST is stateless, requiring each client request to provide all information needed for processing as part of query parameters, request headers or URI. It should be noted that in a typical RESTful architecture, the server doesn't retain any client-specific information between requests, thus enabling improved scalability and load balancing by allowing any server to process any client request.
Layered Architecture
Requests and responses to REST APIs are routed through several layers spread across multiple tiers. A layered system architecture is one in which the application is split across various layers to isolate presentation, application processing, and data management in a layered architecture. These layers work together to fulfill client requests while clients are unaware of them. It helps if you design your RESTful architecture to split your RESTful services across multiple layers, thereby fostering the separation of concerns in your application.
Uniform Interface
RESTful architecture encourages uniform and standardized interfaces for interaction with a resource as part of its basic principles. The interface typically consists of four main HTTP methods: GET, POST, PUT, and DELETE. RESTful services should have a uniform interface. In a RESTful architecture, the server transmits information to a client in a standard format. In RESTful architecture, a formatted resource is known as a representation. Note that the format of a resource may differ from its internal representation on the server. A server can, for instance, store data in text and send it in HTML format. In a RESTful architecture, by decoupling implementations from the services they provide, they can evolve independently.
Client-Server Architecture
As a rule of thumb, a RESTful architecture should be based on a client-server architecture. Although the client requests resources from the server, the server provides resources as appropriate to the authorized clients. In a typical client-server architecture, the client and the server are decoupled and they don't have any knowledge of each other, thereby enabling them to grow and evolve independent of each other.
Cacheable
Resources should be cacheable to improve network efficiency. Each response should state whether it is cacheable on the client side and for how long. When the client requests data in the future, it retrieves the data from its cache, thereby eliminating the need to transmit the request to the server again for future requests. When managed effectively, caching reduces client and server traffic, enhancing availability and performance. However, you should take proper measures to ensure that clients don't have stale data. The server can include caching-related headers (e.g., Cache-Control or Last-Modified) in the response to indicate to the client how long the response can be cached.
Benefits of Using REST
The following are the benefits of REST at a glance:
- Scalability: RESTful architectures are inherently scalable due to their stateless nature, allowing for easy scaling of services to meet changing demands and making it easier to handle a large number of requests.
- Simplicity: With its emphasis on standard HTTP methods and status codes, REST simplifies the communication process between clients and servers.
- Flexibility: The ability to work with different data representations and to support various client types adds flexibility to RESTful services.
- Performance: By caching resources, you can reduce client-server interactions, which can greatly improve the performance of your application.
- Interoperability: REST APIs work over standard protocols like HTTP, enabling seamless communication between different systems regardless of their implementation details.
- Technology Agnostic: REST APIs are technology agnostic, enabling you to write both server and client applications in different programming languages. The underlying technology can also be changed on either side of the communication, if needed, without affecting the functionality.
How Does REST Work?
Initially, the client sends a request to the server over HTTP in order to initiate communication with the server. The server acknowledges and processes the request and then produces a response, as appropriate. Responses are usually in the form of data, such as JSON or XML, which the client can display or use. REST APIs use predefined methods like GET, PUT, POST, DELETE to perform diverse operations on the server. These methods correspond to various actions, such as retrieving data, updating old data, creating new data, and deleting old data.
What Are REST APIs? How Do They Work?
REST APIs communicate data between client and server using HTTP requests. Once a client sends a request, the server acknowledges and processes it and then sends an appropriate response to the client. Responses are usually in the form of data, such as JSON or XML, which the client can display or use. REST APIs use predefined methods like GET, POST, PUT, and DELETE to perform diverse operations on the server. The methods apply to various actions, such as retrieving data, creating new data, updating old data, and deleting old data. Using these principles and methods, REST APIs can effectively communicate and transfer data between applications. A REST API encompasses a collection of guidelines and standards that can help you build applications that can interact and share information over the internet. It adheres to REST principles, a stateless architectural approach, to develop scalable and adaptable web services.
Challenges of REST
Although REST offers many advantages, some challenges exist, such as maintaining statelessness leading to increased network overhead and designing consistent and meaningful URI structures can be complex in large-scale applications.
Here are the key challenges of RESTful architecture:
- Limited support for performing complex operations: It's important to note that the REST API can only be used for CRUD (Create, Read, Update, Delete) operations through a limited set of HTTP methods (GET, PUT, POST, DELETE). Performing complex operations may require multiple requests or custom endpoints.
- No standard error handling mechanism: There's no standardized error handling in REST. There can be a range of REST implementations for implementing consistent error handling mechanisms, such as error codes, error messages, and error formats.
- Over-fetching and under-fetching: REST APIs typically return a fixed representation of resources. When clients only require a subset of the resource data or need additional data not included in the response, it can result in inefficiencies.
- Versioning: As REST APIs evolve, introducing changes can break existing client implementations. When many clients consume the API at the same time, maintaining backward compatibility and versioning can be challenging.
- Security issues: Security challenges exist when using REST APIs, such as data exposure, unauthorized access, and protection against XSS and CSRF attacks. Implementing proper security measures, such as authentication, authorization, and encryption, is imperative.
The Future of REST
With technology advancing at such a lightning-fast pace, REST seems to have a bright future. With its simplicity and scalability, REST is expected to remain a fundamental architectural style for designing networked applications. As more businesses embrace cloud computing and microservices architecture, REST will play a crucial role in enabling seamless communication between various services and systems. Furthermore, with the rise of Internet of Things (IoT) devices and mobile applications, RESTful APIs will be essential in facilitating data exchange between these interconnected devices. As the web industry continues to evolve, REST's flexibility and compatibility with different programming languages make it well-positioned to meet the demands of modern web development practices.
Implementing a RESTful Application in ASP.NET Core
Let's now build a RESTful web application in ASP.NET Core. Follow the steps outlined in a previous section where you've built a ASP.NET Core Web API application in Visual Studio. The only difference is that you'll build a minimal API application in Visual Studio by leaving the Use controllers checkbox unchecked. You'll use this project to build the RESTful application in ASP.NET Core.
Create the Model Class
Assuming that the minimal API application has been created, create a new class named Product in a file having the same name with a .cs extension and write the following code in there:
public class Product
{
   public int Product_Id { get; set; }
   public string Product_Name { get; set; }
   public string Description { get; set; }
   public string SKU { get; set; }
   public decimal Price { get; set; }
}
For the sake of simplicity and brevity, I'll skip other model classes here.
Create the ProductRepository
The ProductRepository abstracts all calls to the database. The ProductRepository class extends the IProductRepository interface and implements its methods as shown in Listing 4.
Listing 4: The IProductRepository interface
public interface IProductRepository
   {
       public Task<List<Product>> GetProducts();
       public Task<Product> GetProduct(int id);
   }

public class ProductRepository
   {
       private readonly List<Product> products = new List<Product> {
           new Product {
               Product_Id = 1,
               Product_Name = "HP Envy Laptop",
               SKU = "HPL/i9/1TB",
               Description = "HP Envy Laptop i9 32 GB RAM 1 TB SSD",
               Quantity = 100,
               Price = 6500.00m
           },
           new Product {
               Product_Id = 2,
               Product_Name = "Lenovo Legion Laptop",
               Description = "Lenovo Legion Laptop i7 16 GB RAM 1 TB SSD",
               SKU = "Len/i9/1TB/SSD",
               Quantity = 150,
               Price = 6000.00m
           },
           new Product {
               Product_Id = 3,
               Product_Name = "DELL XPS Laptop",
               Description = "Dell XPS 9730 Laptop,
               Intel Core i9 32GB 1TB SSD",
               SKU = "DEL/i9/1TB",
               Quantity = 50,
               Price = 7500.00m
           }
       };
public async Task<List<Product>> GetProducts()
       {
           return await Task.FromResult(products);
       }
public async Task<Product> GetProduct(int id)
       {
           return await Task.FromResult
           (products.FirstOrDefault(x => x.Product_Id == id));
       }
   }
Create the RESTful API
Finally, let's create the API endpoints in the Program.cs file. Remember, this is a Minimal API application, so you don't use any APIController class here. The following code snippet shows how you can create the API endpoints:
app.MapGet("/getproducts", async(IProductRepository productRepository)
    => await productRepository.GetProducts());

app.MapGet("/getproduct/{id:int}",
    async(IProductRepository productRepository, int id)
        => await productRepository.GetProduct(id)
    is Product product ? Results.Ok(product) : Results.NotFound());

app.MapPost("/addproduct", async(IProductRepository productRepository,
Product product) =>
{
    await productRepository.AddProduct(product);
    return Results.Created($"/addproduct/{product.Product_Id}", product);
});

app.MapDelete("/deleteproduct/{id}", async
    (int id, IProductRepository productRepository) =>
{
    await productRepository.DeleteProduct(id);
});
Although the MapGet method has been used to create the HttpGet endpoints, the MapPost method has been used to create the HttpPost endpoint. Similarly, the MapDelete method has been used here to create the HttpDelete endpoint.
Replace the content of the Program.cs file with source code given in Listing 5. You can now execute the application and then use Postman to launch the endpoints.
Listing 5: Configuring the REST endpoints in the Program.cs file
using REST_Demo;

var builder = WebApplication.CreateBuilder(args);

// Add services to the container.

builder.Services.AddScoped<IProductRepository, ProductRepository>();
var app = builder.Build();

// Configure the HTTP request pipeline.

app.MapGet("/getproducts", async
    (IProductRepository productRepository)
    => await productRepository.GetProducts());
app.MapGet("/getproduct/{id:int}", async
    (IProductRepository productRepository, int id)
        => await productRepository.GetProduct(id)
    is Product product ?
    Results.Ok(product) : Results.NotFound());

app.MapPost("/addproduct", async
    (IProductRepository productRepository,
     Product product) =>
    {
        await productRepository.AddProduct(product);
        return Results.Created
        ($"/addproduct/{product.Product_Id}", product);
    });

app.MapDelete("/deleteproduct/{id}", async
    (int id, IProductRepository productRepository) =>
    {
        await productRepository.DeleteProduct(id);
    });

app.Run();
From REST to GraphQL
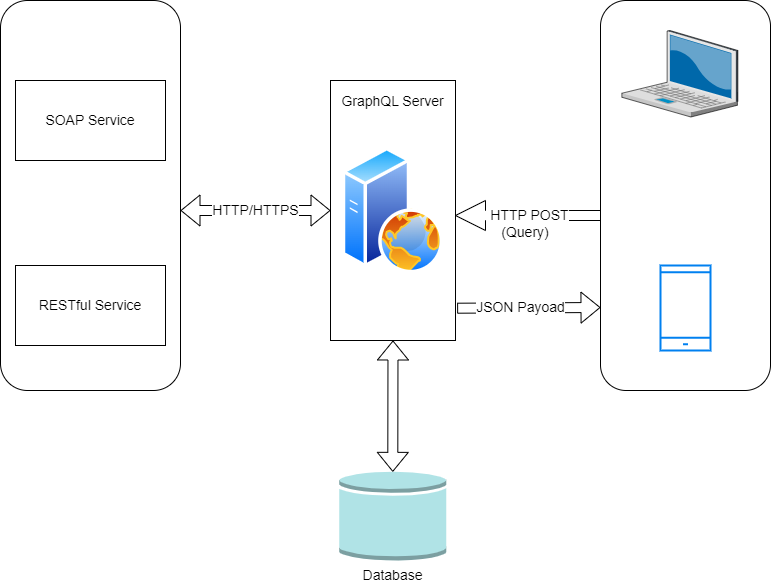
It was Facebook's desire to find a method of accessing data that was both more efficient and more elegant that led to the development of GraphQL in the year 2012. GraphQL achieves this by adopting a declarative approach toward retrieving and manipulating data and enabling the API clients to request only the data they require, thereby improving performance and efficiency while reducing unnecessary data transfer. In order to retrieve data from different endpoints using REST APIs, the client must make multiple requests, which can be inefficient and time intensive. If your API is proficient in retrieving all the data your application requires, you won't encounter any issues with over-fetching or under-fetching.
The primary goal of GraphQL is to simplify the process of querying data by enabling clients to request exactly the format and structure of data they need in a single call. Remember, you need to make several calls to your server to retrieve data split across multiple data stores, as shown in Figure 8.
Here are the key reasons why GraphQL is considered a better alternative to REST in some use cases.
- Data Retrieval: REST often necessitates accessing various endpoints to collect different pieces of information, potentially leading to over-fetching or under-fetching data. GraphQL enables clients to specify the precise data they require from a single endpoint, minimizing the volume of data transmitted across the network. Over fetching is defined as a situation in which an API returns more information than is necessary for your application. For instance, a client might request Order ID and Order Date and receive Order Id, Order Date, and Product Id instead. Under fetching occurs when an API doesn't provide all the data your application requests. A client may request Order Id and Order Date, but only receive Order Id. As a consequence, the client may experience reduced performance and improper or inefficient use of memory, CPU, and network resources.
- Versioning: Versioning in REST APIs manages changes to the APIs by assigning different versions, such as v1, v2, and so on. GraphQL eliminates the necessity for version control by allowing clients to specify the data they need in the query, making it easier for APIs to evolve without breaking the existing queries. APIs built with GraphQL do not require separate versioning because clients or API consumers can define their requirements in the query and fetch the required data without breaking the existing queries.
- Type System: GraphQL employs a strongly typed schema specifying the data format you can request. This schema functions as a consensus between the client and the server, thereby enabling the early detection of errors. By recognizing potential errors up front, you can resolve the errors in a planned way before they impact your clients.
Benefits and Downsides of GraphQL
Here are the key benefits of GraphQL:
- Efficient data querying: With GraphQL, clients can query multiple resources and retrieve related data in a single request. They can traverse the data graph and retrieve only the required data, avoiding the over-fetching of unnecessary fields or nested objects.
- Reduced network traffic: GraphQL reduces the network traffic and bandwidth consumption by minimizing the payload size of the responses. This explains why applications that leverage GraphQL often exhibit better performance compared to RESTful applications.
- Versioning and evolution: With GraphQL, deprecated fields or types can be marked to signal clients for migration, allowing for smooth API evolution without breaking existing clients.
- Support for real-time data: With GraphQL subscriptions, clients can subscribe to specific data changes in real-time. Once subscribed, the clients are notified using events about any changes made to the data in real-time.
- Strongly typed schema: GraphQL enforces a robust typing system and a well-defined schema, providing clarity for the available data types and fields. The GraphQL schema defines the structure of the data and the types of operations (queries and mutations) that can be performed, thereby helping with validation and introspection.
- Improved performance: For applications that require complex queries combining multiple resources, GraphQL can be more efficient than REST because it can gather all data in a single request.
There are certain downsides as well:
- Learning curve: Despite its simplicity, GraphQL is quite complex for those who are unfamiliar with its concepts. The learning curve for designing schemas, resolving queries, and securing GraphQL APIs can be quite steep.
- Caching challenges: Due to the dynamic nature of GraphQL queries, client-side and server-side caching can be more challenging compared to REST, where URLs can easily serve as cache keys.
- Increased complexity: GraphQL adds more complexity to the server-side implementation in contrast to conventional REST APIs. You should use resolvers to get the data you need. Managing complex queries might incur additional effort.
- Rate limiting: Implementing rate limiting in GraphQL is more complex than in REST because it's harder to predict the cost of a query due to its flexible nature.
- Security considerations: GraphQL APIs must be carefully designed to avoid potential vulnerabilities. Exposing too much data or functionality through the API can increase the attack surface, making proper authentication and authorization crucial.
GraphQL vs. REST
Although REST and GraphQL are two of the most popular approaches for building APIs, there are subtle differences between the two:
- Request format: Each endpoint in REST specifies a set of resources and operations, and the client can typically retrieve or modify all resources using HTTP methods, such as GET, POST, PUT, or DELETE. With GraphQL, clients request data based on a specific structure that matches the server's schema.
- Data Retrieval: Each resource in REST can only be accessed through a particular endpoint, meaning the client needs to make multiple requests to retrieve related data or complex object structures. On the contrary, GraphQL enables the client to retrieve the exact data they need with a single query, thereby reducing the number of requests required to fetch the data and minimizing network bandwidth consumption. This can lead to fewer data transfers and more efficient API performance.
- Type System: In GraphQL, there's a strongly typed schema system that defines the types, fields, and relationships between them. The client and server have a clear contract using this approach, and advanced tooling capabilities, such as schema introspection and auto generation, are also available. On the other hand, REST APIs do not typically include formal type systems, which makes them flexible but also challenging to handle.
- Caching: REST enables you to cache frequently accessed data for faster access during subsequent calls to access the same piece of data, thereby reducing network traffic and improving application performance. REST APIs can use HTTP caching techniques to minimize the data sent between clients and servers. Native caching mechanisms, on the other hand, are not supported by GraphQL APIs. A GraphQL API relies on client-side caching mechanisms to optimize performance because query parameters may affect the responses.
- Protocol: Although REST works only with HTTP protocol, there are no protocol constraints in GraphQL. In other words, GraphQL is agnostic of the transport layer - you can use it with any transport layer protocol.
- Partial Responses: GraphQL allows clients to retrieve specific information in a single query, minimizing data transmission. This is beneficial for sluggish networks or when accessing APIs via mobile apps.
Applications with complex queries, a large number of data sources, or unpredictable data needs may benefit from GraphQL. REST may be more appropriate for simple CRUD applications when a mapping exists between the resources and their endpoints. However, in REST, resources are typically returned in their entirety, which can lead to over-fetching.
Comparing REST and GraphQL
Here's how REST and GraphQL compare against each other in a typical request/response scenario. Consider two entities, Employee and Address. The former stores employee details and the latter contains address details of the employees. The following code snippets illustrate the requests and responses in REST to retrieve the details (including address information) of an employee.
Request:
GET /api/employee?id=1
Response:
{
    "id": 1
    "name": "Joydip"
}
Request:
GET /api/address?employee_id=1
Response:
{
    "street": "Banjara Hills"
    "city": "Hyderabad"
    "country": "India"
}
You can do the same in GraphQL in a much more elegant way.
Request:
query {
  employee (id: 1) {
      id
      name
      address
     {
         street
         city
         country
     }
  }
}
Here's the GraphQL response to the preceding query:
{
     "employee": {
         "id": 1
         "name": "Joydip"
         "address": {
             "street": "Banjara Hills"
             "city": "Hyderabad"
             "country": "India"
         }
     }
}
Note that you could retrieve the entire data in just one call.
Building a Simple Application Using GraphQL
It's time for writing some code. Let's now examine how to build a simple ASP.NET Core 8 Web API application using GraphQL. A typical Order Processing System is comprised of several entities such as Store, Supplier, Order, Product, Customer, etc. In this example, you'll implement only the Store part of it for simplicity.
Let's now examine how to create a ASP.NET Core 8 project in Visual Studio 2022.
Create a New ASP.NET Core 8 Project in Visual Studio 2022
You can create a project in Visual Studio 2022 in several ways. When you launch Visual Studio 2022, you'll see the Start window. You can choose “Continue without code” to launch the main screen of the Visual Studio 2022 IDE.
To create a new ASP.NET Core 8 Project in Visual Studio 2022:
- Start the Visual Studio 2022 IDE.
- In the “Create a new project” window, select “ASP.NET Core Web API” and click Next to move on.
- Specify the project name as GraphQL_Demo and the path where it should be created in the “Configure your new project” window.
- If you want the solution file and project to be created in the same directory, you can optionally check the “Place solution and project in the same directory” checkbox. Click Next to move on.
- In the next screen, specify the target framework and authentication type as well. Ensure that the “Configure for HTTPS,” “Enable Docker Support,” and the “Enable OpenAPI support” checkboxes are unchecked because you won't use any of these in this example.
- As you'll not leverage minimal APIs in this example, leave the Use controllers checkbox checked.
- Click Create to complete the process.
In this application, you'll take advantage of HotChocolate to generate GraphQL schemas. With HotChocolate, you can build an extra layer on top of your application layer that uses GraphQL. It's easy to set up and configure, and it eliminates the clutter of generating schemas.
Install NuGet Package(s)
So far so good. The next step is to install the necessary NuGet Package(s). To install the required packages into your project, right-click on the solution and the select Manage NuGet Packages for Solution…. Now search for the packages named HotChocolate.AspNetCore, and HotChocolate.AspNetCore.Playground in the search box and install them one after the other. Alternatively, you can type the commands shown below at the NuGet Package Manager Command Prompt:
PM> Install-Package HotChocolate.AspNetCore
PM> Install-Package HotChocolate.AspNetCore.Playground
You can also install these packages by executing the following commands at the Windows Shell:
dotnet add package HotChocolate.AspNetCore
dotnet add package HotChocolate.AspNetCore.Playground
Create the Model Class
Create a new class named Order in a file having the same name with a .cs extension and write the following code in there:
public class Store
{
    public int Id { get; set; }
    public string Name { get; set; }
    public string Address { get; set; }
    public string City { get; set; }
    public string State { get; set; }
    public string Country { get; set; }
    public string Zip { get; set; }
    public string Email { get; set; }
    public string Phone { get; set; }
}
The other entity classes are not being shown here for brevity and also because this is a minimalistic implementation to illustrate how you can work with GraphQL in ASP.NET Core 7.
Create the IStoreRepository Interface
Create a new .cs file named IStoreRepository in your project and replace the default generated code with the following code snippet:
public interface IStoreRepository
{
    public Task<List<Store>> GetStores();
    public Task<Store> GetStore(int Id);
}
Create the StoreRepository Class
Next, create a new class named StoreRepository in a file having the same name with a .cs extension. Now write the following code in there:
public class StoreRepository : IStoreRepository
{

}
The StoreRepository class illustrated in the code snippet below implements the methods of the IStoreRepository interface:
public async Task<List<Store>> GetStores()
{
    return await Task.FromResult(stores);
}

public async Task<Store> GetStore(int Id)
{
  return await Task.FromResult(stores.
  FirstOrDefault(x => x.Id == Id));
}
The complete source code of the StoreRepository class is given in Listing 6.
Listing 6: The StoreRepository class
public class StoreRepository : IStoreRepository
{
    private readonly List<Store> stores = new List<Store>
    {
         new Store
         {
             Id = 1,
             Name = "Walmart",
             Address = "274 Reagan Apt. 919",
             City = "Huntington",
             State = "West Virginia",
             Country = "USA",
             Zip = "25049",
             Phone = "1111111111",
             Email = "test@xyz.com"
         },
         new Store
         {
             Id = 2,
             Name = "Amazon",
             Address = "57526 Michelle Ferry Suite 714",
             City = "Edmond",
             State = "Oklahoma",
             Country = "USA",
             Zip = "66347",
             Phone = "1111111111",
             Email = "test@xyz.com"
         },
         new Store
         {
             Id = 3,
             Name = "Harrods",
             Address = "Flat 60 Davis Road",
             City = "Bradford",
             State = "Yorkshire",
             Country = "UK",
             Zip = "BD1 1BL",
             Phone = "1111111111",
             Email = "test@xyz.com"
         }
    };
    public async Task<List<Store>> GetStores()
    {
         return await Task.FromResult(stores);
    }
    public async Task<Store> GetStore(int Id)
    {
         return await Task.FromResult(stores.FirstOrDefault(x => x.Id == Id));
    }
}
Register the StoreRepository instance
The following code snippet illustrates how an instance of type IStoreRepository is added as a scoped service to the IServiceCollection.
builder.Services.AddScoped<IStoreRepository, StoreRepository>();
Create the GraphQL Query Class
A GraphQL query is defined as a request sent by the client to the server. In GraphQL, clients request data from the server using queries that adhere to a specific structure and syntax per the GraphQL specification. When using GraphQL queries, clients may specify data and the response format.
There are several fields in the query that represent the data that was retrieved from the API. The data contained in each of these fields can be traversed and retrieved by nesting them. Create a new .cs file named StoreQuery in your project and replace the default generated code with the code given in Listing 7.
Listing 7: The StoreQuery class
using HotChocolate.Subscriptions;

namespace GraphQL_Demo
{
    public class StoreQuery
    {
        public async Task<List<Store>>
        GetAllStores([Service]
        IStoreRepository storeRepository,
        [Service] ITopicEventSender eventSender)
        {
            List<Store> stores = await storeRepository.GetStores();
            await eventSender.SendAsync("Returned a List of Stores", stores);
            return stores;
        }
    }
}
Create the GraphQL Object Type
In GraphQL, Object Types are used to describe the type of data fetched using your API and they are represented by creating a class that derives the GraphQL.Types.ObjectGraphType class. Create a new file named StoreType.cs in your project and replace the default code with the code given in Listing 8.
Listing 8: The StoreType class
using HotChocolate.Types;

namespace GraphQL_Demo
{
    public class StoreType :
    ObjectType<Store>
    {
        protected override void Configure
        (IObjectTypeDescriptor <Store> descriptor)
        {
            descriptor.Field(s => s.Id).Type<IdType>();
            descriptor.Field(s => s.Name).Type<StringType>();
            descriptor.Field(s => s.Address).Type<StringType>();
            descriptor.Field(s => s.City).Type<StringType>();
            descriptor.Field(s => s.State).Type<StringType>();
            descriptor.Field(s => s.Country).Type<StringType>();
            descriptor.Field(s => s.Zip).Type<StringType>();
            descriptor.Field(s => s.Email).Type<StringType>();
            descriptor.Field(s => s.Phone).Type<StringType>();
        }
    }
}
Create a GraphQL Subscription
You should also create a subscription to enable your GraphQL server to notify all subscribed clients when an event occurs. Create a new class named StoreSubscription and replace the default generated code with the source code given in Listing 9.
Listing 9: The StoreSubscription class
using HotChocolate.Execution;
using HotChocolate.Subscriptions;

namespace GraphQL_Demo
{
    public class StoreSubscription
    {
        [SubscribeAndResolve]
        public async ValueTask<ISourceStream<List<Store>>> OnStoreGet([Service]
        ITopicEventReceiver eventReceiver, CancellationToken cancellationToken)
        {
            return await eventReceiver.SubscribeAsync<List<Store>>
            ("Returned Stores", cancellationToken);
        }
    }
}
Configure GraphQL Server in ASP.NET Core
Once you've created the Query type to expose the data you need, you should configure GraphQL Server in the Program.cs file using the following code snippet:
builder.Services.AddGraphQLServer()
    .AddType<StoreType>()
    .AddQueryType<StoreQuery>()
    .AddSubscriptionType<StoreSubscription>()
    .AddInMemorySubscriptions();
You can then call the MapGraphQL method to register the middleware:
app.MapGraphQL();
When you register this middleware, the GraphQL server will be available at /graphql by default. You can also customize the endpoint where the GraphQL server will be hosted by specifying the following code in the Program.cs file:
app.MapGraphQL("/graphql/mycustomendpoint");
Listing 10 shows the complete source of the Program.cs file.
Listing 10: Configuring GraphQL in the Program.cs file
using GraphQL_Demo;
using HotChocolate.AspNetCore;
using HotChocolate.AspNetCore.Playground;

var builder = WebApplication.CreateBuilder(args);

// Add services to the container.builder.Services.AddScoped
<IStoreRepository, StoreRepository>();

builder.Services.AddGraphQLServer()
    .AddType<StoreType>()
    .AddQueryType<StoreQuery>()
    .AddSubscriptionType<StoreSubscription>()
    .AddInMemorySubscriptions();

builder.Services.AddControllers();

var app = builder.Build();

// Configure the HTTP request pipeline.

app.UseAuthorization();

app.MapControllers();
app.UsePlayground(new PlaygroundOptions
{
    QueryPath = "/graphql",
    Path = "/playground"
});

app.MapGraphQL();
app.Run();
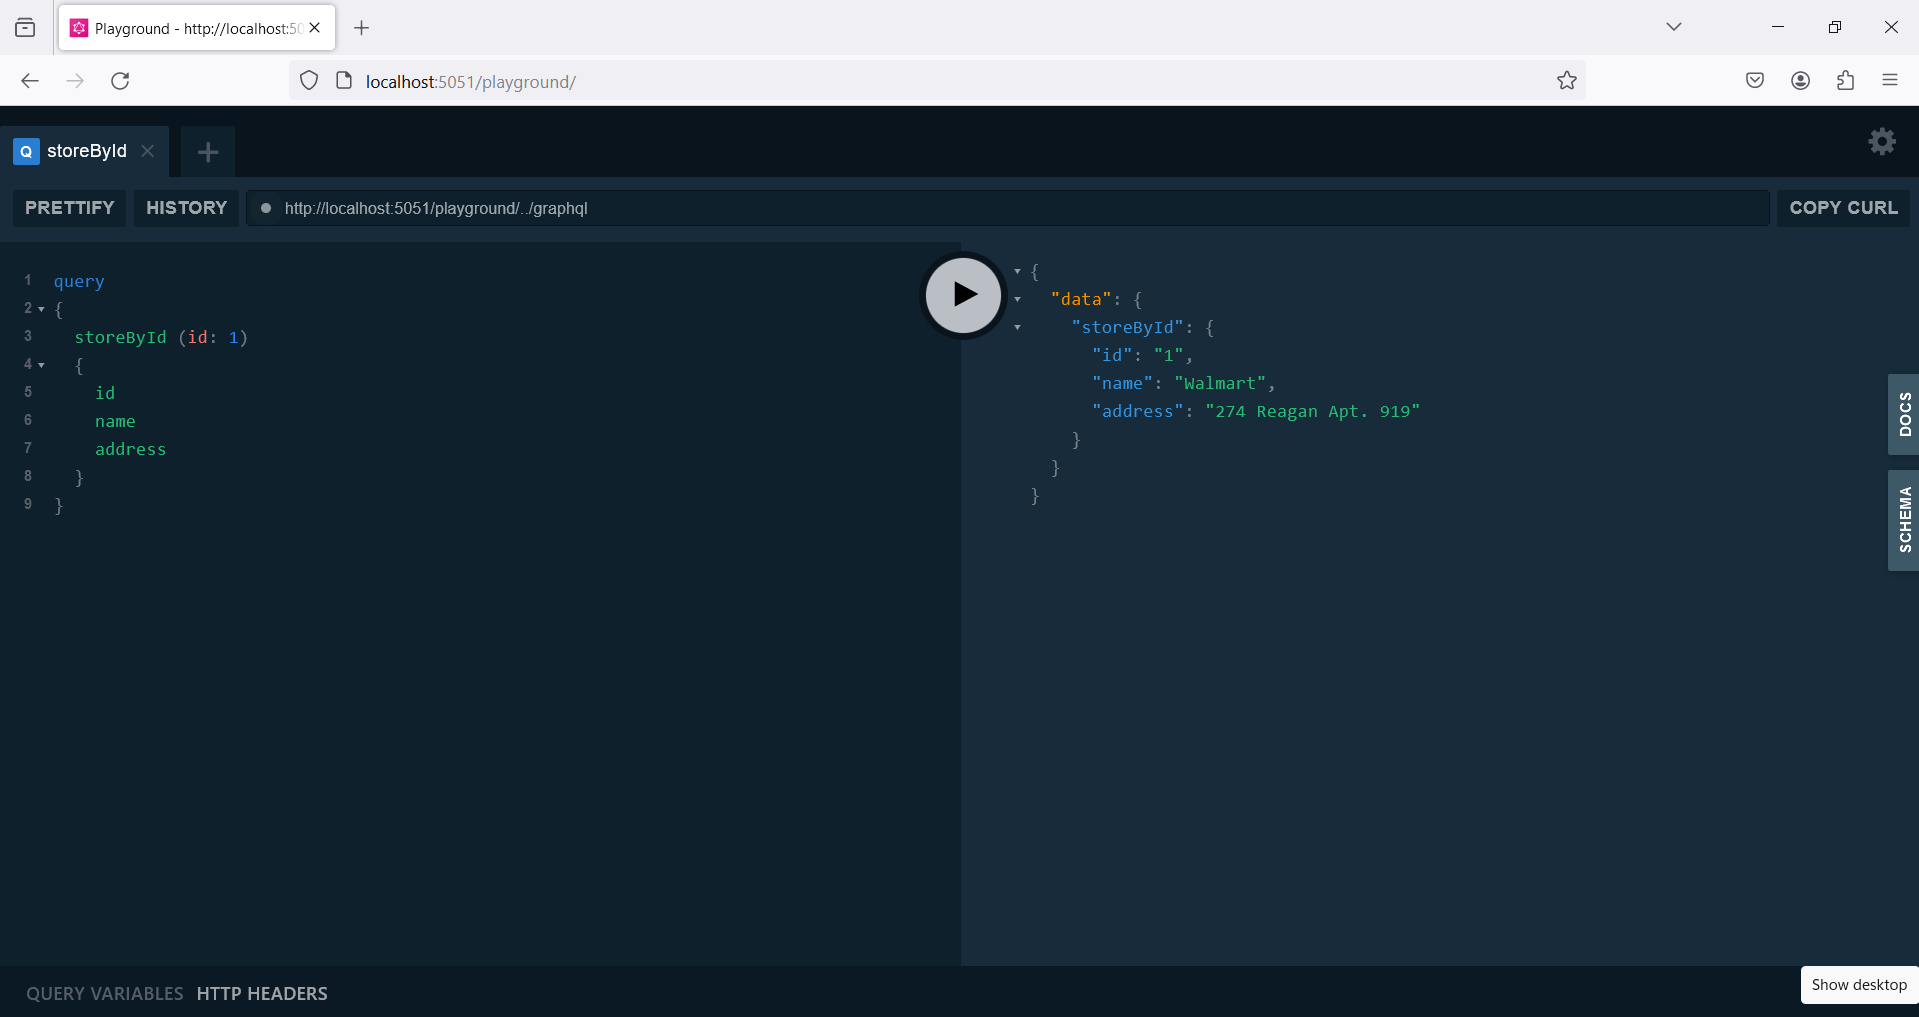
Now execute the application and browse the /playground endpoint. Next, execute the following query:
query
{
    storeById (id: 1)
    {
        id
        name
        address
    }
}
Figure 9 shows the output on execution of the application.
Create the StoreController Class
Finally, you need to build the controller class to expose the endpoints to the outside world so that they can be consumed by the authenticated clients or consumers of the API. To do this, create a new API Controller in your project named StoreController and write the code given in Listing 11 in there.
Listing 11: The StoreController class
using Microsoft.AspNetCore.Mvc;

namespace GraphQL_Demo.Controllers
{
    [Route("api/[controller]")]
    [ApiController]
    public class StoreController : ControllerBase
    {
        private IStoreRepository _storeRepository;
        public StoreController(IStoreRepository storeRepository)
        {
            _storeRepository = storeRepository;
        }

        [HttpGet("{id}")]
        public async Task<Store> GetStore(int id)
        {
            return await _storeRepository.GetStore(id);
        }

        [HttpGet("GetStores")]
        public async Task<List<Store>> GetStores()
        {
            return await _storeRepository.GetStores();
        }
    }
}
Conclusion
The requirements and constraints of your project will determine the most appropriate choice between SOAP, REST, or GraphQL. SOAP is a good choice for enterprise-level applications because of better support for security and its robust contract definitions. REST can significantly enhance a resource-oriented application because of better performance, enhanced scalability, and simplicity. GraphQL offers a flexible, efficient approach to data retrieval and manipulation, making it an excellent choice for applications that require strong typing, real-time data updates, and efficient data retrieval capabilities.
