


There are many advantages to hosting ASP.NET and ASP.NET Core applications in Azure. Platform-as-a-Service (PaaS) environments like Azure App Service, Azure Kubernetes Service, and Azure Container Apps provide easy and automatic scalability, reliability, and availability in multiple geographies. What's more, these environments allow you to focus on the apps themselves without the overhead of maintaining underlying infrastructure. But for apps that are already deployed on-premises, it can be difficult to know how to get started re-platforming to one of these environments. Even though .NET applications can often by deployed to Azure App Service with minimal changes, there are usually some changes required and discovering what those are can take some trial and error.
This article introduces a new feature: Azure Migrate application and code assessment. This new feature allows analyzing the source code, configuration, and binaries of an application to discover upfront what changes will be needed for the app to work in Azure. Azure Migrate application and code assessment make it easy to plan re-platforming to Azure and highlights what work will be needed along the way. Azure Migrate application and code assessment is a developer-focused experience available as both a Visual Studio extension and a command line .NET SDK tool. The tool scans ASP.NET and ASP.NET Core solutions (and, optionally, their binary dependencies) for a wide variety of potential issues that need to be addressed prior to running in Azure PaaS environments.
Although this article focuses on the experience of using Azure Migrate application and code assessment for .NET, there is also a Java version of the tool available. To learn more about the Java experience, please visit https://learn.microsoft.com/azure/developer/java/migration/appcat.
Relationship to Other Azure Migrate Features
Using Azure Migrate to prepare for a migration to the cloud isn't new, of course. Azure Migrate has helped users discover and assess on-premises infrastructure for some time. Azure Migrate also includes the Data Migration Assistant to help users assess SQL Server databases for migration to Azure SQL DB, Azure SQL Managed Instance, or SQL Server on an Azure VM. Azure Migrate can even discover web apps hosted on-premises and (if no blocking issues are detected) automate migrating them to Azure with its App Service Migration Assistant tool.
Up until now, though, Azure Migrate hasn't had the ability to look at the source code of the applications it detected. The App Service Migration Assistant tool can provide insight into whether there are likely to be issues migrating to Azure based on IIS configuration, but it doesn't have visibility into what's happening inside the code of the application. The Azure Migrate application and code assessment feature fills this gap. The Visual Studio extension or command line tool can assess your source code of your solution and identify potentially problematic APIs and code patterns. This assessment is a useful follow-up to the discovery by other Azure Migrate features. It is recommended to use Azure Migrate's existing application discovery features to gain insight into the complete set of applications to be migrated. Then, after the applications have been reviewed and prioritized, Azure Migrate application and code assessment can be used by developers to dive deeply into the applications that will be moved to learn more details about potential issues and to plan the migration.
Installing Azure Migrate Application and Code Assessment
As a Visual Studio extension, the Azure Migrate application and code assessment feature is easy to install. It's available on the Visual Studio Marketplace at https://marketplace.visualstudio.com/items?itemName=ms-dotnettools.appcat, as shown in Figure 1. From that site, use the download button to download the .vsix installer, and then open the installer and wait while it installs the Visual Studio extension.

Note that the Azure Migrate application and code assessment Visual Studio extension requires Visual Studio 2022. If you don’t have Visual Studio 2022, the free community edition is available at https://visualstudio.microsoft.com/downloads.
Analyzing a Solution
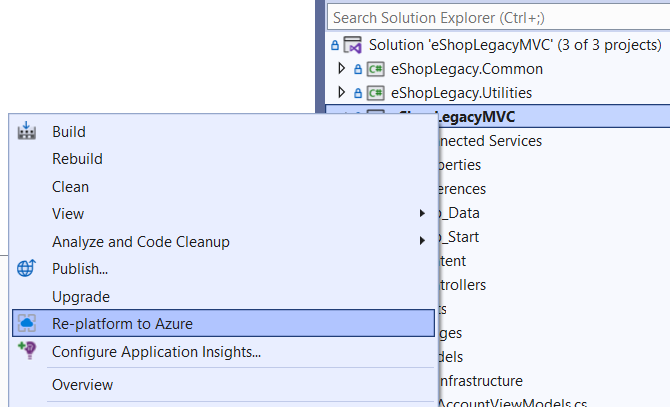
To begin analyzing a solution, open the solution in Visual Studio and right-click on it in the solution explorer. With the Azure Migrate application and code assessment extension installed, there will be a new command available: Re-platform to Azure, as shown in Figure 2. Choosing this option opens a new user interface for managing Azure Migrate application and code assessment reports.
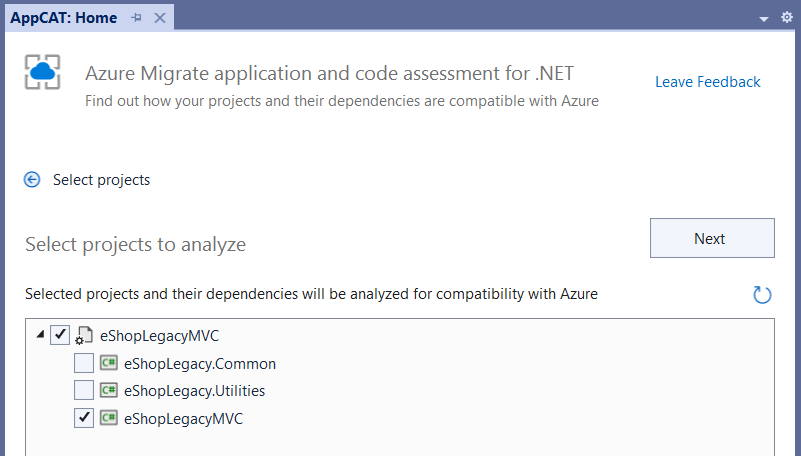
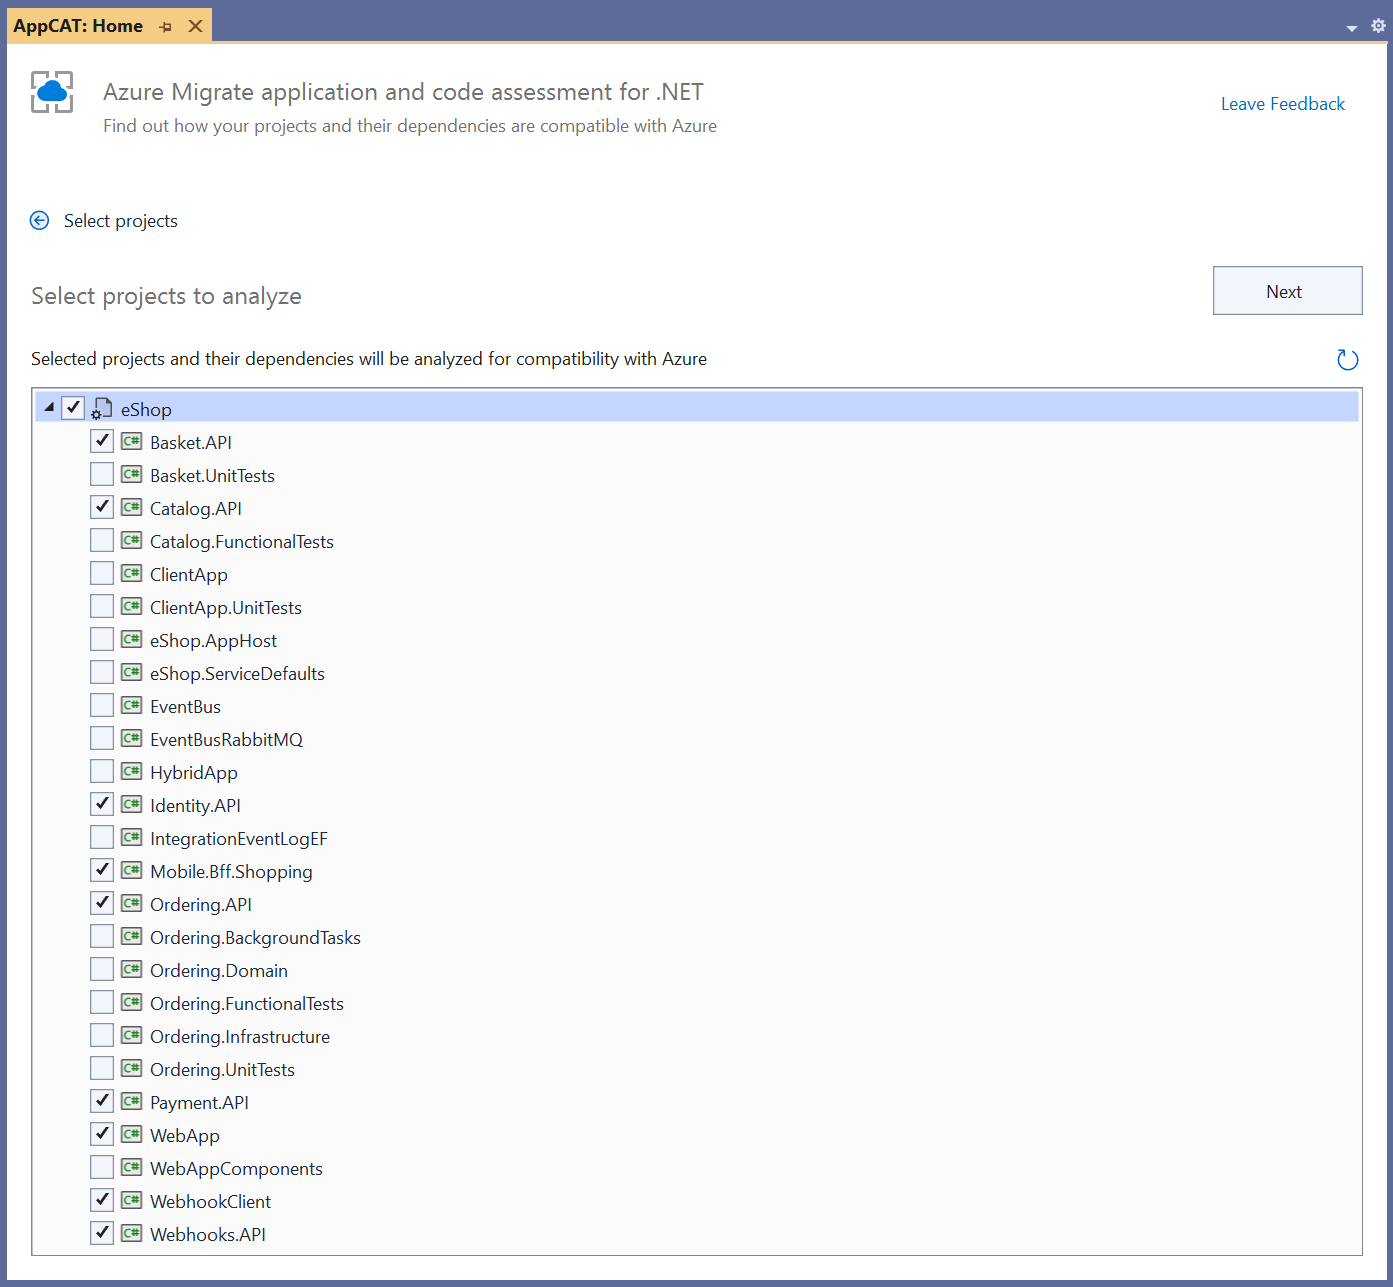
After clicking New Report, you will be able to choose which projects in the solution you wish to assess, as shown in Figure 3. Note that the Azure Migrate application and code assessment feature automatically analyzes dependencies of selected projects, so you only need to choose top-level projects you're interested in. All recursive project-to-project dependencies of the selected projects will be included automatically.
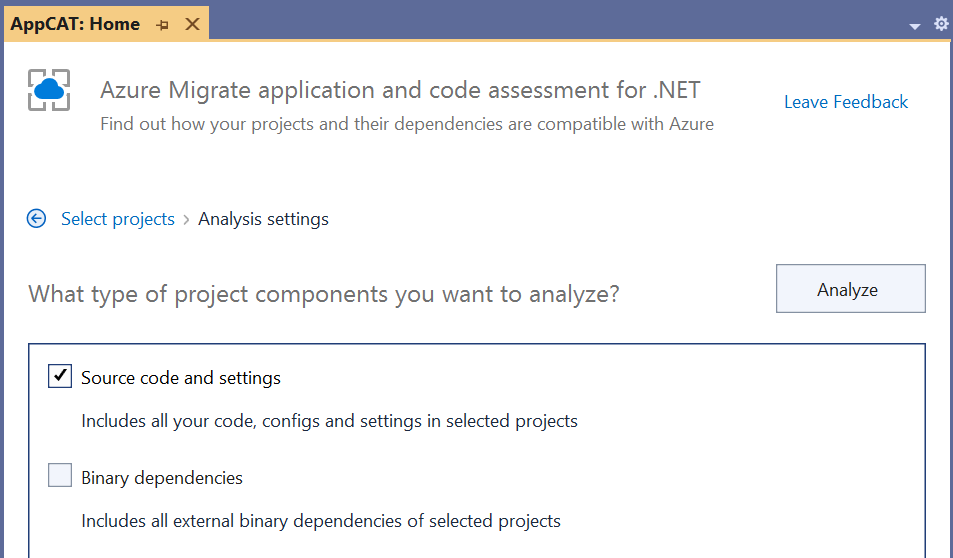
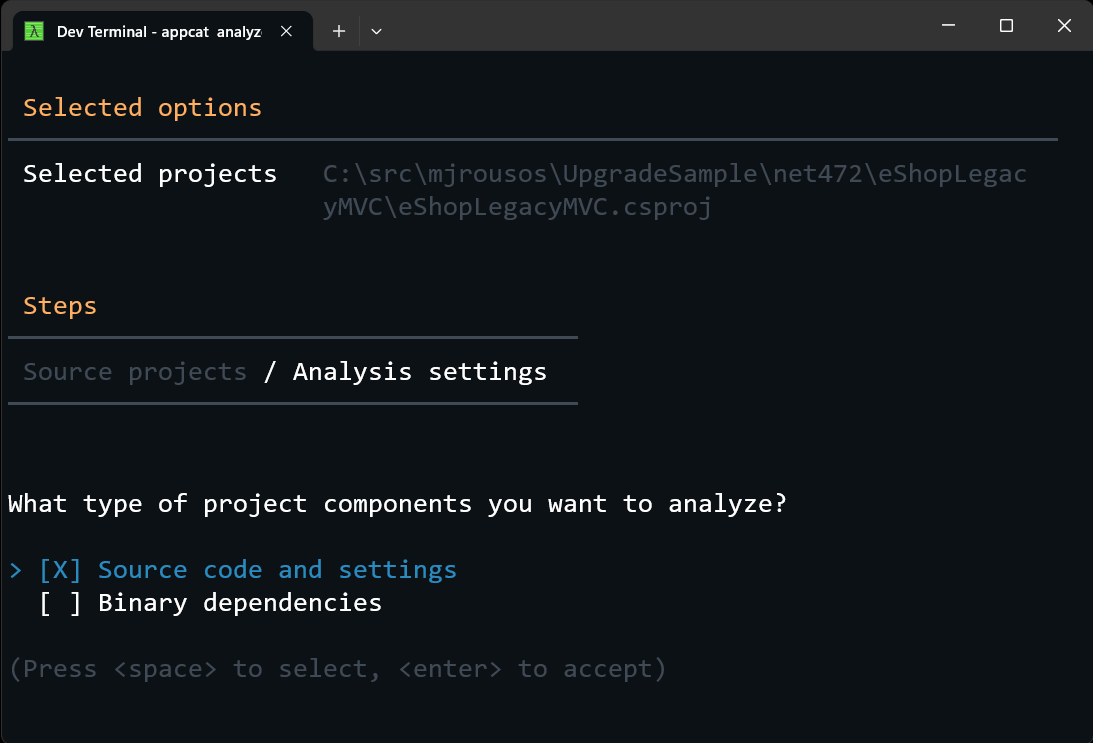
After clicking next, the following UI will allow you to choose whether to scan only source code and settings or also binary dependencies, as shown in Figure 4. Choosing to analyze source code will look at the source code of the selected projects - C# or Visual Basic code files, project files, config files, and static content. This option should typically be checked. If you also check the Binary dependencies option, the tool also analyzes binaries that the projects depend on. This includes references to loose DLLs, references to assemblies (other than .NET Framework components) in the global assembly cache, or referenced NuGet packages. Choosing to analyze binaries produces the most comprehensive set of issues the application may run into while migrating, but it also includes more issues than analyzing only source code and may include issues that you're not able to fix directly (because they exist in components you don't have source code for) or that aren't relevant if they exist in code paths not used from your application. A useful strategy is to begin only by analyzing source code and later consider producing another report with binary analysis enabled if there are binary dependencies whose Azure-readiness you're unsure of and would like to learn more about. Because issues in binary dependencies can't be fixed directly by updating source code, they are typically addressed by finding updated versions of the binaries, working with partners who can change the source code, or finding alternative solutions that work better in Azure.
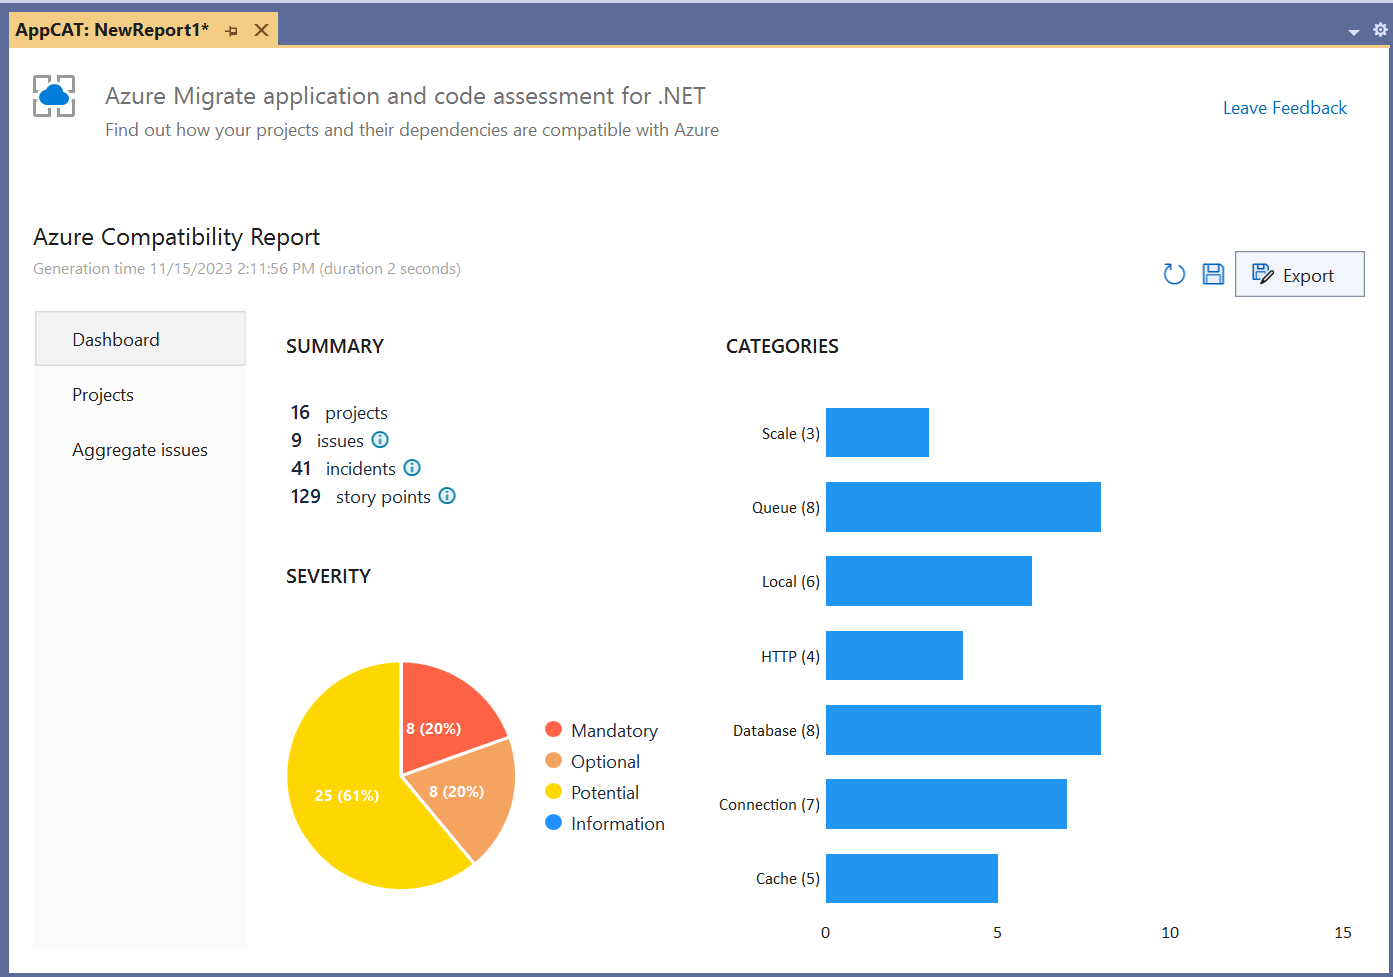
Once you click the Analyze button, the extension analyzes the selected projects for any potential issues re-platforming to Azure. This analysis will take anywhere from a few seconds to a few minutes, depending on the size of the projects. When the analysis is complete, you'll be shown a report summarizing the results. (See Figure 5.) This report can be saved to disk and returned to later using the save icon (or common shortcuts like Ctrl+S).
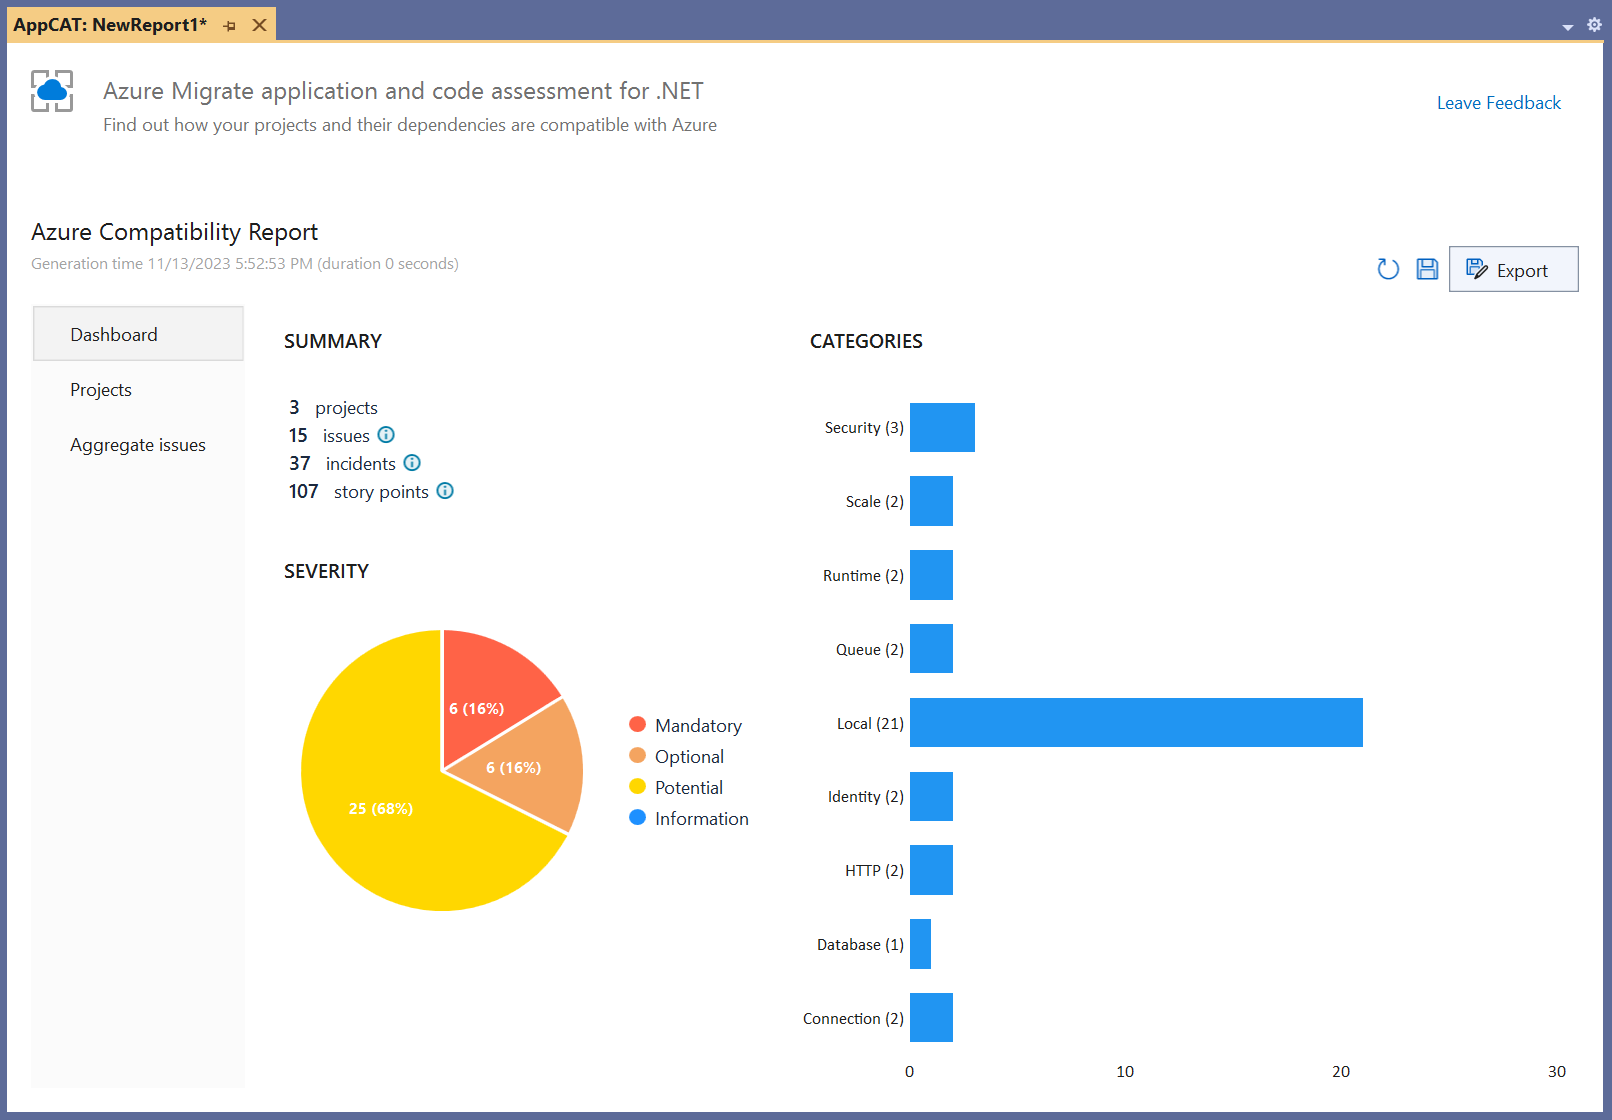
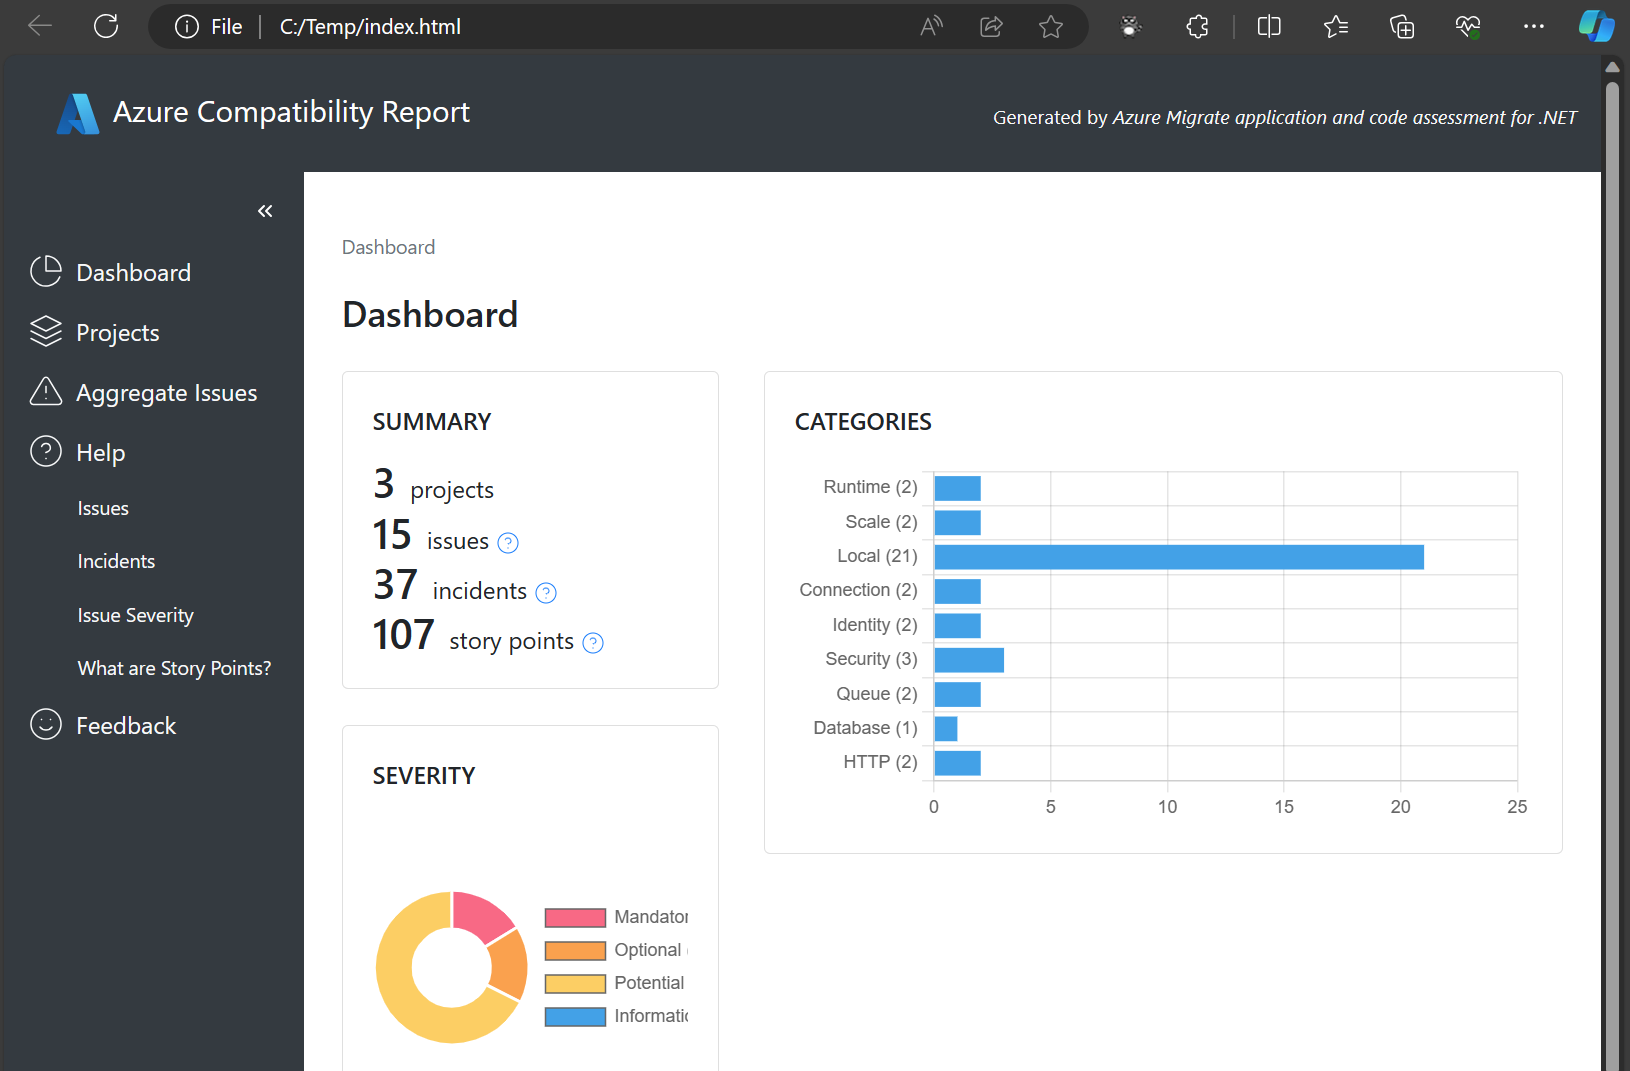
The report's dashboard includes the total number of projects scanned, the number of incidents discovered, and graphics showing the incidents by category and severity. The report include both a number of issues that are the types of problems detected and a number of incidents that are the individual occurrences of the issues.
Azure Migrate application and code assessment issues are each assigned one of four severities:
Mandatory: Mandatory issues are those that likely need to be addressed before the application will work in Azure. An example of a mandatory issue is using Windows authentication to authenticate web app users. Because that authentication mechanism depends on the on-premises Active Directory environment, it will likely need to be updated in the cloud to use Azure AD or some other authentication alternative.
Optional: Optional issues are opportunities to improve the application when it's running in Azure, but they aren't blocking issues. As an example, storing app settings or secrets in a
web.configfile is considered an optional issue. That pattern will continue to work when deployed in Azure, just like on-premises, so no changes are required. Apps that are hosted in Azure can take advantage of services like Azure App Configuration and Azure Key Vault to store settings in ways that are easier to share and update and that are more secure. So, there's an optional issue to begin taking advantage of these services as part of the Azure re-platform.Potential: Potential issues represent situations where there might need to be a change made for the app to work in Azure, but it's also possible that no change is needed, depending on the details of the scenario. This severity is common and requires an engineer to review the incidents. As an example, connecting to a SQL Server database is a potential issue because whether a change is needed depends on whether the database that's used is accessible from Azure. If the database is already hosted in Azure or is accessible from Azure (via Express Route, for example), no changes are needed. On the other hand, if the database used exists on-premises without a way for the app to connect to it once it's running in Azure, thought will need to be given to how this dependency will work after the app is re-platformed. Perhaps the database will need to be migrated alongside the app or perhaps a solution like Express Route or Hybrid Connections will be needed to make the database accessible.
Information: Information issues are useful pieces of information for the developer to know but don't require any action. As of the time of this writing, there aren't any information issues in Azure Migrate application and code assessment for .NET (although there are a couple in the Java version of the tool).
In addition to severity, each incident in the report includes a story point number. This is a unitless number representing the relative effort estimated to address the incident (if, in fact, it needs to be addressed). These shouldn't be used to estimate the precise amount of work in terms of hours or days but can be used as a rough estimate for comparing two projects. If one solution has 500 story points worth of issues and another has 200 story points worth of issues, it's probably true that the solution with fewer story points of issues will be simpler and easier to re-platform.
From the initial dashboard, you can navigate to views displaying aggregate issues (all incidents organized by issue type) or projects (incidents organized by project). When viewing incidents for a particular project, you can choose to view all incidents for the project or to view incidents per component (a single source file or binary dependency is considered a component).
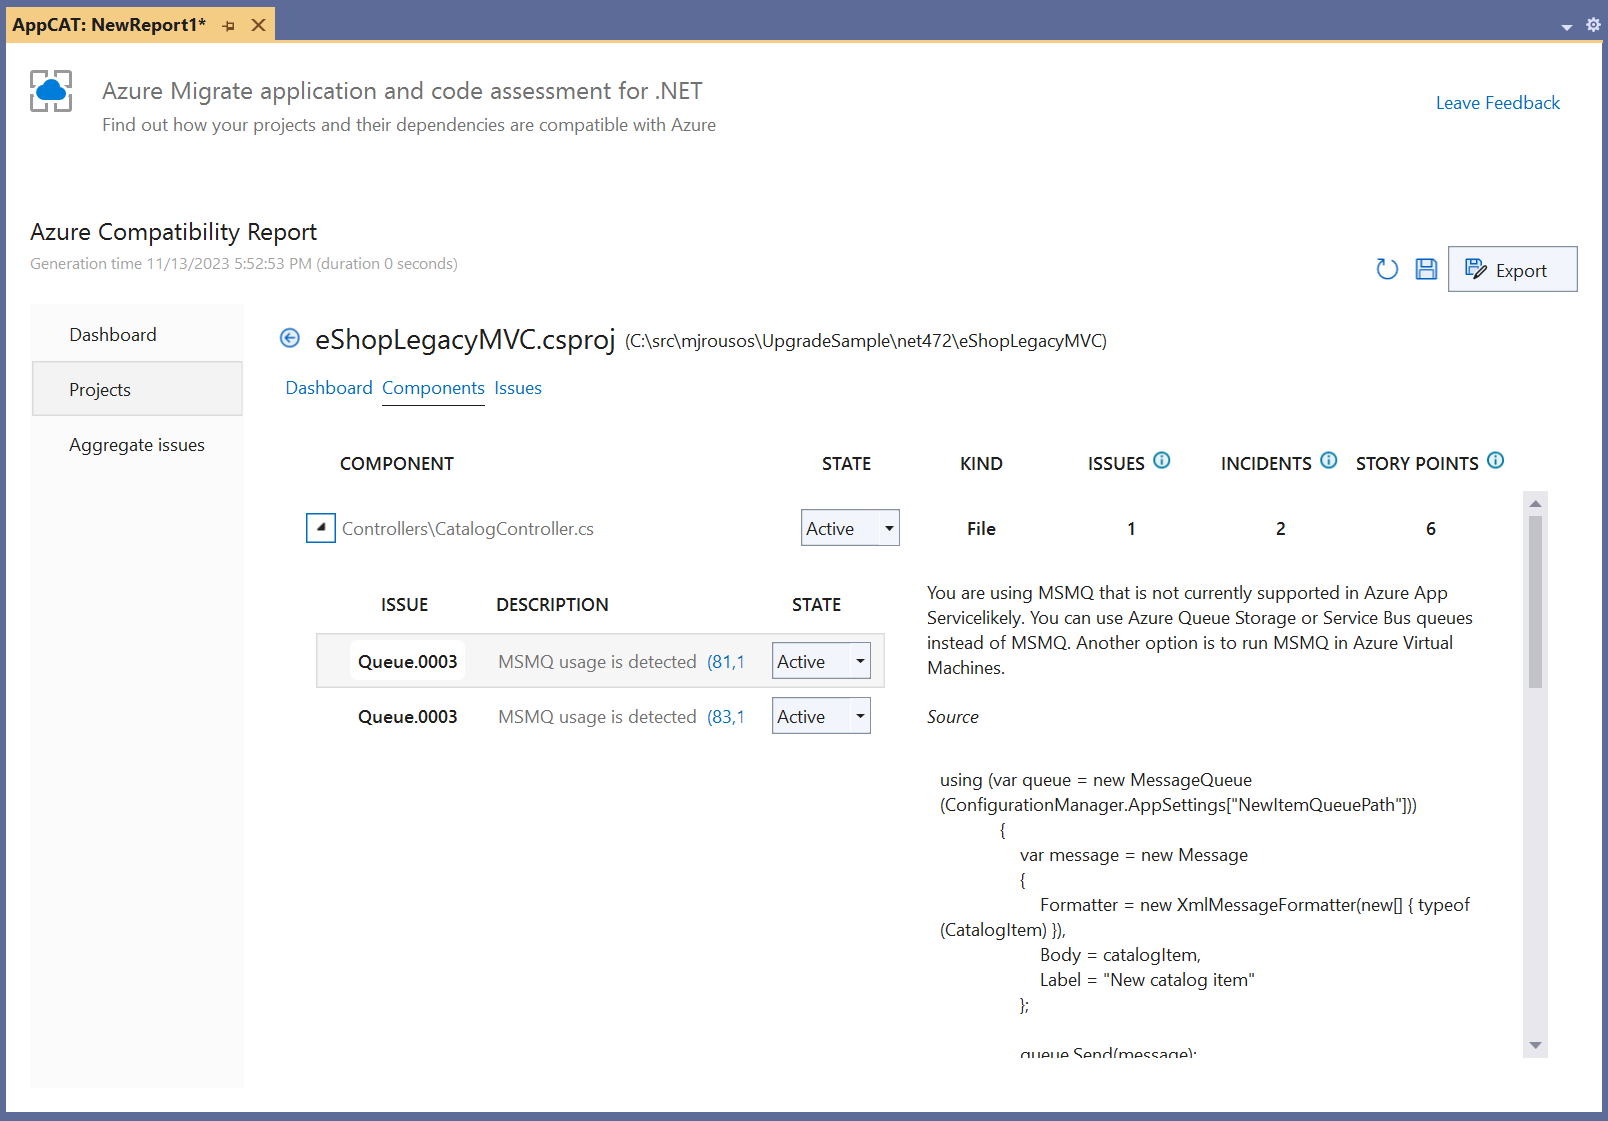
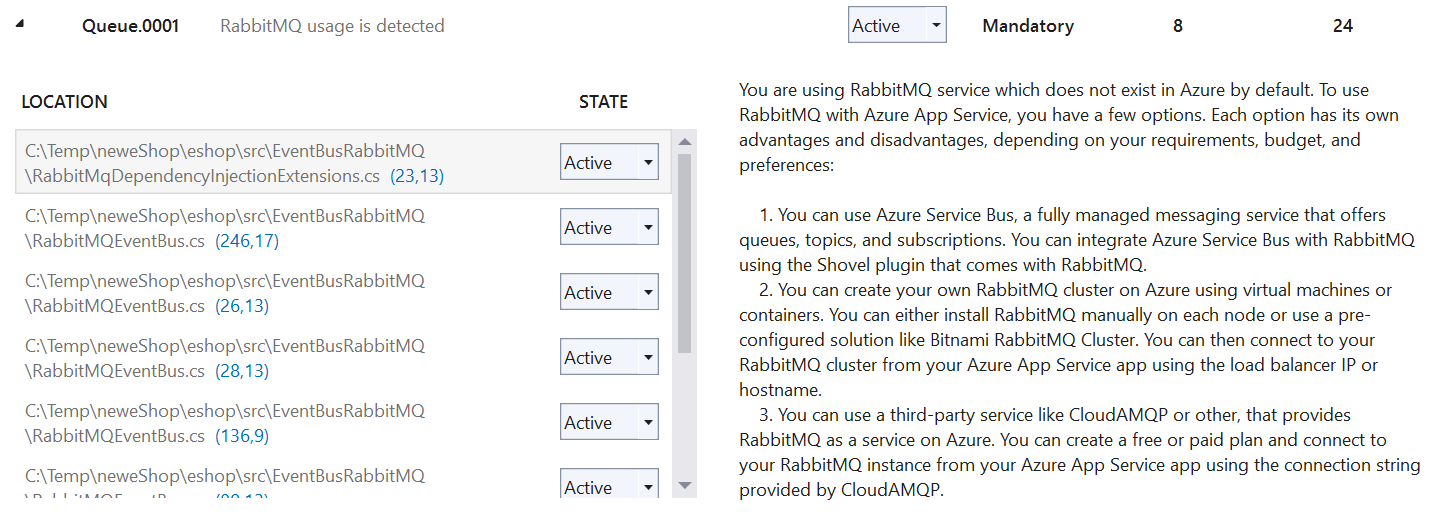
In incident detail views, there will be a state drop-down box indicating whether each incident is Active, Resolved, or Not Applicable (N/A). All incidents begin as Active and you can change the state as you investigate. Reports can be saved (using the save icon in the top right of the report) and the state will be persisted so that you can return to the same report in the future and continue to review remaining issues and further update the state. As you review the incidents in the report, mark incidents that don't need to be addressed in your solution as not applicable and those that you've fixed as resolved. The incident detail pages also give descriptions of why the incidents were identified, why they matter, and how you can address them. These detail views, shown in Figure 6, include links to documentation and links to the locations in source code where the issues were detected.
In addition to working with reports in the Visual Studio IDE, it's possible to export the reports to share with others. The Export button in the top right of the report interface allows you to export the report in three different formats:
- Export as HTML produces the most readable report for sharing with others. The HTML report, shown in Figure 7, has all the same dashboards and views as the Visual Studio UI and includes snapshots of the latest state of all incidents. This report is best for sharing with others for viewing issues and investigation progress.
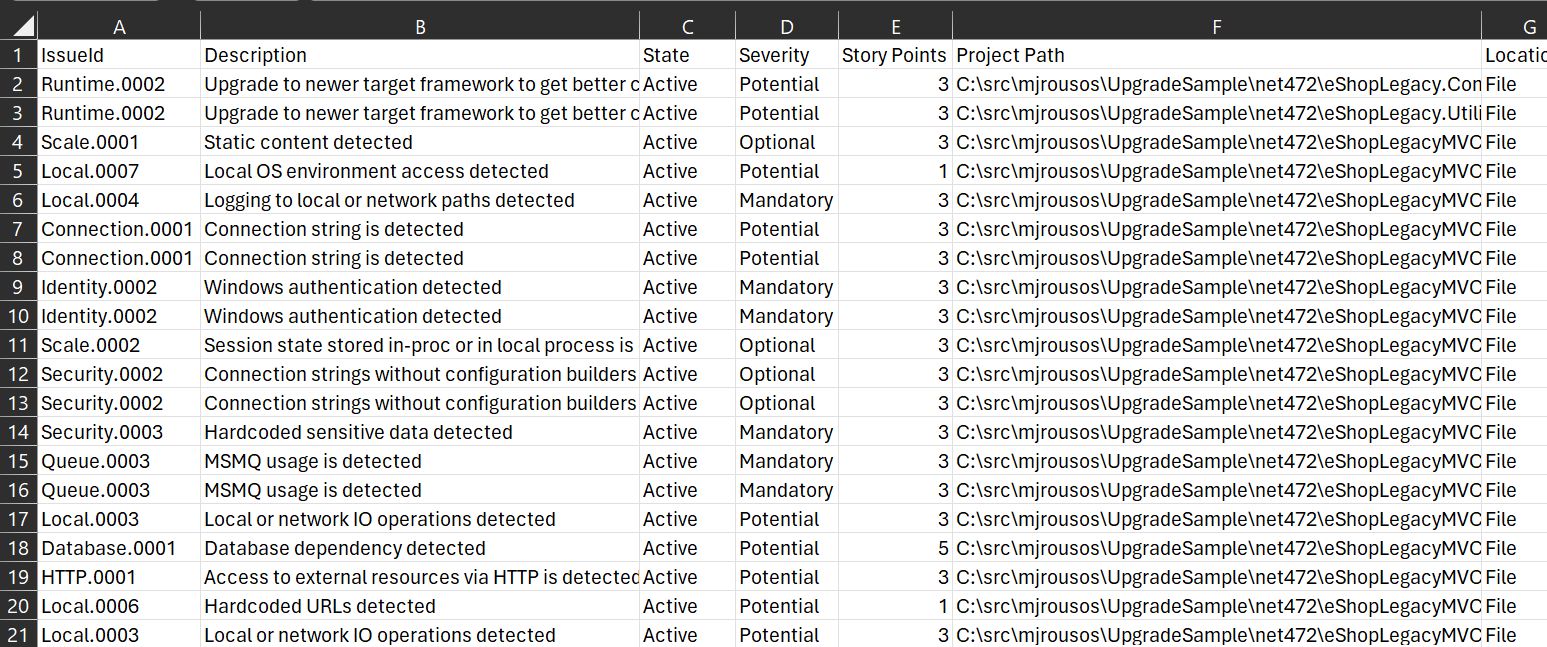
- Export as CSV produces a report with the same information but in a spreadsheet format. As seen in Figure 8, this report format doesn't have the nice charts and graphics of the HTML view but can be useful when you need a simple spreadsheet representation of the issues that you can annotate and update as you discuss and review the incidents.
- Export as JSON produces a machine-readable JSON representation of the incidents. This export option isn't meant for human consumption. Instead, this option produces JSON reports that can be parsed by other applications programmatically.
Not every incident in the report requires action. It's common for Azure Migrate application and code assessment reports to include many potential issues that don't actually require changes. And some of the issues will be optional. The best way to think about the reports is as a helpful resource listing parts of the application requiring review. Once you've looked at the highlighted parts of the application, you can have confidence that you understand what work (if any) is required prior to re-platforming it to Azure.
Example Walkthrough
As an example, I've used the Azure Migrate application and code assessment feature to analyze the updated eShop Northern Mountains sample application found at https://github.com/dotnet/eshop. eShop is a multi-service ASP.NET Core e-commerce solution. Although it does have a number of external dependencies, the sample was created with cloud deployment in mind so there shouldn't be too many issues to address aside from the identification of the external dependencies.
Because the eShop sample is comprised of multiple services, I needed to make sure to select all entry points when choosing projects to assess, as shown in Figure 9.
Assessing the source code was quick. Even with its multiple projects, the eShop sample isn't large, so analysis finished in just a few seconds. Altogether, 16 projects were scanned and 41 total incidents of nine different types of issues were detected. Of the 41 incidents, eight had mandatory severity, eight had optional severity, and 25 had potential severity. This ratio of issue severities is typical. The report dashboard is shown in Figure 10.
Normally, I like to review incidents in Azure Migrate application and code assessment reports one project at a time. In this case, though, with a relatively low number of total incidents, it's just as easy to use the Aggregate Issues view and review them all at once. Here are the issues that were identified in the eShop sample:
- RabbitMQ usage: The only mandatory incidents are eight instances of RabbitMQ usage detected in the EventBusRabbitMQ project and shown in Figure 11. As explained in the issue's description, these incidents relate to a dependency on a RabbitMQ queue that will need to be made available in Azure as part of re-platforming efforts. Several potential strategies are presented, either using an alternative messaging system like Azure Service Bus or running a RabbitMQ cluster in Azure. In order for eShop to work properly in the cloud, though, it will be necessary to follow one of these suggestions to make the messaging done in EventBusRabbitMQ work.
- Database usage: The next most common issue is the eight incidents of database usage detected across several different eShop projects. In all these cases, the assessment has found data being read from or written to databases using Entity Framework Core. The incidents' descriptions explain that I need to ensure that the database used will be available from the Azure environment I migrate the eShop solution to. Similar to the RabbitMQ incidents earlier, these relate to an external dependency that needs to be accessible for eShop to work properly.
- Connection strings: The next issue category I looked at was connection strings. Spread across five projects, there were six incidents of connection strings being detected in configuration files. These were strings like
EventBus: amqp://localhostandRedis: localhost. Once again, these are indications of dependencies the eShop solution has on services outside its own processes. The connection strings point to localhost but AMQP and Redis services will not be available locally when run in an Azure App Service or AKS environment. As before, these incidents are reminders to make sure you have messaging and caching services available for eShop to use in Azure and that configuration is updated when deploying to Azure to take advantage of those services. - Hardcoded URLs: The next issue type I looked at were the five incidents of hardcoded URLs. In the case of eShop, these were all references to other eShop services that will be invoked via the Aspire framework. URLs included
http://catalog-api/healthandhttp://basket-api. Because these services are made accessible via Aspire, the URLs will continue to work in Azure and there aren't any changes needed in the application. I can mark these incidents as N/A to indicate that they're false positives. If there had been external URLs in use, I would have had to review the URLs to make sure that the services they represented would be available in eShop's new environment. - Caching: The next most common issue type was the five incidents of caching APIs being used. In eShop's case, these were all in the
Basket.APIproject and represented Redis usage that the basket API uses to maintain the user shopping basket state. As explained in the issue description, I need to ensure that a Redis instance is available for the basket API to use in the cloud and should also explore using an external caching solution like Azure Cache for Redis so that cached state can be shared between instances of the basket API service if I need to scale out to multiple instances. - HTTP usage: The report also includes four incidents of outgoing HTTP calls being made. Much like many of the other incidents, these potential incidents represent an external dependency that I need to review to ensure that the referenced services will be available when deployed to Azure. Looking at the code, I see that these are the same calls that use the hardcoded URLs reviewed earlier. Those incidents were about the hardcoded URL strings whereas these ones are about the HTTP client API usage, but both relate to the same dependency, so these items have already been reviewed.
- Local file usage: The final potential issue reported is a single incident of file IO occurring in the
Catalog.APIproject. I see from the incident details that the project is callingFile.ReadAllText.To ensure that the accessed file path will be available from Azure, I need to review the file (CatalogContextSeed.cs) where the call occurs. I can click the link included in the incident report to navigate directly to the relevant code in my solution. Doing so, I see that this call is part of seeding the database with information on first run and that the file read is deployed alongside the application, so everything should work just as well in Azure as it did on-premises. This one, also, can be marked N/A. - Static content: The last remaining set of issues are three optional incidents about several eShop projects serving static content. These incidents are optional because no action is required. However, the issue description explains that once deployed to Azure, there may be performance and scalability benefits of serving static content such as the files identified here using Azure Blob Storage and Azure CDN.
Those are all of the issues detected in the eShop sample. It's a larger list than initially expected, perhaps, but, as we thought, the issues were almost entirely about external dependencies that will need to be migrated to Azure along with the eShop solution. There was nothing blocking in the report except for the helpful reminders that the solution will need database, message queue, and caching solutions in the cloud that may look different from on-premises, and provisioning those (and updating the app to use them) needs to be part of the re-platforming plan.
Using the Command Line Interface
In addition to the Visual Studio extension discussed in the rest of this article, the Azure Migrate application and code assessment feature is also available via a .NET command line tool. The Visual Studio extension offers the most functionality (because the reports maintain state for which incidents have been reviewed), but all the same assessment capabilities are available from the command line, meaning that analysis doesn't need to depend on Visual Studio and can be scripted, if needed.
Like all .NET SDK tools, the Azure Migrate application and code assessment CLI tool is installed using a .NET CLI command:
dotnet tool install -g dotnet-appcat
That command pulls down a NuGet package containing the latest version of the dotnet-appcat tool and installs it globally. The tool is run using the appcat command. The simplest way to use the Azure Migrate application and code assessment CLI is to run appcat analyze solution.sln where solution.sln is the path to the solution or project file you want to assess. Running analyze without a project or solution specified causes the tool to search for projects in the current directory. This command starts an interactive command line experience, allowing you to choose which projects from the solution you want to assess, whether you want to analyze only source code or source code and binaries, and what output format you want (HTML, CSV, or JSON) - all the same options as with the Visual Studio extension! See Figure 12.
Once the appcat CLI tool gathers the necessary data from you, it proceeds with analysis and publishes results to a report using your desired format.
One important note about the CLI experience is that the solution must be able to build without errors. Visual Studio can provide the necessary symbol information for analysis, but when running from the command line instead, the target project must be in a buildable state.
In addition to mimicking the Visual Studio experience, the Azure Migrate application and code assessment command line tool accepts parameters that allow all decisions to be made up-front so that the tool runs completely automatically, allowing for a non-interactive experience suitable for scripting. To do this, use the --non-interactive parameter and make sure to specify report format and components to analyze via the command line. Here's an example command line for assessing a C# project non-interactively:
appcat analyze eShopLegacyMVC.csproj -s HTML
-r OutputPath --code --non-interactive
This command assesses the eShopLegacyMVC.csproj project, only considers source code (thanks to --code), and puts an HTML report in the OutputPath folder. The output is the same as the Azure Migrate application and code assessment Visual Studio extension produced and it all runs automatically from the command line as shown in Figure 13.

Road Map
The Azure Migrate application and code assessment feature already provides insights necessary to plan a successful Azure migration. In the future, though, there are even more useful features planned. Key features coming in future versions of Azure Migrate application and code assessment include:
GitHub Copilot Chat integration: Azure Migrate application and code assessment is great at identifying points of interest in an application that should be reviewed to be prepared for re-platforming to Azure. It's only an analysis tool, though, and guidance that's given on how to address issues is static. By partnering with GitHub Copilot Chat, it will be possible for users to have reports from Azure Migrate application and code assessment summarized for them and to have back-and-forth conversations about the best way to review and remediate issues. GitHub Copilot Chat will be knowledgeable about the issues discovered by Azure Migrate application and code assessment and will be able to provide step-by-step instructions for configuring Azure resources, updating code, and more, to address them.
Multiple Azure targets: A feature available for the Java version of Azure Migrate application and code assessment that isn't yet available for the .NET version of the tool is the ability to specify a desired Azure target environment during analysis (for example, Windows Azure App Service or AKS with a Linux container). The issues that apply to different Azure environments overlap a lot and, currently, Azure Migrate application and code assessment for .NET assesses a general Azure PaaS environment that covers issues of interest in any potential target. But this feature will be coming soon to Azure Migrate application and code assessment for .NET. In the next version, you will be able to specify an Azure environment to target and issue severity levels and descriptions will be updated for that environment.
Binary output analysis: Today, Azure Migrate application and code assessment can scan binary dependencies referenced by a solution. But there still has to be a source solution as a starting point. In the next version of the tool, the command line interface will allow scanning compiled binaries in a given folder directly.
Wrap-Up
Azure Migrate has been helping developers migrate solutions from on-premises to Azure for years. With the addition of the Azure Migrate application and code assessment feature, that migration help now extends to understanding the inner workings of your solution and source-level changes that are needed for the application to work in Azure platform-as-a-service environments!
You can learn more about Azure Migrate application and code assessment from documentation available at https://learn.microsoft.com/azure/migrate/appcat/overview. As you use the new feature, please send feedback if you have ideas for how the experience could be improved or if you run into any bugs. The feature is brand new, so there are bound to be opportunities to improve it as customers use the Visual Studio extension and CLI and share their experiences. To get instructions on how to leave feedback, click the Leave Feedback link in the top right corner of the Azure Migrate application and code assessment's Visual Studio UI or use the Q&A tab of the Visual Studio marketplace page at https://marketplace.visualstudio.com/items?itemName=ms-dotnettools.appcat.
