


JavaScript Object Notation (JSON) is a great way of storing configuration settings for a .NET application. JSON is also an efficient method to transfer data from one machine to another. JSON is easy to create, is human readable, and is easy for programming languages to parse and generate. This text-based format for representing data is language agnostic and thus easy to use in C#, JavaScript, Python, and almost any programming language existing today. In this article, you're going to learn multiple methods of creating and manipulating JSON documents in .NET 8. In addition, you'll learn how to serialize and deserialize C# objects to and from JSON.
JSON Structure
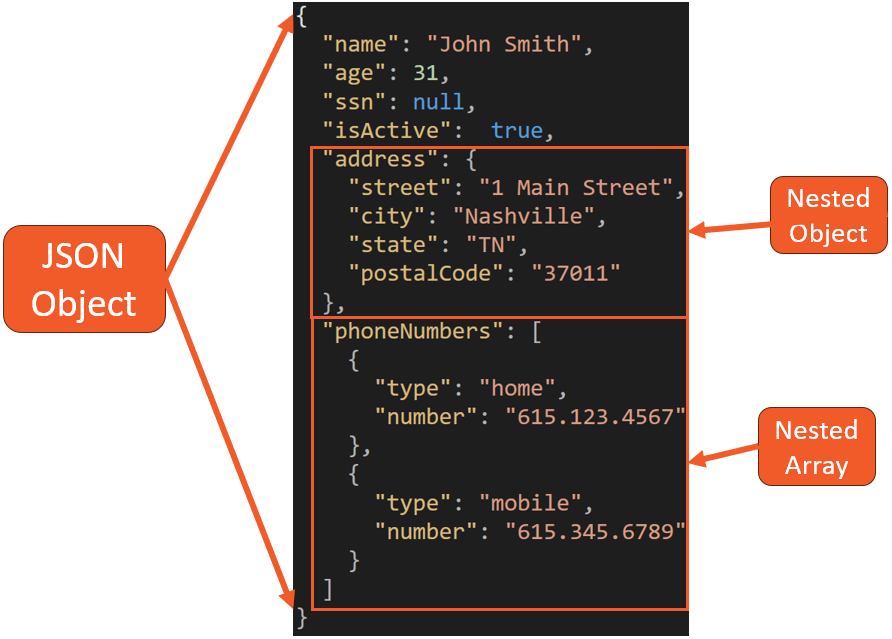
As shown in Figure 1, a JSON object is made up of a collection of name/value pairs. You may hear these also expressed as key/value pairs, or, in C# terms, this is a property and a value. In C#, a JSON object is the equivalent of an object, record, or a struct with property names, and the values you assign to those properties. JSON can also be a collection of one or more objects (Figure 2 and Figure 3). In C#, this would be the equivalent of a dictionary, hash table, keyed list, or associative array. Although I'm going to use C# in this article, the constructs mentioned are universal across all modern programming languages. Because of this, any language can manipulate these JSON objects easily.

A JSON object begins with a left brace and ends with a right brace (see Figure 1). Each name is followed by a colon and the name/value pairs are separated by a comma. Each name must be wrapped within double quotes. All string values must be wrapped within double quotes.
A JSON array is an ordered collection of values that begins with a left bracket and ends with a right bracket. Each value within the array is separated by a comma. The values within the array may be a single item, such as a string or a number (Figure 2), or each value within the array may be a JSON object (Figure 3).


Nested Objects
Each value after the name can be one of the various data types shown in Table 1. Although this isn't a large list of data types, all data can be expressed with just this set of types.
Look at Figure 4 to see an example of a JSON object that has a value of each of the data types for each name. The name property has a string value “John Smith” enclosed within double quotes. The age property is a numeric with a value of 31. The ssn property is empty as represented by the keyword null. The address property is another JSON object and is thus enclosed by curly braces. The phoneNumbers property is a JSON array, with each value of the array another JSON object. As you see, JSON is very flexible and can represent almost any type of structure you can possibly need in your programming tasks.
JSON Manipulation Classes
There are several classes within a couple of namespaces in .NET 8 that you use to work with JSON in your C# applications. The first namespace is System.Text.Json and the second namespace is System.Text.Json.Nodes. You have most likely already used the JsonSerializer class to serialize C# objects to JSON, or to deserialize a JSON string into a C# object. However, there are other classes you can use to add nodes to a JSON object, set and retrieve values, and create new JSON objects.
The System.Text.Json Namespace
Within this namespace are classes and structures to help you manipulate JSON documents including the JsonSerializer class. Table 2 provides a description of each of the classes within this namespace. Each of these classes is illustrated throughout this article. All the classes and structures within this namespace are immutable. This means that once they've been instantiated with data, they cannot be modified in any way.
The System.Text.Json.Nodes Namespace
The classes in this namespace (Table 3) are for creating and manipulating in-memory JSON documents using a DOM. These classes provide random access to JSON elements, allow adding, editing, and deleting elements, and can convert dictionary and key value pairs into JSON documents.
Build In-Memory JSON Documents
I recommend following along with this article to ensure that you have a solid foundation for manipulating JSON documents. The tools needed to follow the step-by-step instructions in this article are .NET 6, 7, or 8, and either Visual Studio 2022 or VS Code. Create a console application named JsonSamples. The goal of this first example is to create the following JSON object.
{
  "name": "John Smith",
  "age": 31
}
Of course, there are many ways to create this JSON object using C# and the JSON classes. For this first example, open the Program.cs file, delete any lines of code in this file, and add the following Using statement as the first line.
using System.Text.Json.Nodes;
Below the Using statement, create a variable named jo that is an instance of a JsonObject. The JsonObject provides the ability to add, edit, and delete nodes within the JSON document.
JsonObject jo = new();
Add two name/value pairs to the JsonObject using the C# KeyValuePair class, as shown in the following code.
jo.Add(new KeyValuePair<string, JsonNode?>("name", "John Smith"));
jo.Add(new KeyValuePair<string, JsonNode?>("age", 31));
Write out the JSON document using the ToString() method on the JsonObject.
Console.WriteLine(jo.ToString());
The output from this statement is the JSON object shown earlier. Notice how the JSON is nicely formatted. If you wish to remove all of the carriage returns, line feeds, and whitespace between all the characters, change the call from the ToString() method to the ToJsonString() method instead. You should then see the following JSON appear in the console window.
{"name":"John Smith","age":31}
Use a New C# 12 Feature
In C# 12 (.NET 8) you can create the JsonObject using the following syntax. Note that the square brackets used in the code are a new C# 12 feature that allows you to initialize the new JsonObject object without using the new keyword.
JsonObject jo =
[
    new KeyValuePair<string, JsonNode?>("name", "John Smith"),
    new KeyValuePair<string, JsonNode?>("age", 31)
];
Using a Dictionary Class
You can pass an instance of a Dictionary<string, JsonNode?> to the constructor of the JsonObject to create your JSON document. Replace the code in the Program.cs file with the following:
using System.Text.Json.Nodes;

Dictionary<string, JsonNode?> dict = new() {
    ["name"] = "John Smith",
    ["age"] = 31
};

JsonObject jo = new(dict);

Console.WriteLine(jo.ToString());
Using a JsonValue Object
The Add() method on the JsonObject class also allows you to pass in the name and a JsonValue object. Pass in the value to static method Create() on the JsonValue class to create a new JsonValue object.
using System.Text.Json.Nodes;

JsonObject jo = new() {
    { "name", JsonValue.Create("John Smith") },
    { "age", JsonValue.Create(31) }
};

Console.WriteLine(jo.ToString());
Because the JsonObject can be initialized with a Dictionary object, you may use the same syntax you used to create a Dictionary object in the constructor of the JsonObject, as shown in the following code:
using System.Text.Json.Nodes;

JsonObject jo = new() {
  ["name"] = "John Smith",
  ["age"] = 1
};

Console.WriteLine(jo.ToString());
Create Nested JSON Objects
Not all JSON objects are simple name/value pairs. Sometimes you need one of the properties to be another JSON object. The address property is another JSON object that has its own set of name/value pairs, as shown in the following snippet:
{
    "name": "John Smith",
    "age": "31",
    "ssn": null,
    "isActive": true,
    "address": {
        "street": "1 Main Street",
        "city": "Nashville",
        "stateProvince": "TN",
        "postalCode": "37011"
    }
}
To create the above JSON object, create a new instance of a JsonObject and, using a Dictionary object, build the structure you need, as shown in the following code snippet:
using System.Text.Json.Nodes;

JsonObject jo = new() {
    ["customer"] = "Acme",
    ["IsActive"] = true,
    ["address"] = new JsonObject() {
        ["street"] = "123 Main Street",
        ["city"] = "Walla Walla",
        ["stateProvince"] = "WA",
        ["postalCode"] = "99362",
        ["country"] = "USA"
    }
};

Console.WriteLine(jo.ToString());
Parse JSON Strings into Objects
JSON documents are commonly stored as strings in a file or in memory. Instead of attempting to read specific values in the JSON using File IO or string parsing, you can parse the string into a JsonNode object. Once in this object, it's very easy to retrieve single values, or entire nodes.
Instead of repeating the same set of JSON strings throughout this article, I'm creating a single class (Listing 1) with some string constants to represent different JSON documents. The PERSON constant is a JSON document that contains four properties to represent a single person. The PHONE_NUMBERS constant is a JSON array of a few phone numbers where each number has a type property with a value such as Home, Mobile, or Work. The PERSON_ADDRESS constant contains a nested address property that is another object with a street, city, state, and postalCode properties. The PERSON_ADDRESS_PHONES constant contains person information, address information, and an array of phone numbers all in one JSON object.
Listing 1: To save typing, I have created a class with some JSON documents
namespace JsonSamples;

public class JsonStrings
{
  public const string PERSON =
    @"{
           ""name"": ""John Smith"",
           ""age"": 31,
           ""ssn"": null,
           ""isActive"": true
    }";

  public const string PHONE_NUMBERS =
    @"[
          {
               ""type"": ""Home"",
               ""number"": ""615.123.4567""
          },
          {
               ""type"": ""Mobile"",
               ""number"": ""615.345.6789""
          },
          {
               ""type"": ""Work"",
               ""number"": ""615.987.6543""
          }
    ]";

  public const string PERSON_ADDRESS =
    @"{
          ""name"": ""John Smith"",
          ""age"": 31,
          ""ssn"": null,
          ""isActive"": true,
          ""address"": {
               ""street"": ""1 Main Street"",
               ""city"": ""Nashville"",
               ""state"": ""TN"",
               ""postalCode"": ""37011""
          }
    }";

  public const string PERSON_ADDRESS_PHONES =
    @"{
          ""name"": ""John Smith"",
          ""age"": 31,
          ""ssn"": null,
          ""isActive"": true,
          ""address"": {
               ""street"": ""1 Main Street"",
               ""city"": ""Nashville"",
               ""state"": ""TN"",
               ""postalCode"": ""37011""
          },
          ""phoneNumbers"": [
          {
                ""type"": ""Home"",
                ""number"": ""615.123.4567""
          },
          {
                ""type"": ""Mobile"",
                ""number"": ""615.345.6789""
          },
          {
                ""type"": ""Work"",
                ""number"": ""615.987.6543""
          }
          ]
    }";
}
Create a JsonNode Object
The JsonNode class is probably the class you will use most often. It's very flexible and contains most of the functionality you need when manipulating JSON documents. For example, to parse the PERSON constant into a JsonNode object, place the following code into the Program.cs file:
using JsonSamples;
using System.Text.Json.Nodes;

// Parse string into a JsonNode object
JsonNode? jn = JsonNode.Parse(JsonStrings.PERSON);

Console.WriteLine(jn!.ToString());
Console.WriteLine(jn!.GetValueKind());
Run the console application and you should see the following displayed in the console window:
{
   "name": "John Smith",
   "age": 31,
   "ssn": null,
   "isActive": true
}
Object
The first Console.WriteLine() statement emits the JSON object, and the second Console.WriteLine() statement reports the kind of object contained in the JsonNode object that's the type of Object. Of course, you may pass to the Parse() method any of the other constant strings. Write the following code in the Program.cs file to parse the PHONE_NUMBERS constant into a JsonNode object:
using JsonSamples;
using System.Text.Json.Nodes;

// Parse string into a JsonNode object
JsonNode? jn = JsonNode.Parse(JsonStrings.PHONE_NUMBERS);

Console.WriteLine(jn?.ToString());
Console.WriteLine(jn!.GetValueKind());
Run the console application and you should see the following displayed in the console window:
[
  {
     "type": "Home",
     "number": "615.123.4567"
  },
  {
     "type": "Mobile",
     "number": "615.345.6789"
  },
  {
     "type": "Work",
     "number": "615.987.6543"
  }
]
Array
Notice that in this case, the GetValueKind() method reports this as an Array instead of an Object. When the JSON string that is read in starts with a square bracket, it's a JSON array instead of a JSON object.
Create a JsonDocument Object
Earlier in this article, you learned that you could add items to a JsonObject in its constructor. There's no constructor for the JsonDocument object, so you must use the Parse() method to get valid JSON data into this object. The JsonDocument object is a very efficient object to use when all you need to do is to read data from a JSON document. Once the data is parsed into the JsonDocument, access the RootElement property to retrieve the JSON. Write the following code into the Program.cs file:
using JsonSamples;
using System.Text.Json;

// Parse string into a JsonDocument object
using JsonDocument jd = JsonDocument.Parse(JsonStrings.PERSON);

// Get Root JsonElement structure
JsonElement je = jd.RootElement;

Console.WriteLine(je.ToString());
Console.WriteLine(je.ValueKind);
In the code above, you retrieve the RootElement property and place it into a new variable of the type JsonElement. It's this class that you're going to use to read the data from JSON document, as you shall soon learn. Run the application and you should see the following displayed in the console window:
{
   "name": "John Smith",
   "age": 31,
   "ssn": null,
   "isActive": true
}
Object
Read Data from JSON Documents
There are a few different ways you can read individual name/value pairs from a JSON document. Both the JsonElement and the JsonNode classes allow you to get at the data within the JSON.
Once you've parsed some JSON into a JsonDocument object, you must always use the RootElement property to retrieve specific values within the JSON document. You can either place the RootElement property into a JsonElement object, or you can use the full path of the JsonDocument.RootElement property. Write the code shown in Listing 2 into the Program.cs file.
Listing 2: Retrieve values from the JSON using the RootElement property
using JsonSamples;
using System.Text.Json;

// Parse string into a JsonDocument object
using JsonDocument jd = JsonDocument.Parse(JsonStrings.PERSON);

// Get a specific property from JSON
JsonElement je = jd.RootElement!.GetProperty("name");

// Get the numeric value from the JsonElement
Console.WriteLine($"Name={je!.GetString()}");
Console.WriteLine($"Age={jd.RootElement!
    .GetProperty("age")!.GetInt32()}");
In Listing 2, you parse the PERSON string into a JsonDocument. You then get the property called "name" from the JSON document and place this into a JsonElement object named je. Because the name property is a string value, call the GetString() method on the je variable to extract the value from the "name" property. If you don't wish to use a separate variable, you may access the jd.RootElement property directly by calling the GetProperty("age") to get the "age" element. Call the GetInt32() method on this element to extract the "age" value and display it on the console. Run the application and you should see the following output from Listing 2 displayed in the console window:
Name=John Smith
Age=31
Retrieve Data in a Nested Object
Look back at Listing 1 and notice that the PERSON_ADDRESS constant is the one with the nested "address" object. To access the "city" value within the address, replace the code in the Program.cs file with the following:
using JsonSamples;
using System.Text.Json;

// Parse string into a JsonDocument object
using JsonDocument jd = JsonDocument.Parse(JsonStrings.PERSON_ADDRESS);

// Get a specific property from JSON
JsonElement je = jd.RootElement.GetProperty("address").GetProperty("city");

// Get the string value from the JsonElement
Console.WriteLine($"City={je!.GetString()}");
After parsing the string into the JsonDocument object, access the RootElement property and call the GetProperty("address") to get to the “address” property, and then call GetProperty("city") to get to the “city” property. Once you have this element in a JsonElement object, call the GetString() method to retrieve the value for the "city" property.
Run the application and you should see the following displayed in the console window:
City=Nashville
Reading Data Using JsonNode
Unlike the JsonDocument object, the JsonNode object has an indexer that allows you to specify the name in double brackets to retrieve that specific node, as shown in the following code:
// Parse string into a JsonNode object
JsonNode? jn = JsonNode.Parse(JsonStrings.PERSON);

// Get the age node
JsonNode? node = jn!["age"];
With this new JsonNode object, node, retrieve the value as a JsonValue using the AsValue() method. With the JsonValue object, you can report the path of where this value came from, the type (string, number, Boolean, etc.), and get the value itself as shown in the following code:
// Get the value as a JsonValue
JsonValue value = node!.AsValue();

Console.WriteLine($"Path={value.GetPath()}");
Console.WriteLine($"Type={value.GetValueKind()}");
Console.WriteLine($"Age={value}");
Another option is to retrieve the value using the GetValue<T>() method, as shown in the following code:
// Get the value as an integer
int age = node!.GetValue<int>();
Console.WriteLine($"Age={age}");
If you type in the above code snippets into the Program.cs file and run the application, the following should be displayed in the console window:
Path=$.age
Type=Number
Age=31
Age=31
Retrieve Data in a Nested Object
Look back at Listing 1 and look at the PERSON_ADDRESS constant. This JSON string is the one with the nested "address" object. To access the "city" value within the address, you replace the code in the Program.cs file with the following:
using JsonSamples;
using System.Text.Json.Nodes;

// Parse string into a JsonNode object
JsonNode? jn = JsonNode.Parse(JsonStrings.PERSON_ADDRESS);

// Get the address.city node
JsonNode? node = jn!["address"]!["city"];

// Display string value from the JsonNode
Console.WriteLine($"City={node!.AsValue()}");
The above code parses the PERSON_ADDRESS string into a JsonNode object. It then uses an indexer on the jn variable to drill down to the address.city node. This node is placed into a new JsonNode object named node. The value of the city property is retrieved using the AsValue() method and displayed on the console window when you run this application.
Add, Edit, and Delete Nodes
To add a new name/value pair to a JSON document, create a JsonObject object out of the PERSON JSON string constant and convert it to a JsonObject using the AsObject() method. Once you have a JsonObject, use the Add() method to create a new name/value pair, in this case "hairColor": "Brown".
using JsonSamples;
using System.Text.Json.Nodes;

// Parse string into a JsonObject
JsonObject? jo = JsonNode.Parse(JsonStrings.PERSON)?.AsObject();
jo?.Add("hairColor", JsonValue.Create("Brown"));

Console.WriteLine(jo?.ToString());
Replace the code in the Program.cs file with the code listed above and run the application to see the following displayed in the console window:
{
   "name": "John Smith",
   "age": 31,
   "ssn": null,
   "isActive": true,
   "hairColor": "Brown"
}
Updating a Node
Use the JsonNode object to update a value in a name/value pair. Parse the JSON into a JsonNode object, then access the name using an indexer. Set the value using the equal sign just as you would any normal assignment in .NET.
using JsonSamples;
using System.Text.Json.Nodes;

// Parse string into a JsonNode object
JsonNode? jo = JsonNode.Parse(JsonStrings.PERSON);
jo!["age"] = 42;
Console.WriteLine(jo?.ToString());
Replace the code in the Program.cs file with the code listed above and run the application to see the following code displayed in the console window. Notice that the age value has changed from 31 to 42.
{
   "name": "John Smith",
   "age": 42,
   "ssn": null,
   "isActive": true
}
Deleting a Node
The Remove() method on a JsonObject is used to delete a name/value pair from a JSON document. Create a JsonObject object out of the JSON PERSON string constant. Once you have a JsonObject, use the Remove() method, passing in the name you wish to remove from the JSON. In the code below, you remove the "age" name/value pair:
using JsonSamples;
using System.Text.Json.Nodes;

// Parse string into a JsonObject
JsonObject? jo = JsonNode.Parse(JsonStrings.PERSON)?.AsObject();

jo?.Remove("age");

Console.WriteLine(jo?.ToString());
Replace the code in the Program.cs file with the code listed above and run the application to see the following displayed in the console window. The "age": 31 name/value pair has been removed from the JSON document.
{
  "name": "John Smith",
  "ssn": null,
  "isActive": true
}
Working with Arrays
In addition to a simple object, JSON can contain arrays of strings, numbers, Booleans, and JSON objects. Instead of using the JsonObject to represent a JSON document, use the JsonArray class to represent a list of items. For example, to create an array of string values, replace the code in the Program.cs file with the following:
using System.Text.Json.Nodes;

JsonArray ja = [ "John", "Sally", "Charlie"];

Console.WriteLine(ja.ToString());
Console.WriteLine(ja.GetValueKind());
Run the application and you should see the following code displayed in the console window. Notice that after the JSON array is displayed, the type reported from the call to the GetValueKind() method is "Array".
[
   "John",
   "Sally",
   "Charlie"
]
Array
To create an array of JSON objects, use the same syntax with the square brackets, but create a new JsonObject object separated by commas for each element you wish to create in the array. Write the following code into the Program.cs file:
using System.Text.Json.Nodes;

JsonArray ja = [
    new JsonObject() {
        ["name"] = "John Smith",
        ["age"] = 31
    },
    new JsonObject() {
        ["name"] = "Sally Jones",
        ["age"] = 33
    }
];

Console.WriteLine(ja.ToString());
Console.WriteLine(ja.GetValueKind());
Run the application and you should see the following displayed in the console window:
[
  {
     "name": "John Smith",
     "age": 31
  },
  {
     "name": "Sally Jones",
     "age": 33
  }
]
Array
Manipulate an Array
Like most arrays in .NET, you can easily add and remove elements within the array. Given the previous JsonArray object declaration, you can insert a new entry into the array by adding the following code after the declaration. The Insert() method lets you specify where in the array you wish to add the new object. In this case, you are adding a new element into the first position of the array.
ja.Insert(0, new JsonObject() {
    ["name"] = "Charlie Chaplin",
    ["age"] = "50"
});
You can always create a new JsonObject first, initialize it with some data, then add that new JsonObject to the JsonArray using the Add() method. The Add() method adds the JsonObject to the end of the array.
JsonObject jo = new() {
    ["name"] = "Buster Keaton",
    ["age"] = 55
};
ja.Add(jo);
Array elements may be removed by either a reference to the actual object, or by using an index number, as shown in the following two lines of code:
ja.Remove(jo);
ja.RemoveAt(2);
Extract a JSON Array from a JSON Node
Look back at Listing 1 to view the PERSON_ADDRESS_PHONES constant string. Within this JSON object, there's an object named "phoneNumbers" that contains an array of phone number objects. To extract the phone number objects from this string, you first need to parse the string into a JsonNode object. You then retrieve the value from phoneNumbers object and convert it into a JsonArray object using the AsArray() method, as shown in the following code:
using JsonSamples;
using System.Text.Json.Nodes;

// Parse string into a JsonNode object
JsonNode? jn = JsonNode.Parse(JsonStrings.PERSON_ADDRESS_PHONES);

// Get the Phone Numbers Array
JsonArray? ja = jn!["phoneNumbers"]!.AsArray();

Console.WriteLine(ja.ToString());
Console.WriteLine(ja.GetValueKind());
Place this code into the Program.cs file and run the application to display the following in the console window:
[
  {
      "type": "Home",
      "number": "615.123.4567"
  },
  {
      "type": "Mobile",
      "number": "615.345.6789"
  },
  {
      "type": "Work",
      "number": "615.987.6543"
  }
]
Array
Iterate Over Array Values Using JsonNode
Once you have a JsonArray object, you may iterate over each value in the array to extract the different property values. In the code shown below, you parse the PHONE_NUMBERS string constant into a JsonNode object. Next, convert this JsonNode object into a JsonArray using the AsArray() method. Use a foreach loop to iterate over each element in the array and emit the "type" and "number" properties onto the console window.
using JsonSamples;
using System.Text.Json.Nodes;

// Parse string into a JsonNode object
JsonNode? jn = JsonNode.Parse(JsonStrings.PHONE_NUMBERS);

JsonArray? nodes = jn!.AsArray();
foreach (JsonNode? node in nodes) {Console.WriteLine($"Type={node!["type"]},
    Phone Number = {node!["number"]}");
}
Type the above code into the Program.cs file and run the application to see the following values displayed in the console window:
Type=Home, Phone Number=615.123.4567
Type=Mobile, Phone Number=615.345.6789
Type=Work, Phone Number=615.987.6543
Iterate Over Array Values Using JsonDocument
If you wish to use the JsonDocument class instead of a JsonNode class, the following code illustrates the differences between the two classes. After parsing the PHONE_NUMBERS string constant into a JsonDocument, convert the RootElement property, which is an array, into an ArrayEnumerator using the EnumerateArray() method. You may now iterate over the array of JsonElement objects and display the phone number type and the phone number itself.
using JsonSamples;
using System.Text.Json;

// Parse string into a JsonDocument object
using JsonDocument jd = JsonDocument.Parse(
    JsonStrings.PHONE_NUMBERS);

JsonElement.ArrayEnumerator elements = jd.RootElement.EnumerateArray();
foreach (JsonElement elem in elements) {
    Console.WriteLine($"Type={elem.GetProperty("type")},
    Phone Number={elem.GetProperty("number")}");
}
The output is the same as the output shown above when using the JsonNode object to iterate over the array values.
Get a Single Phone Number from Array
Looking back at Listing 1, you see the PHONE_NUMBERS string constant, which is a JSON array. After you parse this data into a JsonNode, you might wish to retrieve just the home phone number from this array. After converting the phone numbers to a JsonArray object, use the FirstOrDefault() method to search where the "type" value is equal to "Home". If this node is found, extract the number value to display on the console window, as shown in Listing 3. If you type the code shown in Listing 3 into the Program.cs file and run the application, the code displays "Home Number=615.123.4567" in the console window.
Listing 3: Retrieve a single item from an array
using JsonSamples;
using System.Text.Json.Nodes;

string? value = string.Empty;

// Create JsonNode object from Phone Numbers
JsonNode? jn = JsonNode.Parse(JsonStrings.PHONE_NUMBERS);

// Cast phone numbers as an array
JsonArray ja = jn!.AsArray();

// Search for Home number
JsonNode? tmp = ja.FirstOrDefault(row => (string)(row!["type"]!
  .GetValue<string>()) == "Home");

// Extract the home number value
value = tmp!["number"]!.GetValue<string>();

Console.WriteLine($"Home Number={value}");
Parsing JSON from a File
There are a couple of different methods you may use to extract JSON from a file. You can use .NET File I/O classes, or you can use the IConfiguration interface. Let's start by looking at how you can read JSON values using the .NET File I/O classes.
Read Runtime Configuration Settings
When you run a .NET application, there's a runtimeconfig.json file (Listing 4) created with information about the application. The JSON object shown below is an example of what's generated from a console application. When you run an ASP.NET web application, there will be additional information in this file.
Listing 4: A sample runtime configuration file
{
    "runtimeOptions": {
        "tfm": "net8.0",
        "framework": {
            "name": "Microsoft.NETCore.App", "version": "8.0.0"
        },
      "configProperties": {
          "System.Runtime...": false
      }
  }
}
If you wish to read the .NET Framework version from this file, you need to first open the file and parse the text into a JsonNode or JsonDocument object, as shown in Listing 5. You then access the runtimeOptions.framework.version property to retrieve the value "8.0.0". Replace all the code in the Program.cs file with the code shown in Listing 5 and run the application to display the runtime version.
Listing 5: Use File I/O to read a value from the runtime configuration file
using System.Text.Json.Nodes;

string? value = string.Empty;
string fileName = $"{AppDomain.CurrentDomain.FriendlyName}
    .runtimeconfig.json";

if (File.Exists(fileName)) {
  JsonNode? jn = JsonNode.Parse(File.ReadAllText(fileName));
  value = jn!["runtimeOptions"]
      !["framework"]
      !["version"]?.GetValue<string>();
}

Console.WriteLine(json);
Create an appsettings.json File
In most .NET applications you write, you most likely will need a file to store global settings such as a connection string, logging levels, and other application-specific settings. This information is generally stored in a file named appsettings.json. Add this file to the console application and put the settings shown in Listing 6 into this file. Once the file is created, click on the file and bring up the Properties window. Set the Copy to Output Directory property to Copy always. You should put the connection string all on one line. I had to break it across several lines due to the formatting constraints of the print magazine.
Listing 6: Create an application settings file in the console application
{
  "ConnectionStrings": {
      "DefaultConnection": "Server=Localhost;
         Database=AdventureWorks;
         Trusted_Connection=Yes;
         MultipleActiveResultSets=true;
         TrustServerCertificate=True;"
  },
  "AdvWorksAppSettings": {
      "ApplicationName": "Adventure Works",
  },
  "Logging": {
      "LogLevel": {
          "Default": "Information", "Microsoft.AspNetCore": "Warning"
      }
  }
}
Read appsettings.json File Using File I/O
Because the appsettings.json file only contains text, you can read in the JSON contained in this file using the .NET File I/O classes, as shown in Listing 7. In this code, you set the fileName variable to point to the location of the appsettings.json file. Because the appsettings.json file is in the same folder as the executable that's running, you don't need to specify a path to the file. If the file exists, read all of the text using the ReadAllText() method of the File class and pass that text to the Parse() method of the JsonNode class. Once you have the JSON in the JsonNode object, you can read the value from the ConnectionStrings.DefaultConnection property. Type the code shown in Listing 7 into the Program.cs file, run the application, and you should see the connection string in the appsettings.json file displayed in the console window.
Listing 7: Read the appsettings.json file using .NET File I/O classes
using System.Text.Json.Nodes;

string connectString = string.Empty;
string fileName = "appsettings.json";

if (File.Exists(fileName)) {
  // Read settings from file
  JsonNode? jd = JsonNode.Parse(File.ReadAllText(fileName));

  // Extract the default connection string
  connectString = jd!["ConnectionStrings"]
    !["DefaultConnection"]?.GetValue<string>() ?? string.Empty;
}

Console.WriteLine(connectString);
Writing to a File
If you're running a WPF application, or a console application, it's perfectly acceptable to write data back to the appsettings.json file. Of course, you wouldn't want to do this when running an ASP.NET web application. The code shown in Listing 8 reads in the appsettings.json file, adds a new name/value pair, then writes the new JSON back to the appsettings.json file. Type the code in Listing 8 into the Program.cs file and run the application to produce the following results:
Listing 8: Write a new value to the appsettings.json file
string fileName = "appsettings.json";
JsonObject? jo = null;

if (File.Exists(fileName)) {
  // Read settings from file
  jo = JsonNode.Parse(File.ReadAllText(fileName))?.AsObject();

  if (jo != null) {
    // Locate node to add to
    JsonObject? node = jo!["AdvWorksAppSettings"]?.AsObject();

    // Add new node
    node?.Add("LastDateUsed",
       JsonValue.Create(DateTime.Now.ToShortDateString()));

    // Write back to file
    File.WriteAllText(fileName, jo?.ToString());
  }
}

Console.WriteLine(jo?.ToString());
{
    "ConnectionStrings": {"DefaultConnection": "Server=...;"
    },
    "AdvWorksAppSettings": {
        "ApplicationName": "Adventure Works",
        "LastDateUsed": "12/27/2023"
    },
    "Logging": {
        "LogLevel": {
            "Default": "Information",
            "Microsoft.AspNetCore": "Warning"
        }
    }
}
Using the IConfiguration Interface
Instead of using the .NET File I/O classes, you can take advantage of the IConfiguration interface and the ConfigurationBuilder class to read in a JSON file. To use the ConfigurationBuilder class, you must add two packages to your project.
- Microsoft.Extensions.Configuration
- Microsoft.Extensions.Configuration.Json
After adding these two packages to your project, you can write the code shown in Listing 9. In this code, you pass in the runtime configuration file name (see Listing 4) to the AddJsonFile() method on the ConfigurationBuilder. The Build() method is called to create the configuration builder object, which reads the JSON file into memory and converts the text into a JSON document. Use the GetSection() method to retrieve a specific section within the JSON file. In this case, you're asking for the runtimeOptions section. From the section variable, you can now retrieve the framework version number. Type in the code in Listing 9 into the Program.cs file, run the application, and you should see the version number appear in the console window.
Listing 9: Use the ConfigurationBuilder class to read in a JSON file
using Microsoft.Extensions.Configuration;

string? value = string.Empty;
string fileName = $"{AppDomain.CurrentDomain.FriendlyName}
     .runtimeconfig.json";

IConfiguration config = new ConfigurationBuilder()
     .AddJsonFile(fileName)
     .Build();

IConfigurationSection section = config.GetSection("runtimeOptions");
value = section["framework:version"] ?? string.Empty;

Console.WriteLine(value);
Read the appsettings.json File
You previously read the appsettings.json file using the .NET File I/O classes. In Listing 10 you're now going to use the ConfigurationBuilder to read the same file. Because the appsettings.json file is in the same folder as the executable that's running, you don't need to specify a path to the file. Type the code in Listing 10 into the Program.cs file, run the application and you should see the connection string appear in the console window.
Listing 10: Read the appsettings.json file using the ConfigurationBuilder class
using Microsoft.Extensions.Configuration;

string connectString;

IConfiguration config = new ConfigurationBuilder()
    .AddJsonFile("appsettings.json")
    .Build();

IConfigurationSection section = config.GetSection("ConnectionStrings");
connectString = section["DefaultConnection"] ?? string.Empty;

Console.WriteLine(connectString);
Bind Settings to a Class
Instead of reading values one at a time from a configuration file, you can bind a section within a configuration file to a class with just one line of code. Create a class named AppSettings and add a property that maps to each name in the configuration file. In the following code, there's a sole property named ApplicationName that maps to the ApplicationName property in the appsettings.json file shown in Listing 6.
namespace JsonSamples;
public class AppSettings
{
    public string ApplicationName { get; set; }
        = string.Empty;
}
To perform the binding operation, add the package Microsoft.Extensions.Configuration.Binder to your project using the NuGet Package Manager. Add the following code to the Program.cs file and run the application to see the application name displayed in the console window:
using JsonSamples;
using Microsoft.Extensions.Configuration;

AppSettings entity = new();

IConfiguration config = new ConfigurationBuilder()
  .AddJsonFile("appsettings.json")
  .Build();

config.Bind("AdvWorksAppSettings", entity);
Console.WriteLine(entity.ApplicationName);
Serialize C# Object to JSON
So far, everything you've done manipulates JSON using C# code. Another excellent feature of .NET is that you may serialize your C# objects into JSON using just a few lines of code. This is very handy for sending C# objects over the internet via Web API calls. In fact, the code you're going to learn about now is exactly how ASP.NET sends your data across the internet when writing Web API calls. To illustrate this concept, right mouse-click on the project and add a new class named Person, as shown in the following code snippet:
namespace JsonSamples;
public class Person
{
    public string? Name { get; set; }
    public int Age { get; set; }
    public string? SSN { get; set; }
    public bool IsActive { get; set; }
    public override string ToString()
    {
        return $"{Name}, Age={Age},
        SSN={SSN}, IsActive={IsActive}";
    }
}
After creating the Person class, replace all the code in the Program.cs file with the following:
using JsonSamples;
using System.Text.Json;

Person entity = new() {
    Name = "John Smith",
    Age = 31,
    SSN = null,
    IsActive = true
};

Console.WriteLine(JsonSerializer.Serialize(entity));
This code uses the Serialize() method of the JsonSerializer class from the System.Text.Json namespace. Pass in the instance of your C# object to the Serialize() method and a string of JSON is returned. Run the application and you should see the following string of JSON appear in your console window:
{"Name":"John Smith","Age":31,"SSN":null,"IsActive":true}
Notice that there's no indentation or spaces between the values. Also notice that the names are the exact same case as your C# class property names. JSON usually uses camel case for names (first letter is lower-case), whereas C# uses Pascal case (first letter is upper-case).
Change Casing of Property Names
If you wish to change the casing of the property names, create an instance of a JsonSerializerOptions object and set the PropertyNamingPolicy to the enumeration value of CamelCase (as seen in Listing 11). Change the formatting of the JSON to become indented by setting the WriteIndented property to true.
Listing 11: Add a JsonSerializerOptions object to control how the JSON is formatted
using JsonSamples;
using System.Text.Json;

Person entity = new() {
    Name = "John Smith",
    Age = 31,
    SSN = null,
    IsActive = true
};

JsonSerializerOptions options = new() {
    PropertyNamingPolicy = JsonNamingPolicy.CamelCase,
    WriteIndented = true
};

Console.WriteLine(JsonSerializer.Serialize(entity, options));
Type the code in Listing 11 into the Program.cs file and run the application to display the following JSON in the console window:
{
    "name": "John Smith",
    "age": 31,
    "ssn": null,
    "isActive": true
}
Go back to the Program.cs file and change the PropertyNamingPolicy property to JsonNamingPolicy.SnakeCaseUpper to produce each property as upper-case with each word in the property name separated by an underscore, as shown in the following output:
{
    "NAME": "John Smith",
    "AGE": 31,
    "SSN": null,
    "IS_ACTIVE": true
}
Go back to the Program.cs file and change the PropertyNamingPolicy property to JsonNamingPolicy.SnakeCaseLower to produce each property as lower-case with each word in the property name separated by an underscore, as shown in the following output:
{
    "name": "John Smith",
    "age": 31,
    "ssn": null,
    "is_active": true
}
The other enumeration values you may set the PropertyNamingPolicy to are JsonNamingPolicy.KebabCaseUpper or JsonNamingPolicy.KebabCaseLower. This policy separates each word in the property name with a dash instead of an underscore, as shown below:
{
    "name": "John Smith",
    "age": 31,
    "ssn": null,
    "is-active": true
}
Control Serialization Using JSON Attributes
In the System.Text.Json.Serialization namespace are some attributes you may use to decorate C# class properties to help you control how each property is serialized. There are several attributes you may use, but the most used are JsonPropertyName, JsonIgnore, and JsonPropertyOrder. Listing 12 shows a PersonWithAttributes class with these attributes applied to different properties.
Listing 12: Add JSON attributes to your C# class properties to control serialization
using System.Text.Json.Serialization;

namespace JsonSamples;

public class PersonWithAttributes
{
    [JsonPropertyName("personName")]
    [JsonPropertyOrder(1)]
    public string? Name { get; set; }
    [JsonPropertyName("personAge")]
    [JsonPropertyOrder(2)]
    public int Age { get; set; }
    public string? SSN { get; set; }
    public bool IsActive { get; set; }

    [JsonIgnore]
    public DateTime? CreateDate { get; set; }
    [JsonIgnore(Condition = JsonIgnoreCondition.WhenWritingNull)]
    public DateTime? ModifiedDate { get; set; }

    public override string ToString()
    {
        return $"{Name},
        Age={Age},
        SSN={SSN},
        IsActive={IsActive}";
    }
}
When you decorate a C# property with the JsonPropertyName attribute, you pass the JSON name to use to the attribute when this property is serialized. When a C# class is serialized, the order of the properties is in the order they appear in the class. To change the order in which the properties are serialized, add a JsonPropertyOrder attribute to each property and set the order in which you want them to appear. If the JsonPropertyOrder attribute is not applied to a property, the default number is zero (0). To never have a property serialized into JSON, apply the JsonIgnore attribute with no parameters. You may also set the Condition property of the JsonIgnore attribute to not serialize the data when the value is null.
After creating the PersonWithAttributes class, write the code shown in Listing 13 in the Program.cs file. In this listing, notice that the CreateDate and ModifiedDate properties are both set to the current date and time.
Listing 13: Serialize the C# object with the JSON attributes applied
using JsonSamples;
using System.Text.Json;

PersonWithAttributes entity = new() {
  Name = "John Smith",
  Age = 31,
  SSN = null,
  IsActive = true,
  // This property is never serialized
  CreateDate = DateTime.Now,
  // Comment this property to
  // remove from serialization
  ModifiedDate = DateTime.Now
};

JsonSerializerOptions options = new() {
    PropertyNamingPolicy = JsonNamingPolicy.CamelCase,
    WriteIndented = true
};

Console.WriteLine(JsonSerializer.Serialize(entity, options));
If you run the code shown in Listing 13, the following output is displayed in the console window:
{
    "ssn": null,
    "isActive": true,
    "modifiedDate": "2024-01-28T12:48:53",
    "personName": "John Smith",
    "personAge": 31
}
There are a few things to notice about this output. The modifiedDate appears in the output because the value is not null. The Name and Age C# properties are emitted as personName and personAge in JSON. These two properties also appear at the end of the object because their order was set to one (1) and two (2) respectively. If you go back to the code in the Program.cs file, comment the ModifiedDate property, and rerun the application, the ModifiedDate value will not display in the output.
Serializing Objects with Enumerations
Another common scenario is that you have a class with an enumeration as one of the property types. When you serialize that object, you can either emit the numeric value of the enumeration or use the string representation of the enumeration itself. Create a new enumeration named PersonTypeEnum.
namespace JsonSamples;

public enum PersonTypeEnum
{
    Employee = 1,
    Customer = 2,
    Supervisor = 3
}
Create a class named PersonWithEnum that has a PersonType property that is of the type PersonTypeEnum.
namespace JsonSamples;

public class PersonWithEnum
{
    public string? Name { get; set; }
    public PersonTypeEnum PersonType { get; set; }
    public override string ToString()
    {
        return $"{Name}, Type={PersonType}";
    }
}
Open the Program.cs file and write the code shown in the code snippet below:
using JsonSamples;
using System.Text.Json;
PersonWithEnum entity = new() {
    Name = "John Smith",
    PersonType = PersonTypeEnum.Supervisor
};

JsonSerializerOptions options = new() {
    PropertyNamingPolicy = JsonNamingPolicy.CamelCase,
    WriteIndented = true
};

Console.WriteLine(JsonSerializer.Serialize(entity, options));
When you run the application, the following output is displayed in the console window.
{
    "name": "John Smith",
    "personType": 3
}
Notice that the personType property has a value of 3, which equates to the Supervisor enumeration value. Go back to the Program.cs file and add the following using statement at the top of the file:
using System.Text.Json.Serialization;
Set the Converters property in the JsonSerializerOptions object to use an instance of the JsonStringEnumConverter class. This class works with the serializer and instead of emitting the numeric value of enumeration properties, it emits the string representation of the enumeration.
JsonSerializerOptions options = new() {
    PropertyNamingPolicy = JsonNamingPolicy.CamelCase,
    WriteIndented = true,
    Converters =
    {
        new JsonStringEnumConverter()
    }
};
After adding the JsonStringEnumConverter object, run the application and the following should now display in the console window:
{
  "name": "John Smith",
  "personType": "Supervisor"
}
Serialize a Nested Object
Often you have a property in a class that is itself another class. Don't worry, the JSON serialization process handles this situation just fine. To illustrate, create a class called JwtSettings, as shown in Listing 14.
Listing 14: Create a JwtSettings class to be nested within an AppSettings class
namespace JsonSamples;

public class JwtSettings
{
    public string Key { get; set; } = string.Empty;
    public string Issuer { get; set; } = string.Empty;
    public string Audience { get; set; } = string.Empty;
    public int MinutesToExpiration { get; set; }
    public string[] AllowedIPAddresses { get; set; } = [];

    #region ToString Override
    public override string ToString()
    {
        return $"{Key} - {Issuer} – {Audience} - {MinutesToExpiration}";
    }
    #endregion
}
Next, create a class named AppSettingsNested that has two properties: ApplicationName and JWTSettings. The data type for the JWTSettings property is the JwtSettings class you just created.
namespace JsonSamples;
public class AppSettingsNested
{
    public string ApplicationName { get; set; } = string.Empty;
    public JwtSettings JWTSettings { get; set; } = new();
}
Now that you have a nested class, write the code shown in Listing 15 into the Program.cs file. In this code, you fill in the ApplicationName property, create a new instance of a JwtSettings class for the JWTSettings property, and then fill in each property in that class too.
Listing 15: Write code to serialize a nested object to view the JSON output
using JsonSamples;
using System.Text.Json;

AppSettingsNested entity = new() {
    ApplicationName = "JSON Samples",
    JWTSettings = new() {
        Key = "ALongKeyForASymmetricAlgorithm",
        Issuer = "JsonSamplesAPI",
        Audience = "PDSCJsonSamples",
        MinutesToExpiration = 60
    }
};

JsonSerializerOptions options = new() {
    PropertyNamingPolicy = JsonNamingPolicy.CamelCase,
    WriteIndented = true
};

Console.WriteLine(JsonSerializer.Serialize(entity, options));
Run the application and you should see the following displayed in your console window:
{
  "applicationName": "JSON Samples",
  "jwtSettings": {
      "key": "ALongKeyForASymmetricAlgorithm",
      "issuer": "JsonSamplesAPI",
      "audience": "PDSCJsonSamples",
      "minutesToExpiration": 60,
      "allowedIPAddresses": []
    }
}
Serialize a Dictionary
If you have a generic Dictionary<TKey, TValue> object, or a KeyValuePair object filled with data, the JSON serializer emits those as a single object. Open the Program.cs file and add the code shown below.
using System.Text.Json;
Dictionary<string, object?> dict = new()
    {
        {"name", "John Smith"},
        {"age", 31},
        {"isActive", true}
    };

JsonSerializerOptions options = new() {
    WriteIndented = true
};

    Console.WriteLine(JsonSerializer.Serialize(dict, options));
When you run the application, the console window displays the following JSON object:
{
    "name": "John Smith",
    "age": 31,
    "isActive": true
}
Serialize a List
To write a JSON array, you can use any of the IEnumerable objects in .NET such as an array or a List<T>. To illustrate, use the PersonWithEnum class and create a generic list of two PersonWithEnum objects, as shown in Listing 16.
Listing 16: Create a generic List and serialize it to create a JSON array
using JsonSamples;
using System.Text.Json;

List<PersonWithEnum> list = new()
{
    new PersonWithEnum {
        Name = "John Smith",
        PersonType = PersonTypeEnum.Supervisor
    },
    new PersonWithEnum {
        Name = "Sally Jones",
        PersonType = PersonTypeEnum.Employee
    }
};

JsonSerializerOptions options = new() {
    PropertyNamingPolicy = JsonNamingPolicy.CamelCase,
    WriteIndented = true
};

Console.WriteLine(JsonSerializer.Serialize(list, options));
Type the code shown in Listing 16 into the Program.cs file and run the application to display the following output in the console window.
[
    {
        "name": "John Smith",
        "personType": 3
    },
    {
        "name": "Sally Jones",
        "personType": 1
    }
]
Deserialize JSON into a C# Object
Now that you've seen how to serialize a C# object into JSON, let's look at reversing the process. To illustrate, create a JSON string with the JSON property name that exactly matches the C# property name in the class you wish to deserialize this JSON into. You use the JsonSerializer class (Listing 17) like you did for serializing, but call the Deserialize() method passing in the data type you wish to deserialize the JSON string into and the string itself.
Listing 17: Use the Deserialize() method to convert a JSON string into a C# object
using JsonSamples;
using System.Text.Json;

// JSON names must match
// C# properties by default
string json = @"{
    ""Name"": ""John Smith"",
    ""Age"": 31,
    ""SSN"": null,
    ""IsActive"": true
}";

// Deserialize JSON string into Person
Person? entity = JsonSerializer.Deserialize<Person>(json);

Console.WriteLine(entity);
Type the code in Listing 17 into the Program.cs file and run the application to see the following results displayed in the console window:
John Smith, Age=31, SSN=, IsActive=True
Use Serialization Options
Just like you did when serializing, if the case of the JSON property names doesn't match the C# property names, you may set the PropertyNameCaseInsensitive property to true in the options and pass those options to the Deserialize() method, as shown in Listing 18. Notice that in this listing the JSON property names start with lower-case. If you forget to use the options and the property names have different casing, then no data is mapped from the JSON to the C# object, so an empty object is returned from the Deserialize() method.
Listing 18: Pass in options to control the deserialization process
using JsonSamples;
using System.Text.Json;

string json = @"{
    ""name"": ""John Smith"",
    ""age"": 31,
    ""ssn"": null,
    ""isActive"": true
}";

// Override case matching
JsonSerializerOptions options = new() {
    PropertyNameCaseInsensitive = true
};

// Deserialize JSON string into Person
Person? entity = JsonSerializer.Deserialize<Person>(json, options);

Console.WriteLine(entity);
Deserialize Using the JsonNode Object
Another option for deserializing JSON into a C# object is to use either the JsonNode or the JsonDocument classes. The code shown in Listing 19 uses the JsonNode object to illustrate. The JsonDocument class looks very similar to that of the JsonNode. Type this code into the Program.cs file and run the application to get the same output as you saw in the last example.
Listing 19: Use the JsonNode object to deserialize a JSON string into a C# object
using JsonSamples;
using System.Text.Json.Nodes;
using System.Text.Json;

string json = @"{
    ""name"": ""John Smith"",
    ""age"": 31,
    ""ssn"": null,
    ""isActive"": true
}";

JsonSerializerOptions options = new() {
    PropertyNameCaseInsensitive = true,
};

// Parse string into a JsonNode object
JsonNode? jn = JsonNode.Parse(json);

// Deserialize JSON string into Person
// using the JsonNode object
Person? entity = jn.Deserialize<Person>(options);

Console.WriteLine(entity);
Deserializing Enumeration Values
If you know that the JSON object is going to have the string representation of a C# enumeration, set the Converters property to a new instance of the JsonStringEnumConverter class in the JsonSerializerOptions object, as shown in Listing 20. If you forget to include the Converters property on the JsonSerializerOptions, a JsonException is thrown.
Listing 20: If you use enumerations, be sure to include the JsonStringEnumConverter in the serialization options
using JsonSamples;
using System.Text.Json.Serialization;
using System.Text.Json;

string json = @"{
    ""name"": ""John Smith"",
    ""personType"": ""Supervisor""
}";

JsonSerializerOptions options = new() {
    PropertyNameCaseInsensitive = true,
    // Avoid an exception being thrown on Deserialize()
    Converters =
    {
        new JsonStringEnumConverter()
    }
};

// Deserialize JSON string
PersonWithEnum? entity = JsonSerializer
  .Deserialize<PersonWithEnum>(json, options);

Console.WriteLine(entity);
Type the code shown in Listing 20 into the Program.cs file and run the application to see the following output appear in the console window:
John Smith, Type=Supervisor
Convert JSON File to a Person Object
Right mouse-click on the JsonSamples console application and create a new folder named JsonSampleFiles. Right mouse-click on the JsonSampleFiles folder and add a new file named person.json. Place the following JSON object into this file:
{
    "name": "Sally Jones",
    "age": 39,
    "ssn": "555-55-5555",
    "isActive": true
}
Open the Program.cs file and replace the contents of the file with the code shown in Listing 21. In this sample, you're using a FileStream object to open the file and stream it to the Deserialize() method. Thus, you should use the Using statement in front of the FileStream declaration so it will be disposed of properly.
Listing 21: Read a JSON file and convert the JSON object in the file into a C# object
using JsonSamples;
using System.Text.Json;

string fileName = $"{AppDomain.CurrentDomain.BaseDirectory}
  JsonSampleFiles\\person.json";

using FileStream stream = File.OpenRead(fileName);

JsonSerializerOptions options = new() {
    PropertyNameCaseInsensitive = true,
};

// Deserialize JSON string into Person
Person? entity = JsonSerializer.Deserialize<Person>(stream, options);

Console.WriteLine(entity);
Run the application and you should see the following output displayed in the console window:
Sally Jones, Age=39, SSN=555-55-5555, IsActive=True
Convert a JSON Array in a File to a List of Person Objects
Right mouse-click on the JsonSampleFiles folder and add a new file named persons.json. Place the following JSON array into this file:
[
    {
        "name": "John Smith",
        "age": 31,
        "ssn": null,
        "isActive": true
    },
    {
        "name": "Sally Jones",
        "age": 39,
        "ssn": "555-55-5555",
        "isActive": true
    }
]
Open the Program.cs file and type in the code shown in Listing 22. This code is almost the same as the code you wrote to deserialize a single person object; the only difference is that you pass the data type List<Person> to the Deserialize() method. Once you have the collection of Person objects, iterate over the collection and display each person on the console window.
Listing 22: Read an array of JSON objects from a file and convert to a list of person objects
using JsonSamples;
using System.Text.Json;

string fileName = $"{AppDomain.CurrentDomain.BaseDirectory}
  JsonSampleFiles\\persons.json";

using FileStream stream = File.OpenRead(fileName);

JsonSerializerOptions options = new() {
    PropertyNameCaseInsensitive = true,
};

// Deserialize JSON string into List<Person>
List<Person>? list = JsonSerializer
  .Deserialize<List<Person>>(stream, options);

if (list != null) {
    foreach (var item in list) {
        Console.WriteLine(item);
    }
}
Run the application and you should see the following output displayed in the console window:
John Smith, Age=31, SSN=, IsActive=True
Sally Jones, Age=39, SSN=555-55-5555, IsActive=True
Get Maximum Age from List of Person Objects
After reading in a list of objects, you may now use LINQ operations or any Enumerable methods such as Min, Max, Sum, and Average on that list. In the code shown in Listing 23, the Max() method is applied to the list and the maximum value found in the Age property is displayed on the console window. When you run this application, the value reported back should be thirty-nine (39).
Listing 23: After deserializing a list of person objects, apply the Max() method to calculate the largest numeric value
using JsonSamples;
using System.Text.Json;

string fileName = $"{AppDomain.CurrentDomain.BaseDirectory}
 JsonSampleFiles\\persons.json";

using FileStream stream = File.OpenRead(fileName);

JsonSerializerOptions options = new() {
  PropertyNameCaseInsensitive = true,
};

// Deserialize JSON string
List<Person>? list = JsonSerializer
  .Deserialize<List<Person>>(stream, options);

// Calculate maximum age
int maxAge = list?.Max(row => row.Age) ?? 0;

Console.WriteLine(maxAge);
Using the Utf8JsonWriter Class
The Utf8JsonWriter class is a high-performance, forward-only, non-cached method of writing JSON documents. Just like with serialization, you can control the output of the JSON to include white space, and indentation. Listing 24 shows how to write a single JSON object into a MemoryStream object. Note that both the MemoryStream and the Utf8JsonWriter objects implement the IDisposable interface, so you need to prefix them with the Using statement. You must start each JSON document by calling the WriteStartObject() or the WriteStartArray() method. You then call the appropriate method to write a string, a number, a Boolean, a null, or a comment. Finally, call the WriteEndObject() or the WriteEndArray() method to close the JSON document.
Listing 24: The Utf8JsonWriter object is a forward-only cursor for emitting JSON quickly
using System.Text.Json;
using System.Text;

JsonWriterOptions options = new() {
  Indented = true
};

using MemoryStream ms = new();
using Utf8JsonWriter writer = new(ms, options);

writer.WriteStartObject();
writer.WriteString("name", "John Smith");
writer.WriteNumber("age", 31);
writer.WriteBoolean("isActive", true);
writer.WriteEndObject();
writer.Flush();

string json = Encoding.UTF8.GetString(ms.ToArray());

Console.WriteLine(json);
Type the code shown in Listing 24 into the Program.cs file and run the application to display the output shown below in the console window:
{
    "name": "John Smith",
    "age": 31,
    "isActive": true
}
Write a JSON Array
As just mentioned, you may also write a JSON array of data using the Utf8JsonWriter class. The only difference is that you start writing using the WriteStartArray() method, and then call the WriteStartObject() method to create your first JSON object in the array. You then continue this process until all your array elements are written. Finish the JSON array document by calling the WriteEndArray() method, as shown in Listing 25.
Listing 25: The Utf8JsonWriter object can write arrays as well as single objects
using System.Text.Json;
using System.Text;

JsonWriterOptions options = new() {
  Indented = true
};

using MemoryStream ms = new();
using Utf8JsonWriter writer = new(ms, options);

writer.WriteStartArray();
writer.WriteStartObject();
writer.WriteString("name", "John Smith");
writer.WriteNumber("age", 31);
writer.WriteBoolean("isActive", true);
writer.WriteEndObject();
writer.WriteStartObject();
writer.WriteString("name", "Sally Jones");
writer.WriteNumber("age", 39);
writer.WriteBoolean("isActive", true);
writer.WriteEndObject();
writer.WriteEndArray();
writer.Flush();

string json = Encoding.UTF8.GetString(ms.ToArray());

Console.WriteLine(json);
Type the code shown in Listing 25 into the Program.cs file and run the application to display the output shown below in the console window:
[
    {
        "name": "John Smith",
        "age": 31,
        "isActive": true
    },
    {
        "name": "Sally Jones",
        "age": 39,
        "isActive": true
    }
]
Summary
In this article, you were introduced to the many different classes in .NET that are used to manipulate JSON documents. If you need fast, read-only access to JSON documents, the JsonDocument class is what you should use. If you need the ability to modify JSON in your application, use the JsonNode class. Serialization is accomplished using the JsonSerialization, JsonDocument, or the JsonNode classes. When you're dealing with configuration files such as the appsettings.json file in your application, take advantage of the IConfiguration interface and the ConfigurationBuilder class. Finally, to write JSON documents one name/value pair at a time, the Utf8JsonWriter class gives you the most control over how your document is formatted.
Table 1: JSON has a limited set of data types available for a value.
| Data Type | Description |
|---|---|
| Number | A signed number value. The number may be a whole number (integer) or a decimal with a fractional part. |
| String | A set of zero or more Unicode characters enclosed within double quotes. Strings support a backslash escaping syntax just as you find in C#. |
| Boolean | Either a true or a false value. |
| Object | A JSON object using the JSON object syntax previously explained. |
| Array | A set of zero or more values using the JSON array syntax previously explained. Each element within the array may be of any of the types shown in this table. |
| Null | Use the keyword null to signify an empty value for this name. |
Table 2: The System.Text.Json namespace contains classes and structures for manipulating and serializing JSON objects
| Class / Structure | Description |
|---|---|
| JsonDocument | A class that represents an immutable (read-only) document object model (DOM) of a JSON object. Use this class when you don't have a C# class to deserialize the JSON into and you need to access the name/value pairs programmatically. |
| JsonProperty | This structure represents a single JSON property within a JSON object. For example, "colorId": 1 is an example of a JsonProperty. |
| JsonElement | This structure represents a single value within a JSON property. For example, the number one (1) within the property "colorId": 1 is the JsonElement. |
| JsonSerializer | A class used to serialize a JSON string into a C# object, or to deserialize a C# object into a JSON string. |
| Utf8JsonWriter | A class that can be used to emit a JSON document one property at a time. This class is a high-performance, forward-only, non-cached method of writing UTF-8 encoded JSON text. |
Table 3: The System.Text.Json.Nodes namespace contains classes for manipulating in-memory JSON objects as a document object model
| Class | Description |
|---|---|
| JsonObject | This class represents a mutable (read/write) JSON document. This class is like the JsonDocument class from the System.Text.Json namespace. |
| JsonNode | This class represents a mutable (read/write) node within a JSON document. This class is like the JsonProperty class from the System.Text.Json namespace. |
| JsonValue | This class represents a mutable (read/write) JSON value. This class is like the JsonElement class from the System.Text.Json namespace. |
| JsonArray | This class represents a mutable (read/write) JSON array. |
