Launch browser. Enter username password. Log in. Done. How hard could it be? This is a challenge I run into when I talk about security and identity. My demos are so boring, because after all that jazz, you see “Hello username” written in Times New Roman. It really punctures the demo, doesn't it?
As it turns out, authentication can be quite involved. And it's still evolving every day because this boundary to your application is under duress, constantly, and our enemies are getting smarter. That's what this article is about. And although I'll talk generically and stick to general concepts, I'll use Azure AD as an example.
A Long Time Ago
A long time ago when the internet was nascent, we used a text-based browser called Lynx. There were other mechanisms to access information on the internet too. There was this protocol called SMTP, which is still widely used today. Did you know that SMTP existed basically as an unauthenticated protocol for almost three decades? All it took was understanding the protocol and Telnetting to the SMTP server, and you could send email as anyone. Boy, did I have some fun with that.
I used to wonder, how could this be so simple? I could set up three email addresses, A, B, and C. A forwards to B and C. B forwards to A and C, and C being the email address. Now, I could just initiate an unauthenticated email to A, and C will get overwhelmed by email messages causing old-style DDOS (distributed denial of service), and you know what? It worked. This is how insecure the internet used to be not too long ago. Frankly, with a slight modification, you could defeat inboxes even today.
This is what keeps me up at night. The internet, still, feels very flimsy, and thanks to my unimpressive demos, almost nobody cares about security in a project. It's all about deadlines and features, and security is just an inconvenience to get past.
A very long time ago, we invented an authentication protocol called basic authentication. This was just sending the username password over the wire in a header. We tried to secure it using HTTPS, but plenty of governments and organizations can sniff HTTPS traffic as a man-in-the-middle. So we came up with NT Lan Manager version 1 (NTLMv1), which was easily defeatable. Followed by NTLMv2, which was better and is still in wide usage today but has plenty of shortcomings. And perhaps the most common legacy protocol in widespread use today is Kerberos. Kerberos relies on a central authority and plenty of network chit chat, so it didn't scale to the internet.
As these dinosaur protocols roamed the earth, a meteorite called the internet came by to spoil their party. Organizations tried to solve the puzzle by using VPNs and trust relationships between active directories, but you can't survive a direct hit from a meteorite like the internet. Well, to be precise, some dinosaurs survived. I mean we still have crocs and gators around us, right? Kerberos still has a place on your intranet. But we needed something different, something that focused on the internet.
WS-Fed and SAML
In the early 2000s, the WS-* standards started taking shape. One of these was WS-Fed, and with it came SAML, security assertion markup language. SAML is an XML packet format. In the early 2000s, accessing the internet was either through a website, i.e., a browser on your desktop, or via protocols such as FTP, Telnet, etc. It became clear that websites could offer value if we found a secure way for users to log in.
A post and redirect-based standard emerged, called WS-Fed. At a very high level, it separated the responsibility of the IdP (or identity provider), the entity that performs authentication, and the RP (or relying party), also known as service provider, which is the application you're trying to access. The RP trusted the IdP and this trust was established using certificates. The idea was that the user lands on the RP, and the RP says, “hey, you aren't authenticated, so please go here to prove who you are.” The user could optionally be given more than one choice of an IdP. The user goes to the IdP, proves who they are (via credentials such as username password or more), and the IdP sends back a SAML packet with enough information about the user that the RP can use to establish identity and proceed.
This “enough information” is the attributes about the user, also known as claims.
WS-Fed served us well for many years. One of the products that used it was SharePoint. As time progressed, the demands of applications increased. For instance, they expanded who could initiate an authentication. If the RP initiates an authentication, can it request specific claims in specific situations?
Over time, a new protocol called SAML 2.0 was developed. Hold on for second there. I thought SAML was a packet format? Well yes, it is a packet format, and a protocol. SAML 2.0 is a protocol, which also uses SAML assertions (fancy name for packets) to perform the authentication dance.
SAML has served us well for many years. These days if someone says, “hey we use SAML-based authentication,” they're probably talking about SAML 2.0. SAML is still in use in many enterprises, but SAML is designed for the web. Now it's been shoe-horned into other scenarios, such as mobile, but it was never designed for mobile.
I should note that whenever we talk about authentication and its history, you'll hear dissenting voices. You will find some very smart person explain how SAML works perfectly fine for mobile apps. Sigh! You can also row to Japan in a little boat, but that doesn't mean it's a good idea. (For my readers in Japan, just row to Hawaii instead.)
The World Today
A few years back, Steve Jobs took the stage and released a pocket-based device that was an internet communicator, web browser, and phone all rolled into one device, called the iPhone. Years later, Tim Cook calls the same tired design an “all new design” for the last 10 years in a row. But the iPhone was revolutionary. Google shortly thereafter came up with another very capable platform called Android. And Microsoft give it a good college try with Windows Phone. Whichever way you looked, the world had changed. Just think of all you did on your phone in the last week. Did you order food? Did you order a cab? Did you share your location? Take pictures? What websites did you visit and how many times did you sign in?
We take the simplicity of it for granted, but when I check my security camera with Siri, a lot happens.
First, AI recognizes my voice and the command I issue. More importantly, it differentiates me from some other person. Then, an authenticated request goes from my phone to the cloud and bounces across numerous servers in the cloud, which are not all controlled by the same vendor. The request then lands on my security camera, which then sends a secure feed to the cloud, which is then streamed securely to my screen, all the while making sure I'm authenticated and the stream for me is viewed by me, so I can answer the doorbell and receive the pizza I ordered on another app, talking to another system.
There is a lot at play here, but let's break it down in authentication terms.
First, the action from Siri talks to an app on my phone which securely communicates using my identity to a cloud-based service. This means that the app has a secure way of remembering my identity. And apps must use a consistent mechanism because we cannot rely on every app reinventing the wheel.
That cloud-based service needs to communicate to various nodes, sometimes to get a secret, sometimes to get some configuration. Here we have an example of server-to-server communication not done under the user's identity. Additionally, all the infrastructure powering those containers needs to be tracked, paid for, patched, upgraded, etc. All that has its own layers of security and identity.
Then the request comes from there to my camera. Here, a bunch of network boundaries must be crossed. Also the camera's identity must be confirmed. There's an IoT device proving its identity to the cloud and the cloud making sure this identity matches with a camera on my account.
Then a stream is sent to my phone and my mobile device should somehow receive data securely, so we have transport layer security (TLS) at play, my device's identity, and my identity in play.
You see, the world is a lot more complex than a web app redirect can handle.
Meanwhile, a delegation protocol called OAuth emerged, mostly pushed by social media companies with very poor intentions. OAuth meant that I'm allowing website A to do X on my behalf based on an identity proven by website B. The word “website” could be replaced by any technology. The problem is that to do X, A requests all sorts of permissions from B. And people would just say “Okay” and click so they could participate in an internet fight.
One concern about X is that we'd like to know the user's identity. So this delegation protocol effectively ended up being used as an authentication protocol. The problem is that nobody agreed on which claim establishes the user's identity. Also OAuth 1 was horrendously complex because it didn't bake in the requirement of HTTPS.
The world then agreed that we needed something better and OpenID Connect (OIDC) emerged. OIDC was OAuth + standards. The world agreed that we will have certain kinds of tokens, certain kinds of endpoints, and certain minimum claims in tokens to qualify to be OIDC-compliant. Additionally, the world agreed on certain flows/grants to support scenarios, such as mobile apps, web apps, etc.
And this is where we are today.
A Peek into the Future
Okay, let's take a little diversion and talk about the future before I return to talking about the main theme of this article, which is OIDC and Web App authentication. OIDC is maturing every single day. As new threats and scenarios emerge, a lot of smart people collaborate and improve upon OIDC. There are some interesting new standards emerging that you can expect to see in the future.
You have proof of possession that will protect tokens from being exfiltrated. To be precise, an exfiltrated token will be useless because the server can verify that it didn't come from the original issuer.
Conditional access evaluation (CAE) allows the IdP to inform RPs that an access token is now invalid due to revocation at the server. The problem is that access tokens are usually valid for a short but too long duration. Short because it isn't days or months. Too long because the typical 30 minutes to two-hour duration is far too long for many scenarios. CAE bridges that problem allowing RPs to know if an access token, while still valid, belongs to an invalid user.
Step up authentication is great for scenarios where an elevated action or anomaly detection can cause the user to reauthenticate with a higher strength factor to continue. This is a very good compromise between convenience and security.
Verified credentials are essentially credentials the user controls, but that originate from an attesting authority. For example, you could create a VC based on your driver's license, but the credential and the various attributes are yours to keep and secure. They are proven via a distributed technology such as blockchain. And you're the owner of that identity, so next time someone asks you to prove if you are over 21 years of age, you can share only that information instead of sharing your address, eye color, height, weight, etc.
Broker-based authentication is another emerging standard in the Microsoft space. Brokers involve some executing code on your computer, typically very secure and built into the OS, that can back a primary refresh token to secure hardware. This means that they can use a primary refresh token to ask for access tokens for more than one audience, giving the user the convenience of single sign on across a family of apps and also giving the user greater security.
A Speedy OIDC Tutorial
Treat this section as the bare minimum you need to know about OIDC and it's intentionally incomplete. There are three things you need to know about OIDC: tokens, endpoints, and grants.
Tokens
In OIDC, among other tokens, there are three main tokens you need to know about. These are issued by the IdP to the RP.
The first is an ID token. An ID token establishes the user's identity. The token is signed by the server (IdP) and its veracity can be verified by the RP. The ID token contains a bare minimum set of claims in a standard format. No matter what IdP issues an ID token, you know that there's a standard mechanism of verifying it, and a standard claim you need to look at to know the user's identity. Once the app receives an ID token, it “logs the user in.” The exact definition of login depends on the kind of application and platform. For instance, a web-based app may establish a web-based session. A mobile app, on the other hand, could use a different approach.
An access token is what you use to establish the identity of a user or process to an API. The access token is also issued by the IdP and it also can be verified by the RP, in this case, the API, for veracity and there are standard claims in an access token that help the API establish the caller's identity and the validity of the access token. The access token is valid for a short duration. Although the OIDC standard doesn't mandate a specific duration, it's typical to see access tokens between 30 minutes to two hours, although plenty of exceptions exist. For example, Azure AD-managed identity access tokens are valid for 24 hours.
Because an access token is of a shorter duration and you don't want to show the log in UI to the user every single time the user logs in, you're given another kind of token called the refresh token. A refresh token, typically an opaque string, can be used to request new access tokens. Usually, you'll ask for a new access token when the old access token is about to expire. This is so that the user sees an uninterrupted experience and isn't shown a log-in UI when, from the user's perspective, they never logged out. A refresh token also allows you to use the user's identity when the user isn't present. This is why you ask for a specific scope, called offline_access, to request a refresh token.
Endpoint
There are many endpoints in OIDC. There is one where you discover the OIDC configuration of an IdP. There's another where you can get the signing keys from. There's another that you can use for introspection, which is evaluating a token just in time by sending it back to the IdP. And yet another for a special flow called device code flow.
But there are two key endpoints that you must know about: the authorize endpoint and the consent screen.
The authorize endpoint is where the user proves who they are (via entering a password or doing MFA or FIDO2 etc.) and the user consents to whatever the requesting application needs. In the case of Azure AD, this endpoint is at this URL: https://login.microsoftonline.com/{tenant}/oauth2/v2.0/authorize.
The {tenant} is either the name or GUID tenantID of the tenant. For example, Microsoft Corp's tenant is at microsoft.onmicrosoft.com, so you can try visiting https://login.microsoftonline.com/microsoft.onmicrosoft.com/oauth2/v2.0/authorize to see what Azure AD does. You should get an error saying that a client_id was not present. Well, that makes sense. The client_id is the unique ID of the application you're trying to sign into. With no application ID and no sign in, you're given an error.
The other screen you'll see after you've proven your identity is the consent screen. For example, you can see the consent screen for graph explorer (aka ms/ge) in Figure 1.
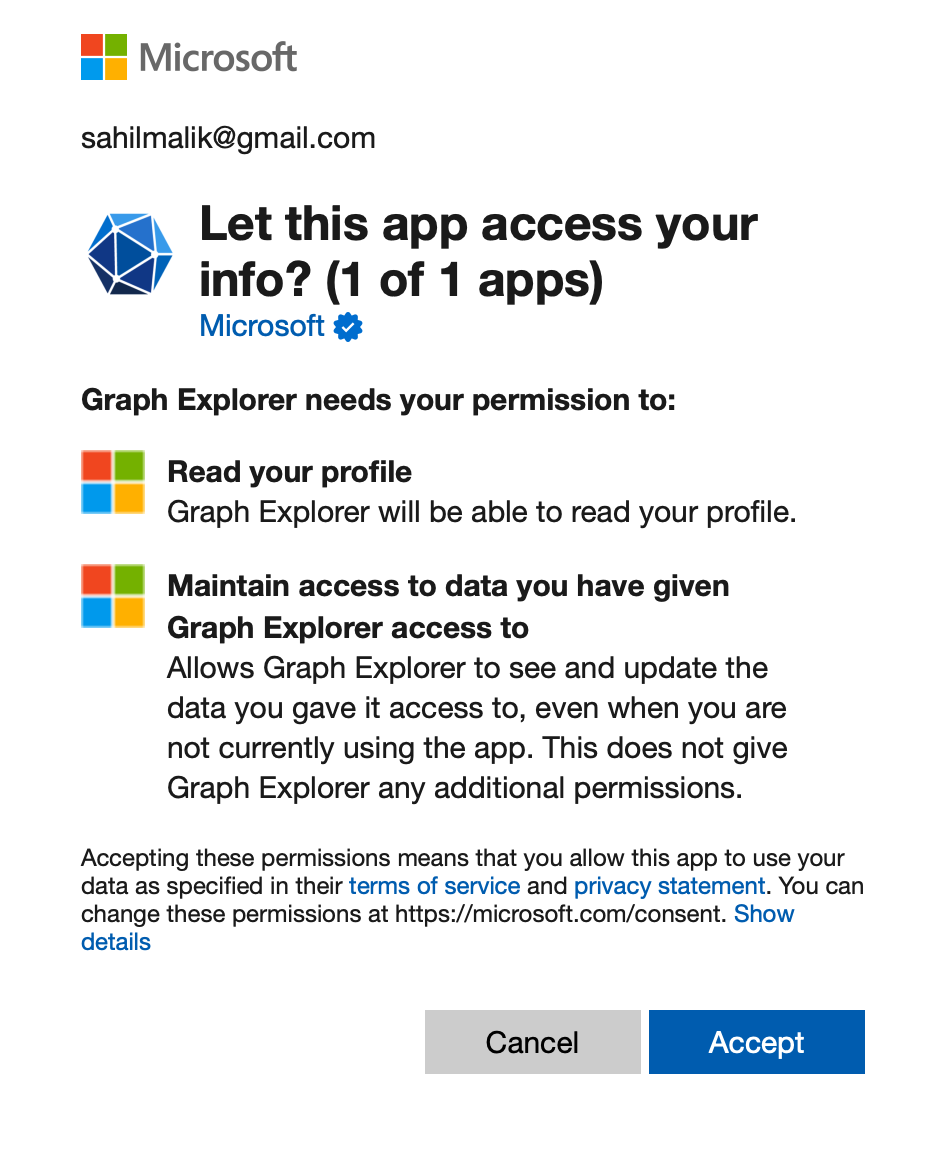
Certain permissions require you to be an administrator. Tenants are frequently configured by tenant admins so that average (non-admin) users cannot grant consent. Or you may have custom consent policies where certain kinds of consents can be granted by the average user, and others need approvals. Consent, as you can imagine, is a primary way that information leaks out to third parties. All it takes is to download an app from an Appstore and grant consent where you shouldn't have. It's no surprise that, over the years, Microsoft has invested and built a lot of thought, process, and features to lock this facility down.
The other endpoint you need to know about is the token endpoint. The token endpoint for Azure AD is at this URL: https://login.microsoftonline.com/{tenant}/oauth2/v2.0/token.
Usually, this isn't an endpoint that the user interacts with. But the application issues a POST request here, and exchanges one kind of token, such as an auth_code, for an ID token, refresh token, or access token. This, of course, depends on the grant type in use, which is the next thing you need to know about.
Grants
OIDC is a standard, or, more accurately, an umbrella of standards. It's designed to support many kinds of applications. For example, it can support single page applications, or web applications, or mobile apps, etc.
Here are some important grant types you should be familiar with.
Implicit Grant was designed for single page application (SPA) kinds of applications. It relied on a hidden iframe to renew an access token. This meant that the RP at
www.yourrp.comis making requests on a hidden iframe tologin.microsoft.com, which is the IdP. Modern browsers block this because this request looks shockingly like a tracker. Safari was the first browser that blocked this and now all modern browsers do. As a result, this flow is no longer recommended, and you should use auth code with PKCE instead.Authorization code grant provides a way to retrieve tokens on a back channel as opposed to the browser's front channel. It also supports client authentication. This means that after you prove your identity, you get a one-time use auth code, which you use to exchange for an ID token, refresh token, or access token. You can certainly use this grant type on its own, but it's common to combine it with identity tokens, which turns it into the so-called hybrid flow. Hybrid flow gives you important extra features, like signed protocol responses.
Hybrid grant is a combination of the implicit and authorization code flow - it uses combinations of multiple grant types. Usually in an auth code grant, you ask for a code. Here you can ask for multiple token types, typically code id_token. This means that the IdP returns both the code and id_token in one request response. This is great for applications that don't need to call an API. Effectively, they skip an extra hop to the IdP in the log-in process because they no longer have to exchange the code for an ID token. The back channel can still be used to retrieve the access and refresh token. In hybrid flow, the identity token is transmitted via the browser channel and contains the signed protocol response along with signatures for other artifacts like the authorization code. This mitigates a number of attacks that apply to the browser channel.
Client credentials grant is the simplest grant type and is used for server-to-server communication. The tokens never have a user identity, and requesting a token is a matter of a POST request to the token endpoint with the client ID and a credential (secret or a derivation of a certificate). The return is always an access token, and never a refresh token. Also, because this is server-to-server, and there's no user interface, there's no opportunity to do consents, so all consents must be done ahead of time.
Resource owner password (ROPC) grant allows you to request tokens on behalf of a user by sending the user's name and password to the token endpoint. You can imagine why this is a bad idea. It gets past many conditional access policies, it thwarts many security protections, and the app gets to know the user's password. I've been in so many meetings where someone insisted they must have this because it allows them to own the native UI for the log-in experience. I try very hard to discourage anyone from using this grant type.
Device flow grant is designed for input-constrained devices, where the device is unable to securely capture user credentials. This flow shows you a code, which you use to sign into a different, more capable device. This flow is typically used by IoT devices and can request both identity and API resources. I'm not a fan of this grant type because authentication is being performed on a device that's different from the device where the tokens are sent. This means that all protections apply on a device, one that is different from the device where tokens are sent, effectively defeating many of those protections.
I also see this particular flow being misused way more than it should. I see numerous desktop applications and lazy developers making up for shortcomings of their architecture by piggybacking this flow. In fact, I've literally seen some major applications where they give you a code, you authenticate somewhere else, they show you an access token, that you are required to copy paste somewhere else. I'm not going to name this application, but you know who you are and you suck. Your first sin is using device code where you didn't have to. Your second sin is to show the access token as plain text to the user. Your third sin is to allow the access token to move from device to device and still be valid. Anyway, I'm getting carried away.
- Refresh tokens allow gaining long-lived access to APIs, also known as offline_access. Access tokens are valid for a short duration. To prevent showing the user a log in screen over and over again, you can ask for a refresh token. Then, using the refresh token, you can ask for new access tokens. This allows you to retrieve new access tokens on a back-channel call without bothering the user. In fact, the user can log off and go home.
There's one important consideration: The IdP can revoke a refresh token at any time. In such a circumstance, you'll need to ask the user to log in again and request a new refresh token. This happens rarely, but it's something your architecture must accommodate.
Web App Authentication
Oh my, so much background. I'm sure you are itching to see some code, some action, right? Well, if you skipped all the background above, please go back and read it. It took me a good five hours to write it, but it has taken me years to learn it, and then try to squeeze the message into such a tight space.
With that behind us, now let's see a web application signing in using OIDC, and truly understand how things work behind the scenes.
The first thing any IdP, Azure AD or otherwise, needs to know is which application requires authentication services. This is a matter of visiting the Azure AD blade in portal.azure.com and creating a new app registration.
Okay, hold on for a second. I thought Azure AD was renamed to EntraID or something like that? Because it's just a product rename, you can search and replace “Azure AD” with “Entra ID” in this article and everything will still be valid. In fact, you can follow along these instructions in entra.microsoft.com and the steps are nearly identical. I'm sure these stories may diverge in the future, but that's the story today.
Now, back to “new app registration.” Go ahead and create a new app registration, as shown in Figure 2.
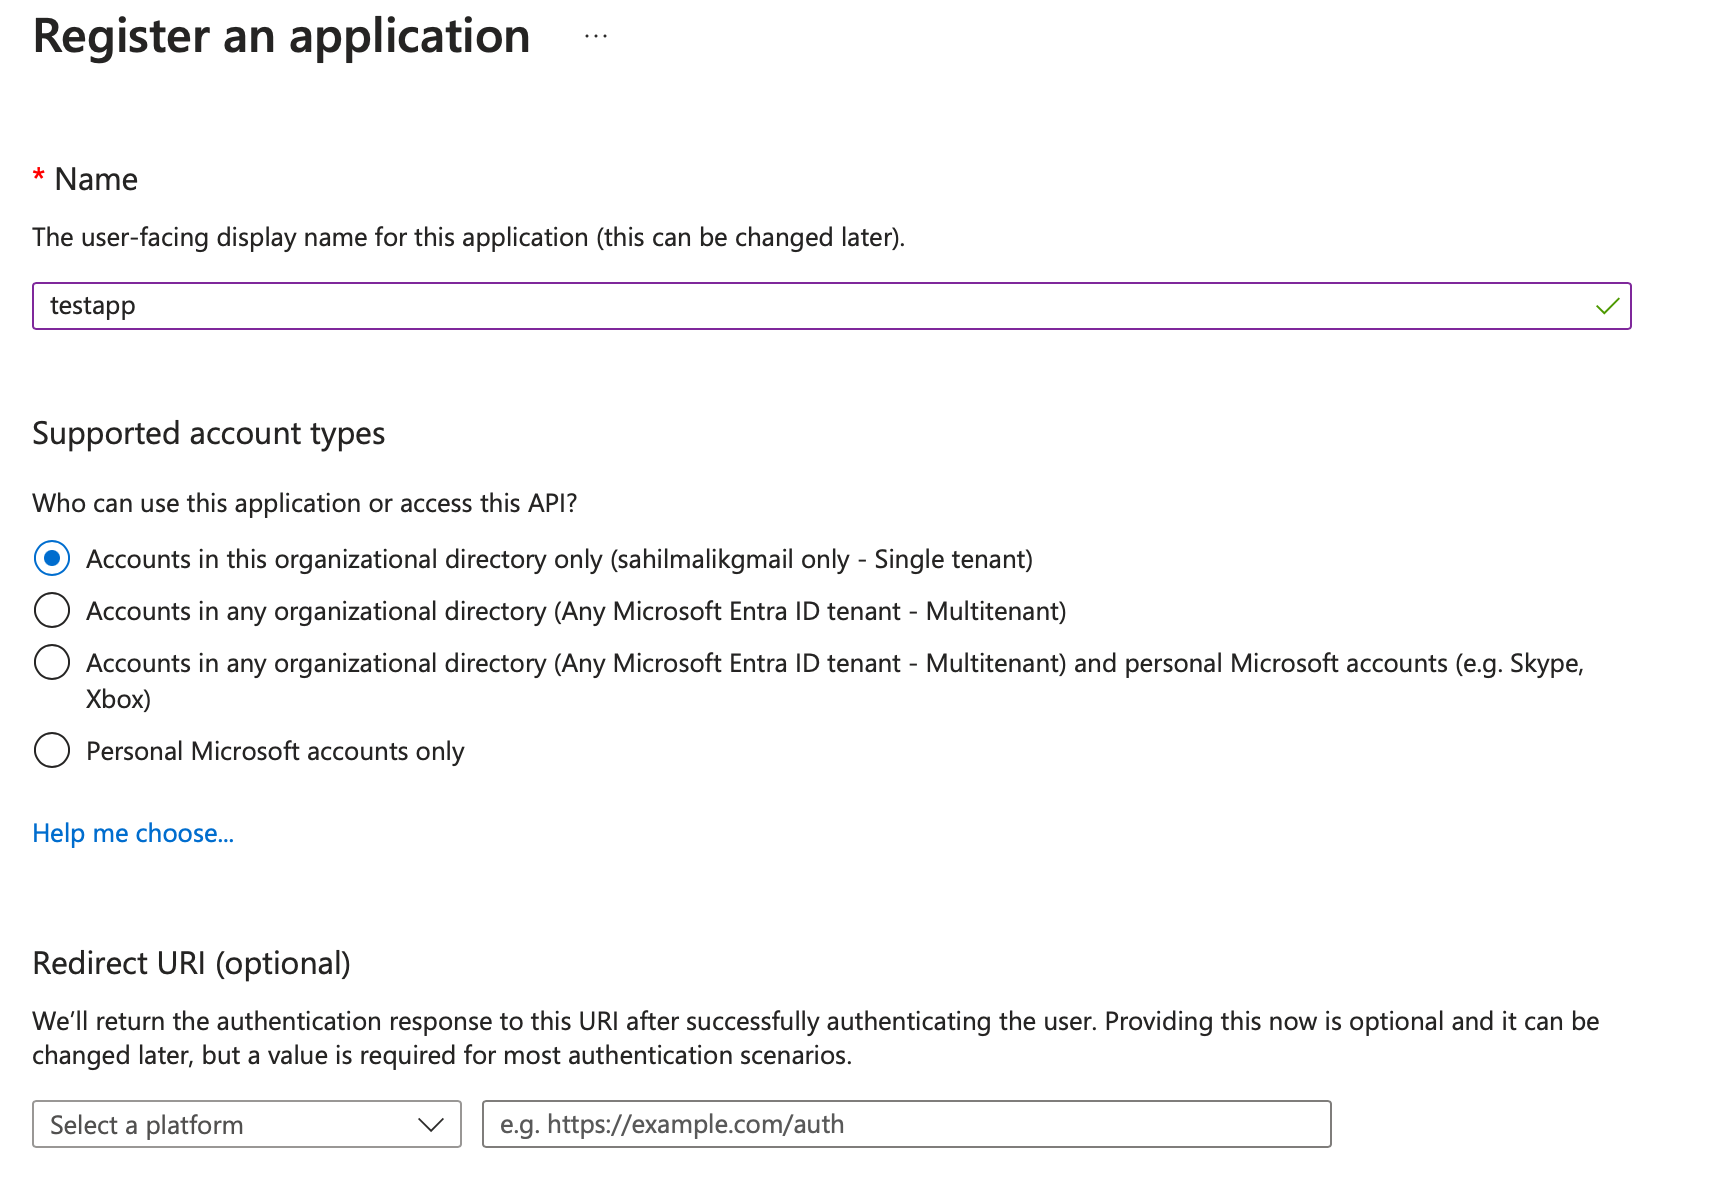
There are a number of interesting things going on this screen. First is the name of the app, which is what the user sees. So you should write something descriptive, like “Timesheet app” or “HR system” etc.
Next is the supported account types section. This is a Microsoft-specific concept. You may find other equivalents in other IdPs. Azure AD has tenants, you have a tenant, I have a tenant, Microsoft has a tenant. Some orgs may have more than one tenant. A tenant is sort of like my home: I get to decorate it with the policies that suit me the best. This may be login-page customization, what IdPs I federate to, and much more.
When picking a single tenant app, you're effectively saying “I'm writing an app that will be used by only my organization.”
When picking a multi-tenant app, you are effectively saying “I'm writing an app that will be used by users of my organization, and users of other organizations with Azure AD accounts.” This means that the other organization's admin or users must consent to using the app for any permission, even the most basic User.Read permission. When such a consent is given, a shadow, or to be precise, a service principal of your app registration shows up in the other tenant. This way, you manage the app going forward, but the other tenant is able to use the app in addition to your tenant. Any changes to consent policies will need to be re-approved.
Finally, you can allow Microsoft accounts in addition to multi-tenant scenarios to log in. Microsoft accounts, also known as personal accounts, are a special kind of account Think of it as a mega Azure AD tenant with plenty of exceptions. So many things you'd expect to see working for organizational accounts won't work for Microsoft accounts.
For now, let's leave it as single tenant.
At the very bottom of Figure 2, you'll also see an option to add a redirect URI. Not all app types require a redirect URI. A redirect URI is a whitelisted safe URI, to which Azure AD will send tokens. This has to be a whitelisted safe URI because you don't want those tokens landing at the wrong recipient. But grant types such as client credential grants or APIs don't need redirect URIs. Additionally, the format of a redirect URI for a web app could be different from a mobile app, could be different from a native app. For now, let's leave it blank and proceed.
With the settings done, click on “Register.”
After clicking register, you're brought to a page that lets you manage the app registration. At the top, you'll see a few GUIDs. These can be seen in Figure 3.
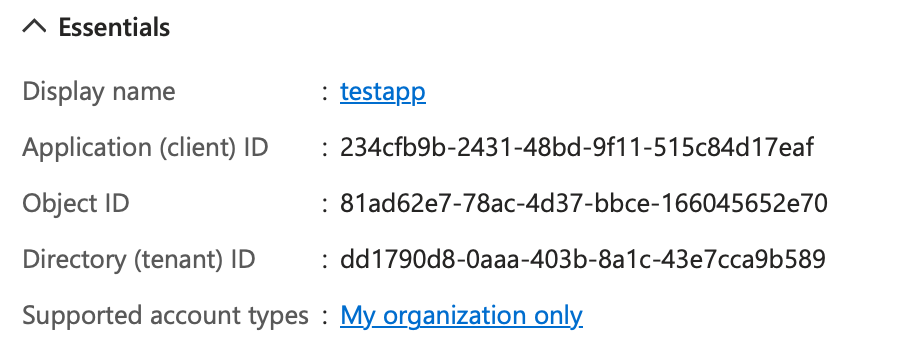
The Client ID, sometimes also referred to as AppID, is the unique identifier for my app. ObjectID is the Azure AD-generated unique identifier for Azure AD purposes. This follows good database design principles, where you don't want to use a primary key that has business meaning. The tenant ID is the GUID that represents your Azure AD tenant. As you'll see shortly, you'll need the client ID and tenant ID in the log-in process.
Now you have multiple ways to get started. The app registration can support multiple kinds of apps. Let's say that you wish to support a web-based app. You can either choose to go the “Quickstart” route and set up everything easily or you can click on the “Authentication” blade route and set up everything manually. You can also set up things via Azure CLI, PowerShell, or MS Graph.
No matter how you set things up, the end result is the same. I'll use the Quickstart route and show the end results. You can hand-configure it via the Authentication blade if you wish, as well.
Click on Quickstart and choose Web application. The next screen asks you to pick the platform you'd like to write your web app in. Azure AD endpoints are OIDC compliant, so it doesn't matter which client-side technology you use to write your web app. But certain platforms have MSALs (Microsoft authentication libraries) available to make your job easier. Also, certain platforms have a more mature MSAL compared to others. Any guesses about which MSAL is the most mature?
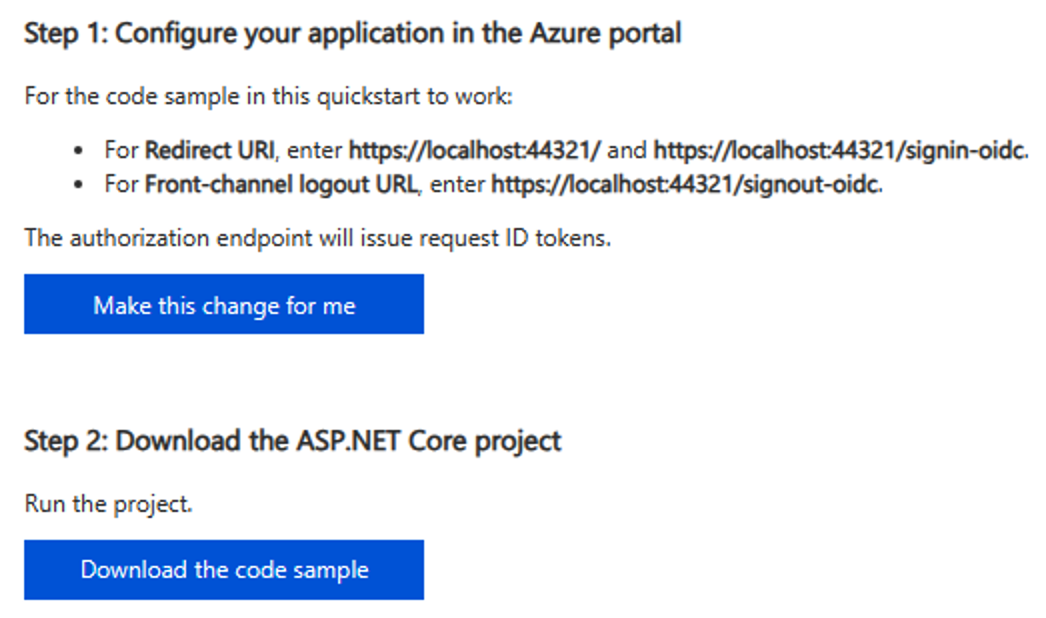
I'll pick ASP.NET Core for this article. The next screen is interesting. It'll ask you to make some changes to your app registration and to download a preconfigured code example. The changes are to add a redirect URI. This URI needs to match what your app is listening on. The second change is a front-channel logout URI. This is the URI at which Azure AD will redirect after a log out is complete. Log out in modern authentication can get interesting. A log out from your app needs to clear the session between your app and the browser, but you also need to clear the session between AAD and the browser. So either your app redirects to AAD or AAD redirects to the app, once the former has finished clearing the session.
Go ahead and click the “Make this change or me” and choose to download the sample, as seen in Figure 4.
As you make this change, you'll notice something interesting in a pop over. The app is also enabling hybrid flows, as can be seen in Figure 5.
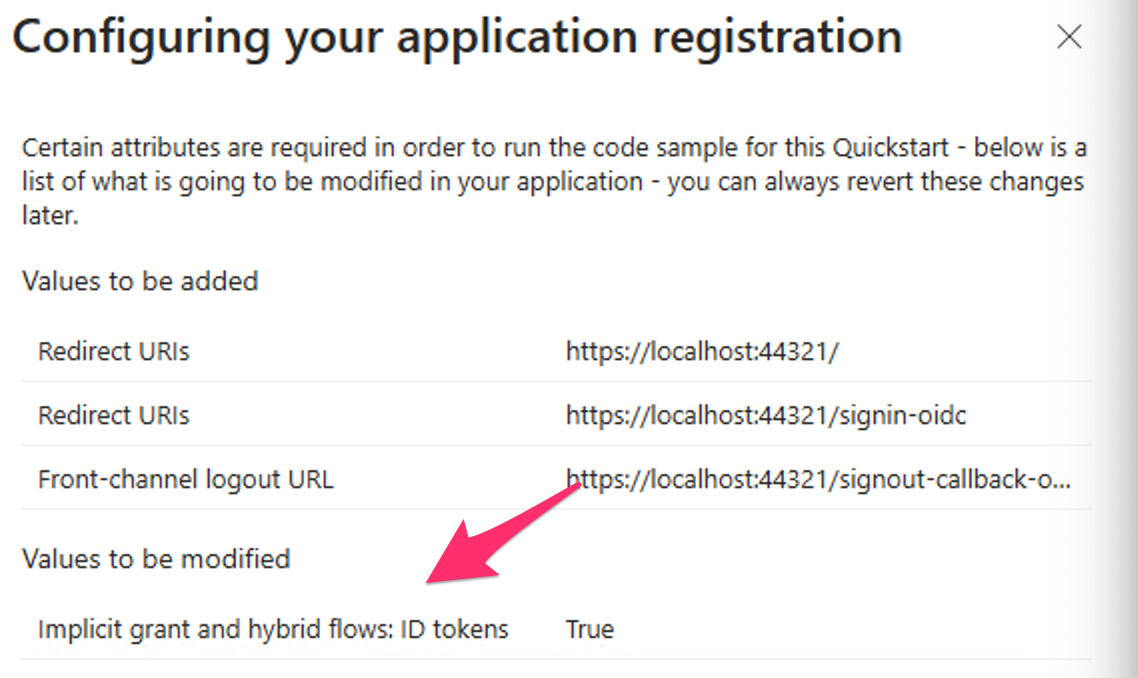
Although enabling hybrid flows is strictly not necessary, for pure log-in scenarios, i.e., where you don't wish to call APIs, it avoids a server hop. You'll see how this looks at protocol level shortly.
Next, after you've downloaded the code sample, unzip it, and open it in VSCode or Visual Studio. I assume that you have your local computer set up for .NET development.
Also, lets briefly look at the changes made to your app registration. In a new tab, visit your app registration, and look under the authentication blade. You'll note that the Quickstart added the redirect URIs, the front-channel log-out URI, for you. Additionally, it checked the checkbox for ID tokens under hybrid flows.
You could have done all this manually too. In fact, when you move this app to production, you may want to remove the localhost redirect URIs and change them to a production URL.
Now let's focus on the code. The downloaded code is written in .NET Core. Different languages have different paradigms around how they solve the identity puzzle. .NET Core uses NuGet packages. Specifically, it uses Microsoft.Identity.Web and Microsoft.Identity.WebUI NuGet packages.
Once you add those dependencies into your project, you can start configuring the HTTP pipeline to use authentication. You can plug in authentication in the HTTP pipeline using these two calls.
app.UseAuthentication();
app.UseAuthorization();
Typically, you'll find this in the Configure method of Startup.cs. You also need to specify the details of the configuration, which are in the ConfigureServices section of the Startup.cs file, as seen in Listing 1.
Listing 1: The ConfigureServices section
public void ConfigureServices(IServiceCollection services)
{
    services.AddAuthentication(OpenIdConnectDefaults.AuthenticationScheme)
        .AddMicrosoftIdentityWebApp(Configuration.GetSection("AzureAd"));

    services.AddControllersWithViews(options =>
    {
        var policy = new AuthorizationPolicyBuilder()
            .RequireAuthenticatedUser()
            .Build();
        options.Filters.Add(new AuthorizeFilter(policy));
    });
    services.AddRazorPages().AddMicrosoftIdentityUI();
}
In Listing 1, you're relying on a section called “AzureAd” in the appsettings.json to get configuration information. Additionally, you're saying that views need the Authorize Filter. This typically means that putting the [Authorize] attribute on top of your controllers requires authentication to view the corresponding view of the controller.
Appsettings.json and its relevant sections can be seen in Listing 2. I've already plugged in the values of my tenant and my app in the appsettings.json. You'll need to use values from your tenant and app registration.
Listing 2: Appsettings.json
{
  "AzureAd": {
      "Instance": "https://login.microsoftonline.com/";,
      "Domain": "sahilmalikgmail.onmicrosoft.com",
      "ClientId": "234cfb9b-2431-48bd-9f11-515c84d17eaf",
      "TenantId": "dd1790d8-0aaa-403b-8a1c-43e7cca9b589",
      "CallbackPath": "/signin-oidc"
  },
  "Logging": {
      "LogLevel": {
          "Default": "Information",
          "Microsoft": "Warning",
          "Microsoft.Hosting.Lifetime": "Information"
      }
  },
  "AllowedHosts": "*"
}
Now, a curious omission in appsettings.json is that there's no client secret. Usually, auth code flow requires a client secret. But auth code flow with PKCE doesn't require a client secret. You'll see this work in the protocol shortly. But this is a great advantage: There's one less secret to maintain, one less secret to leak.
With the project all done, press F5 to run it. I'm going to perform log in, and extract the relevant portions to demonstrate the protocol in action to see how this authentication dance for web apps using OIDC works.
When you run the app, the browser opens. Open debug tools (F12), and start recording network activity. If you're using Edge or Chrome, make sure to choose “Preserve log” in the toolbar. This causes Edge or Chrome to remember the network log as you go through pages. This setting is more or less essential when dealing with log-in flows because they do go over multiple pages.
Go ahead and form a full log in. You should see a log-in screen or SSO if you're already signed in, a consent screen, and your app loaded. Your network log should look like Figure 6.
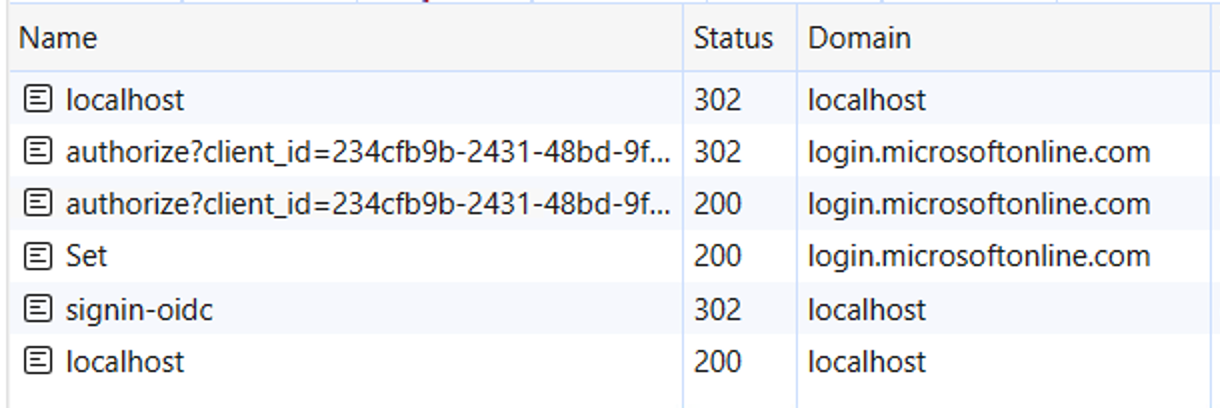
Let's break down one-by-one what the steps in Figure 6 look like, starting with the first request. The first request was to localhost:44321 and it was an anonymous request. This is the URL where my site is running. My site replied by saying, “hey you aren't authenticated, go here to authenticate yourself.” This is done via a HTTP 302 redirect. The redirect location is as below. I've trimmed and edited the URL for readability.
https://login.microsoftonline.com/
  <tenantID>/oauth2/v2.0/authorize?
client_id=&
redirect_uri=https%3A%2F%2Flocalhost%3A44321%2Fsignin-oidc&
response_type=id_token&
scope=openid%20profile&
response_mode=form_post&
nonce=...&
...
Wow. There's a lot going on here. The first thing to notice is that you issue a GET to the authorize endpoint of the IdP. Remember, this was the endpoint where the user can log in. Here, you give enough information to the identity provider, so the identity provider can do a full sign in and issue you the tokens you request.
You specify the identifier of your app using the client ID. This tells Azure AD that this is known to the Azure AD application, i.e., an app registration exists in the tenant identified by the authorize endpoint.
The next parameter is the redirect URI. If the redirect URI isn't associated with the app registration, you'll get an error. This is basically a simple GET request that anyone could have generated. You could specify any redirect URI. But Azure AD shouldn't send the tokens back anywhere you specify - they must be whitelisted. This is what you did in the app registration, as can be seen in Figure 5.
The next thing you see is that the request is asking for an id_token. Well, that makes sense. You want Azure AD to log the user in and tell you who the user is via an id_token.
Then there's scope. Here, you can ask for any scopes you may need to access, such as refresh tokens/offline_access or APIs. The needs are quite simple here: You just wish to log in. So ask for OpenID, which is the default minimum scope, and profile, which isn't an OIDC requirement, but it allows you to ask for basic information about the user in the ID token.
Finally, you're asking for the request to be sent back to you via a POST (versus a GET), which is a bit more secure and reliable.
There is also a nonce that prevents replay attacks and state and telemetry that I trimmed out.
Examining further in Figure 6, the next three requests originate from login.microsoftonline.com. This is interaction between the user and the IdP. If you dive into the network traffic there, you'll see that it's logging you in, asking for consent, and setting a cookie between Azure AD and the user's browser to remember that the user is signed into Azure AD.
This cookie doesn't mean that the user is signed into the app yet. That comes next.
Next, there is a POST to /signin-oidc. This is the whitelisted URL to which you'd requested a POST. The payload to this request contains the id_token given to the app by Azure AD. You can view this in Figure 7.
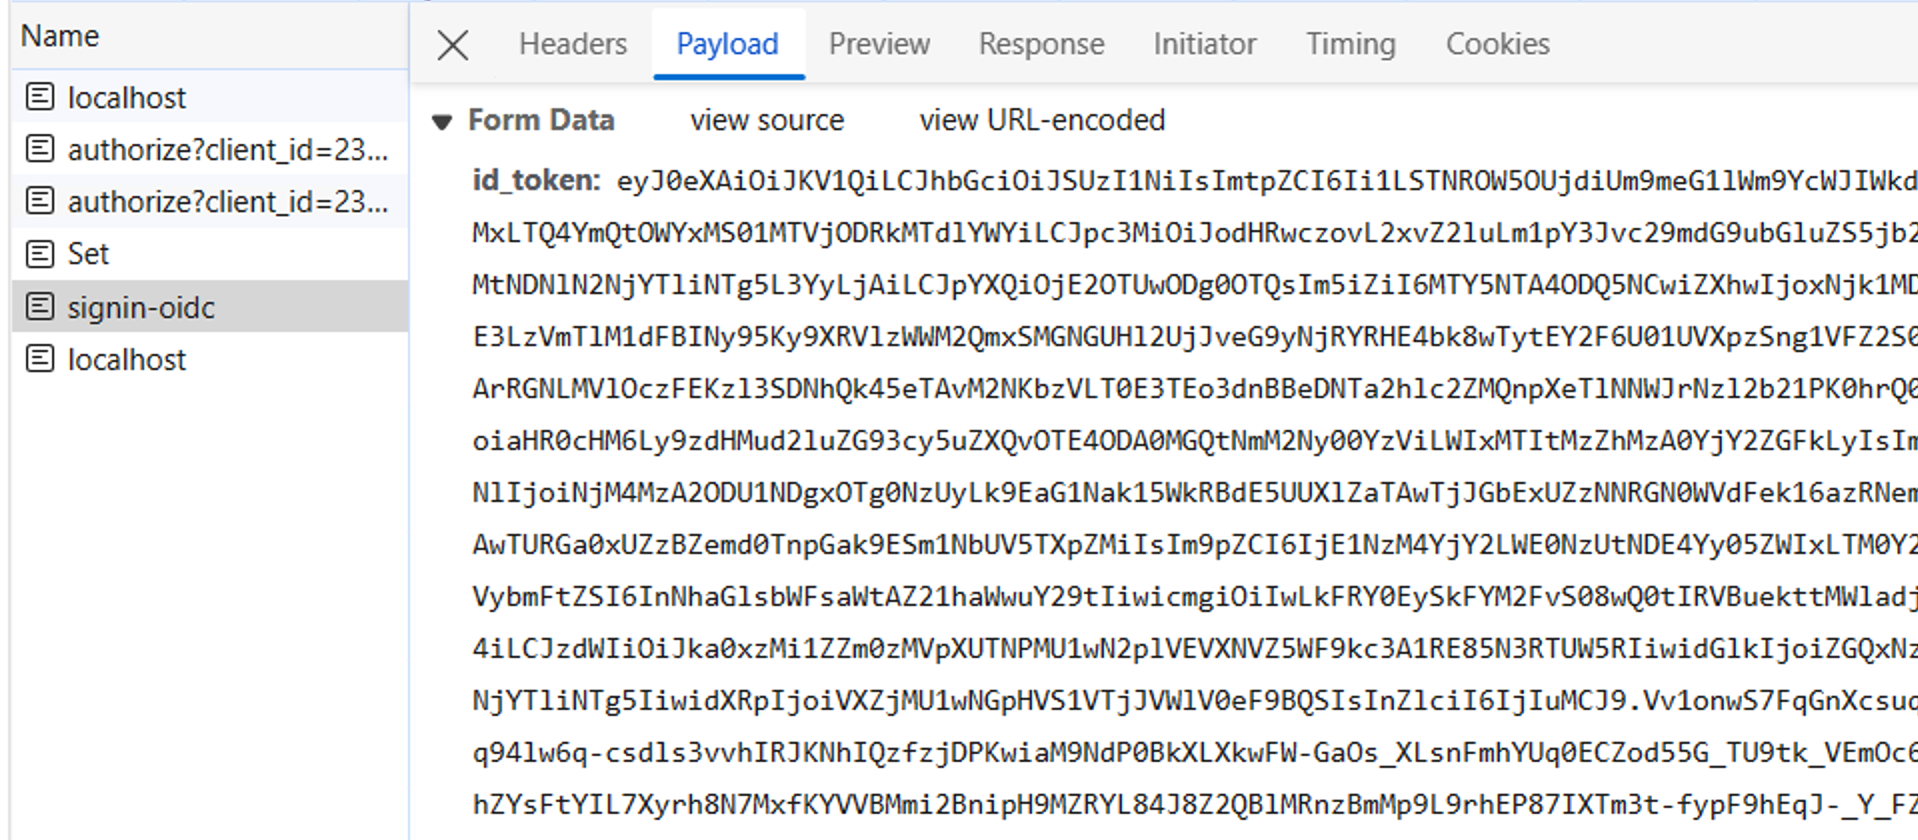
You can copy and paste this token and decrypt it at jwt.ms. The output should look like Figure 8.
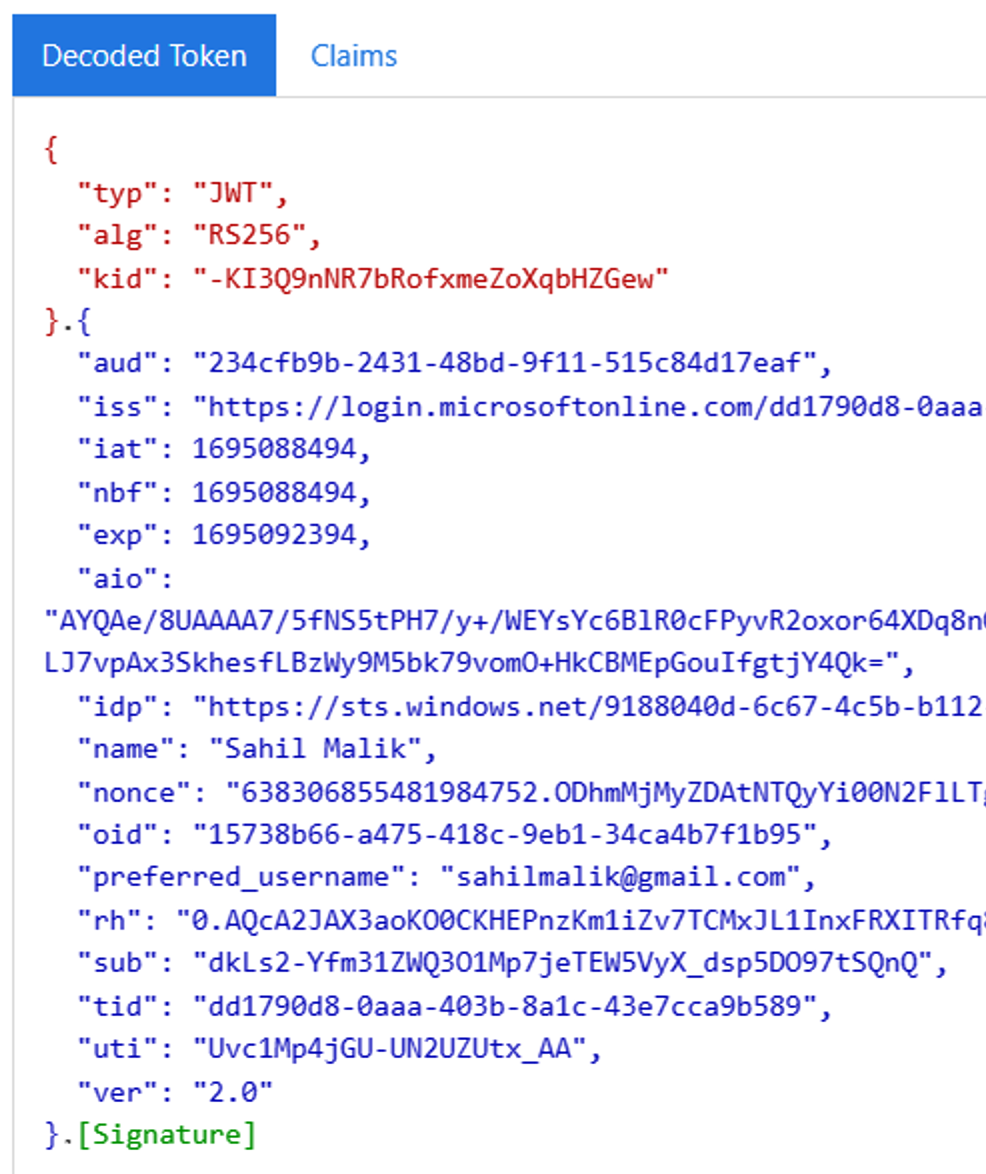
This id_token is a standard OIDC id_token, plus a few additional claims. It's a base64 string with three parts: the header, the body, and the signature. Those three parts are separated by dots. Although OIDC doesn't mandate a token format, this JWT (JSON web token) format is by far the most prevalent.
You may be wondering if this token is so easy to generate, why can't anyone just fake one up and sign in as any user? Well, the trick lies in signature. The signature can be verified by your app. See the header has a “kid” and “alg” claims. That's key ID and algorithm. Your app is supposed to call the JWKS (JSON Web Key Sets) URI for your IdP and get the public key by matching the kid in the JSON object returned by the JWKS URI. The idea is that Azure AD has signed this token using its private key and has made its public key available for you (or anyone) to verify the authenticity of that token.
Your app must verify this token. This is, of course, done by the SDK for you. The next step is to simply read the claims that identify the user and log the user in. This can be seen in the Response portion of the /sigin-oidc request, as shown in Figure 9.
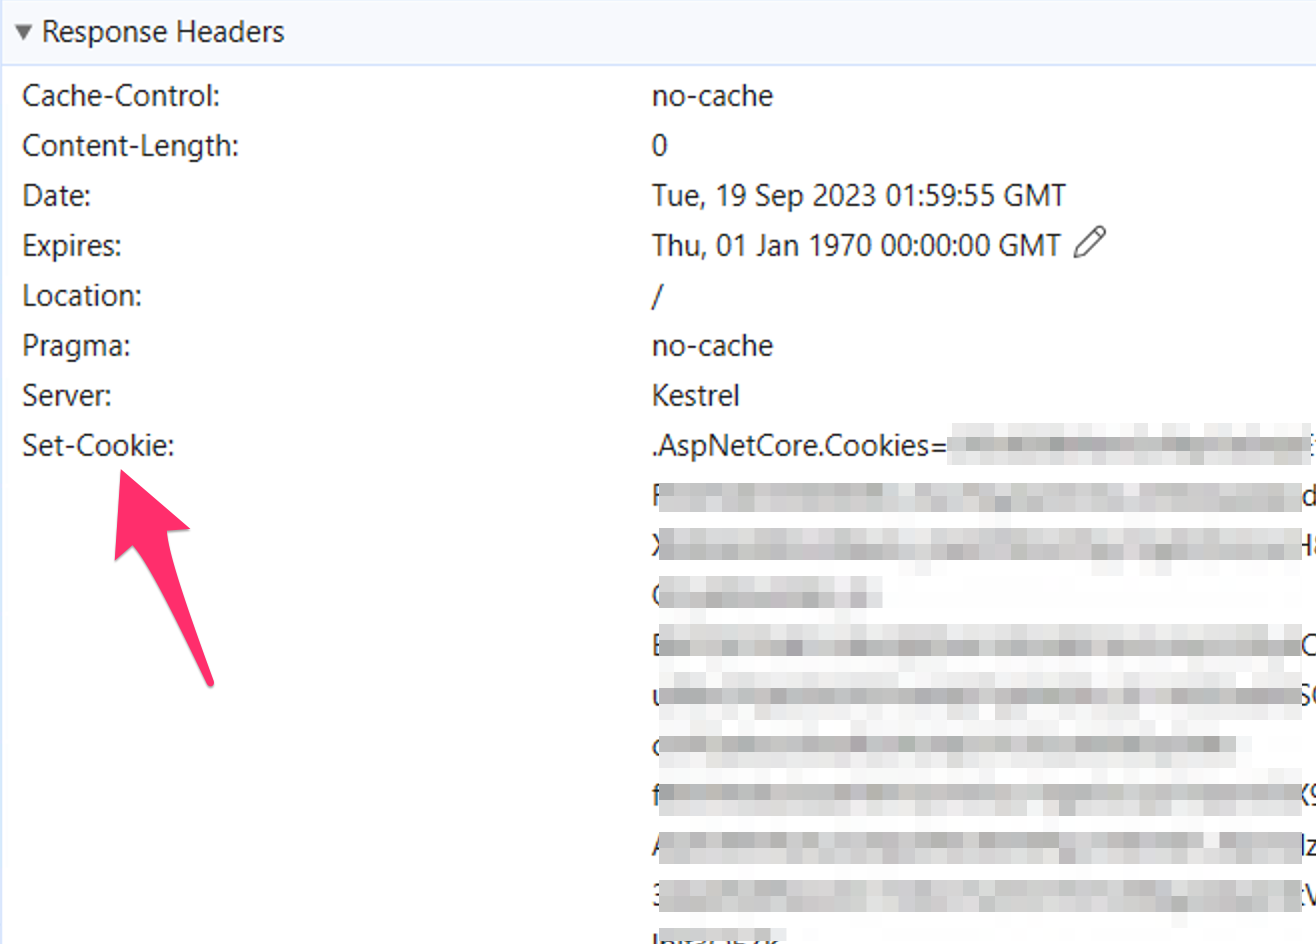
Logging out the user is a matter of clearing this cookie and letting Azure AD know to clear its cookie. Remember how this is orchestrated? Via the front-channel logout URI, as I explained above.
Finally, there's a request to any page of the app, in this case, localhost/ which then uses the cookie and shows an authenticated view of the user.
This is how the web app authentication in OIDC works.
Summary
Before writing this article, I was debating if it was worth writing. I mean, this is the broccoli that nobody wants to eat. Developers copy and paste code and get authentication out of the way so they can focus on the fun stuff that gives them recognition. But there's so much thought and experience that has gone behind building these protocols. Not only do these need to be secure, they need to be simple, non-opinionated, and platform- or vendor-independent.
As I type this, explaining (a compressed version) how a web app signs in goes took around 15 pages in Word. And I haven't even scratched the surface here. What about SPAs? What about a web app that requests an access token? What if the server needs to request the access token on the user's behalf? What if you had a web farm and the refresh tokens need to be cached, how will sign out work then? How does a mobile app work or a native app?
More on that some other day. Until then, stay secure and happy coding.