


Microservices architecture is a structural approach that organizes an application as a collection of small independent services modeled around a business domain that can communicate with one another, if need be. In this article, I'll examine GraphQL, its features and benefits, and how it compares and contrasts with REST and gRPC. I'll then discuss how you can take advantage of GraphQL to build microservices-based real-time applications in ASP.NET Core 7.
If you're to work with the code examples discussed in this article, you need the following installed in your system:
- Visual Studio 2022
- .NET 7.0
- ASP.NET 7.0 Runtime
If you don't already have Visual Studio 2022 installed in your computer, you can download it from here: https://visualstudio.microsoft.com/downloads/.
What Is GraphQL?
GraphQL was created in 2012 by Facebook as a faster and more efficient way of querying data. Using GraphQL, you can query only the data you need from an API, enhancing efficiency and reducing unnecessary data transfers. REST APIs require a client to make multiple requests to retrieve data from different endpoints, which can be inefficient and time-consuming.
GraphQL can help you to specify only the data you might need in a single request. It's an efficient way of querying data compared to traditional methods such as REST or RPC. GraphQL provides a declarative approach to retrieving and manipulating data, making it easy for developers to work with complex data.
Benefits and Downsides
GraphQL has various benefits over conventional REST APIs, such as:
- Better efficiency: By allowing clients to specify exactly what information they want, GraphQL boosts API productivity by cutting down on data transmission that isn't used.
- Enhanced flexibility: GraphQL's adaptability makes it simple to add new features to APIs without negatively affecting current users by letting them choose the specific data they desire to receive.
- Improved developer experience: Thanks to GraphQL's advanced type system, APIs are easier to learn and use. It also includes a powerful suite of tools for producing consistent results throughout development.
- Better performance: GraphQL can improve API performance by lowering the number of queries used to fetch data.
- Platform agnostic: GraphQL is platform agnostic to the data sources you use to read and write data. Additionally, you can take advantage of platform agnostic tools to query data in GraphQL.
Despite these benefits, there are certain downsides to using GraphQL:
- Complexity: Setting up and managing GraphQL takes more time and resources than setting up and managing REST APIs.
- Learning curve: Developers may need time and money to learn GraphQL because they have to understand new ideas and syntax.
- Caching: Because GraphQL lets clients ask for only the information they need, caching might be harder than with REST APIs.
- Over fetching/under fetching: Although GraphQL can help stop REST APIs from over fetching (getting more data than needed), it can also make the problem of under fetching worse, which is when clients don't get all the data they want in one query.
What Is a Schema in GraphQL?
In GraphQL, a schema describes the data your clients can request from a GraphQL API, including support for validation, parsing, automatic code generation, introspection, and type safety. You can specify the data you need (i.e., ID, firstName, lastName, etc.) in the GraphQL schema.
A schema is comprised of a collection of GraphQL types used to describe the structure of your data. A schema defines a contract between the client and the server and describes how the client can request the data from the server. A GraphQL schema typically contains two special types: query and mutation.
schema {
  query: Query
  mutation: Mutation
}
Supported Types in a GraphQL Schema
Here are the supported types in a GraphQL schema
- Object type
- Scalar type
- Query type
- Mutation type
The following is an example of an Object type:
type Author {
}
GraphQL provides support for the following built-in scalar types:
- Int
- Float
- String
- Boolean
- ID
The code snippet below illustrates how a scalar type is defined in GraphQL:
type Author {
  firstname: String!
  lastname: String!
}
Queries and Mutations in GraphQL
A GraphQL query can be either of the following:
- A Read operation accomplished using Query to retrieve or fetch data
- A Write operation accomplished using mutation to create, update, or delete data
What Are Resolvers?
Resolvers in GraphQL are analogous to query handlers that can generate responses to the queries and mutations executed by the server. The resolver is defined as part of the GraphQL schema and is responsible for fetching, processing, and transforming the data.
It should be noted that each field in a GraphQL schema has its resolver. Most importantly, you can use any supported language to build it. The GraphQL server takes advantage of resolver routines to retrieve data from a database or API efficiently.
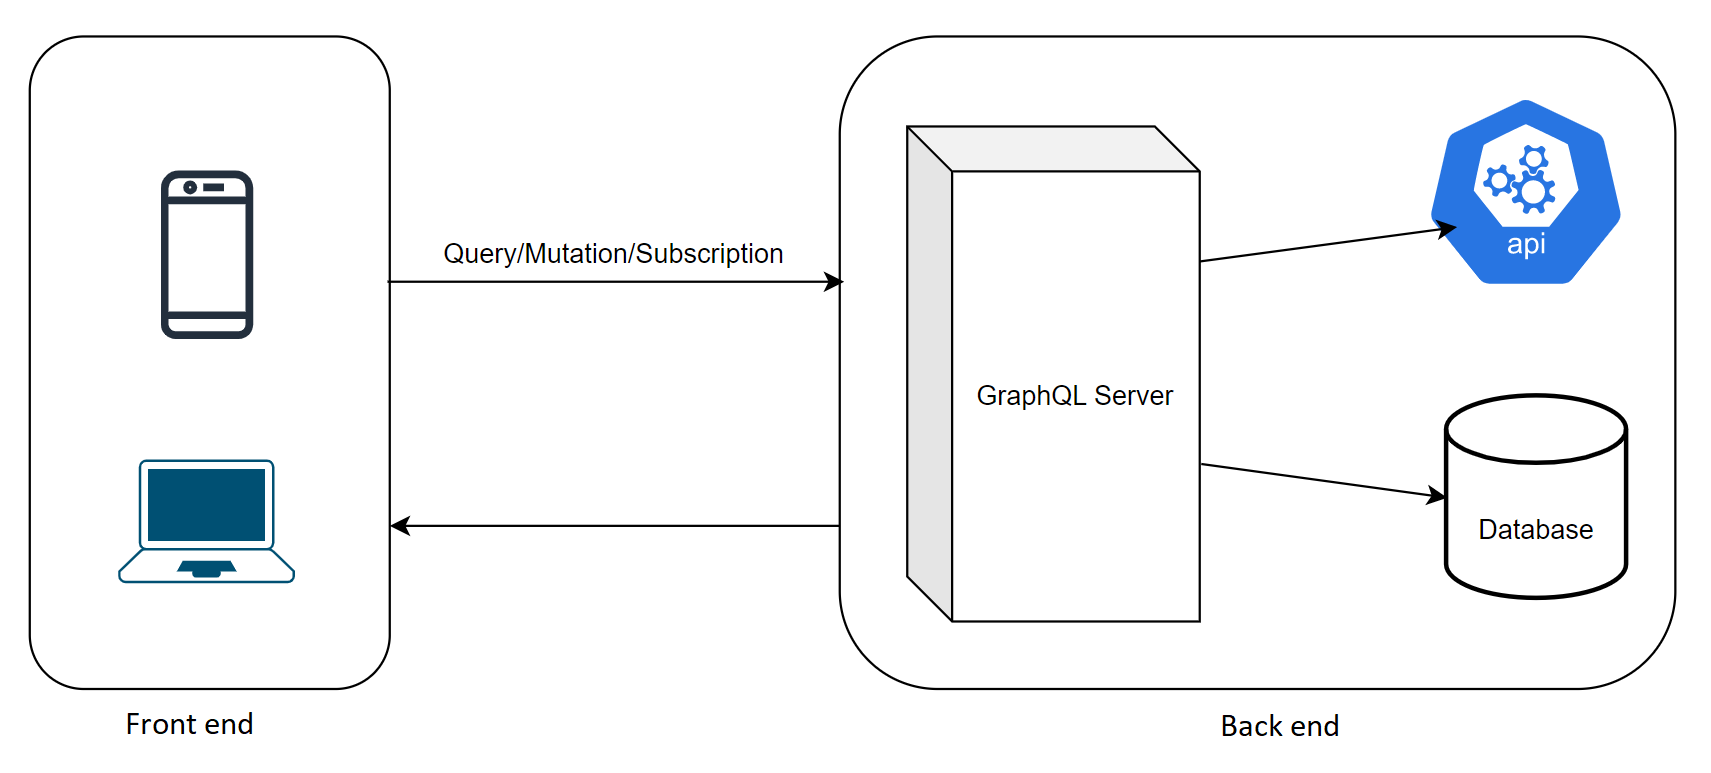
The GraphQL Architectural Components
GraphQL is made up of the following architectural elements:
- Schema: GraphQL employs a schema, which is defined using the GraphQL Schema Definition Language, to identify the sorts of data that may be requested and updated. Before queries and updates are done, this schema is used to verify them.
- Queries and Mutations: GraphQL supports two core operations: queries and mutations. The former obtains information from a server, whereas the latter can alter data on the server. Before the server executes API requests, they are verified for accuracy. When consumers submit API queries, they are validated for accuracy before being performed.
- Resolvers: A resolver is a component that governs how a query or mutation interacts with a specific data source by getting and transmitting data at the appropriate time.
- Execution Engine: An execution engine is in charge of processing queries and data changes against a schema. When the execution engine gets a query, it compares it to the schema and runs the necessary resolvers to generate the desired data.
- Type System: The extensive type system of GraphQL provides for the design of the API's data structure, guaranteeing that the API is legitimate and that queries are processed fast and without mistakes.
- Client Libraries: GraphQL client libraries are used to let clients and APIs communicate by delivering requests and updates, caching data, and addressing problems as they occur.
- Tools and Frameworks: GraphQL comes with a plethora of tools and frameworks, including code generators, testing frameworks, and middleware.
Figure 1 illustrates the GraphQL architectural components.
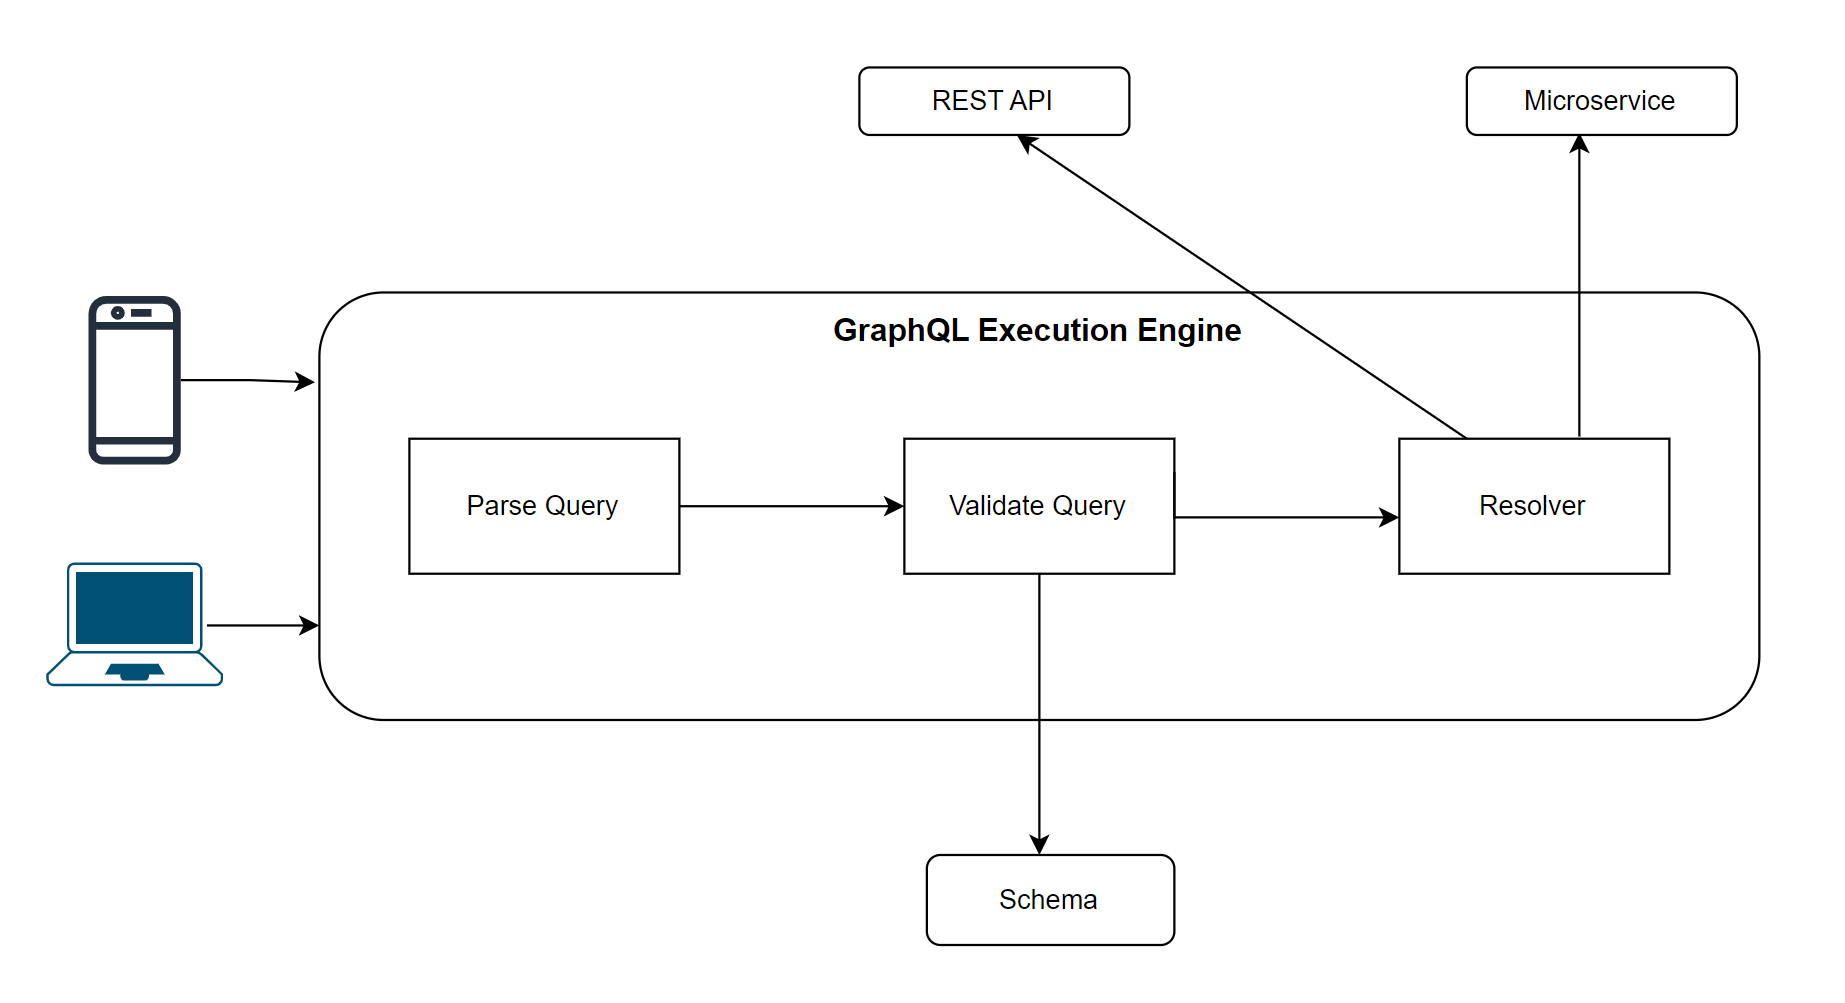
How Does GraphQL Work?
The server processes a GraphQL query sent by a client in three distinct phases: parsing, validation, and execution.
- The initial processing of a GraphQL query involves parsing it into an abstract syntax tree (AST). The query is represented in the AST as a tree of nodes, which the server may then process. As part of the parsing process, the query's syntax is validated to make sure it conforms to GraphQL's syntax.
- The server checks the query against the schema once it has been parsed into an AST. Schemas are used to define the various types of data and their relationships. By checking that the query satisfies the schema, the validation process guarantees that it�s semantically correct and hence executable.
- The server resolves each field by traversing the AST repeatedly while processing the query. Resolvers find and retrieve data from specified data sources (e.g., databases or REST APIs). The server generates the response while executing resolver functions.
After processing the query is complete, the server sends the response to the client or the consumer. It should be noted that the responses contain not only data but also details of errors (if any) thar were encountered.
GraphQL also supports mutations, which are operations that can modify data on the server and are handled differently than queries and have their own syntax. You can consider mutations in GraphQL similar to POST, PUT, PATCH, and DELETE in REST.
Each GraphQL query is sent to the server through this same cycle of parsing, validation, and execution, as shown in Figure 2.
GraphQL also provides support for mutations, which are operations that alter data on the server. It should be noted that mutations are executed in a different way from queries and use a distinct syntax. When a mutation is executed, an updated copy of the data is included in the returned JSON object.
The Problem of Under-Fetching and Over-Fetching
When working with APIs you might often come across challenges such as over-fetching and under-fetching. Over fetching is defined as a situation in which an API returns more information than is necessary for your application. For instance, a client might request Order ID and Order Date and receive Order ID, Order Date, and Product ID instead.
Under fetching occurs when an API doesn't provide all the data your application requests. A client may request Order ID and Order Date, but only receive Order ID. As a consequence, the client may experience reduced performance and improper or inefficient use of memory, CPU, and network resources.
Because GraphQL enables users to query for only the information they need, it helps in elegantly resolving these difficulties. If your API is adept at returning all the data your application needs, you'll not encounter any over-fetching or under-fetching issues.
GraphQL vs. REST
GraphQL and REST are two different architectural approaches to building APIs, each with advantages and disadvantages. REST, or Representational State Transfer, is a style of software architecture that uses HTTP to communicate between clients and servers. The term REST refers to a type of architecture that emphasizes the usage of HTTP protocols for interaction between clients and servers.
Here are a few important distinctions between GraphQL and REST:
- A REST API takes advantage of “resources,” or URLs, to represent data and HTTP methods like GET, POST, PUT, and DELETE to work with this data. Although REST APIs can be efficient, they can also suffer from over-fetching or under-fetching data, resulting in unnecessary data transfer.
- Although REST works only with HTTP protocol, there are no protocol constraints in GraphQL. In other words, GraphQL is agnostic of the transport layer - you can use it with any transport layer protocol.
- GraphQL can provide an elegant way to retrieve data from an API. Rather than using multiple requests and endpoints like REST, GraphQL APIs use a single endpoint and a GraphQL query language to retrieve only the needed data. This can lead to fewer data transfers and more efficient API performance.
- Another important distinction between GraphQL and REST is the existence of a schema. GraphQL features a sophisticated type system that specifies the structure of data sent by the API, which can guarantee that queries are valid and efficient. REST APIs lack a formal schema definition, which makes them more flexible but also more challenging to deal with.
- Caching is yet another important point to consider. REST APIs can use HTTP caching techniques to minimize the data sent between clients and servers. Native caching mechanisms, on the other hand, are not supported by GraphQL APIs.
GraphQL vs. gRPC
GraphQL and gRPC are both modern approaches to building APIs, but they have different design goals and use cases. GraphQL is a query language that provides a flexible and efficient way to request and retrieve data from an API. It's designed to provide a single endpoint that can be used to retrieve all the data needed by a client in a single request.
GraphQL APIs are often used for web applications, mobile applications, and microservices architectures. On the contrary, gRPC is an open-source framework built by Google for creating remote procedure call APIs. It uses Protocol Buffers, a language- and platform-neutral serialization format, to define service interfaces and message types.
Here are some important distinctions between GraphQL and gRPC:
- Query Language vs. Service Definition: GraphQL offers a query language for retrieving data from the API, and gRPC provides a service definition for defining the methods and messages accessible on the API.
- Data Transport: GraphQL uses HTTP as its data transport, but gRPC employs HTTP/2, a binary protocol that offers a variety of performance and efficiency advantages.
- Type System: GraphQL has a comprehensive type system that specifies the structure of data delivered by the API. gRPC includes a robust type system as well, but it's built on Protocol Buffers and is intended to be language- and platform-agnostic.
- Tooling: Although GraphQL encompasses a rich ecosystem of libraries, tools, server frameworks, and code generators, gRPC is still in its infancy in comparison to GraphQL.
The GraphQL Schema Definition Language (SDL)
The Schema Definition Language (SDL) represents the schema of a GraphQL API in a concise manner using a simple syntax and defines the following:
- The type of data you can query
- The relationships between those types
- The actions you can perform on them
The GraphQL SDL has a collection of built-in scalar types including String, Int, and Boolean, as well as the option to build new types. Fields representing data of other kinds may be used to create custom types.
- Fields: Fields are used to express data on a type that can be queried. Arguments to fields may be used to filter or change the data provided by the field.
- Queries and Mutations: Queries and mutations are used on GraphQL APIs to obtain and alter data. Queries are “read-only” operations used to retrieve data, while mutations are “write” operations used to change data.
- Directives: Directives are used to supplement a schema's metadata. They may be used to change the behavior of queries and modifications, as well as to provide extra documentation.
Building GraphQL Applications: The Schema-First and Code-First Approaches
A GraphQL server requires two artifacts: a schema, which defines all types and fields; and resolvers, a collection of functions that are invoked to return data for those types. There are two approaches used to build GraphQL applications. These include the schema-first and code-first approaches. Although the former designs the schema up front, the latter uses code to build the schema programmatically.
The Schema-First Approach
Here's an example of simple schema definition:
type Author
{
     id: Int!
     firstname: String!
     lastname: String!
     email: String!
     books: [Book!]!
}
In this example, the Author object has an ID, firstname, lastname, and email field, each with a specific scalar type (Int! and String!). The books field is an array of Book objects.
The following is an example of a typical query:
query{
    authors
    {
        id
        firstname
        lastname
    }
}
The Code-First Approach
Using the code-first or resolver-first approach, you begin by coding the resolvers and then generate the schema from the code as a single source of truth as an artifact. Consequently, you still have a schema, but it's now generated automatically by a script instead of being created manually.
The Code-First approach is often used when you're using a typed programming language such as C# to build GraphQL applications. In this approach, you code the resolvers first and then, assuming code as the single source of truth, the schema is generated thereafter. I'll be using this approach throughout this article.
Where Does GraphQL Fit in the Technology Stack?
GraphQL may thrive in a number of different places in the technological stack, depending on the use case and the requirements at hand. Clients may use GraphQL to request and retrieve data from an API in a flexible and efficient manner because it acts as a layer between them and the server. By acting as a mediator between the client and the server, GraphQL makes it possible for clients to make more elegant and efficient API requests.
GraphQL can fit in any of the following layers of the tech stack:
- API Layer: GraphQL may be used as an application programming interface (API) layer between a client and a server, facilitating centralized data retrieval and querying. Then the GraphQL server may offer the information in the format requested by mapping the queries to the appropriate data sources or services.
- Server-side framework: To create server-side APIs, GraphQL may be used as a server-side framework. Several modern languages have support for GraphQL server-side framework.
- Client-side framework: You can use GraphQL as a framework for creating applications on the client side that can access data using a GraphQL API.
GraphQL may function as a layer of abstraction for data between your app, database, and other sources. Here, the GraphQL server translates the client's requests into SQL queries against a database and provides the results.
Error Handling in GraphQL
Contrary to errors in a REST-based application, you no longer have to bank on status codes and status text messages in GraphQL. It should be noted that GraphQL has a built-in error handling mechanism that allows servers to return informative error messages to clients in case of errors.
Typically, any GraphQL response should contain a data field and/or an errors field. In the event of an error, the standard error-handling mechanism in GraphQL returns JSON data that corresponds to the GraphQL operation, such as query, mutation, and subscription, together with an array of error objects with the message and location.
The error object in GraphQL gives specific information on any problems that may have arisen while an operation was being carried out. These problems might have been caused by a number of factors. In order to provide more in-depth information on an issue, a response may include an error object.
An error object in GraphQL is typically comprised of the following:
- Message: A message field is a required string with an error message that people can read.
- Locations: The locations field is an optional list of source locations that show where in the query the problem happened. There can be both line and column fields in a location field.
- Path: The path field contains the names of the fields in the GraphQL response where the error occurred.
- Extensions: This is an optional field that may give more details or metadata pertaining to the error, such as a custom error code or other error details.
Here is an error object with all these fields:
{
    "message": "The input is not a valid email address.",
    "locations": [
        {
            "line": 5,
            "column": 8
        }
   ],

        "path": [
            "createEmployee", "email"
       ],

        "extensions": {
            "code": "INPUT_ERROR",
            "details": {
                "email": "Please provide an email
                address in the correct format."
            }
        }
}
When this mutation named createEmployee is executed and a wrong email address or an invalid email address is specified, an error occurs and the appropriate error message is returned as part of the response. In the preceding code snippet, the extensions column is used to store a user-defined error code along with additional information related to the error. If you can provide specific error information, it will be easier to detect, debug, and resolve any errors that might occur when a GraphQL operation is in execution.
Building a Simple Application Using GraphQL
It's time for writing some code. Let's now examine how to build a simple ASP.NET Core 7 Web API application using GraphQL.
Create a New ASP.NET Core 7 Project in Visual Studio 2022
You can create a project in Visual Studio 2022 in several ways. When you launch Visual Studio 2022, you'll see the Start window. You can choose “Continue without code” to launch the main screen of the Visual Studio 2022 IDE.
- Start the Visual Studio 2022 IDE.
- In the “Create a new project” window, select “ASP.NET Core Web API” and click Next to move on.
- Specify the project name as GraphQLDemo and the path where it should be created in the “Configure your new project” window.
- If you want the solution file and project to be created in the same directory, you can optionally check the “Place solution and project in the same directory” checkbox. Click Next to move on.
- In the next screen, specify the target framework and authentication type. Ensure that the “Configure for HTTPS,” “Enable Docker Support,” and the “Enable OpenAPI support” checkboxes are unchecked because you won't use any of these in this example.
- Because you won't be using minimal APIs in this example, remember to leave the Use controllers (uncheck to use minimal APIs) checkbox checked.
- Click Create to complete the process. To create a new ASP.NET Core 7 Project in Visual Studio 2022:
Because the support for GraphQL isn't built in ASP.NET Core, you need to install it as a package from NuGet via NuGet Package Manager.
Hot Chocolate
Hot Chocolate is an open-source, high-performance, versatile, and flexible framework for building GraphQL APIs using .NET Core. It enables developers to define GraphQL schema, connect to various data sources, and offer clients a reliable and sustainable API. Hot Chocolate fully supports GraphQL features like mutations, queries, and subscriptions. Hot Chocolate comes with all the tools and features you need to create a reliable, easy-to-maintain GraphQL API, regardless of whether it's for a single application or a complex system.
Hot Chocolate also supports advanced features like interfaces, unions, and enums, which is an advantage. The type system of Hot Chocolate allows defining GraphQL schema using strongly typed .NET classes, which improves API reliability and maintainability while providing better support for tools like refactoring and IntelliSense.
Hot Chocolate provides an array of advanced tools for constructing robust GraphQL APIs. It incorporates capabilities such as caching and batching to optimize functionality and middleware to enable the personalization of GraphQL resolvers. Hot Chocolate enables you to define your GraphQL schema through a straightforward and user-friendly API and encompasses numerous resources that can assist you in testing and debugging your API. One of these is the GraphQL Playground, which allows you to engage within your API and logging and tracing tools to identify any problems during production.
In the application you're about to make, you'll take advantage of HotChocolate to generate GraphQL schemas. With HotChocolate, you can build an extra layer on top of your application layer that uses GraphQL. It's easy to set up and configure, and it eliminates the clutter of generating schemas.
Install NuGet Package(s)
So far so good. The next step is to install the necessary NuGet Package(s). To install the required packages into your project, right-click on the solution, and then select Manage NuGet Packages for Solution…. Now search for the packages named HotChocolate.AspNetCore and HotChocolate.AspNetCore.Playground in the search box and install them one after the other. Alternatively, you can type the commands shown below at the NuGet Package Manager Command Prompt:
PM> Install-Package HotChocolate.AspNetCore
PM> Install-Package HotChocolate.AspNetCore.Playground
You can also install these packages by executing the following commands at the Command Window:
dotnet add package HotChocolate.AspNetCore
dotnet add package HotChocolate.AspNetCore.Playground
Create the Supplier Class
Create a new class named Order in a file having the same name with a .cs extension and write the following code in there:
public class Supplier
{
    public int Id { get; set; }
    public string FirstName { get; set; }
    public string LastName { get; set; }
    public string Address { get; set; }
    public string Email { get; set; }
    public string Phone { get; set; }
}
The other entity classes aren't being shown here for brevity and also because this is a minimalistic implementation to illustrate how you can work with GraphQL in ASP.NET Core 7.
Create the ISupplierRepository Interface
Create a new .cs file named ISupplierRepository in your project and replace the default generated code with the following code snippet:
public interface ISupplierRepository
{
    public Task<List<Supplier>> GetSuppliers();
    public Task<Supplier> GetSupplier(int Id);
}
Create the SupplierRepository Class
Now, create a new class named SupplierRepository in a file having the same name with a .cs extension. Next, write the following code in there:
public class SupplierRepository : ISupplierRepository
{

}
The SupplierRepository class illustrated in the code snippet below implements the methods of the ISupplierRepository interface:
public async Task<List<Supplier>> GetSuppliers()
{
    return await
    Task.FromResult(suppliers);
}

public async Task<Order> GetSupplier(int Id)
{
  return await Task.FromResult(suppliers.FirstOrDefault(x => x.Id == Id));
}
The complete source code of the SupplierRepository class is given in Listing 1.
Listing 1: The Supplier Repository class
public class SupplierRepository: ISupplierRepository
  {
    private readonly List <Supplier> suppliers = new List <Supplier>
    {
        new Supplier
        {
            Id = 1,
            FirstName = "Steve",
            LastName = "Smith",
            Address = "USA",
            Phone = "1111111111",
            Email = "test@xyz.com"
        },
        new Supplier
        {
            Id = 2,
            FirstName = "Michael",
            LastName = "Foster",
            Address = "USA",
            Phone = "2222222222",
            Email = "abc@test.com"
        },
        new Supplier
        {
            Id = 3,
            FirstName = "Anand",
            LastName = "Shah",
            Address = "India",
            Phone = "9999999999",
            Email = "xyz@abc.com"
        }
    };

    public async Task <List <Supplier>> GetSuppliers()
    {
        return await
        Task.FromResult(suppliers);
    }

    public async Task <Supplier> GetSupplier(int Id)
    {
        return await Task.FromResult(suppliers.FirstOrDefault(x => x.Id == Id));
    }
  }
Register the SupplierRepository instance
The following code snippet illustrates how an instance of type ISupplierRepository is added as a scoped service to the IServiceCollection.
builder.Services.AddScoped<ISupplierRepository, SupplierRepository>();
Create the GraphQL Query Class
Create a new .cs file named SupplierGraphQLQuery in your project and replace the default generated code with the code given in Listing 2.
Listing 2: The Supplier GraphQL Query class
using HotChocolate.Subscriptions;

namespace GraphQLDemo
{
    public class SupplierGraphQLQuery
    {
        public async Task<List<Supplier>> GetAllSuppliers([Service]
        ISupplierRepository supplierRepository,
        [Service] ITopicEventSender eventSender)
        {
            List<Supplier> suppliers = await supplierRepository.GetSuppliers();
            await eventSender.SendAsync("Returned a list of Suppliers",
              suppliers);
            return suppliers;
        }
    }
}
Create the GraphQL Object Type
In GraphQL, Object Types are used to describe the type of data that are fetched using your API, and they're represented by creating a class that derives from the GraphQL.Types.ObjectGraphType class. Create a new file named SupplierType.cs in your project and replace the default code with the code given in Listing 3.
Listing 3: The Supplier Type class
namespace GraphQLDemo
{
    public class SupplierType : ObjectType<Supplier>
    {
        protected override void
        Configure(IObjectTypeDescriptor <Supplier> descriptor)
        {
            Descriptor.Field(a => a.Id).Type<IdType>();
            descriptor.Field(a => a.FirstName).Type<StringType>();
            descriptor.Field(a => a.LastName).Type<StringType>();
        }
    }
}
Create a GraphQL Subscription Type
You should also create a subscription to enable your GraphQL server to notify all subscribed clients when an event occurs. Create a new class named SupplierSubscription and write the piece of code given in Listing 4 in there.
Listing 4: The Supplier Subscription class
using HotChocolate.Execution;
using HotChocolate.Subscriptions;

namespace GraphQLDemo
{
    public class SupplierSubscription
    {
        [SubscribeAndResolve]
        public async ValueTask<ISourceStream<List<Supplier>>>
        OnSuppliersGet([Service]
        ITopicEventReceiver eventReceiver, CancellationToken cancellationToken)
        {
            return await
            eventReceiver.SubscribeAsync<List<Supplier>>
            ("Returned Suppliers", cancellationToken);
        }
    }
}
Configure GraphQL Server in ASP.NET Core
Once you've created the Query type to expose the data you need, configure GraphQL Server in the Program.cs file using the following code snippet:
builder.Services.AddGraphQLServer()
    .AddType<SupplierType>()
    .AddQueryType<SupplierGraphQLQuery>()
    .AddSubscriptionType<Subscription>()
    .AddInMemorySubscriptions();
You can then call the MapGraphQL method to register the middleware:
app.MapGraphQL();
When you register this middleware, the GraphQL server is available at /graphql by default. You can also customize the endpoint where the GraphQL server will be hosted by specifying the following code in the Program.cs file:
app.MapGraphQL("/graphql/mycustomendpoint");
Create the SupplierController Class
Create a new API Controller in your project named SupplierController and write the code given in Listing 5 in there. Listing 6 shows the complete source of the Program.cs file.
Listing 5: The Supplier Controller class
    [Route("api/[controller]")]
    [ApiController]
    public class SupplierController: ControllerBase
    {
        private ISupplierRepository _supplierRepository;
        public SupplierController(ISupplierRepository supplierRepository)
        {
            _supplierRepository = supplierRepository;
        }

        [HttpGet("{id}")]
        public async Task <Supplier>
        GetSupplier(int id)
        {
            return await _supplierRepository.GetSupplier(id);
        }

        [HttpGet("GetSuppliers")]
        public async Task <List <Supplier>> GetSuppliers()
        {
            return await _supplierRepository.GetSuppliers();
        }
    }
Listing 6: The Program.cs file
using GraphQLDemo;
using HotChocolate.AspNetCore;
using HotChocolate.AspNetCore.Playground;

var builder = WebApplication.CreateBuilder(args);
// Add services to the container.

builder.Services.AddScoped<ISupplierRepository, SupplierRepository>();

builder.Services.AddGraphQLServer()
    .AddType<SupplierType>()
    .AddQueryType<Query>()
    .AddSubscriptionType<Subscription>()
    .AddInMemorySubscriptions();

builder.Services.AddControllers();
var app = builder.Build();

// Configure the HTTP request pipeline.

app.UseAuthorization();
app.MapControllers();
app.UsePlayground(new PlaygroundOptions
{
    QueryPath = "/graphql",
    Path = "/playground"
});

app.MapGraphQL();
app.Run();
Execute the Application
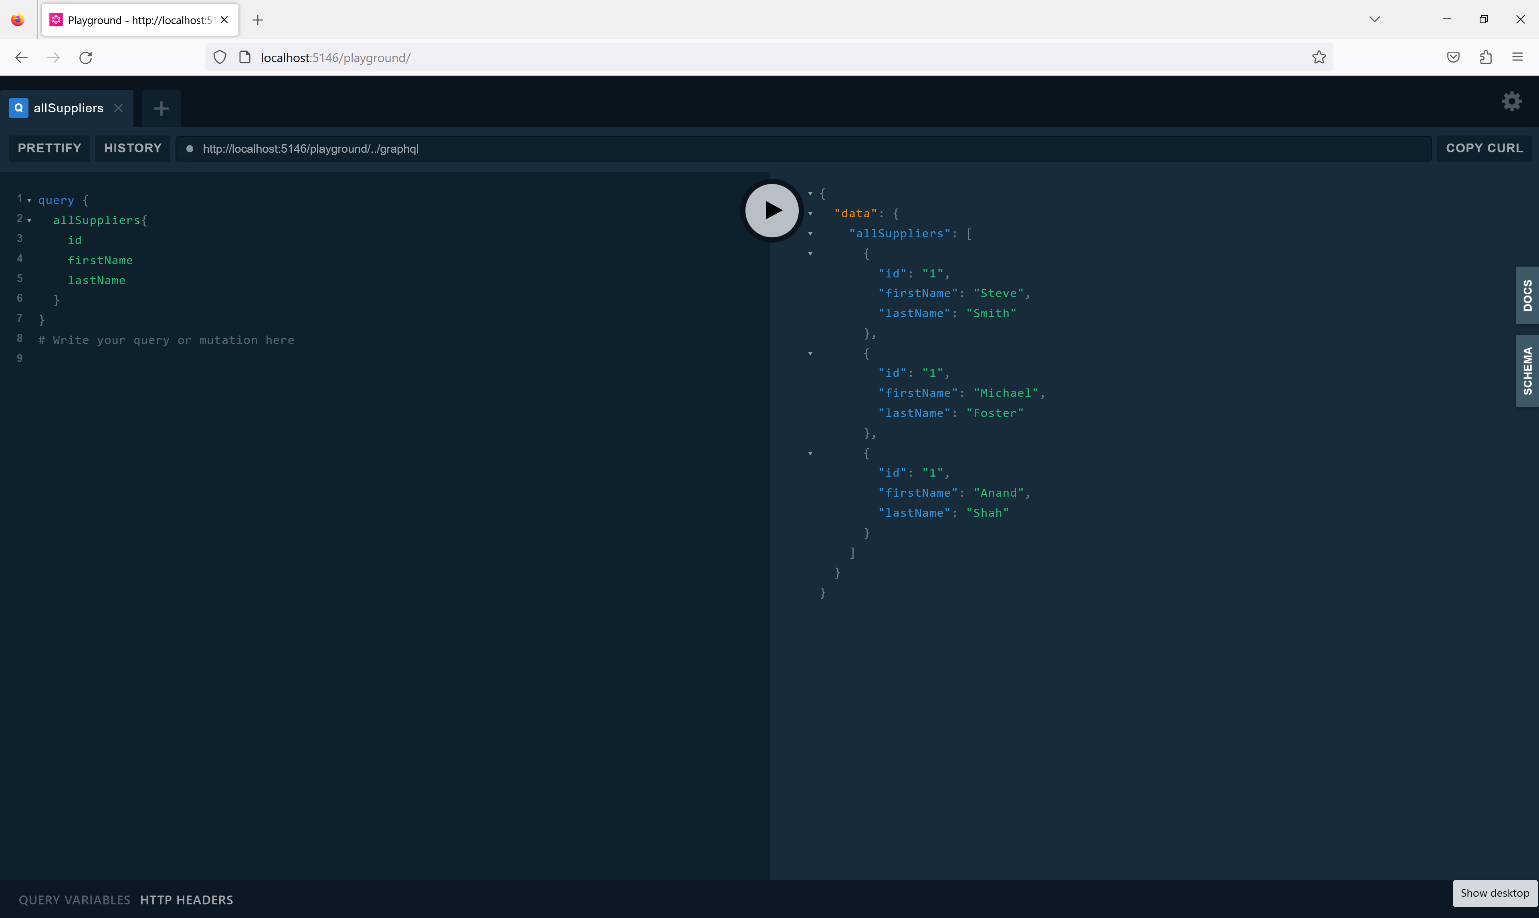
When you run the following GraphQL query, the supplier data is displayed as shown in Figure 3.
query {
    allSuppliers{
        id
        firstName
        lastName
    }
}
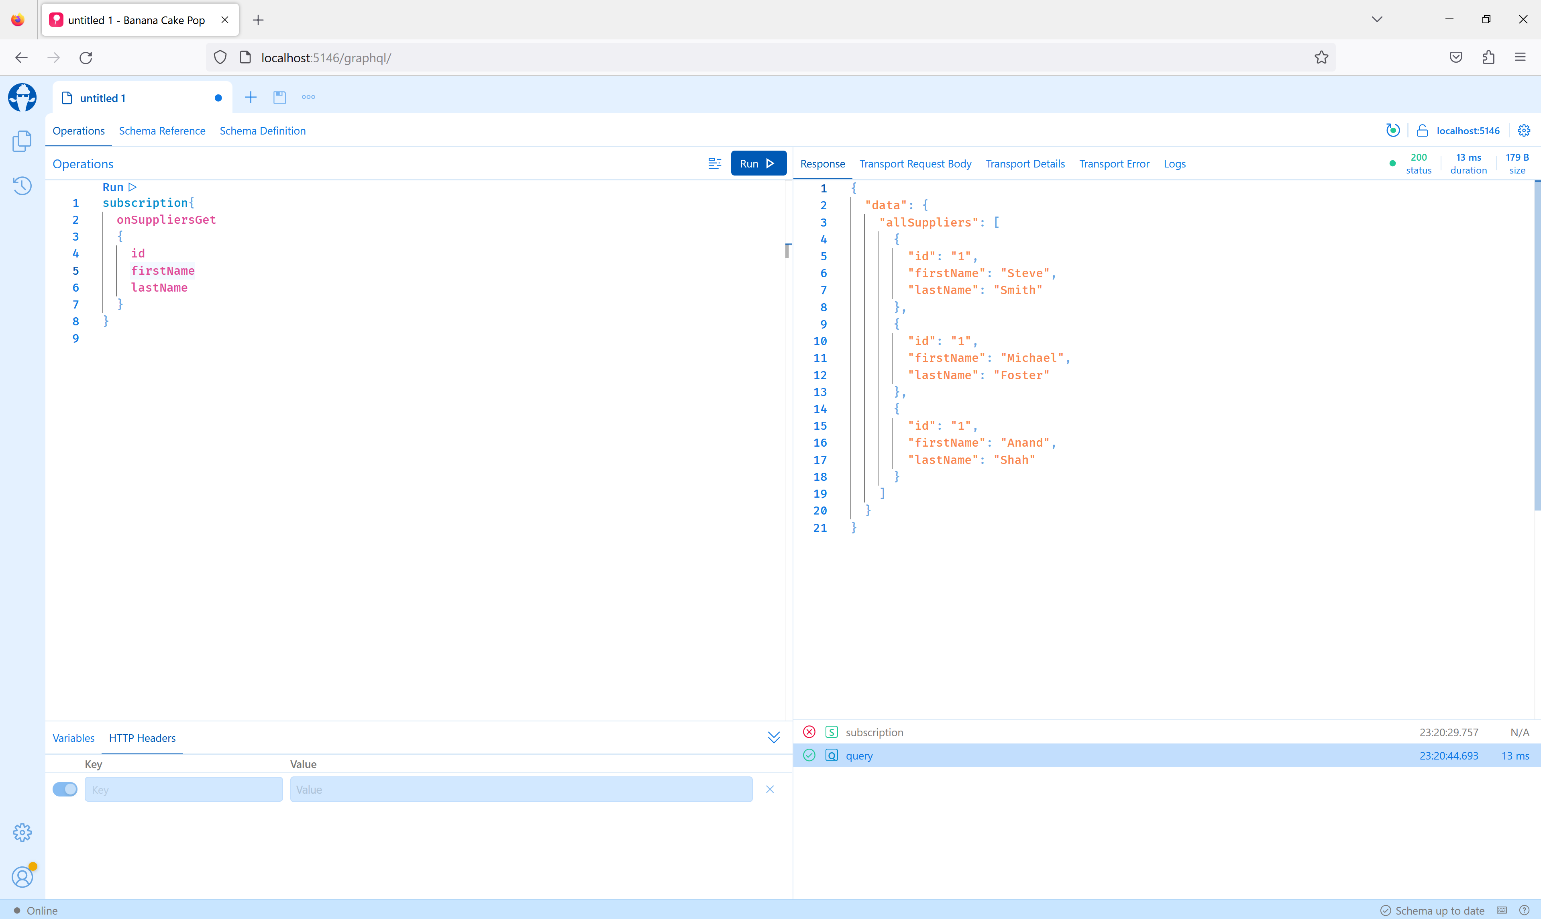
To test the subscription, you can use the following GraphQL query:
subscription{onSuppliersGet
    {
        id
        firstName
        lastName
    }
}
Upon execution of the preceding query, the OnSuppliersGet event is triggered and the data is displayed in the web browser where you executed the subscription query, as shown in Figure 4.
Now that you know how to build applications using GraphQL in ASP.NET Core, you'll use this knowledge to create a microservices application that leverages GraphQL to query data. Before I delve deep into this implementation, let's learn the basic concepts related to microservice architecture.
Introduction to Microservices Architecture
Microservice architecture is a conglomerate of independent, self-contained, interoperable services that can be deployed independently and use a wide range of technologies. A microservice architecture is designed for decentralization. Therefore, it's important to develop strategies that protect microservices-based systems from failures and make them fault-tolerant.
A microservices-based application is comprised of loosely connected services developed and deployed separately and can run on heterogeneous platforms. It's an architectural style used to build applications by splitting business components into small autonomous services. The Microservices Architecture pattern imposes a degree of modularity that's very difficult to accomplish with a monolithic codebase.
Advantages of Microservices Architecture
The key advantages of microservices architecture are:
- Improved Scalability: Scaling a microservice-based application requires scaling only certain components. This significantly optimizes resource utilization. In addition, microservices can be modified independently of each other, so that there is no interference with other services.
- Reduced coupling: Reduced coupling between the components of an application makes it easily adaptable for changes over time.
- Better ROI: Microservice architecture facilitates the separation of responsibilities that's essential for developing highly scaled applications. It allows developers to work independently on individual services without interfering with the work of other developers.
- Faster Deployment and Reduced Development Time: The use of microservice architecture enables teams to work together on independent services and deploy them faster. Microservice architecture reduces development time because it's loosely coupled and autonomous.
- Faster Releases: With microservices, services are loosely coupled, so you don�t have to rebuild your entire code base when you want to add or change a feature. The decentralized nature of developing, maintaining, and updating applications allows faster deployments and releases. You can treat each microservice as an independently deployable unit.
Building a Microservices Application Using GraphQL
It's time to write some code. Let's now examine how to build a simple ASP.NET Core 7 Web API application using GraphQL. In this example, you'll examine how to build a simple order management application using GraphQL in ASP.NET Core.
A Real-World Use Case
A typical Order Processing System is composed of several entities, such as Supplier, Order, Product, Customer, etc. To keep things simple, this application will display one or more order records.
Let's examine how to create an ASP.NET Core 7 project in Visual Studio 2022.
Create a New ASP.NET Core 7 Project in Visual Studio 2022
You can create a project in Visual Studio 2022 in several ways. When you launch Visual Studio 2022, you'll see the Start window. You can choose “Continue without code” to launch the main screen of the Visual Studio 2022 IDE.
To create a new ASP.NET Core 7 Project in Visual Studio 2022:
- Start the Visual Studio 2022 IDE.
- In the “Create a new project” window, select “ASP.NET Core Web API” and click Next to move on.
- Specify the project name as GraphQLDemo and the path where it should be created in the “Configure your new project” window.
- If you want the solution file and project to be created in the same directory, you can optionally check the “Place solution and project in the same directory” checkbox. Click Next to move on.
- In the next screen, specify the target framework and authentication type. Ensure that the “Configure for HTTPS,” “Enable Docker Support,” and the “Enable OpenAPI support” checkboxes are unchecked because you won't use any of these in this example.
- Because you'll not be using minimal APIs in this example, remember to leave the Use controllers (uncheck to use minimal APIs) checkbox checked.
- Click Create to complete the process.
Because the support for GraphQL isn't built in ASP.NET Core, you need to install it as a package from NuGet via NuGet Package Manager.
In this application, you'll take advantage of Hot Chocolate to generate GraphQL schemas. With Hot Chocolate, you can build an extra layer on top of your application layer that uses GraphQL. It's easy to set up and configure, and it eliminates the clutter of generating schemas.
Install NuGet Package(s)
So far so good. The next step is to install the necessary NuGet Package(s). To install the required packages into your project, right-click on the solution and the select Manage NuGet Packages for Solution…. Now search for the packages named HotChocolate.AspNetCore, and HotChocolate.AspNetCore.Playground in the search box and install them one after the other. Alternatively, you can type the commands shown below at the NuGet Package Manager Command Prompt:
PM> Install-Package HotChocolate.AspNetCore
PM> Install-Package HotChocolate.AspNetCore.Playground
You can also install these packages by executing the following commands at the Command Window:
dotnet add package HotChocolate.AspNetCore
dotnet add package HotChocolate.AspNetCore.Playground
Create the Solution Structure
Create three WebAPI projects namely, Customers, Products, and Orders, in the solution you created earlier. You'll also create solution folders to organize the files in each of the projects. Figure 5 shows how the initial solution structure would look.
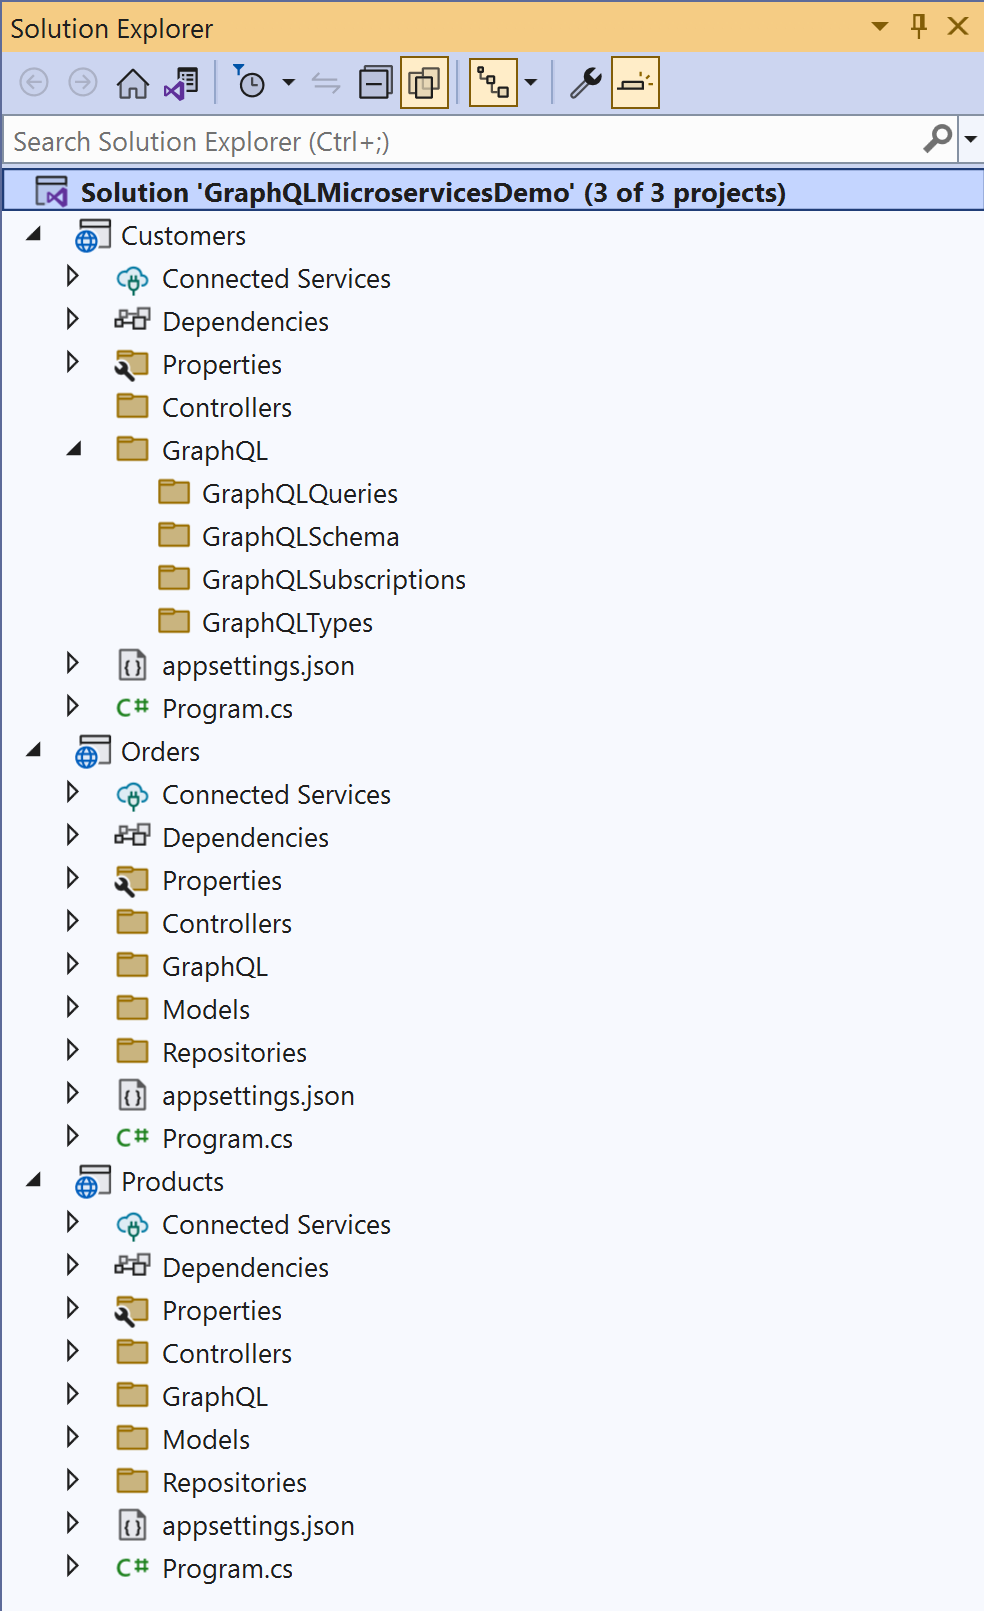
In the sections that follow, you'll create classes and interfaces in each of these projects. In this example, you'll consider how these projects correspond to the Products, Customers, and Orders microservices.
Create the Model Classes
Create the model classes as shown in Listing 7 in the respective projects. You should create separate .cs files for each of these entity classes. This is a minimal implementation to illustrate how you can work with GraphQL in ASP.NET Core 7.
Listing 7: The Model classes
    public class Product
    {
        public int Id { get; set; }
        public string Name { get; set; } = string.Empty;
        Public string Description { get; set; } = string.Empty;
        public decimal Price { get; set; }
    }

    public class Customer
    {
        public int Id { get; set; }
        public string FirstName { get; set; } = string.Empty;
        public string LastName { get; set; } = string.Empty;
        public string Address { get; set; } = string.Empty;
        public string City { get; set; } = string.Empty;
        public string PostalCode { get; set; } = string.Empty;
        public string Country { get; set; } = string.Empty;
        public string Phone { get; set; } = string.Empty;
        public string EmailAddress { get; set; } = string.Empty;
    }

    public class Order
    {
        public int Id { get; set; }
        public string ShipAddress { get; set; }
        public string ShipCity { get; set; }
        public string ShipPostalCode { get; set; }
        public string ShipCountry { get; set; }
        public DateTime OrderDate { get; set; }
        public OrderDetails OrderDetails { get; set; }
    }

    public class OrderDetails
    {
        public int Id { get; set; }
        public int OrderId { get; set; }
        public int ProductId { get; set; }
        public int CustomerId { get; set; }
        public decimal UnitPrice { get; set; }
        public int Quantity { get; set; }
        public decimal Amount { get; set; }
    }
Create the Interfaces for your Repository Classes
Now create the interfaces for the repository classes, as shown in Listing 8.
Listing 8: The Repository interfaces
public interface IProductRepository
{
   public Task<List<Product>> GetProducts();
}

public interface ICustomerRepository
{
   public Task<List<Customer>> GetCustomers();
}

public interface IOrderRepository
{
   public Task<Order> GetOrder(int orderId);
   public Task<List<Order>> GetOrders();
}
Create the Repository Classes
Now create the repository classes, as shown in Listing 9, by implementing the interfaces you created in the preceding section.
Listing 9: The Repository classes
    public class ProductRepository : IProductRepository
    {
        private readonly List<Product>
        products = new List<Product>();
        public ProductRepository()
        {
            products.Add(new Product
            {
                Id = 1,
                Name = "Samsung Mobile",
                Description = "Android Mobile",
                Price = 90000
            });

            products.Add(new Product
            {
                Id = 2,
                Name = "HP Laptop",
                Description = "i9 Laptop",
                Price = 65000
            });

            products.Add(new Product
            {
                Id = 3,
                Name = "Car",
                Description = "Hyundai Xcent",
                Price = 55000
            });
        }
        public Task<List<Product>> GetProducts()
        {
            return Task.FromResult(products);
        }
    }

    public class CustomerRepository : ICustomerRepository
    {
        private readonly List<Customer>
          customers = new List<Customer>();

        public CustomerRepository()
        {
            customers.Add(new Customer()
            {
                Id = 1,
                FirstName = "Joydip",
                LastName = "Kanjilal",
                Address = "Banjara Hills",
                City = "Hyderabad",
                PostalCode = "500034",
                Phone = "1234567890",
                EmailAddress = "joydipkanjilal@yahoo.com"
            });

            customers.Add(new Customer()
            {
                Id = 2,
                FirstName = "Samuel",
                LastName = "Jones",
                Address = "Calgary, Canada",
                Phone = "0987654321",
                EmailAddress = "sjones@gmail.com"
            });
        }
        public Task<List<Customer>> GetCustomers()
        {
            return Task.FromResult(customers);
        }
    }

    public class OrderRepository : IOrderRepository
    {
        private readonly List<Order> orders = new List<Order>
        {
            new Order
            {
                Id = 1,
                ShipAddress = "Banjara Hills",
                ShipCity = "Hyderabad",
                ShipPostalCode = "500034",
                OrderDetails = new OrderDetails
                {
                    Id = 1,
                    CustomerId = 1,
                    OrderId = 1,
                    ProductId = 1,
                    Quantity = 100,
                    UnitPrice = 50,
                    Amount = 5000.00M
                },
                OrderDate = DateTime.Now
            },
            new Order
            {
                Id = 1,
                ShipAddress = "Banjara Hills",
                ShipCity = "Hyderabad",
                ShipPostalCode = "500034",
                OrderDetails = new OrderDetails
                {
                    Id = 1,
                    CustomerId = 1,
                    OrderId = 1,
                    ProductId = 1,
                    Quantity = 100,
                    UnitPrice = 50,
                    Amount = 5000.00M
                },
                OrderDate = DateTime.Now
            }
        };
        public async Task<List<Order>> GetOrders()
        {
            return await Task.FromResult(orders);
        }
        public async Task<Order> GetOrder(int Id)
        {
            return await Task.FromResult (orders.FirstOrDefault
                                          (x => x.Id == Id));
        }
    }
Register the Repository Instances
Write the following code to add the repository instances as a scoped service to the IServiceCollection:
builder.Services.AddScoped<IProductRepository, ProductRepository>();
builder.Services.AddScoped<ICustomerRepository, CustomerRepository>();
builder.Services.AddScoped<IOrderRepository, OrderRepository>();
Create the Controller Classes
Create the API Controller classes named ProductController, CustomerController, and OrderController and write the code shown in Listing 10 in there.
Listing 10: The Controller classes
    [Route("api/[controller]")]
    [ApiController]
      public class ProductController : Controller
      {
          private IProductRepository _productRepository;
          public ProductController(IProductRepository productRepository)
          {
               _productRepository = productRepository;
          }

          [HttpGet("GetProducts")]
                public async Task<List<Product>> GetProducts()
                {
                   return await productRepository.GetProducts();
                }
      }

      [Route("api/[controller]")]
      [ApiController]
        public class CustomersController : ControllerBase
        {
            private readonly CustomerRepository _customerRepository;
            public CustomersController(CustomerRepository customerRepository)
            {
                _customerRepository = customerRepository;
            }

            [HttpGet("GetCustomers")]
              public async Task<List<Customer>> GetCustomers()
              {
                  return await _customerRepository.GetCustomers();
              }

        }

        [Route("api/[controller]")]
        [ApiController]
        public class OrdersController : ControllerBase
        {
            private IOrderRepository _orderRepository;
            public OrdersController(IOrderRepository orderRepository)
            {
                _orderRepository = orderRepository;
            }

            [HttpGet("GetOrders")]
            public async Task<List<Order>> GetOrders()
            {
                return await _orderRepository.GetOrders();
            }

            [HttpGet("{id}")]
            public async Task<Order> GetOrder(int id)
            {
                return await _orderRepository.GetOrder(id);
            }
        }
For the sake of simplicity, you'll implement the Orders microservice in the following sections and skip the other two microservices, Products and Customers.
Create the OrderQuery Class
Create a new .cs file named OrderQuery in the Orders project and replace the default generated code with the code given in Listing 11.
Listing 11: The OrderQuery class
public class OrderQuery
{
    public async Task<List<Order>> GetAllOrders([Service]
        IOrderRepository orderRepository,
        [Service] ITopicEventSender eventSender)
        {
            List<Order> orders = await orderRepository.GetOrders();
            await eventSender.SendAsync("Returned a list of Orders", orders);
            return orders;
        }
}
Create the OrderType Class
In GraphQL, Object Types are used to describe the type of data that are fetched using your API and they're represented by creating a class that derives the GraphQL.Types.ObjectGraphType class. Create a new file named OrderType.cs in your project and replace the default code with the code given in Listing 12.
Listing 12: The OrderType class
public class OrderType : ObjectType<Order>
{
    protected override void Configure(IObjectTypeDescriptor<Order> descriptor)
    {
        descriptor.Field(a => a.Id).Type<IdType>().
            Description("Id property.");
        descriptor.Field(a => a.ShipAddress).Type<StringType>().
            Description("ShipAddress property.");
        descriptor.Field(a => a.ShipCity).Type<StringType>().
            Description("ShipCity property.");
        descriptor.Field(a => a.ShipCountry).Type<StringType>().
            Description("ShipCountry property.");
        descriptor.Field(a => a.ShipPostalCode).Type<StringType>().
            Description("ShipPostalCode property.");
    }
}
Create the OrderSubscription Class
You should also create a subscription to enable your GraphQL server to notify all subscribed clients when an event occurs. Create a new class named OrderSubscription and write the piece of code given in Listing 13 in there.
Listing 13: Notify subscribed clients of an event
public class OrderSubscription
{
    [SubscribeAndResolve]
    public async ValueTask<ISourceStream<List<Order>>>
      OnOrdersGet([Service]
      ITopicEventReceiver eventReceiver,
      CancellationToken cancellationToken)
    {
        return await eventReceiver.SubscribeAsync<List<Order>>
          ("Returned Orders", cancellationToken);
    }
}
Revisiting the Solution Structure
Now that you've created the three microservices, the solution structure looks like Figure 6.
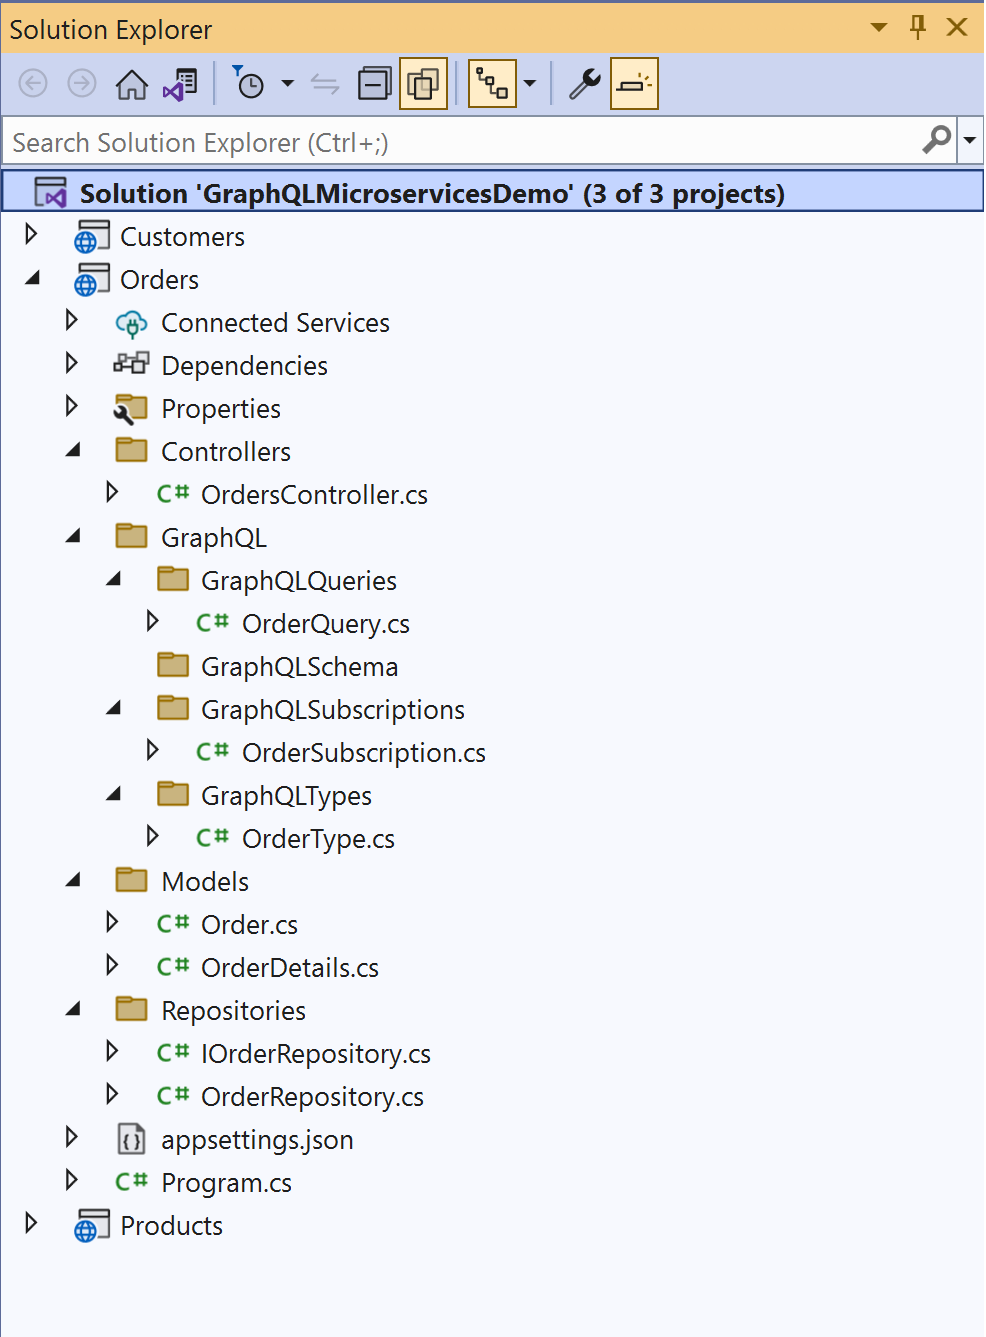
Note that only the Orders microservice project has been expanded and is shown here for brevity.
Configure GraphQL Server in ASP.NET Core
Once you've created the Query type to expose the data you need, configure GraphQL Server in the Program.cs file using the following code snippet:
builder.Services.AddGraphQLServer()
    .AddType<OrderType>()
    .AddQueryType<OrderQuery>()
    .AddSubscriptionType<OrderSubscription>()
    .AddInMemorySubscriptions();
You can then call the MapGraphQL method to register the middleware:
app.MapGraphQL();
When you register this middleware, the GraphQL server will be available at /graphql by default. You can also customize the endpoint where the GraphQL server will be hosted by specifying the following code in the Program.cs file:
app.MapGraphQL("/graphql/orderapiendpoint");
Executing the Order Management Application Using HotChocolate
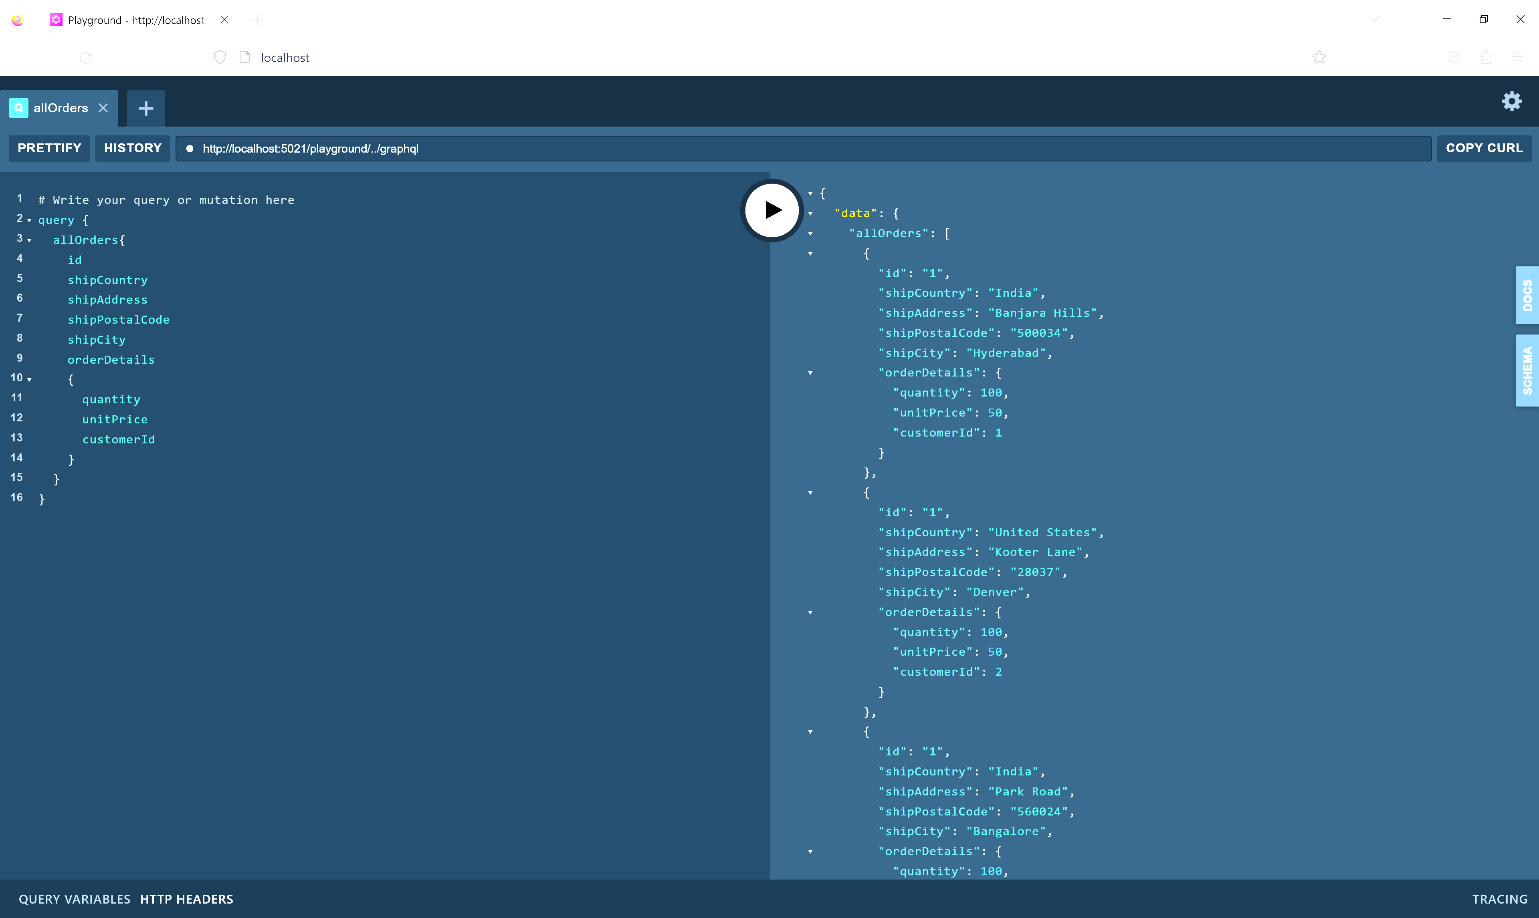
When you execute the application and invoke the HttpGet endpoint of the Orders microservice, the output looks like Figure 7.
Figure 8 shows the output when the query to retrieve order records is executed.
Why Should You Use GraphQL in Microservices Architecture?
Microservices architecture splits applications into self-contained services that communicate through APIs. These services provide business operations and may be designed, deployed, and modified independently. Hence, services are simpler to manage and update, improving system agility, scalability, and resilience.
GraphQL's ability to retrieve and aggregate data from several services in a single request and its adaptability, speed, and flexibility make it a good fit for microservices architectures. GraphQL allows you to define the necessary data in a single request and then get this data from many services with a single query.
GraphQL offers additional benefits for microservices systems, including:
- The schema-first approach and robust type system of GraphQL ease the process of building and testing services independently, decreasing the likelihood of API incompatibility issues.
- Flexible and efficient, GraphQL enables easy updates and inclusion of new features and capabilities without altering the underlying data model.
- The flexibility to create and update APIs independently of back-end services allows cross-functional teams to operate efficiently.
Improving Microservice Architecture with GraphQL API Gateways
GraphQL offers great flexibility in managing data, enabling a more scalable, modular, and maintainable way of creating APIs that combine data from retrieved from multiple downstream services. Here are the key reasons why GraphQL is a good choice for building API gateways:
- Data aggregation: API gateways aggregate data from multiple microservices and present it to clients as a single API. A GraphQL API endpoint can aggregate data from these services, so clients need not make repeated requests to different services.
- Flexible data retrieval: You can use GraphQL to define the precise data you want as well as its format, reducing bandwidth consumption and enhancing performance.
- Effective data fetching: With GraphQL, queries can be batch-processed and cached to improve performance and reduce the number of roundtrips to the server.
- Strong typing: By allowing for strong typing of API requests and responses, GraphQL's type system reduces the possibility of runtime errors and boosts developer efficiency.
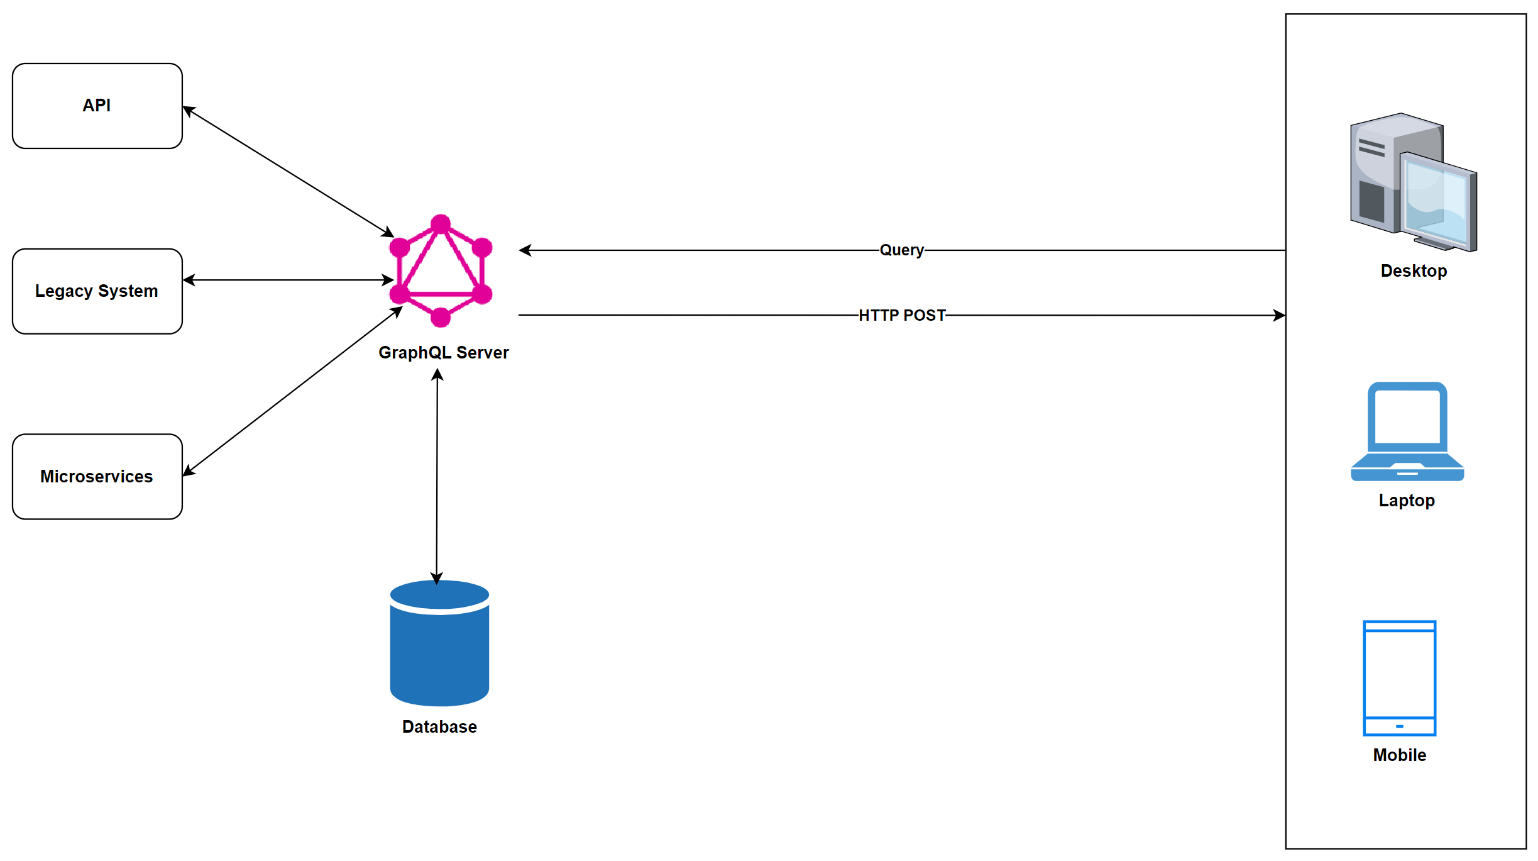
GraphQL as a Data Layer for Microservices
GraphQL can be used as the data layer for your microservices-based applications. In this scenario, GraphQL may be used as an API gateway to collect data from multiple downstream microservices and display it to users. Each microservice handles and saves its data in this architecture, with GraphQL as the API gateway. The server may batch and cache requests using DataLoader to increase performance.
A GraphQL schema describes the data managed by each microservice. The API gateway leverages these schemas to provide a unified, single-schema representation of the entire data graph. The API gateway responds to client requests by delegating the calls to the relevant downstream microservices and collecting the results as shown in Figure 9.
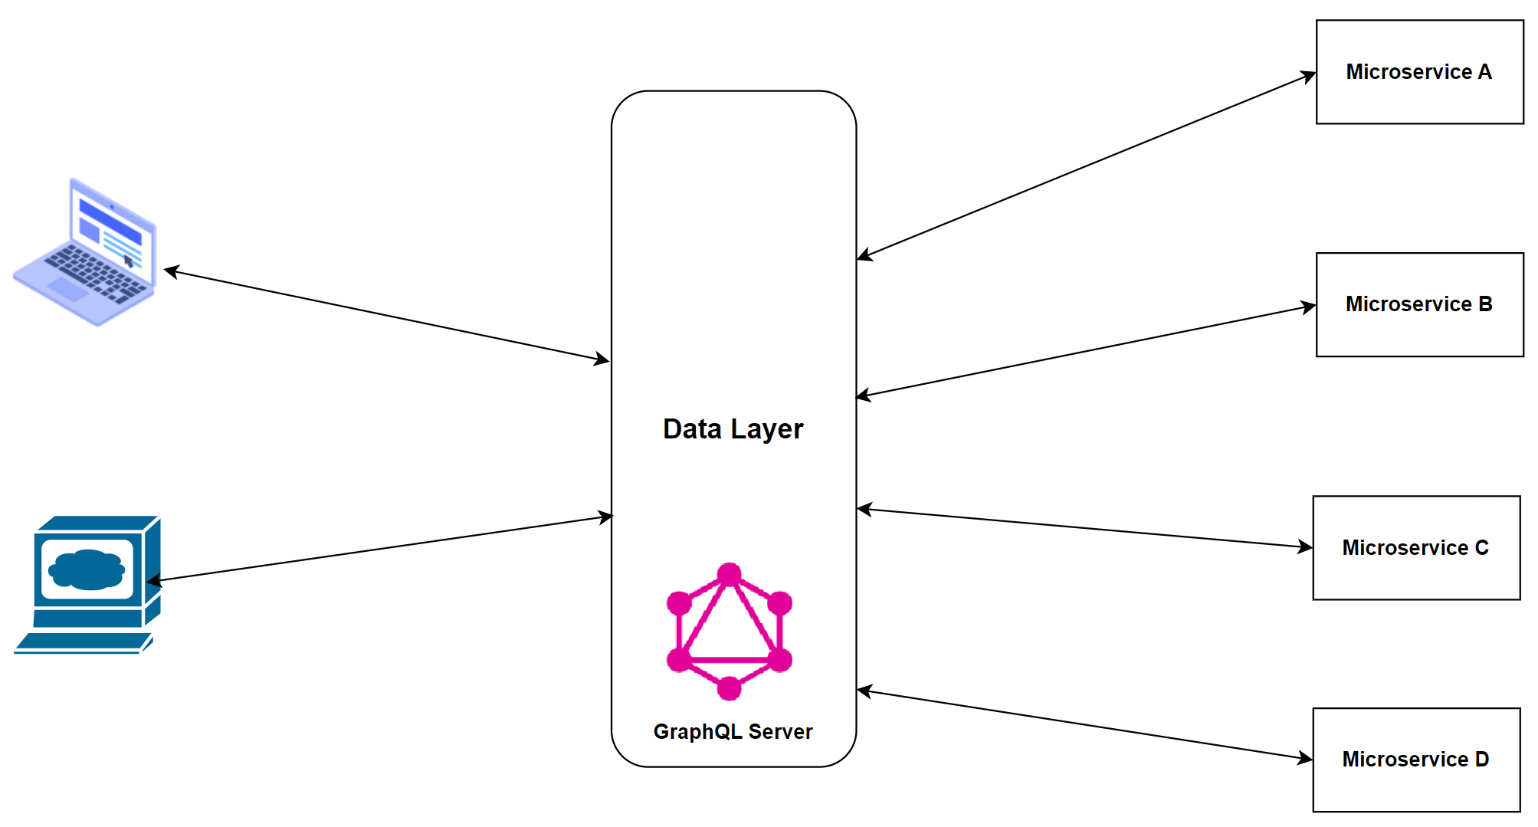
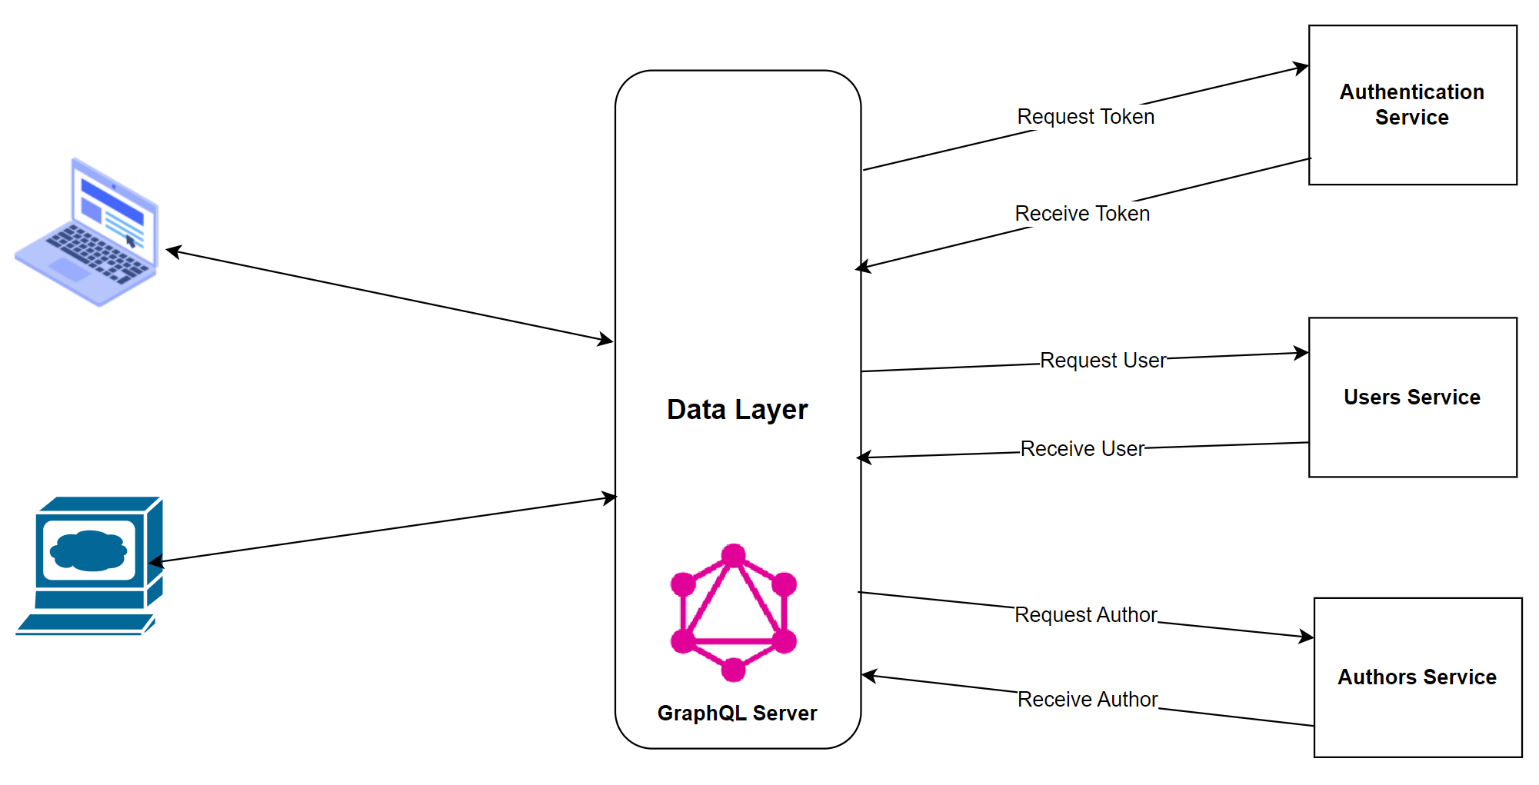
A consumer can fetch data with only one API request when GraphQL is used as an API gateway. The API gateway provides a uniform view of the data, abstracting away the complexities of the microservices. Each microservice can be built independently with this architecture because modifying the microservices does not necessitate altering the API gateway. Figure 10 shows how you can use GraphQL to delegate calls to the downstream services.
Optimizing Data Fetching in GraphQL
This section examines the strategies that can be adopted for optimizing data retrieval in GraphQL.
Caching in GraphQL
Every application that makes repeated queries to a server may benefit significantly from caching. Caching may improve GraphQL application performance and responsiveness by decreasing the number of round trips to the server. In GraphQL a client submits a request to the server, typically using the HTTP POST method. Neither the client nor the server caches these queries; thus, a complete round trip must be made for the query to get the desired results. Here's where caching helps.
There are several strategies to implement caching when working with GraphQL:
- Client-side: Caching GraphQL query results locally on the client computer eliminates the need to re-query the server whenever the same information is needed. You can take advantage of libraries like Apollo Client or Relay, which provide support for in-built caching.
- Server-side: Caching GraphQL query results on the server side allows subsequent requests to be provided directly from the cache rather than requiring a new query to be processed.
- CDN caching: CDN caching allows GraphQL queries to be cached at the network's edge. In CDNs, answers may be cached according to the query parameters, allowing faster caching and serving future requests with the same parameters. Ensure that you use the appropriate caching strategy when using GraphQL to store data in a cache.
Although server-side caching is well-suited for applications with a lot of data and traffic, client-side caching works well for applications that require more user interactivity.
Batching in GraphQL
With batching, GraphQL clients can send a bunch of queries in a single request, reducing network latency and boosting performance. GraphQL servers execute the resolver functions separately when GraphQL queries are executed and return the results in a single response. You package several queries together to make a single request when you use batching. Before returning the results in a single response, the server runs all resolver functions in a single batch.
In order to batch, GraphQL clients have to send one request with a list of queries or mutations. The server processes each query or mutation and sends a single response with a list of results. GraphQL clients, including Apollo, allow you to batch multiple queries together. Batching is a great option when you want to combine several queries.
Using a Data Loader
By batching requests and caching data, data loaders may help your GraphQL APIs perform better, especially when several fields in a query need data from the same data store or when you need to receive data from many searches for the same data. DataLoader may batch queries and cache data to lessen the network cost and latency of getting data from a remote source.
You can easily integrate a data loader with various data sources, such as REST APIs, databases, etc. Additionally, it's compatible with well-known GraphQL libraries such as Apollo Server and GraphQL.js and works with any GraphQL implementation that supports middleware.
The data loader caches the data as soon as the data is fetched from a data store. It examines the cache to determine whether the requested data exists before forwarding it to the resolution function. If the data loader doesn't already have it in the cache, it adds the request to a batch and waits for all requests of the batch to be fulfilled. Once all the requests in the batch have been collected, the data loader executes a single query to retrieve data for all requests in the batch. The retrieved data is sent to each resolver function and any new data is cached.
GraphQL Architectural Patterns
When using GrahQL, you can take advantage of several architectural patterns, depending on your requirements. These patterns are more like guiding stones that provide you with the needed flexibility when working with data using GraphQL.
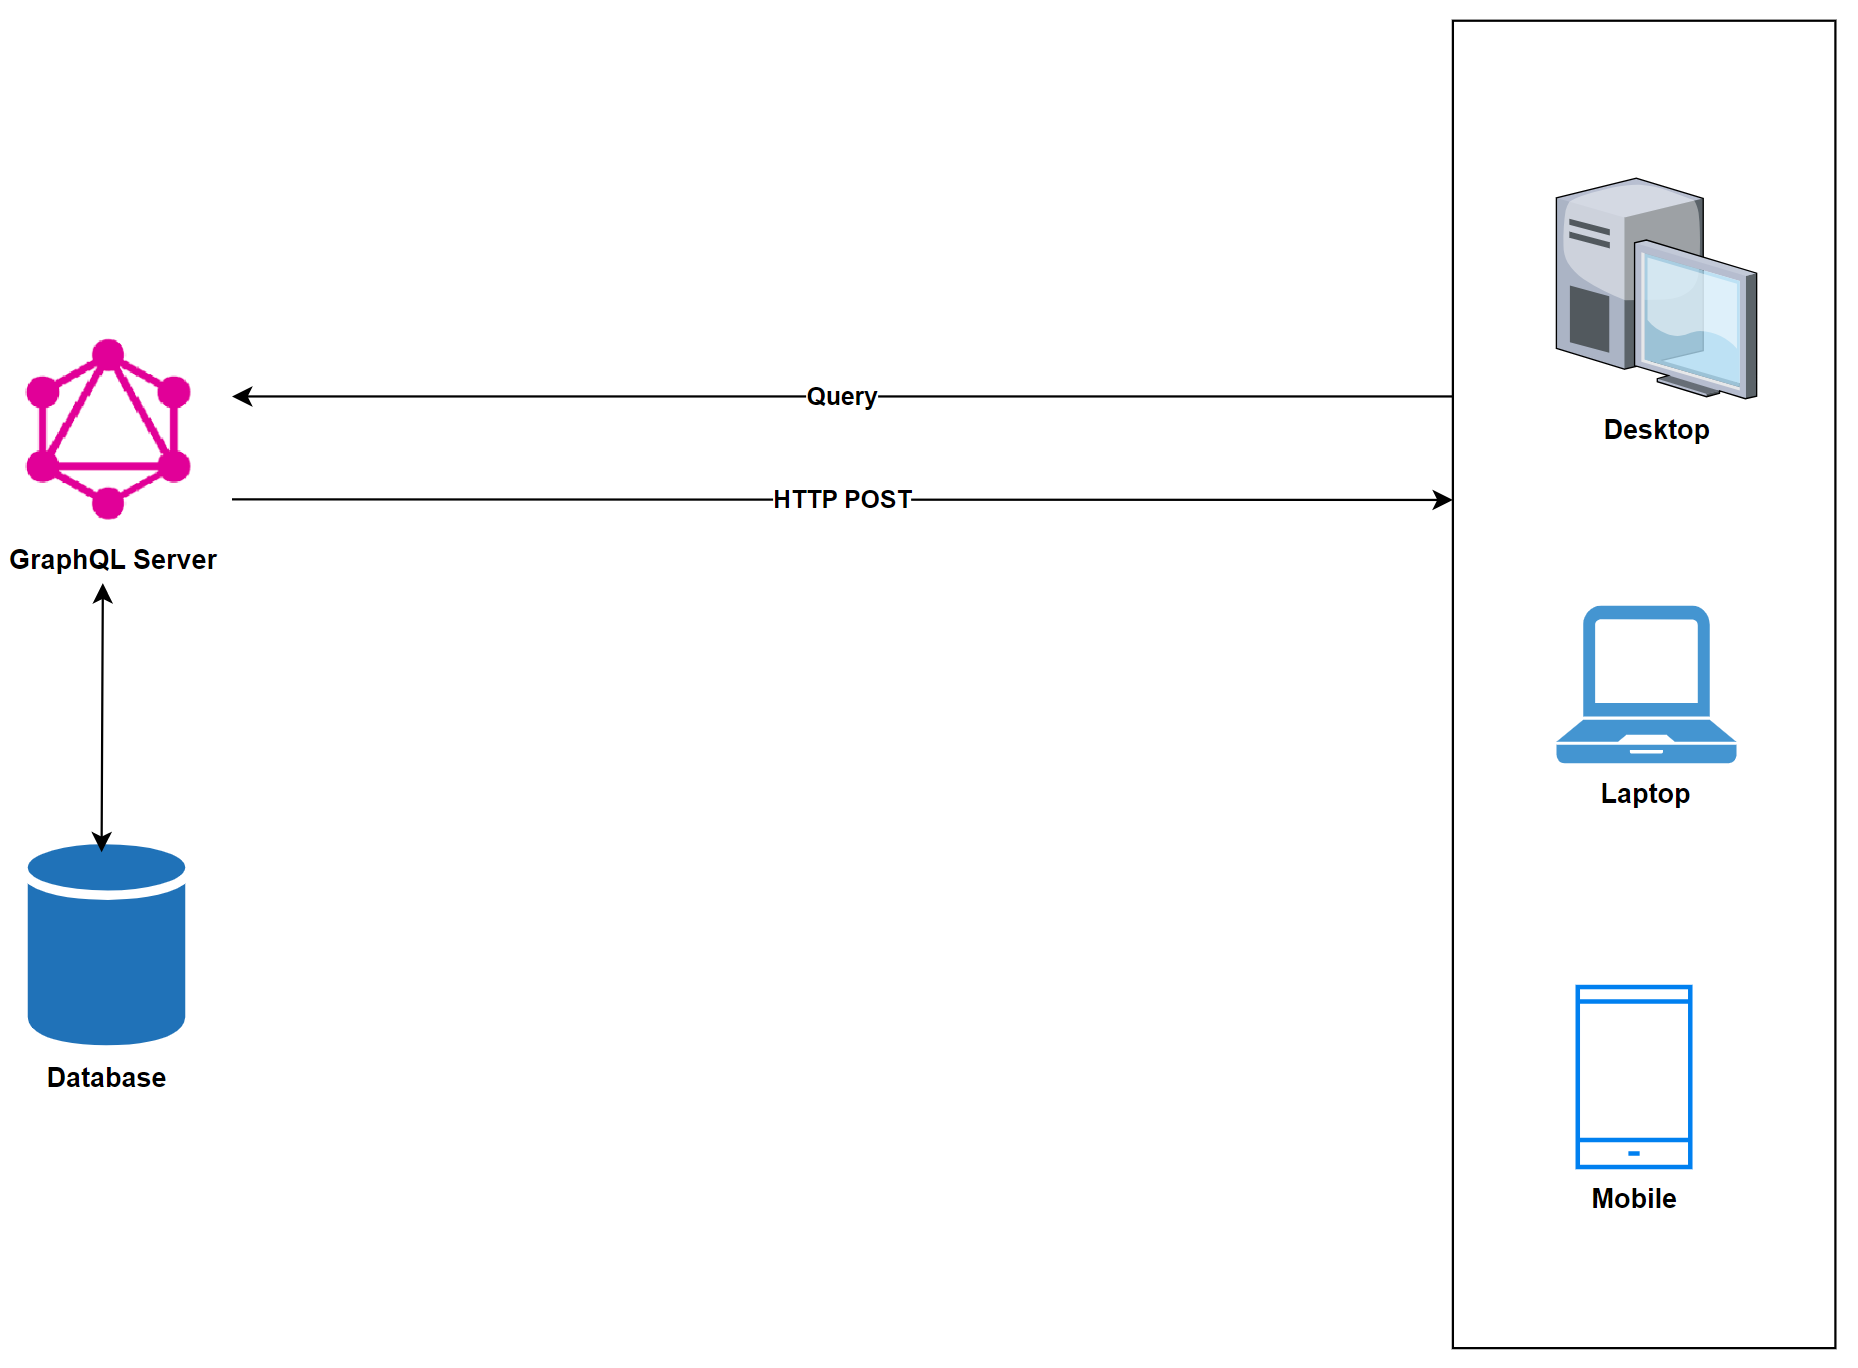
GraphQL Server with a Connected Database
This approach integrates GraphQL with the underlying database through a single server. Clients communicate with GraphQL servers by sending queries. The server responds to client queries by reading them and fetching requested data from the underlying database. Upon resolving the query, the GraphQL server returns the requested data to the client as shown in Figure 11.
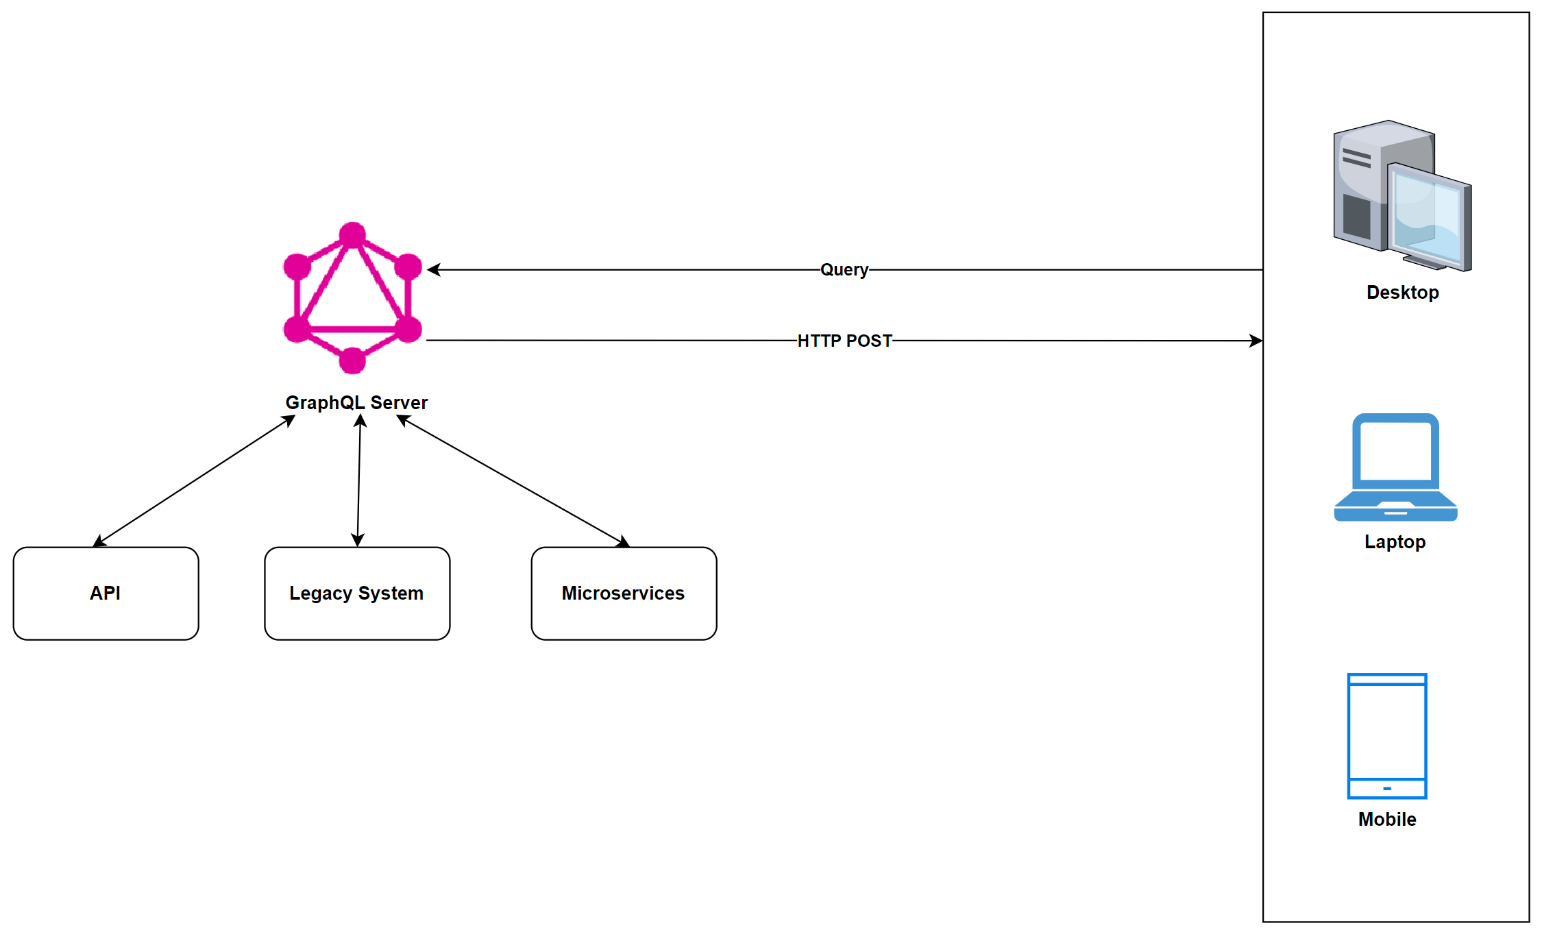
GraphQL Layer Integrated with Existing Systems
In this architectural pattern, the GraphQL server hides the complexity of data fetching logic, providing clients with a unified interface to access data from various disparate systems. It's well suited for projects with legacy infrastructure and multiple APIs, as illustrated in Figure 12.
Hybrid Approach with Connected Database and Integrated System
This architectural pattern combines the two previous approaches where the GraphQL server resolves the query received from a client and then fetches data from the connected database or the integrated APIs. In this approach, the GraphQL server has its connected database, and it can also be connected to external systems while providing the clients with a unified API, as shown in Figure 13.
Securing GraphQL APIs
There are several ways to secure GraphQL APIs. I'll examine some of the key strategies you can adopt to secure your GraphQL API in this section.
Using Rate Limits
The words “rate limiting” refer to a strategy that restricts the number of requests a client may make to a sever in a particular time frame. Rate limitation may be used to prevent your GraphQL APIs from being overloaded. It can help thwart denial-of-service attacks and brute-force attacks by restricting the number of requests made to your GraphQL APIs in a certain time period.
Using Timeouts
For several reasons, when you're working with applications that leverage APIs, the downstream services might need to be fixed, i.e., they might be non-responsive. Possible causes can be because the services are processing data, they're taking quite a lot of time to read from the database, etc. Whatever the reason, you shouldn't allow your GraphQL API to hang for too long while the clients wait for a response. To prevent this, you can leverage timeouts for your slow or non-responsive services.
Using Authentication and Authorization
Authentication aims to verify that a person is who they claim to be, i.e., that the credentials they use for logging into the system are genuine and can be trusted. You can choose strategies, such as JWT tokens, OAuth tokens, or API keys to implement authentication. Authorization refers to the process by which the application determines what resources are accessible to an authenticated user and what information they can access within the application. You can use several techniques to implement authorization, such as attribute-based or role-based access control systems.
Input Validation
Another way to protect APIs is by verifying that the input data, that's the data entered by the user, is valid and satisfies specific requirements. To secure your API, you must validate the input data, such as the user's entered data. This helps you protect your API from injection attacks that include cross-site scripting (XSS) and SQL Injection.
Best Practices in GraphQL
Here are some recommended best practices for GraphQL:
- Define a clear schema. The schema serves as the basis of your GraphQL API, defining the sorts of data that may be queried. Ensure that your schema is well-defined, understandable, and well-documented.
- Use efficient resolvers. Resolvers are functions that get data from a GraphQL query for a specified field. Ascertain that your resolvers are efficient and optimized in order to reduce the amount of database queries and network requests required to complete a request.
- Use pagination. While browsing through large amounts of data, it's recommended to make use of pagination in order to limit the quantity of data returned over the wire, thus improving performance while lowering server load.
- Use caching. Caching is a proven technique that may help you improve performance by reducing the number of database and network calls needed to fulfil a request. You should choose a caching solution commensurate with your use case and the application's data.
- Use nested types to reduce network calls. You should design your GraphQL schema in such a way that related data are grouped in nested types.
- Avoid N+1 queries. N+1 queries occur when a GraphQL query results in several database searches for the same data. To prevent this issue, use DataLoader or other batch-loading approaches.
- Use input types for mutations. Use input types to define mutation input parameters and simplify the structure of your GraphQL documents. This might make your schema more understandable and consistent.
- Use directives. You may use directives to add information to your schema and change the behavior of resolvers. To add validation, authorization, or other functionality to your API, use directives.
- Handle errors gracefully. GraphQL APIs might report errors in a number of situations, such as when a query is incorrect or a database query fails. Ensure that your API handles problems gracefully and offers useful error messages.
- Use a testing tool. To test your API and explore your schema, use GraphiQL or GraphQL Playground. This can help you in executing the queries and mutations and also identifying problems in your API.
Conclusion
GraphQL offers a comprehensive framework for building extendable, efficient, and user-friendly APIs. You can use GraphQL to describe the data you need, and the API will provide it in the most appropriate manner. This capability allows APIs to be easily changed or upgraded without disrupting existing deployments.
In the next and concluding part of this series of articles on GraphQL, I'll examine how GraphQL can be used to build scalable, high performance, flexible microservices architectures.
