Unless you've been living under a rock for the past couple of months, you've heard of the chatbot called ChatGPT. ChatGPT is an artificial intelligence chatbot developed by OpenAI and released in November 2022. Since then, it's taken the world by storm. Not a day passes without someone talking about it on social media, and numerous companies sprang up overnight to take advantage of the capabilities offered by ChatGPT.
In this article, I'll talk about some of the powerful and exciting models offered by OpenAI. And of course, as this is a developer's magazine, my focus will be mostly on what developers can do with them. This is by no means an exhaustive view of what OpenAI offers (in fact I'm confident that things will have changed by the time this article is published), but I want to give you a head-start in getting started with artificial intelligence.
OpenAI is an American artificial intelligence (AI) research laboratory consisting of the non-profit OpenAI Incorporated and its for-profit subsidiary corporation, OpenAI Limited Partnership.
ChatGPT and Large Language Models
The GPT in ChatGPT gets its name from Generative Pre-trained Transformer. GPT is a family of language models known as large language models. Large language models (LLMs) are deep learning models that are trained using vast amounts of text data, such as books, articles, websites, and more. LLMs are able to process and generate human-like responses, and can perform sophisticated tasks, such as language translation, generating new content, generating code, debugging code, providing suggestions and recommendations, and much more. LLMs are often used in natural language processing (NLP) tasks, such as chatbots and virtual assistants, as they are able to hold intelligent conversations with human beings.
According to figures from research firm SemiAnalysis, OpenAI has spent an eye-watering $700,000 a day to run the servers powering ChatGPT. This amount is expected to be much higher today as this figure was based on the older GPT-3 model. At the time of writing, the latest ChatGPT is powered by GPT-4, which is going to cost much more to run.
Microsoft (one of the main investors in OpenAI) is the exclusive provider of the computing power of OpenAI, which runs on the Microsoft Azure platform.
For this article, I won't be going into the details of how LLMs work. Rather, I want to focus on what OpenAI offers. In particular, how you can make use of OpenAI from the perspective as both a user and a developer. For the purpose of this article, Figure 1 shows that behind all the services, APIs, and packages provided by OpenAI, it's essentially a set of pre-trained models. These models are what powers all the various services that users can use (such as ChatGPT). Some of the models are open-sourced (such as GPT-2) and some are not (such as GPT-4).
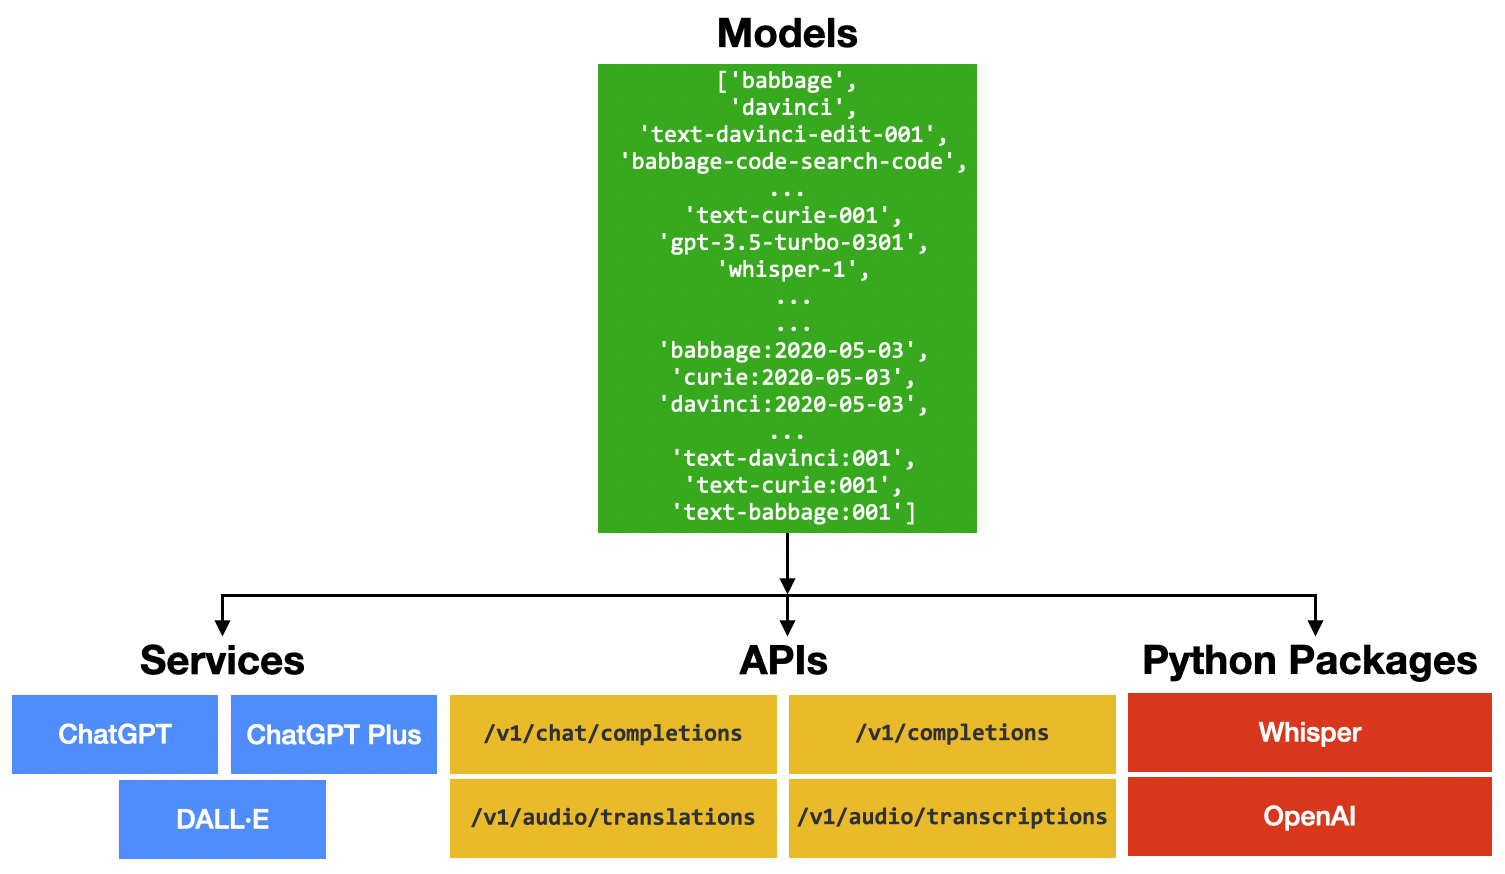
I will discuss how you can make use of OpenAI's services through:
- Services: This is for end-users who want to make use of AI to do their daily work.
- APIs: This is for developers who want to integrate OpenAI's services into their applications.
- Python packages: This is specifically for Python developers to use OpenAI's services.
Using OpenAI Services
Now that you have a basic idea of the different parts in the OpenAI ecosystems, let's start with the services provided by OpenAI to the general public.
ChatGPT
ChatGPT is the service that took the world by storm. Launched as a prototype November 30, 2022, it garnered a lot of attention for its detailed responses and ability to provide the answers to questions across many domains of knowledge. You can ask ChatGPT to:
- Write code for you
- Debug a block of code
- Provide advice
- Explain things
- Write a book summary
- Create a course outline and content
And much more!
Despite ChatGPT's ability to engage in conversations and provide answers to questions, it's important to do your own fact checks because ChatGPT has been known to provide factually incorrect responses.
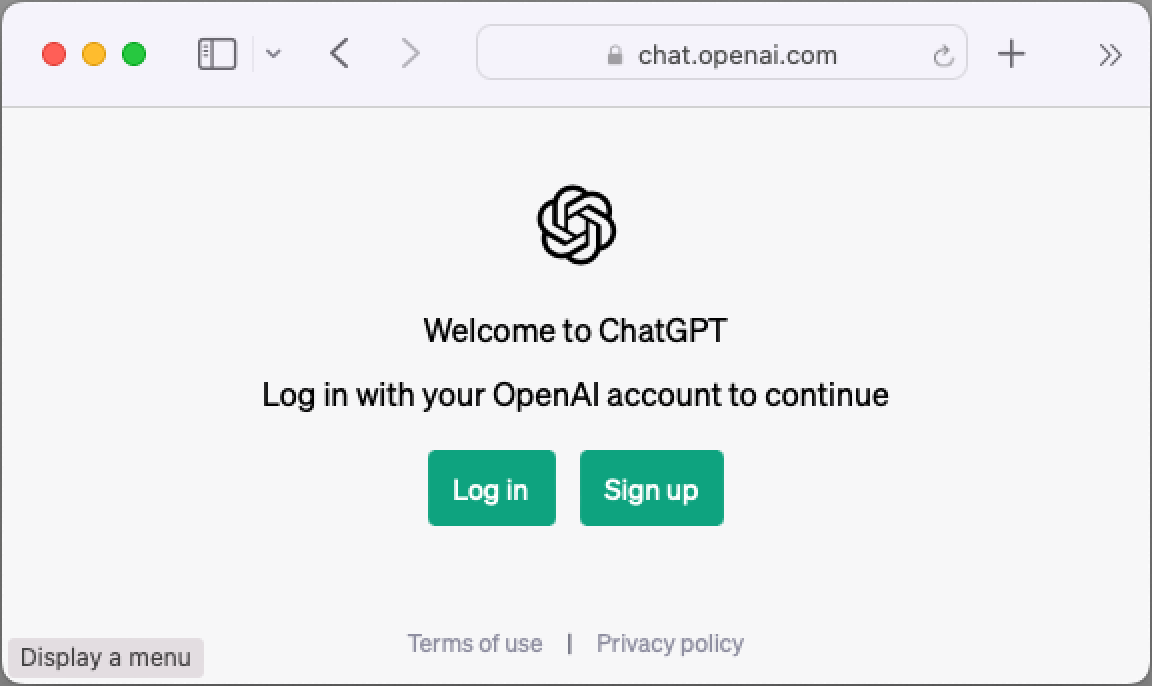
To use ChatGPT, go to https://chat.openai.com (see Figure 2). You need to sign up using a Google or Microsoft account.
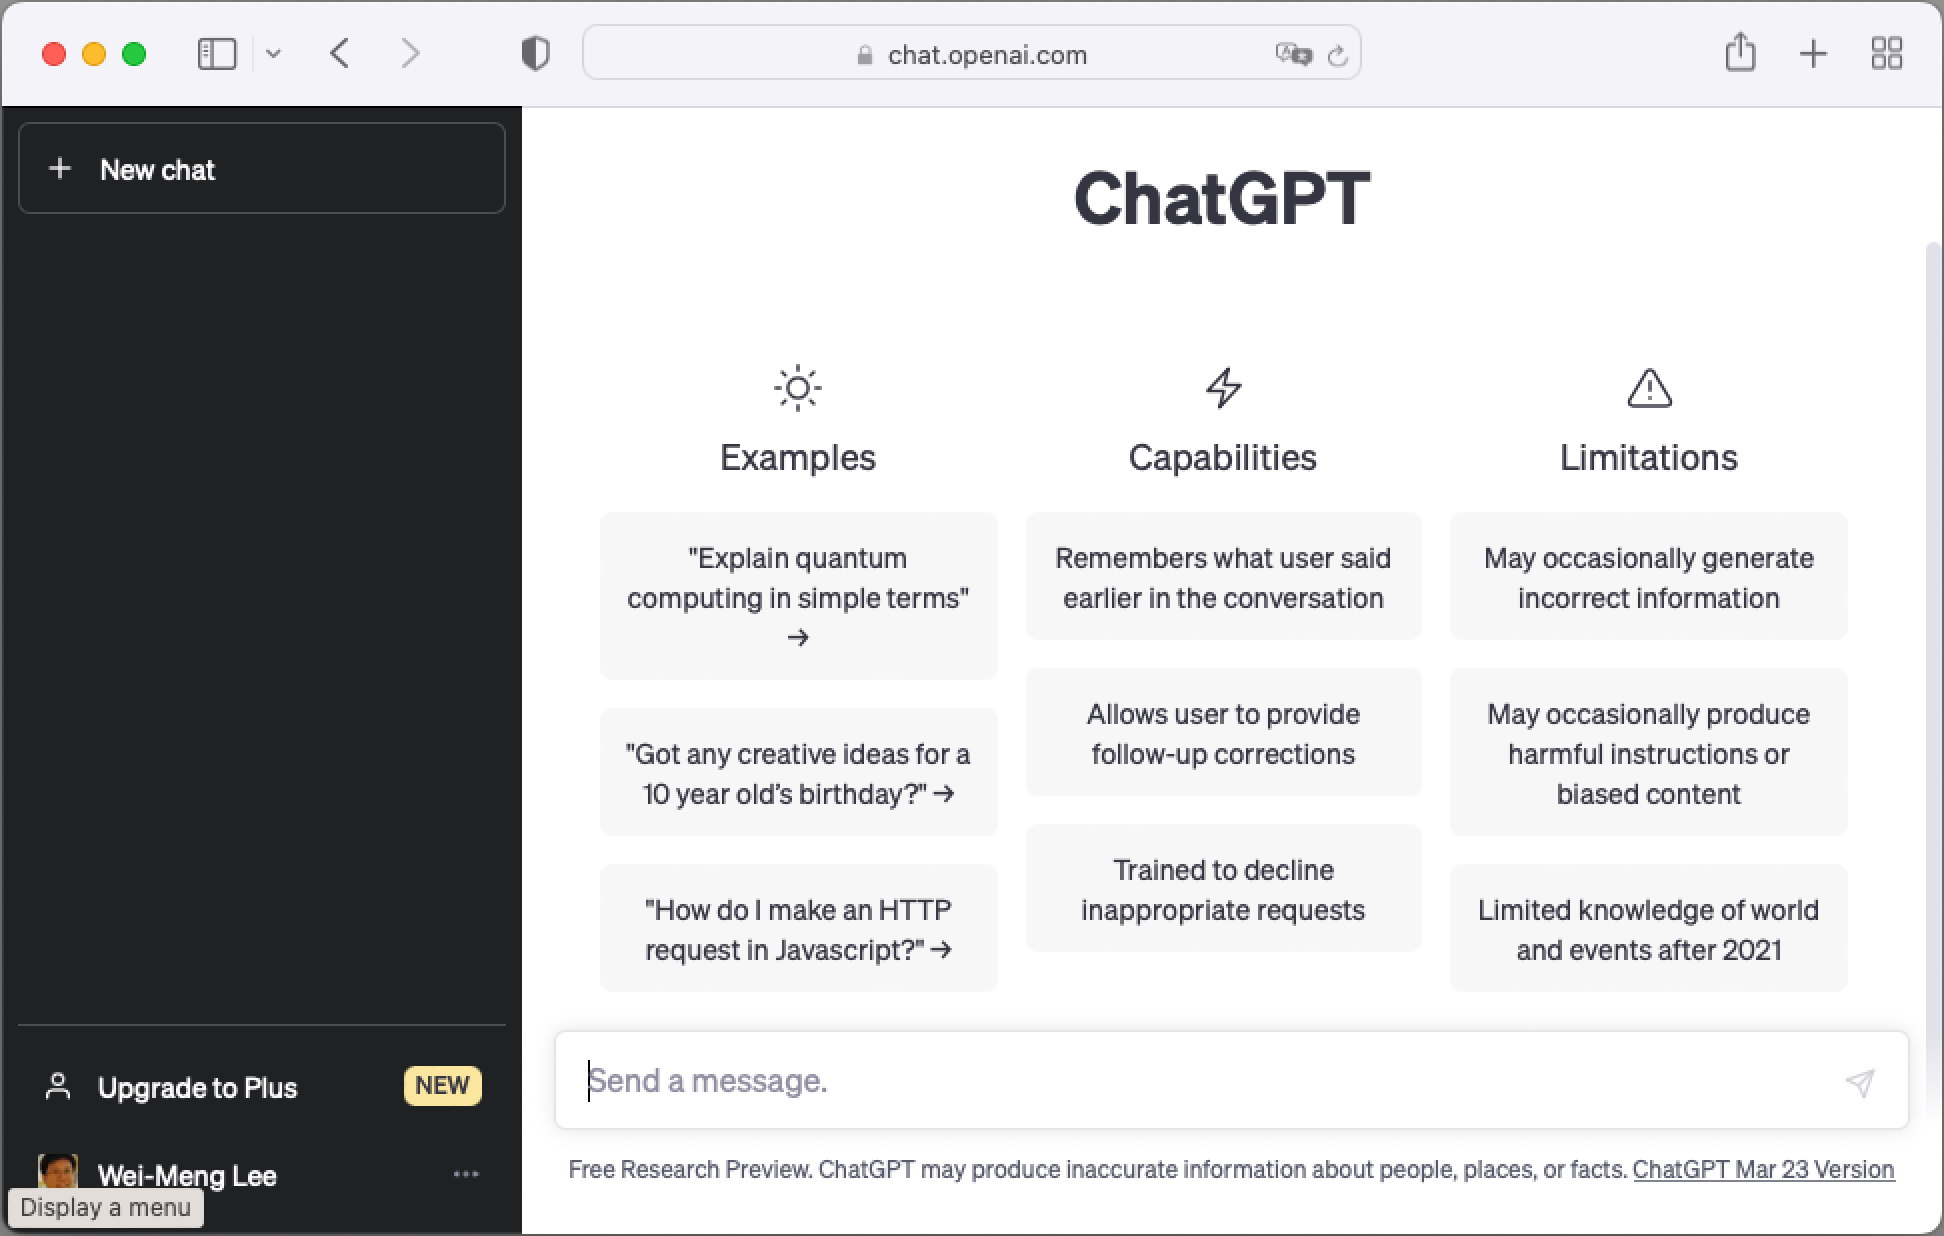
Once you've signed up, you can start asking ChatGPT some questions (see Figure 3).
At the time of this writing, ChatGPT Plus is available for a monthly fee of $20. With ChatGPT Plus, you get faster responses, priority access to new features, and the service is always available even when the demand is high.
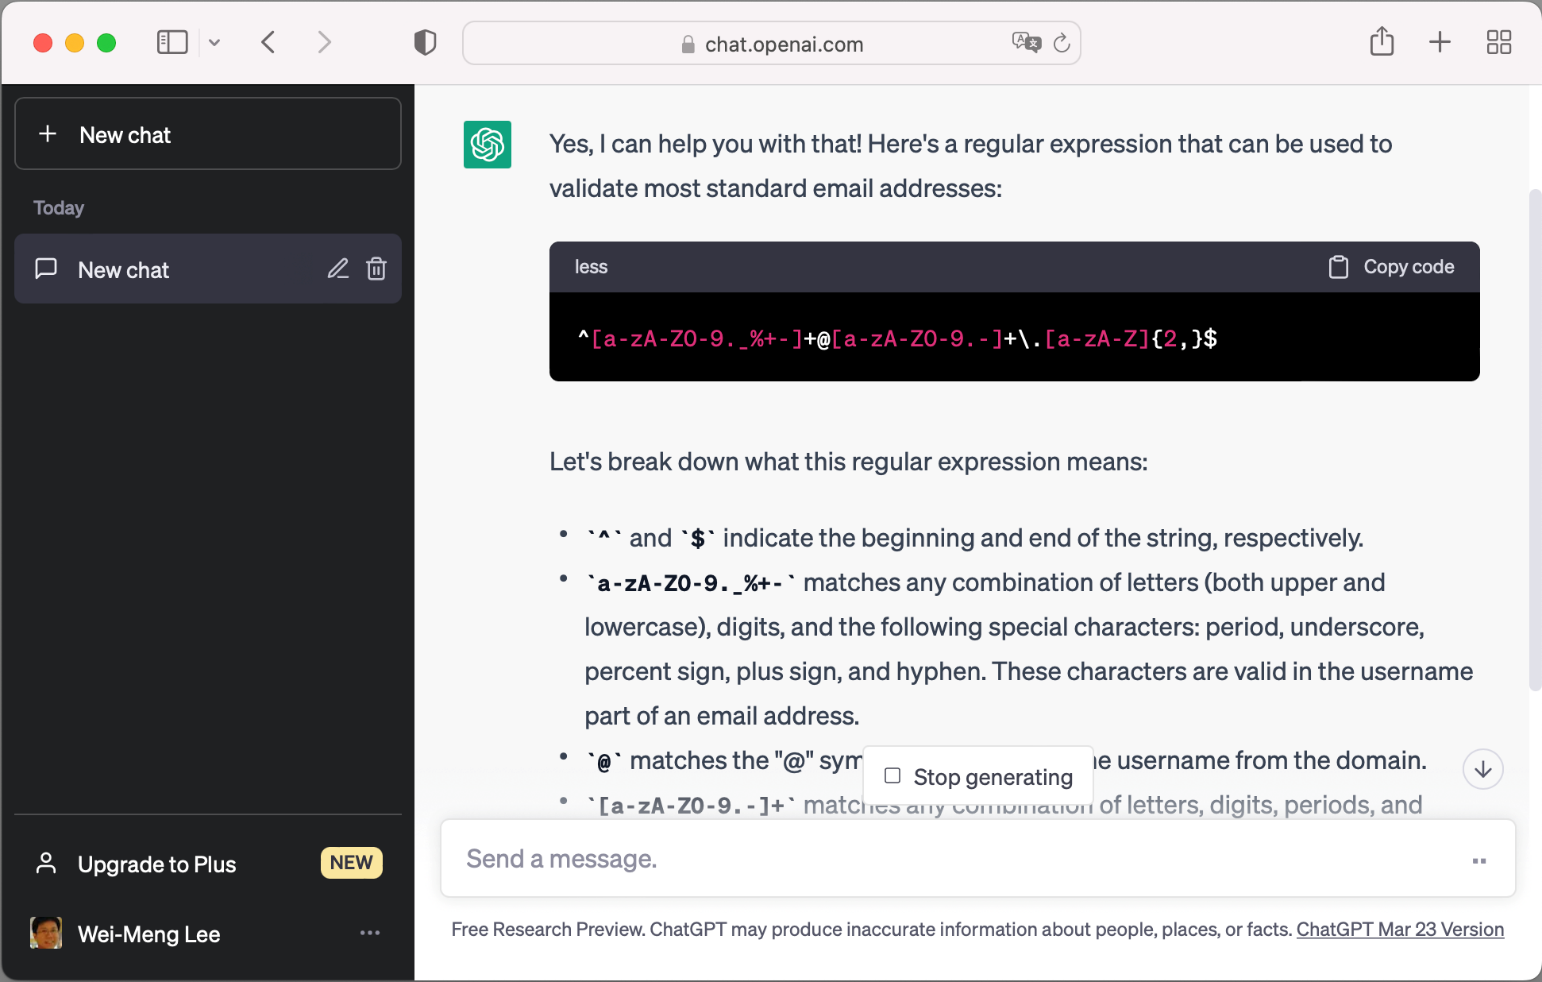
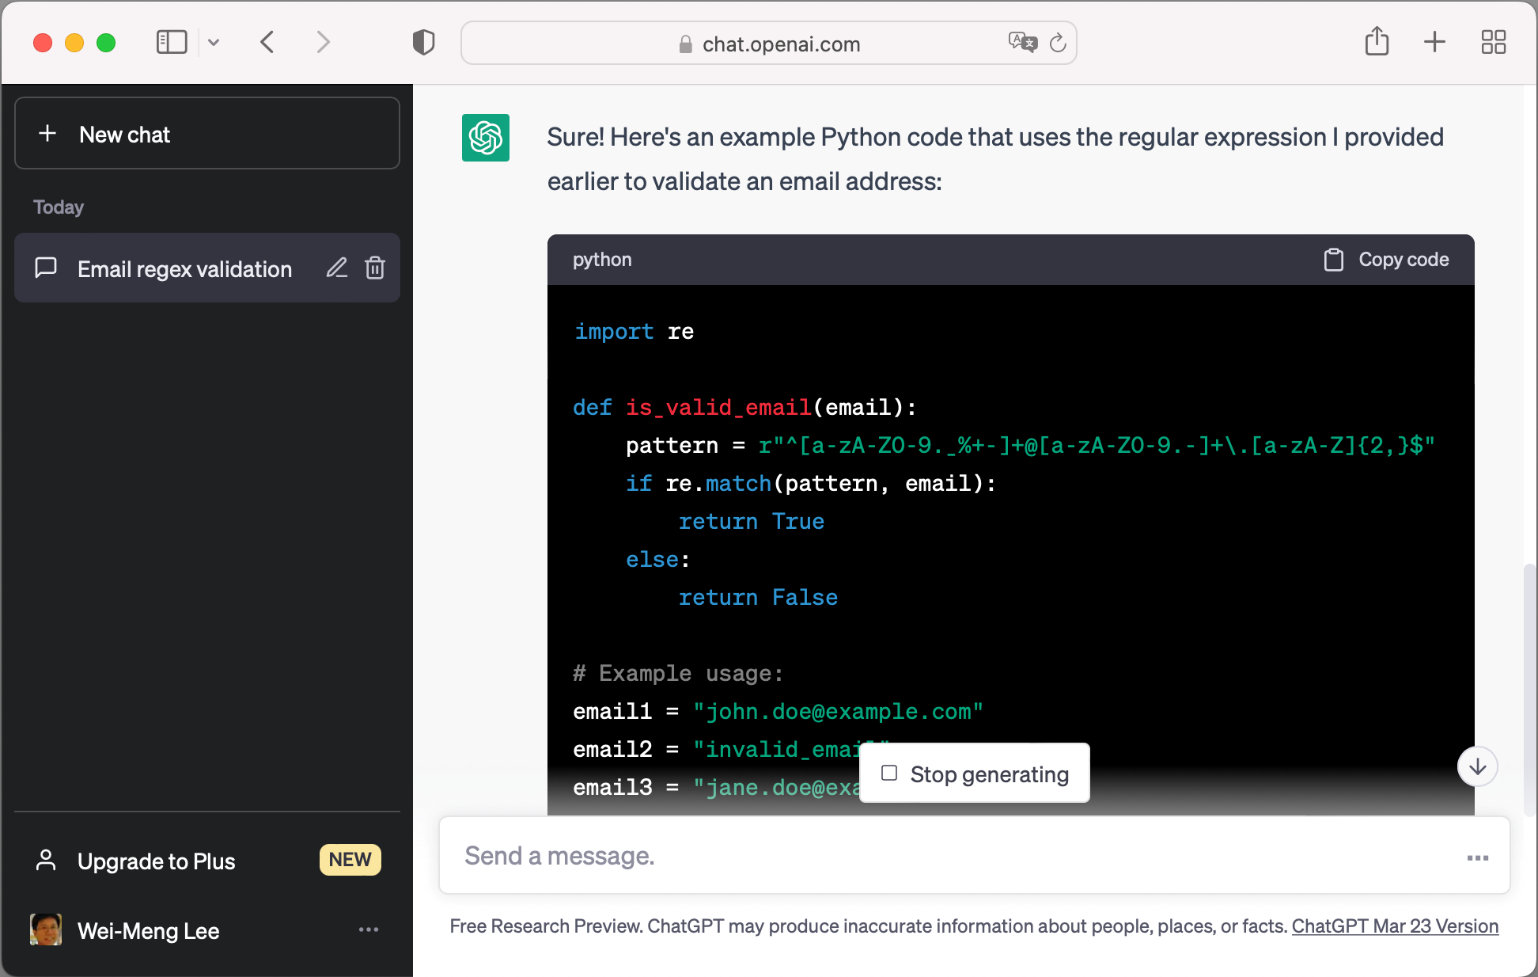
For example, I can ask the following question (called a prompt): “Can you write me the regular expression to validate an email address?” ChatGPT responds with the regular expression (see Figure 4).
You can continue with the conversation by asking “Can you show me an example using Python?” ChatGPT remembers your previous question and provides you with sample code in Python (see Figure 5).
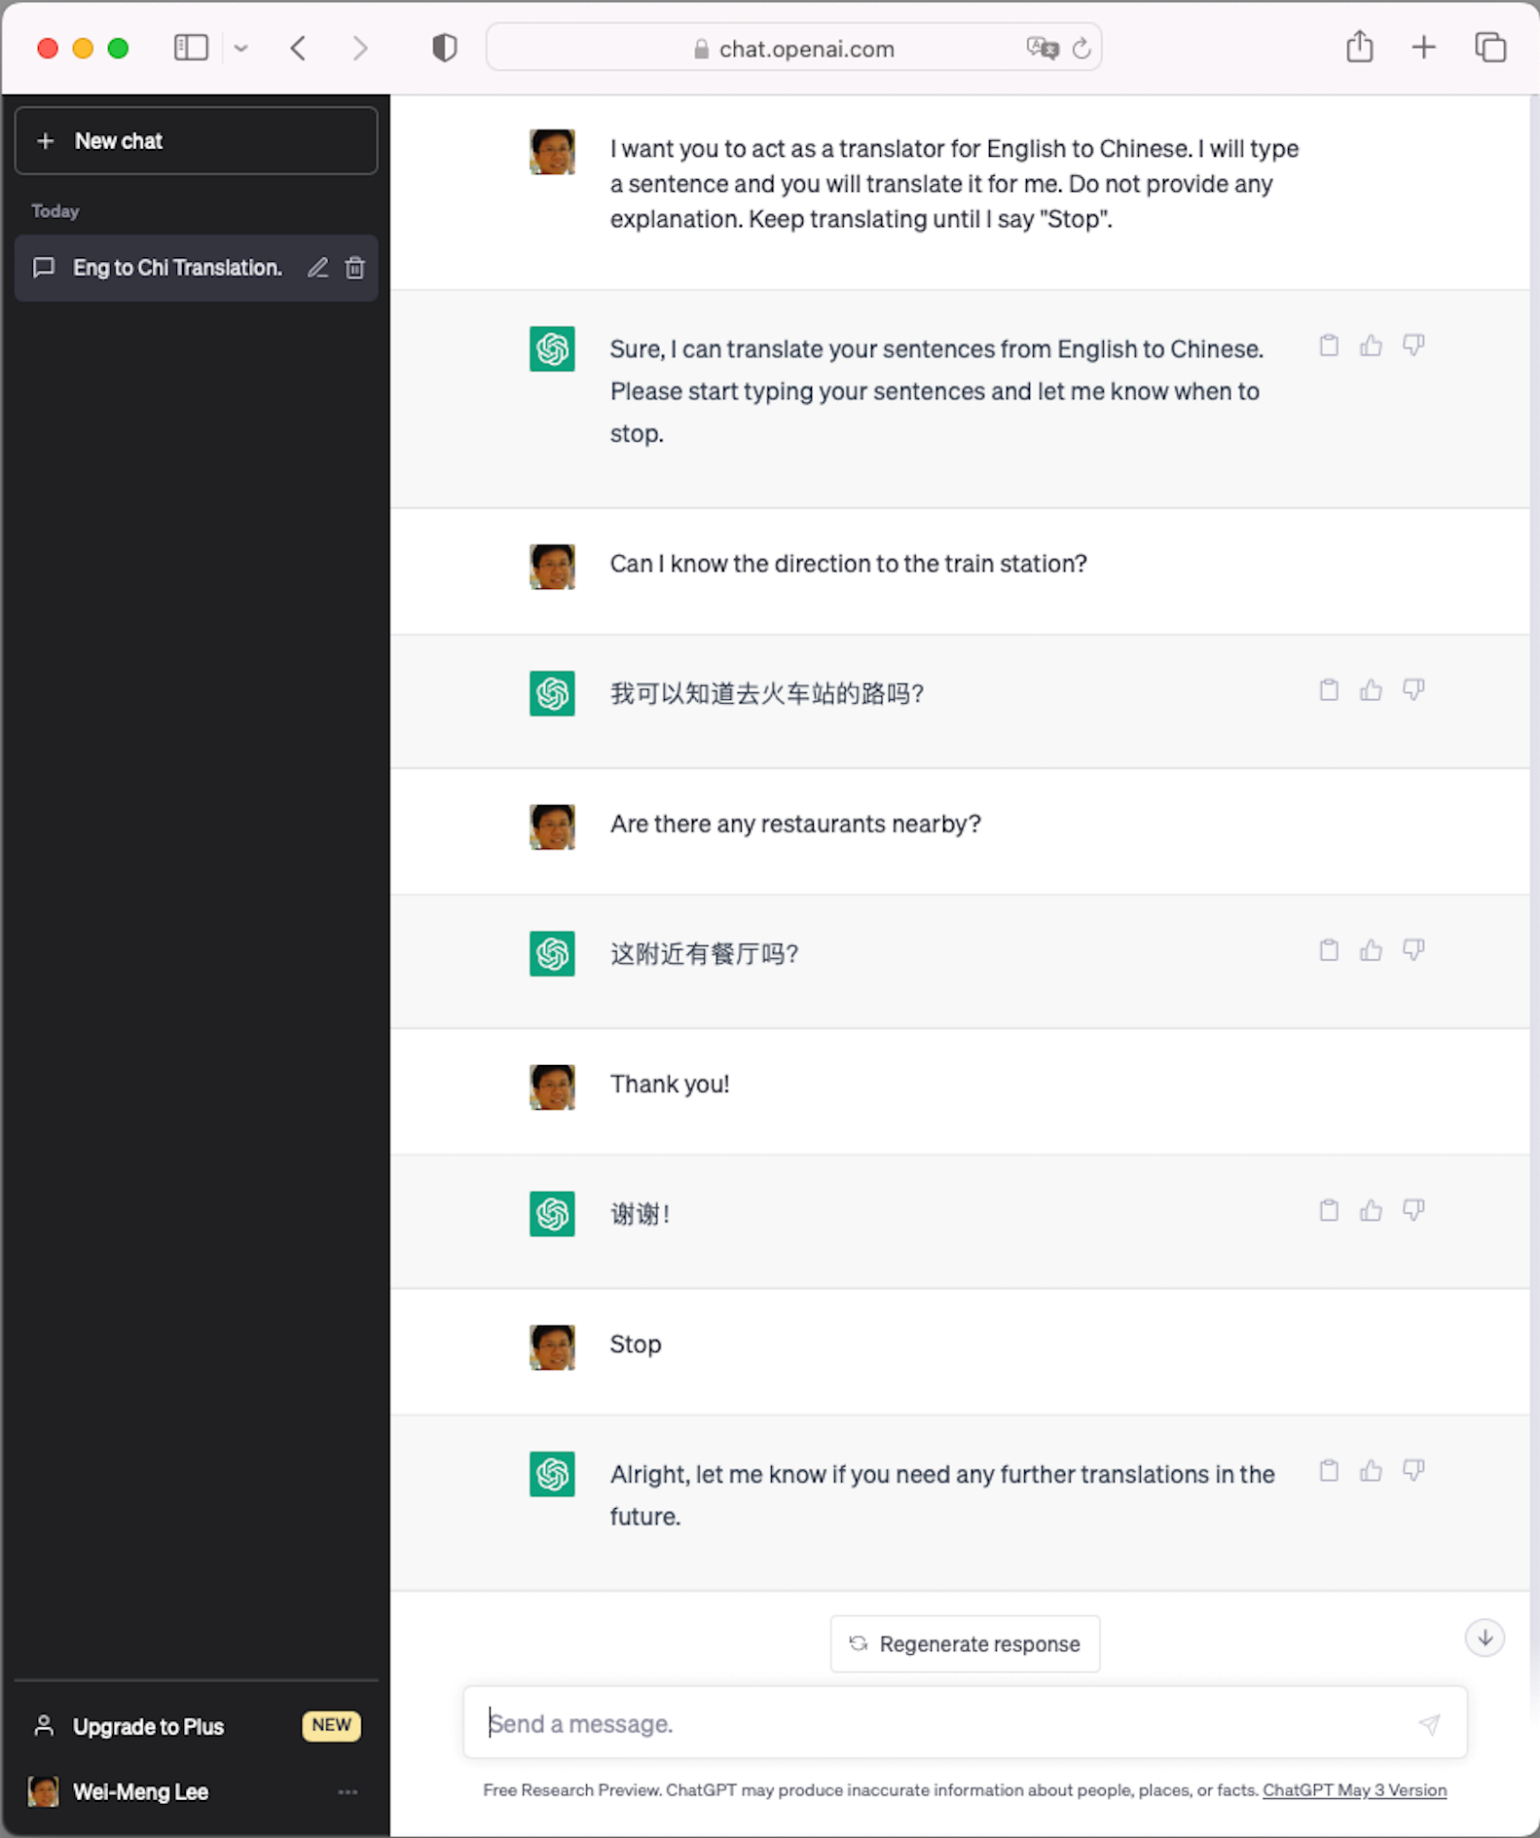
One awesome prompt is to ask ChatGPT to act as a translator. Let's say I want to translate English into Chinese. Instead of explicitly asking ChatGPT to translate each individual sentence I want to translate, I can simply use the following prompt:
“I want you to act as a translator for English to Chinese. I will type a sentence and you will translate it for me. Do not provide any explanation. Keep translating until I say 'Stop.'”
Figure 6 shows the conversation I had with ChatGPT. For every sentence I typed in, ChatGPT straight-away translates it into Chinese until I say “Stop.”
For more interesting prompts that you can use with ChatGPT, check out https://github.com/f/awesome-chatgpt-prompts/.
Using DALL-E 2 to Generate Images
DALL-E 2 is a neural network-based image generation system developed by OpenAI. Based on GPT, it's trained on massive amounts of images and text data. The training set consists of image-text pairs, where each image has an accompanying textual description of the image. The system then learns how to generate new images based on the data that it learned from the training set.
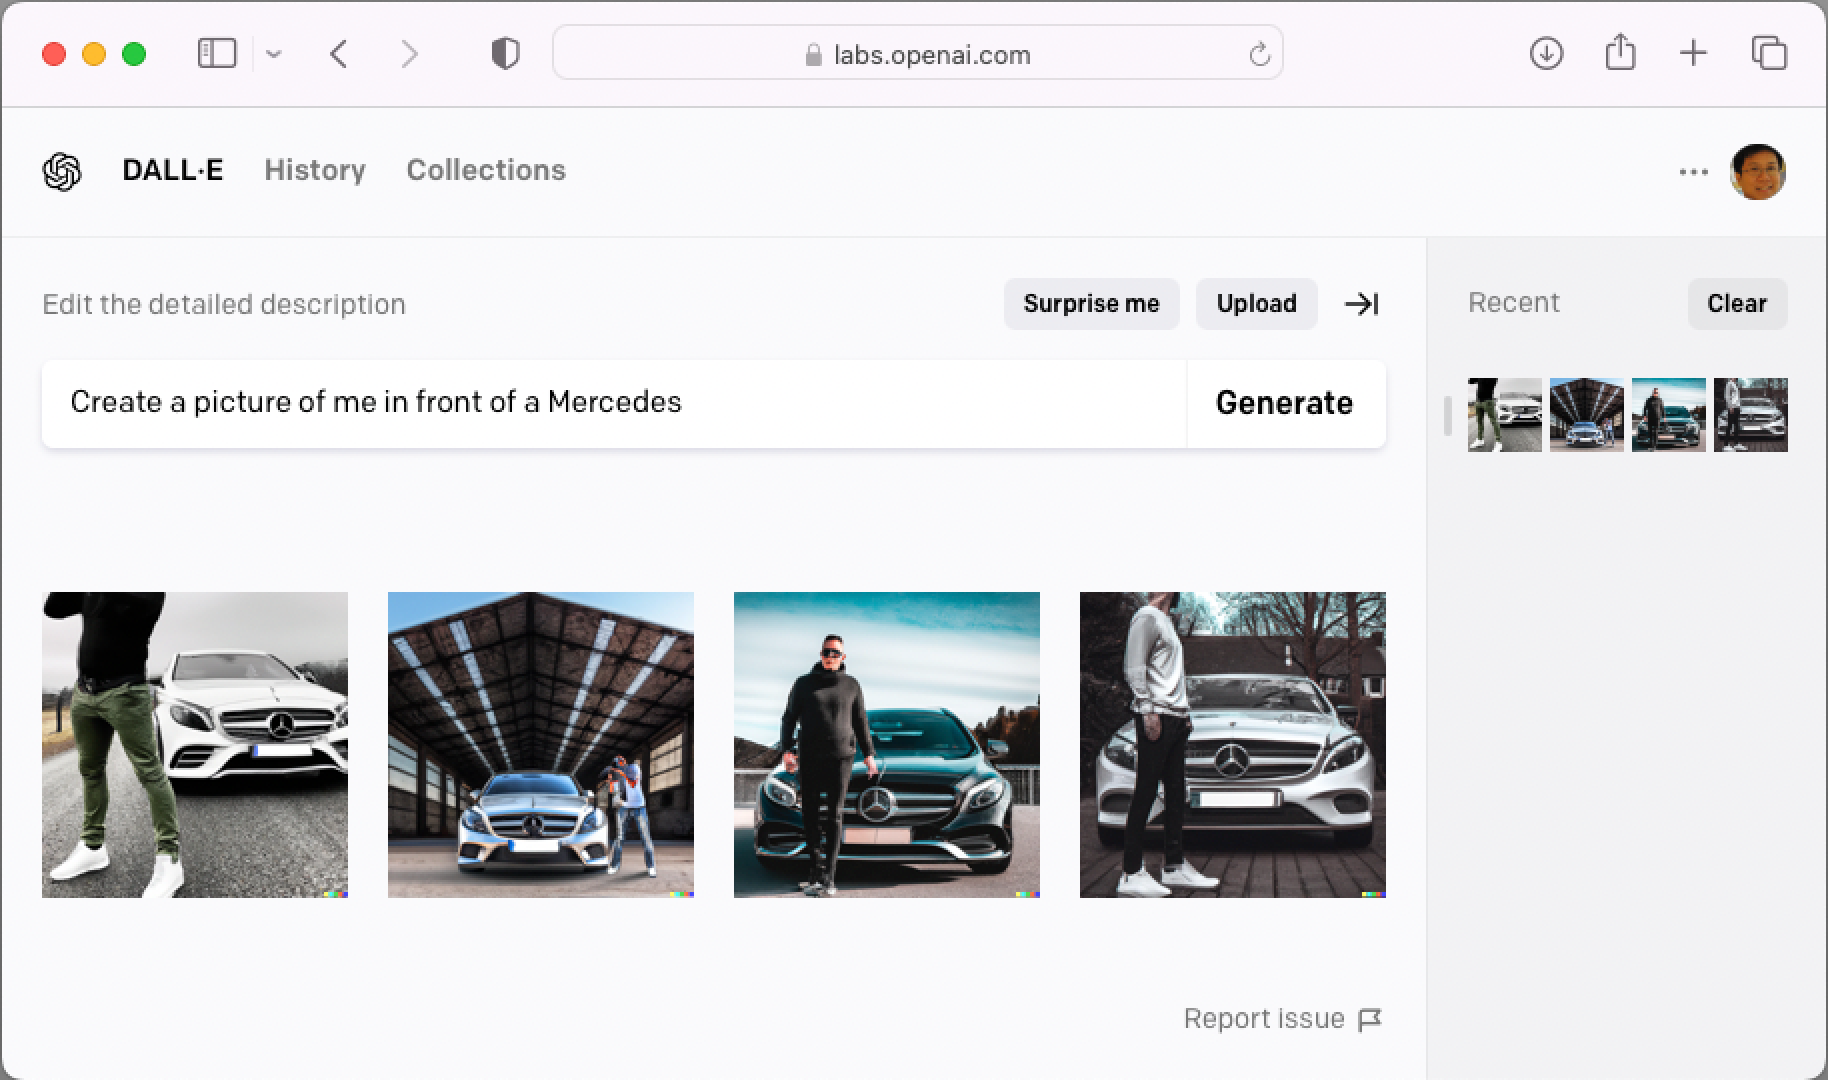
To try out DALL-E 2, go to https://labs.openai.com (see Figure 7).

To generate an image, give it a description (be as detailed as you can). Figure 8 shows the images that it generated for me when I asked DALL-E 2 to create a picture of me in front of a Mercedes.
Another service that's similar to DALL-E is Stable Diffusion, which is an open-source, machine learning model developed by Stability AI. Unlike DALL-E, Stable Diffusion can be accessed through various websites. You can also access it locally through the command line.
Using OpenAI APIs
Because this is a developer magazine, it won't do justice to you if I don't talk about interacting with OpenAI programmatically. So, for this section, I'll discuss how you can integrate OpenAI APIs into your own application.
OpenAI provides APIs for developers to access OpenAI's services. Using them, you can perform a number of tasks, such as:
- Listing the models available for use
- Creating chats
- Creating edits to prompts
- Generating images
- Creating variations of images
- Creating embeddings of a given input
- Creating transcription of audio
Check out https://platform.openai.com/docs/api-reference/ for more details on OpenAI's API offerings.
Accessing Through HTTP
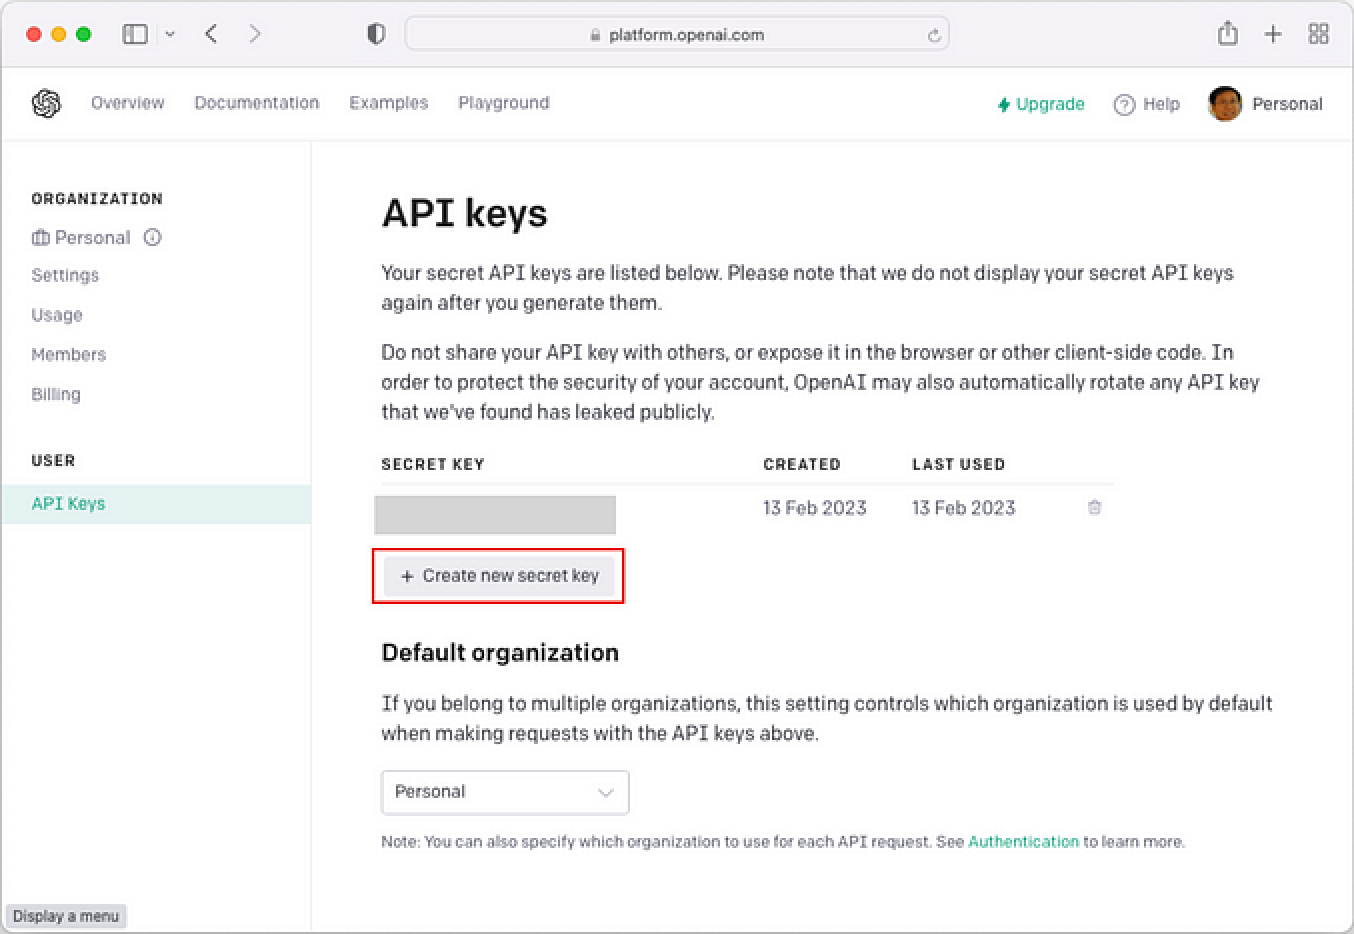
In the following sections, I'll show you a few examples of how to use the OpenAI API using HTTP. To use the APIs, you need to first apply for an OpenAI API key. Head over to https://platform.openai.com/account/api-keys and click the Create new secret key button (see Figure 9).
Once the API key is obtained, it's useful to save it into an environment variable in your OS. For macOS, you can do so via the following command:
$ export OPENAI_API_KEY=xxxxxxxxxxx
For Windows, the command is:
C:\>set OPENAI_API_KEY=xxxxxxxxxxx
Replace xxxxxxxxxxx with your actual OpenAI API key.
Getting All the Models
The first thing you want to use the OpenAI API for is to get a list of models that it supports. You can do so using the following command in Terminal (macOS):
$ curl https://api.openai.com/v1/models \
  -H "Authorization: Bearer $OPENAI_API_KEY"
Note that for Windows, the above command is (note that the \ character used for line continuation is not supported in Windows):
C:\>curl https://api.openai.com/v1/models
   -H "Authorization: Bearer %OPENAI_API_KEY%"
Note: Going forward I'll only show the command for macOS.
Listing 1 shows the partial result returned by OpenAI.
Listing 1: List of models returned by OpenAI
{
    "object": "list",
    "data": [
        {
            "id": "babbage",
            "object": "model",
            "created": 1649358449,
            "owned_by": "openai",
            "permission": [
                {
                    "id": "modelperm-49FUp5v084tBB49tC4z8LPH5",
                    "object": "model_permission",
                    "created": 1669085501,
                    "allow_create_engine": false,
                    "allow_sampling": true,
                    "allow_logprobs": true,
                    "allow_search_indices": false,
                    "allow_view": true,
                    "allow_fine_tuning": false,
                    "organization": "*",
                    "group": null,
                    "is_blocking": false
                }
          ],
          "root": "babbage",
          "parent": null
        },
        {
            "id": "davinci",
            "object": "model",
            "created": 1649359874,
            "owned_by": "openai",
            "permission": [
                {
                    "id": "modelperm-U6ZwlyAd0LyMk4rcMdz33Yc3",
                    "object": "model_permission",
                    "created": 1669066355,
                    "allow_create_engine": false,
                    "allow_sampling": true,
                    "allow_logprobs": true,
                    "allow_search_indices": false,
                    "allow_view": true,
                    "allow_fine_tuning": false,
                    "organization": "*",
                    "group": null,
                    "is_blocking": false
                }
            ],
            "root": "davinci",
            "parent": null
        },
        ...
    ]
}
jq is a lightweight and flexible command-line JSON processor. Go to https://stedolan.github.io/jq/download/ for download and installation instructions.
As the list is pretty long, I'll use the jq tool to extract the ID of each model:
$ curl https://api.openai.com/v1/models \
  -H "Authorization: Bearer \
  $OPENAI_API_KEY" | jq '.data[].id'
The result of the above command now shows the ID of all the models available (see Listing 2).
Listing 2: The list of models supported by the OpenAI API
"babbage"
"davinci"
"text-davinci-edit-001"
"babbage-code-search-code"
"text-similarity-babbage-001"
"code-davinci-edit-001"
"text-davinci-001"
"ada"
"babbage-code-search-text"
"babbage-similarity"
"code-search-babbage-text-001"
"text-curie-001"
"code-search-babbage-code-001"
"text-ada-001"
"text-embedding-ada-002"
"text-similarity-ada-001"
"curie-instruct-beta"
"ada-code-search-code"
"ada-similarity"
"gpt-3.5-turbo-0301"
"code-search-ada-text-001"
"text-search-ada-query-001"
"davinci-search-document"
"gpt-3.5-turbo"
"ada-code-search-text"
"text-search-ada-doc-001"
"davinci-instruct-beta"
"text-similarity-curie-001"
"code-search-ada-code-001"
"ada-search-query"
"text-search-davinci-query-001"
"curie-search-query"
"davinci-search-query"
"babbage-search-document"
"ada-search-document"
"text-search-curie-query-001"
"whisper-1"
"text-search-babbage-doc-001"
"curie-search-document"
"text-search-curie-doc-001"
"babbage-search-query"
"text-babbage-001"
"text-search-davinci-doc-001"
"text-search-babbage-query-001"
"curie-similarity"
"curie"
"text-davinci-003"
"text-similarity-davinci-001"
"text-davinci-002"
"davinci-similarity"
"cushman:2020-05-03"
"ada:2020-05-03"
"babbage:2020-05-03"
"curie:2020-05-03"
"davinci:2020-05-03"
"if-davinci-v2"
"if-curie-v2"
"if-davinci:3.0.0"
"davinci-if:3.0.0"
"davinci-instruct-beta:2.0.0"
"text-ada:001"
"text-davinci:001"
"text-curie:001"
"text-babbage:001"
Chat
Of course, the most exciting features in OpenAI is its chat feature. The popular ChatGPT is powered by the gpt-3.5-turbo model, which you can access in the OpenAI API. The latest version of ChatGPT uses GPT-4, but at the time of writing, it's not publicly available yet.
Let's now use the gpt-3.5-turbo model to ask it to tell us a joke. To do that, use the following command:
$ curl https://api.openai.com/v1/chat/completions \
 -H "Content-Type: application/json" \
 -H "Authorization: Bearer $OPENAI_API_KEY" \
 -d '{
        "model": "gpt-3.5-turbo",
        "messages": [{"role": "user",
        "content": "Tell me a joke!"}],
        "temperature": 0.7
  }'
The result returned look like this (formatted for clarity):
{
    "id":"chatcmpl-7BuXX0OgtQvg32UgU7lD3jELqPgNm",
    "object":"chat.completion",
    "created":1683073303,
    "model":"gpt-3.5-turbo-0301",
    "usage":{
        "prompt_tokens":13,
        "completion_tokens":14,
        "total_tokens":27
    },
    "choices":[
        {
            "message":{
                "role":"assistant",
                "content":"Why don't scientists
                           trust atoms? \n\nBecause they make
                           up everything."
            },
        "finish_reason":"stop",
        "index":0}
    ]
}
The joke returned by the model is encapsulated in the choices key. In a later section of this article, I'll explain in more detail the meanings of tokens and temperature. Also, you can have a conversation with the model based on a previous conversation. I'll explain this in more detail when I talk about how to use this model in a Python application.
Generating Images
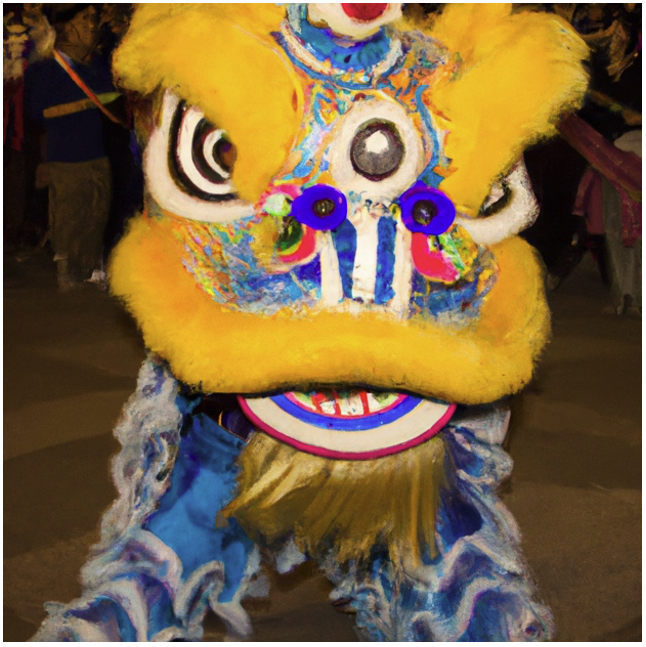
OpenAI is also capable of generating images. The following command asks OpenAI to generate an image of the traditional Chinese lion dance:
$ curl https://api.openai.com/v1/\
images/generations \
  -H "Content-Type: application/json" \
  -H "Authorization: Bearer \
  $OPENAI_API_KEY" \
  -d '{
    "prompt": "Lion dance",
    "n": 1,
    "size": "1024x1024"
  }'
The result returned looks like this:
{
  "created": 1683075354,
  "data": [
    {
      "url": "https://oaidalleapiprodscus.blob.core.
         windows.net/private/org-
         t5oD1gil8GcrGd2igJn9YYK9/user-
         5wXe19z9SoZ72ybzSoVjOs2M/img-
         BL1GLSQcFRuHEqlkpQIb3ikM.png?st=2023-05-
         02T23%3A55%3A54Z&se=2023-05-
         03T01%3A55%3A54Z&sp=r&sv=2021-08-
         06&sr=b&rscd=inline&rsct=image/png&skoid
         =6aaadede-4fb3-4698-a8f6-
         684d7786b067&sktid=a48cca56-e6da-484e-a814-
         9c849652bcb3&skt=2023-05-
         02T19%3A51%3A46Z&ske=2023-05-
         03T19%3A51%3A46Z&sks=b&skv=2021-08-
         06&sig=xpN8HlaJQI6/12yoJGTfJqjtKjAsY4Byxbl
         wLl85P9M%3D"
    }
  ]
}
The value of the url key contains the image that was generated (see Figure 10).
Using OpenAI Python Packages
OpenAI APIs are also available as Python packages. This is very useful if you want to integrate AI services into your applications, particularly Python applications. For the following sections, I'll show you two examples of using OpenAI Python packages:
- Integrating ChatGPT into your Python application
- Using the Whisper API for audio transcription
Using GTP-3 for Chatting
The first example that you'll see is how to integrate ChatGPT into your Python application. First, install the openai package using the pip command (for this section and the next, I'll be using Jupyter Notebook):
!pip install openai
The next step is to specify your OpenAI API key:
import openai
openai.api_key = "YOUR_API_KEY"
Using the openai package, you can list the models available:
models = openai.Model.list()
[model['id'] for model in models['data']]
You will see the list of models, similar to that in Listing 2.
Next, let's use the “gpt-3.5-turbo” for integrating ChatGPT into a Python application:
“gpt-3.5-turbo” is the latest model that is publicly available.
completion = openai.ChatCompletion.create(
    model="gpt-3.5-turbo",
    messages = [{"role": "user", "content": " What is Python?"}],
    max_tokens = 1024,
    temperature = 0.8)
print(completion)
The ChatCompletion.create() function takes in the following arguments:
- Model: The model to use
- Messages: The message to send to the chat bot, which must be packaged as a list of dictionaries
- max_tokens: The maximum number of tokens to generate in the “completion.” If you set this to a small number, the response returned may not be complete.
- Temperature: A value between 0 and 2. Lower value makes the output more deterministic. If you set it to a higher value like 0.8, the output is more likely to be different when you call the function multiple times.
Tokens can be thought of as pieces of words. Before the API processes your prompt, it's broken down into tokens. Approximately a 1500-word sentence is equivalent to about 2048 tokens. For more information on tokens, refer to: https://help.openai.com/en/articles/4936856-what-are-tokens-and-how-to-count-them
Questions to be sent to ChatGPT must be enclosed in the list of dictionaries. For example, the above questions are sent to ChatGPT in the format shown in Figure 11.
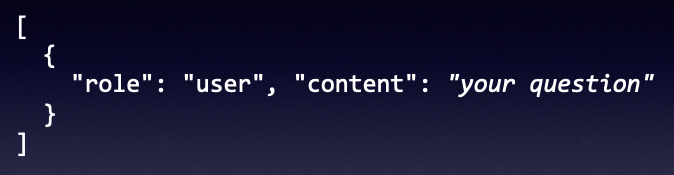
For questions sent to ChatGPT, the dictionary must contain the role key set to user. The question to ask is set in the content key. The response from ChatGPT will look something like this:
{
    "choices": [
        {
            "finish_reason": "stop",
            "index": 0,
            "message": {
                 "content": "Python is a high-level,
                  interpreted programming language that is
                  used for web development, data science,
                  artificial intelligence, machine learning,
                  software development, and many other
                  applications. Python is known for its
                  simplicity, readability, and ease of use,
                  making it a popular choice for beginners
                  and experts alike. It has a vast library
                  of modules and tools that can be used to
                  solve complex problems and automate tasks.
                  Python is open-source and free to use,
                  making it accessible to everyone.",
            "role": "assistant"
            }
        }
    ],
    "created": 1683003427,
    "id": "chatcmpl-7BcMVmIotmFcAFa4Wc9KyLB9Rp0gz",
    "model": "gpt-3.5-turbo-0301",
    "object": "chat.completion",
    "usage": {
        "completion_tokens": 94,
        "prompt_tokens": 12,
        "total_tokens": 106
    }
}
The result in JSON contains a lot of information. In particular, the value of the choices key is an array, of which the first element contains the result that you want, stored in the message dictionary in the content key:
message = completion.choices[0].message.content
print(message)
And here is the response returned by ChatGPT:
Python is a high-level, interpreted
programming language that is used for web
development, data science, artificial
intelligence, machine learning, software
development, and many other applications.
Python is known for its simplicity,
readability, and ease of use, making it a
popular choice for beginners and experts
alike. It has a vast library of modules
and tools that can be used to solve complex
problems and automate tasks. Python is open-
source and free to use, making it
accessible to everyone.
It's important to remember that ChatGPT doesn't remember your previous questions. So in order for you to have a meaningful conversation with it, you need to feed the conversation back to the API. Remember the list of dictionaries you need to pass to the API?
To feed the previous conversation back to ChatGPT, you first append the reply from ChatGPT to the list. Then, you append your follow-up question (see Figure 12).
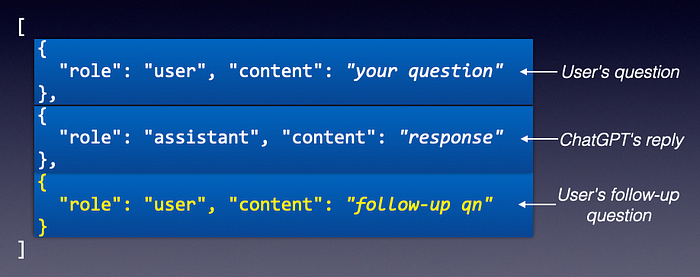
This way, ChatGPT is able to know the previous questions that you have asked and the responses it provided. Here's the updated code to allow the user to have a meaningful conversation with ChatGPT:
Messages = []
while True:
    prompt = input('\nAsk a question: ')
    messages.append(
        {
            'role':'user',
            'content':prompt
        })

    # creating a chat completion
    completion = openai.ChatCompletion.create(
            model="gpt-3.5-turbo",
            messages = messages)

    # extract the response from GPT
    response = completion['choices'][0]['message']['content']
    print(response)
    # append the response from GPT
    messages.append(
        {
            'role':'assistant',
            'content':response
        })
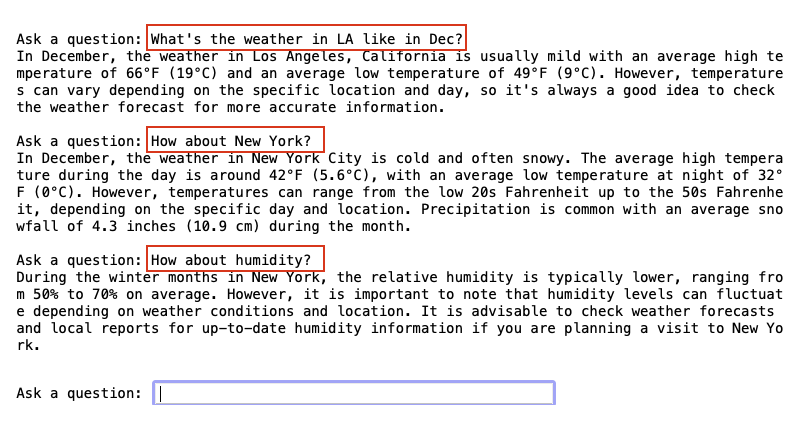
Figure 13 shows a conversation I had with ChatGPT. The rectangles in red are my questions.
Whisper API
Whisper is a general-purpose speech recognition model offered by OpenAI. It's trained on a large dataset of diverse audio and is also a multitasking model that can perform multilingual speech recognition, speech translation, and language identification.
In this section, I'll show you how to use the Whisper API in Python to perform transcription of audio files (to text), and how to translate non-English results into English.
Installing the Whisper Python Package
To install the Whisper API, type the following command in a new cell in your Jupyter Notebook:
!pip install -U openai-whisper
Viewing Available Models and Languages
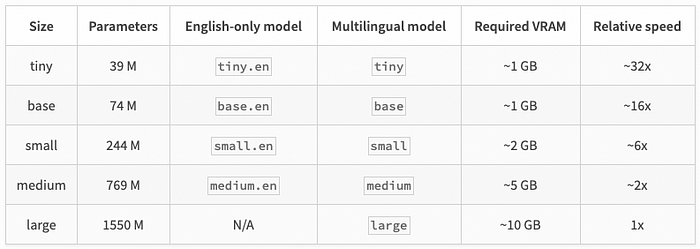
The Whisper API offers five main pre-trained models that you can use for your transcription. You can view the five models by using the models() function:
whisper.available_models()
There are five main models: tiny, base, small, medium, and large:
['tiny.en',
 'tiny',
 'base.en',
 'base',
 'small.en',
 'small',
 'medium.en',
 'medium',
 'large-v1',
 'large-v2',
 'large']
Model names ending with .en are English-only and tend to perform better.
Figure 14 shows the details of the various models, such as their number of trainable parameters, required memory, and relative execution speed.
Creating a Model
Let's now load up a model that you want to use for the transcription:
import whisper
model = whisper.load_model("base")
When you create a model for the first time, the weights of the model are downloaded onto your computer. It will be saved in the ~/.cache/whisper directory.
Transcribing Audio and Translating Text
To transcribe audio, you can either load the audio file that's saved locally on your computer or supply a URL pointing to the audio file. The following example loads the audio file using an URL:
result = model.transcribe(
    'https://www.voiptroubleshooter.com/' +
    'open_speech/american/' +
    'OSR_us_000_0015_8k.wav')
result
If you see a warning like “UserWarning: FP16 is not supported on CPU; using FP32 instead”, that means your model isn't able to make use of the GPU; instead it makes use of the CPU.
FP16 (half-precision floating point) uses 16-bits for storing floating point numbers while FP32 (single-precision floating point) uses 32-bits. Although FP32 allows higher precision and accuracy, it comes with a cost in terms of larger memory footprints. In general, for deep learning, FP16 is preferred over FP32 due to its faster computation times, and also due to the fact that tasks like image classification and object detection do not require a lot of precision.
The result returned by the transcribe() function contains the transcription (text) and a list of all the transcription segments (segments):
{'text': " The first can be slid on the
smooth planks. Glue the sheet to the dark
blue background. It's easy to tell the
depth of a well. These days, the chicken
leg is a rare dish. Rice is often served
in round bowls. The juice of lemons makes
fine punch. The box was thrown beside the
part truck. The house were fed chopped
corn and garbage. Four hours of study
work faced us. A large size of stockings
is hard to sell.",
 'segments': [{'id': 0,
   'seek': 0,
   'start': 0.0,
   'end': 6.5200000000000005,
   'text': ' The first can be slid on the smooth planks.',
   'tokens': [50364,
    440,
    700,
    393,
    312,
    1061,
    327,
    322,
    264,
    5508,
    499,
    14592,
    13,
    50690],
   'temperature': 0.0,
   'avg_logprob': -0.29290932700747535,
   'compression_ratio': 1.5105263157894737,
   'no_speech_prob': 0.024191662669181824},
  {'id': 1,
   'seek': 0,
   'start': 6.5200000000000005,
   'end': 10.32,
   'text': ' Glue the sheet to the dark blue background.',
   'tokens': [50690, 49832, 264, 8193, 281,
        264, 2877, 3344, 3678, 13, 50880],
   'temperature': 0.0,
   'avg_logprob': -0.29290932700747535,
   'compression_ratio': 1.5105263157894737,
   'no_speech_prob': 0.024191662669181824},
   ...
   ],
 'language': 'en'}
The detail of each segment contains information like start time, end time, text, and more. You can load the values of the segments key as a Pandas DataFrame for easier inspection (see Figure 15):
import pandas as pd
df = pd.DataFrame.from_dict(result['segments'])
df

If you're more interested in the transcription of the audio file, extract the value of the text key:
result["text"]
Here's the transcription of the audio:
“The first can be slid on the smooth planks. Glue the sheet to the dark blue background. It's easy to tell the depth of a well. These days, the chicken leg is a rare dish. Rice is often served in round bowls. The juice of lemons makes fine punch. The box was thrown beside the part truck. The house were fed chopped corn and garbage. Four hours of study work faced us. A large size of stockings is hard to sell.”
As the transcription can take a while to perform, you can set the verbose parameter to True so that the transcription segments can be displayed as and when it is ready:
result = model.transcribe(
    'https://www.voiptroubleshooter.com/' +
    'open_speech/american/' +
    'OSR_us_000_0015_8k.wav',
    verbose = True)
result
Here it the output when you set the verbose parameter to True:
Detecting language using up to the first 30
seconds. Use `--language` to specify the language
Detected language: English
[00:00.000 --> 00:06.520]  The first can be slid on the smooth planks.
[00:06.520 --> 00:10.320]  Glue the sheet to the dark blue background.
[00:10.320 --> 00:14.180]  It's easy to tell the depth of a well.
[00:14.180 --> 00:18.280]  These days, the chicken leg is a rare dish.
[00:18.280 --> 00:22.040]  Rice is often served in round bowls.
[00:22.040 --> 00:25.920]  The juice of lemons makes fine punch.
[00:25.920 --> 00:29.880]  The box was thrown beside the part truck.
[00:29.880 --> 00:34.000]  The house were fed chopped corn and garbage.
[00:34.000 --> 00:37.480]  Four hours of study work faced us.
[00:37.480 --> 00:39.800]  A large size of stockings is hard to sell.
Not only can Whisper transcribe your audio, it can also translate the result into English. Let's transcribe an audio which is in French:
result = model.transcribe(
    'https://www.voiptroubleshooter.com/' +
    'open_speech/french/' +
    'OSR_fr_000_0043_8k.wav',
    verbose = True)
result
Here's the result in French:
Detecting language using up to the first
30 seconds. Use `--language` to specify the language
Detected language: French
[00:00.000 --> 00:05.000]  N�on P�le, la m�moire accorde.
[00:05.000 --> 00:09.000]  Instinctivement,  il arr�te � son cheval.
[00:09.000 --> 00:13.000]  Je vous remercie d'�tre l�, mesur.
[00:13.000 --> 00:17.000]  Le chef de ces russes �tait un certain �von.
[00:17.000 --> 00:21.000]  Le feu est sign� de civilisation.
[00:21.000 --> 00:25.000]  Son visage �tait sans expression.
[00:25.000 --> 00:30.000]  Il y a-t-il une raison majeure � cela ?
[00:30.000 --> 00:36.000]  Gabriel va �pouser Simon, la petite boulangerie.
[00:36.000 --> 00:41.000]  La vache noire a eu un petit v�tre adorable.
[00:41.000 --> 00:46.000]  C'est lui qui a distribu� les armes.
[00:46.000 --> 00:50.000]  Ce dernier avait un rendez-vous.
[00:51.000 --> 00:55.000]  C'�tait peu, mais c'�tait assez.
[00:55.000 --> 00:58.000]  Mais le temps lui a manqu�.
[00:58.000 --> 01:03.000]  Nous avons tous notre id�e sur la question.
[01:03.000 --> 01:08.000]  Vous b�n�ficirez des si�ges tr�s confortables.
[01:08.000 --> 01:14.000]  Cette com�die ne manque pas du mort.
[01:14.000 --> 01:19.000]  La vallange d�ferne sur les chalets.
[01:19.000 --> 01:24.000]  Il jouit d'une grande popularit�.
If you want the transcription to be in English, you simply need to set the task parameter to translate:
result = model.transcribe(
    'https://www.voiptroubleshooter.com/' +
    'open_speech/french/' +
    'OSR_fr_000_0043_8k.wav',
    verbose = True,
    task = 'translate')
result
And here's the transcription in English:
Detecting language using up to the first
30 seconds. Use `--language` to specify the language
Detected language: French
[00:00.000 --> 00:05.000]  Do not let the short memory be.
[00:05.000 --> 00:10.000]  Instinctively, instantly, it stops the sound.
[00:10.000 --> 00:14.000]  I thank you for being there, M�sure.
[00:14.000 --> 00:18.000]  The chief of his Russians was a certain Ivan.
[00:18.000 --> 00:22.000]  The fire and signs of civilization.
[00:22.000 --> 00:27.000]  His face was his expression.
[00:27.000 --> 00:31.000]  Is there a major reason for that?
[00:31.000 --> 00:36.000]  Gabriel was supposed to put Simon the little bull in
the air.
[00:36.000 --> 00:42.000]  The black cow had a little adorable.
[00:42.000 --> 00:46.000]  It's him who distributed the weapons.
[00:46.000 --> 00:50.000]  This last one had a big one for you.
[00:50.000 --> 00:54.000]  It was a little, but it was enough.
[00:55.000 --> 00:58.000]  But the time was missing.
[00:58.000 --> 01:03.000]  We all have our ideas on the question.
[01:03.000 --> 01:08.000]  You will benefit very comfortable skies.
[01:08.000 --> 01:14.000]  This comedy does not lack humor.
[01:14.000 --> 01:18.000]  The wave is falling on the shoulders.
[01:18.000 --> 01:23.000]  He is Jewish, a great popularity.
Training ChatGPT Using Your Custom Data
Although it's fun to ask ChatGPT based on the data it's been trained on, what's more useful is if ChatGPT could answer specific questions based on your own training data. For example, say I have the PDFs of CODE Magazine for the past 20 years. These 20 years-worth of content provides a very useful database of coding knowledge. It would be fantastic if ChatGPT could learn from this set of magazine content and be able to answer questions that you throw at it. This is exactly what I'm going to do in this section! The following sections will show you how you can train ChatGPT using your own custom data.
Installing the Prerequisites
For this exercise, you need to install the following packages:
!pip install gpt_index==0.4.24
!pip install gradio
!pip install langchain==0.0.107
!pip install PyPDF2
The uses of these packages are as follows:
- aIndex (gpt_index) is a project that provides a central interface to connect your LLMs with external data.
- Gradio is a Python package that displays UI for interacting with AI chatbot.
- LangChain is a framework for developing applications powered by language models.
- PyPDF2 is a Python package for reading PDF files.
Preparing the Training Data
For the data that I'll be using, I'll use three PDF documents of the most recent issues of CODE Magazine. Create a folder in the same folder as your Jupyter Notebook and name it as training documents. Drag and drop a few PDF documents into the folder (see Figure 16).

You can put as many files as you want in the training documents folder. Besides PDF documents, text files are also supported.
Training ChatGPT
You're now ready to write the code to train ChatGPT using your own data. Listing 3 shows the code with the comments inline.
Listing 3: The code to train ChatGPT using our own data
from gpt_index import SimpleDirectoryReader, \
                      GPTListIndex, \
                      GPTSimpleVectorIndex, \
                      LLMPredictor, \
                      PromptHelper

# the ChatOpenAI class allows you to use the OpenAI's
# models at https://platform.openai.com/docs/models
from langchain.chat_models import ChatOpenAI
import os

os.environ["OPENAI_API_KEY"] = "YOUR_OPENAI_API_KEY"

# index the documents in the specified path
def index_documents(folder):
    max_input_size    = 4096
    num_outputs       = 512
    max_chunk_overlap = 20
    chunk_size_limit  = 600

    # helps us fill in the prompt, split the text, and
    # fill in context information according to
    # necessary token limitations
    prompt_helper = PromptHelper(max_input_size,
                                 num_outputs,
                                 max_chunk_overlap,
                                 chunk_size_limit =
                                 chunk_size_limit)

    # the LLMPredictor class is a wrapper around
    # an LLMChain from Langchain
    llm_predictor = LLMPredictor(
        llm = ChatOpenAI(temperature = 0.7,
                         model_name = "gpt-3.5-turbo",
                         max_tokens = num_outputs))

    # load the documents from the documents folder
    documents = \
        SimpleDirectoryReader(folder).load_data()

    # The GPTSimpleVectorIndex is a data structure
    # where nodes are keyed by embeddings, and
    # those embeddings are stored within a simple
    # dictionary. During index construction, the
    # document texts are chunked up, converted to
    # nodes with text; they are then encoded in
    # document embeddings stored within the dict.
    index = GPTSimpleVectorIndex(documents,
                llm_predictor = llm_predictor,
                prompt_helper = prompt_helper)
    index.save_to_disk('index.json')

index_documents("training documents")
After the training, the model is saved into the index.json file. When you run the code snippet, you'll see the following output:
INFO:root:> [build_index_from_documents]
  Total LLM token usage: 0 tokens
INFO:root:> [build_index_from_documents]
  Total embedding token usage: 218071 tokens
Asking Questions
You can now ask questions pertaining to the content of the PDFs that you've used for training:
def Code_Mag_KB(input_text):
    index = \ GPTSimpleVectorIndex.load_from_disk('index.json')
    response = index.query(input_text, response_mode = "compact")
    return response.response

Code_Mag_KB('Summarize what a smart contract is?')
When you run the above code snippet, you get the following output:
INFO:root:> [query] Total LLM token usage: 641 tokens
INFO:root:> [query] Total embedding token usage: 9 tokens
And the response is also shown:
“\n A smart contract is a piece of code that is stored on a blockchain and is used to execute certain functions. It can write values onto the blockchain and transfer funds between accounts. Smart contracts are useful for verifying credentials and other data that needs to be stored securely and immutably.”
Wrapping ChatGPT Using a Web-Based UI
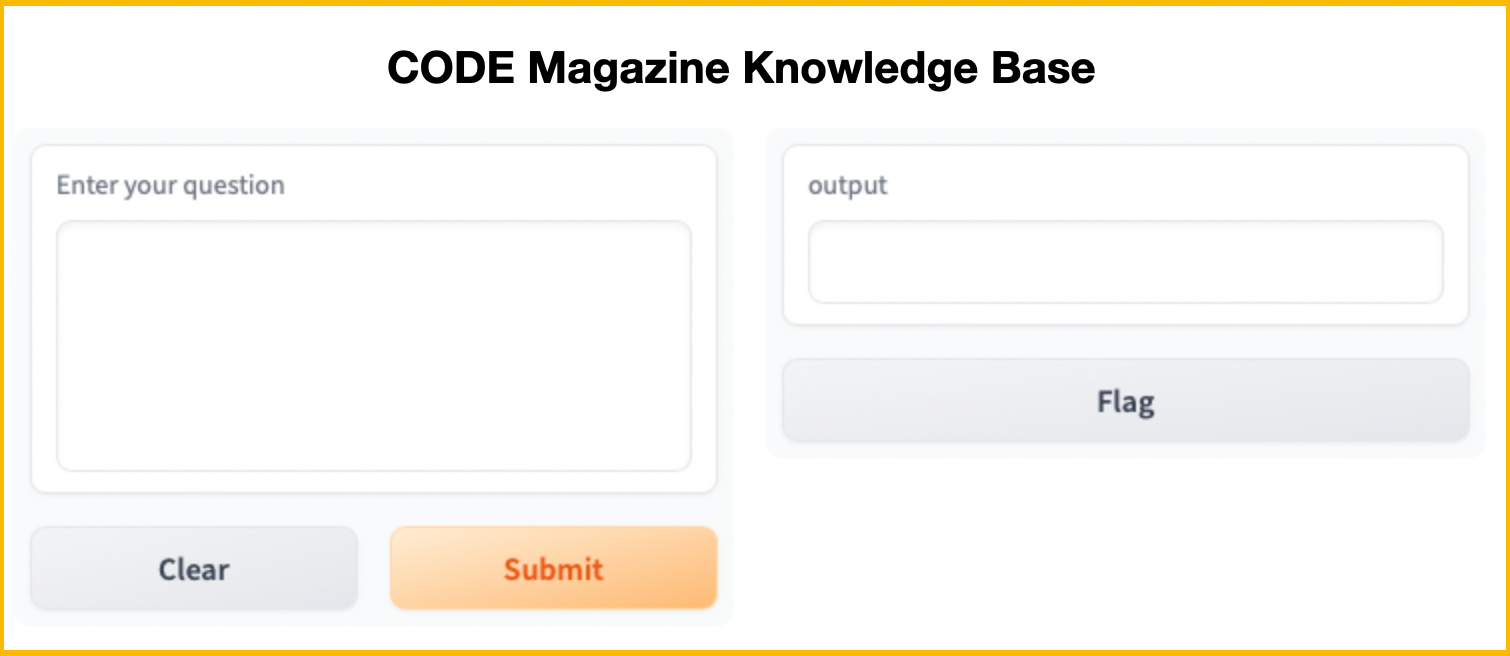
Now that ChatGPT is trained using your data, it would be more user-friendly if you could wrap it up using a web-based UI so that users can directly interact with ChatGPT. The following code snippet wraps ChatGPT using the Gradio package:
Gradio is a Python package that creates a web-based UI for interacting with your machine learning/deep learning models.
import gradio as gr

# display the UI
interface = gr.Interface(fn = Code_Mag_KB,
    inputs = gr.components.Textbox(
    lines = 5,
    label = 'Enter your question'),
    outputs = 'text',
    title = 'CODE Magazine Knowledge Base')

interface.launch(share=False)
When you run the above code snippet, you'll see the UI as shown in Figure 17.
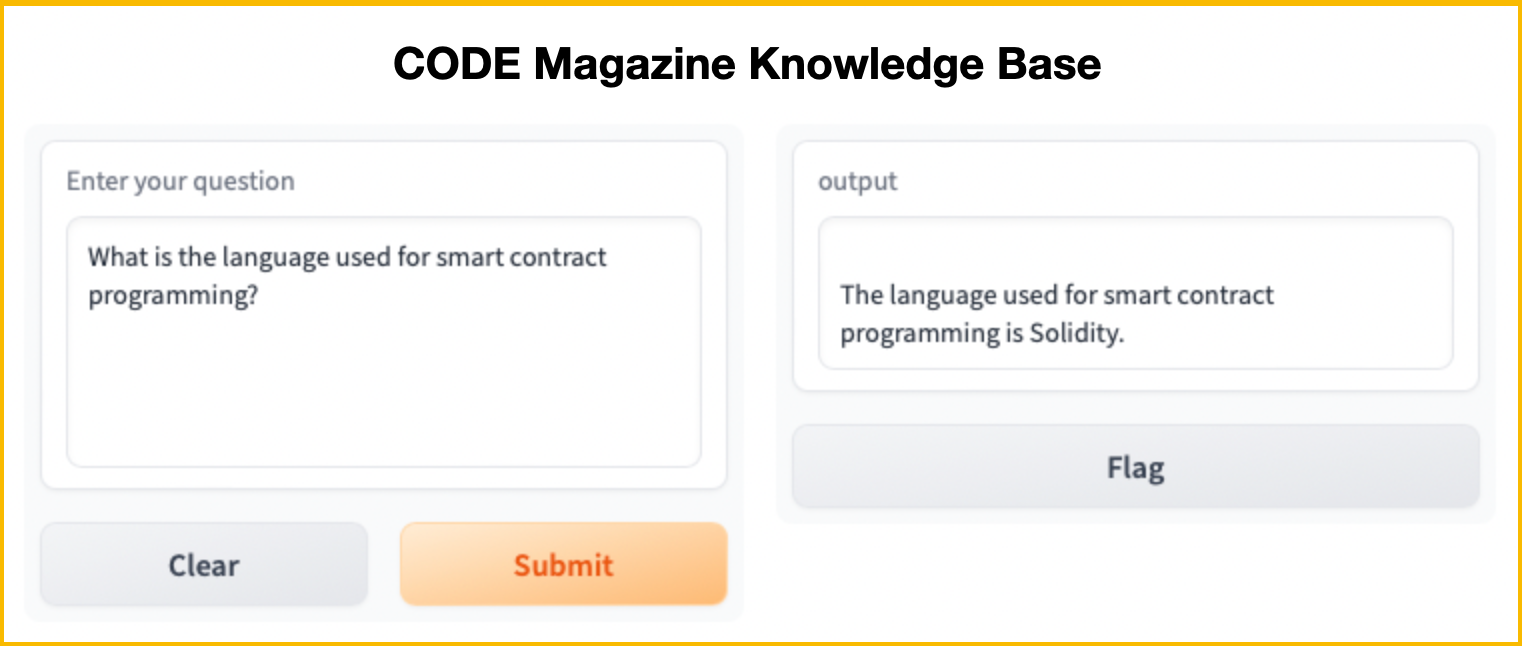
Type in your question on the left side of the textbox and click Submit. The response from ChatGPT is shown in the right textbox (see Figure 18).
Integrating ChatGPT with Jupyter Notebook
The last item that I want to discuss in this article is to demonstrate how you can integrate ChatGPT into your Jupyter Notebook. By integrating ChatGPT into your Jupyter Notebook, you can now get ChatGPT to:
- Add Docstrings for your Python functions.
- Provide an explanation for your code.
- Debug your code.
- Complete your code.
- Review your code.
- Ask questions.
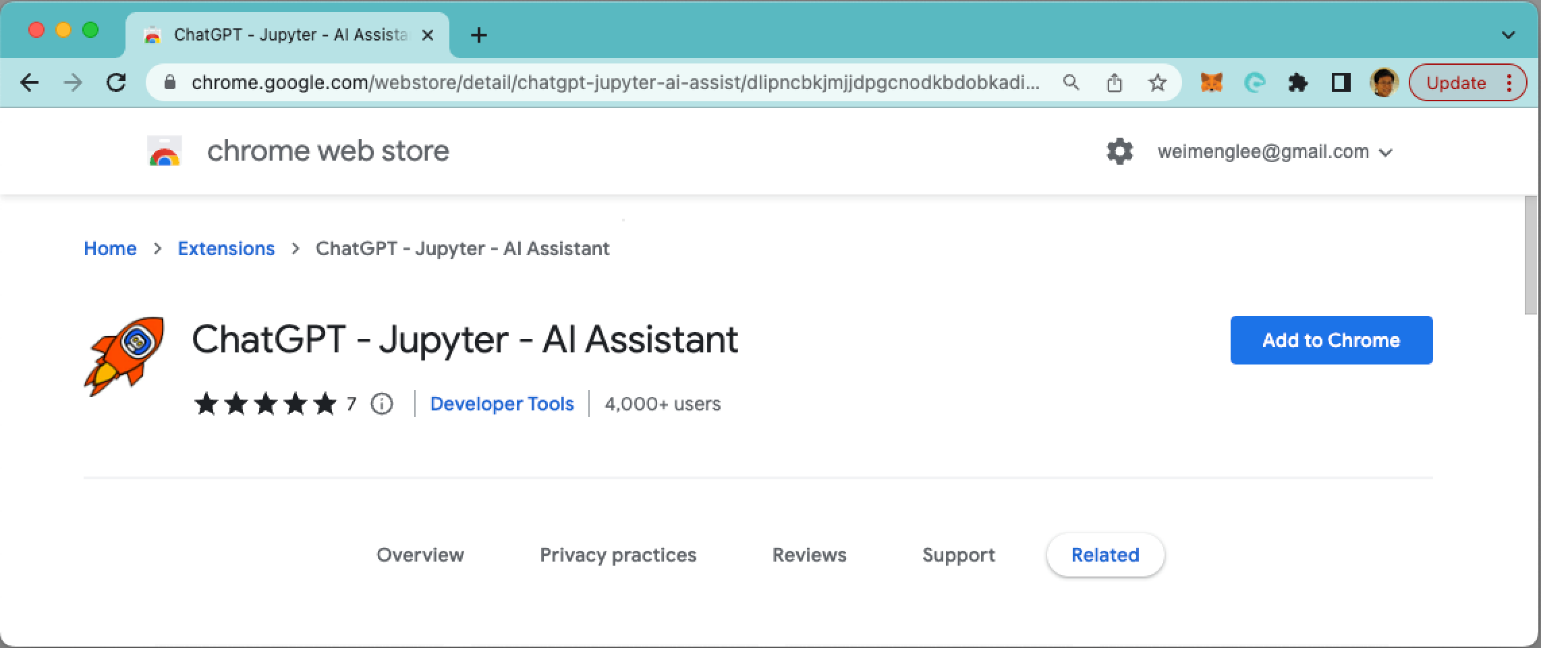
To use ChatGPT in your Jupyter Notebook, you need to install the ChatGPT - Jupyter - AI Assistant Chrome extension in your Chrome browser (https://chrome.google.com/webstore/detail/chatgpt-jupyter-ai-assist/dlipncbkjmjjdpgcnodkbdobkadiejll/related). Click Add to Chrome to add the extension (see Figure 19). In the pop-up that appears, click Add Extension.
As ChatGPT - Jupyter - AI Assistant is a Chrome extension, you need to run your Jupyter Notebook in Chrome.
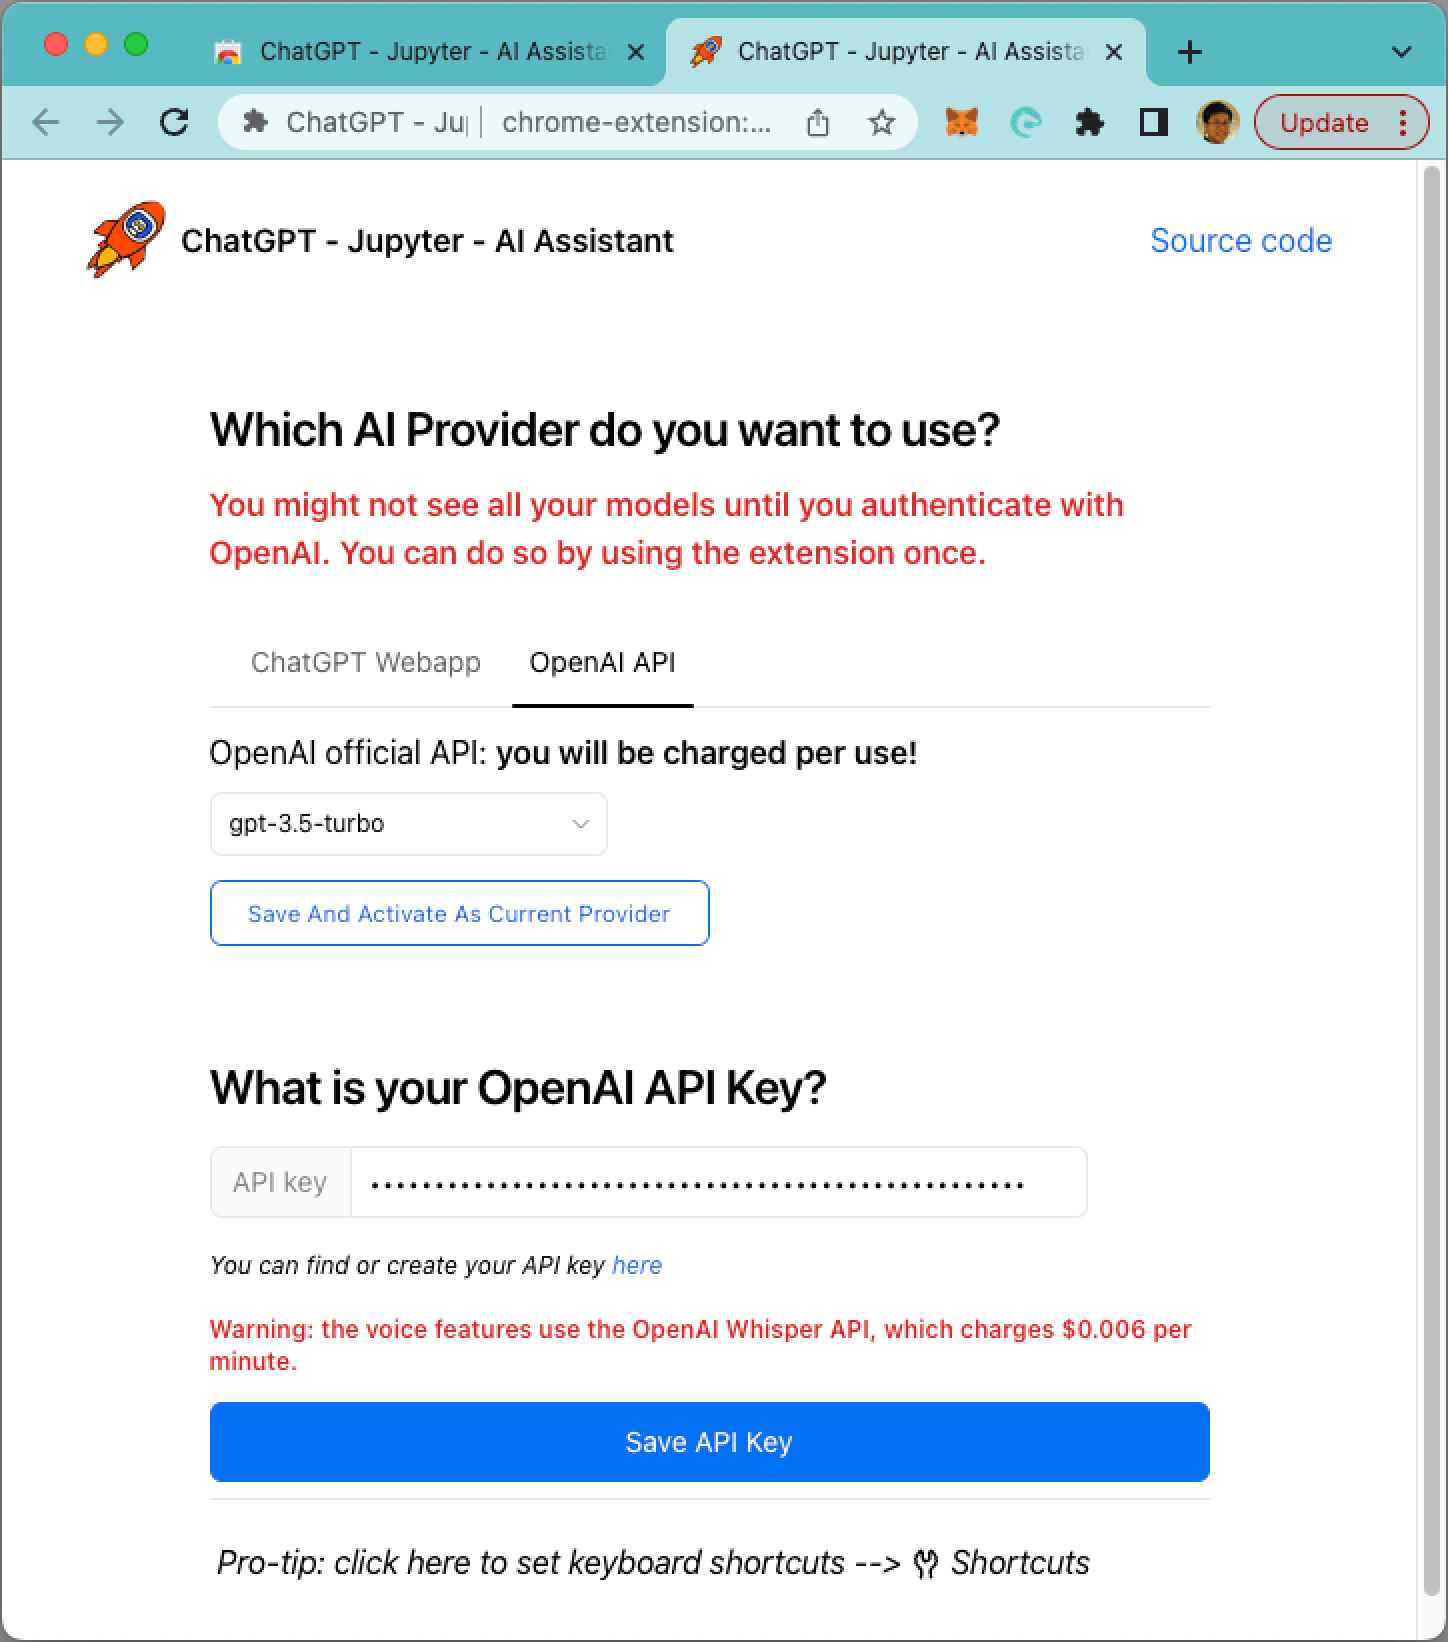
Once the extension is added, you need to configure it - you need to enter your OpenAI key (see Figure 20).
When you now run your Jupyter Notebook, you'll see the following buttons in the toolbar (see Figure 21). In the next few sections, I'll explain the use of each of the buttons.
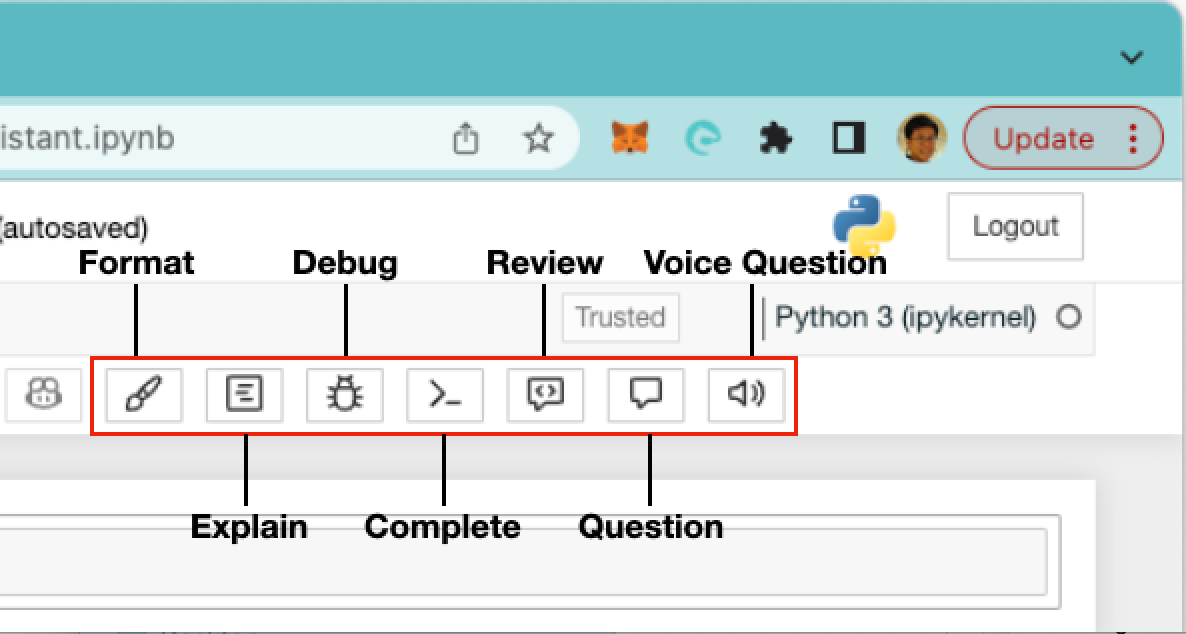
Format: Adding Docstrings to Your Python Function
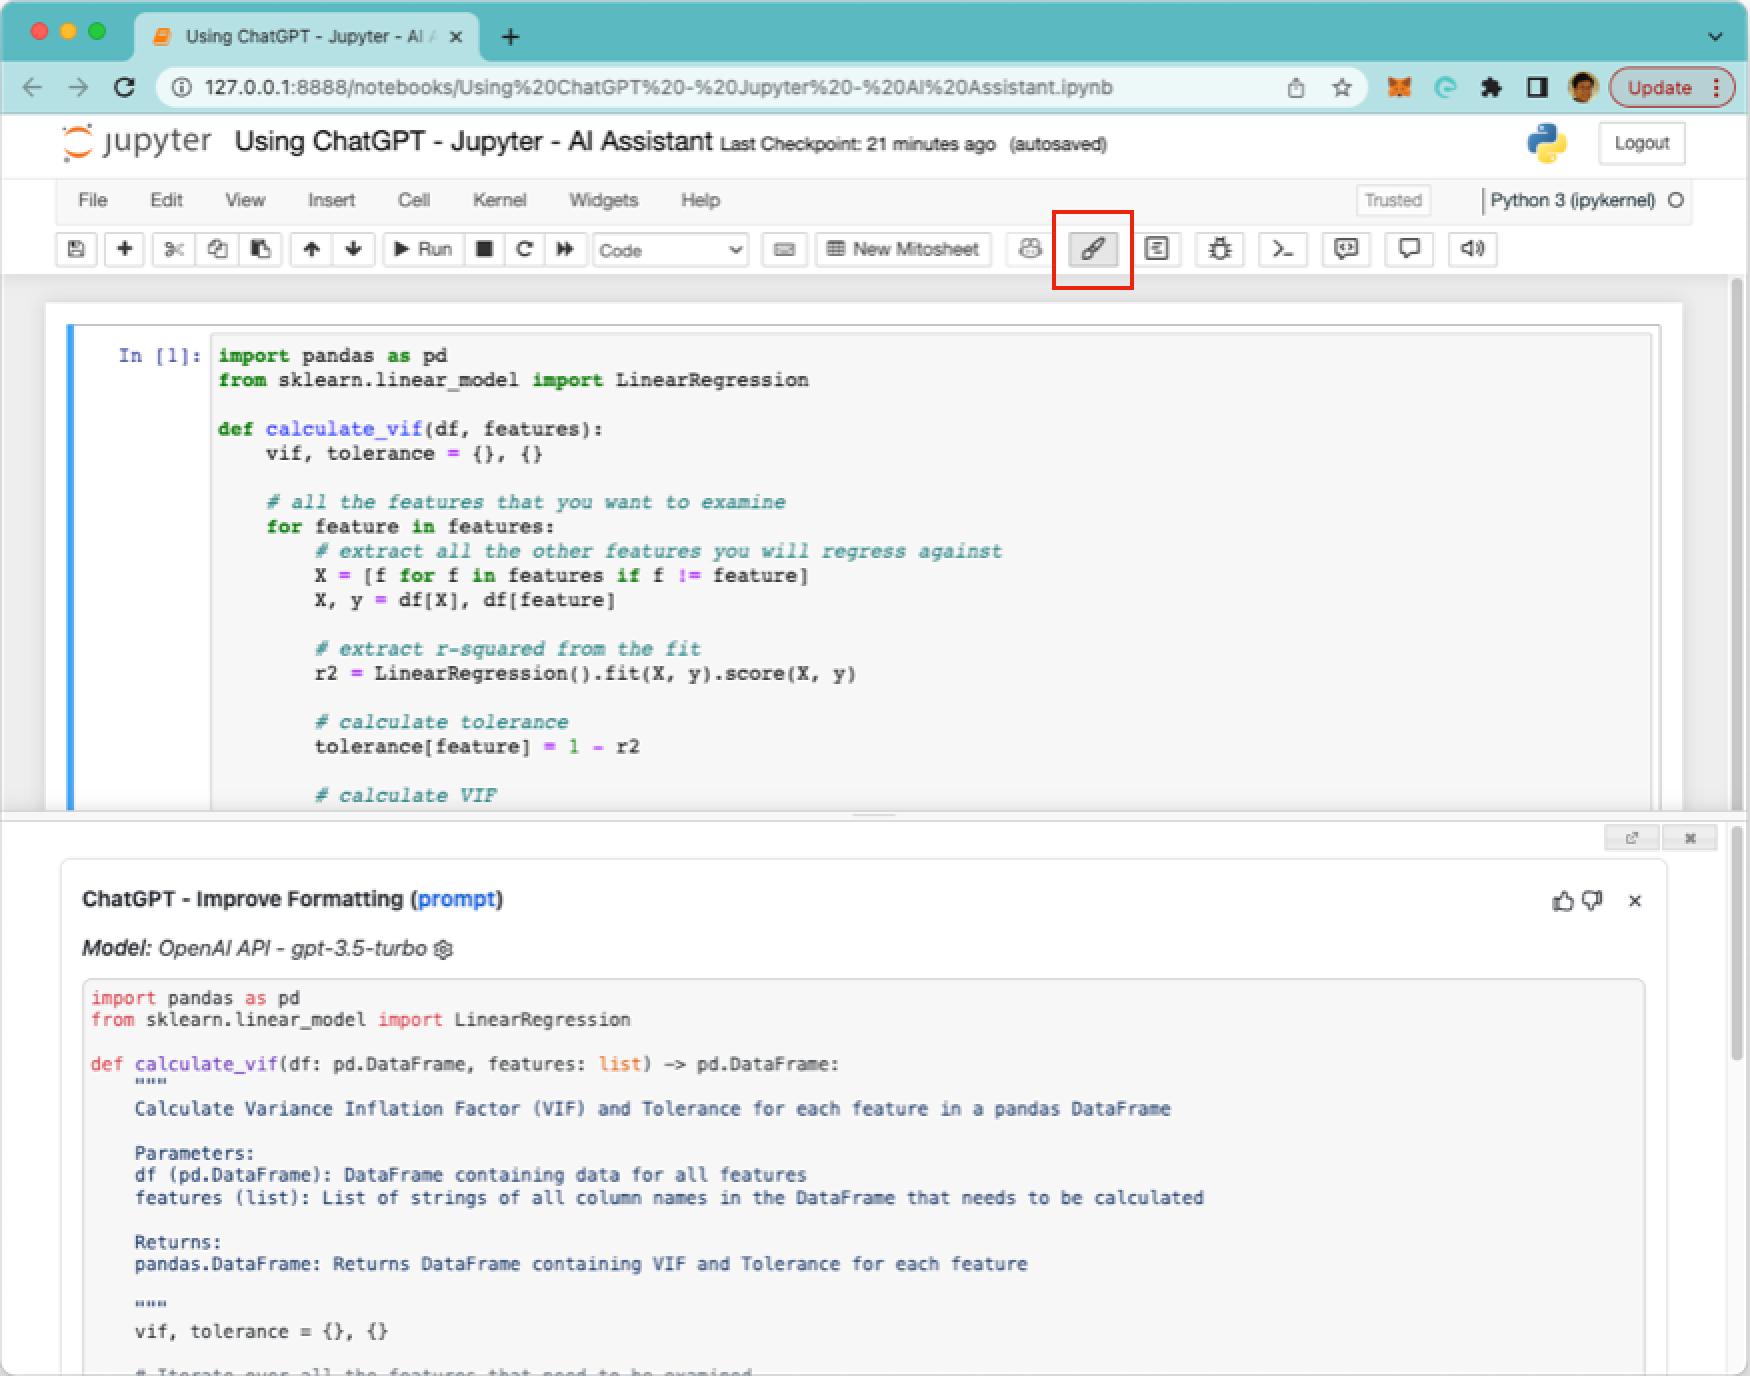
The first button is the Format button. Suppose I have the following code snippet in a cell:
import pandas as pd

from sklearn.linear_model import LinearRegression

def calculate_vif(df, features): vif, tolerance = {}, {}

    # all the features that you want to examine
    for feature in features:
        # extract all the other features
        # you will regress against
        X = [f for f in features if f != feature]
        X, y = df[X], df[feature]

        # extract r-squared from the fit
        r2 = LinearRegression().fit(X, y).score(X, y)

        # calculate tolerance
        tolerance[feature] = 1 - r2

        # calculate VIF
        vif[feature] = 1/(tolerance[feature])

    # return VIF DataFrame
    return pd.DataFrame({'VIF': vif, 'Tolerance': tolerance})
Clicking on the Format button makes ChatGPT add the Docstrings to the function as shown in Figure 22.
Here's what ChatGPT has added and modified (shown in bold):
import pandas as pd

from sklearn.linear_model import LinearRegression

def calculate_vif(df: pd.DataFrame,
    features: list) -> pd.DataFrame:
    """
    Calculate Variance Inflation Factor
    (VIF) and Tolerance for each feature
    in a pandas DataFrame

    Parameters:
    df (pd.DataFrame): DataFrame containing
    data for all features features (list):
    List of strings of all column names in
    the DataFrame that needs to be
    calculated

    Returns:
    pandas.DataFrame: Returns DataFrame
    containing VIF and Tolerance for each
    feature

    """
    vif, tolerance = {}, {}

    # Iterate over all the features that need to be examined
    for feature in features:
        # Extract all the other features
        # you will regress against
        X = [f for f in features if f != feature]
        X, y = df[X], df[feature]

        # Extract R^2 from the fit
        r2 = LinearRegression().fit(X, y).score(X, y)

        # Calculate tolerance
        tolerance[feature] = 1 - r2

        # Calculate VIF
        vif[feature] = 1/(tolerance[feature])

    # Return VIF DataFrame
    return pd.DataFrame({'VIF': vif, 'Tolerance': tolerance})
Not only does ChatGPT add the Docstrings for the function, it also modified my existing comments and the function signature:
def calculate_vif(df: pd.DataFrame,
    features: list) -> pd.DataFrame:
    """
Explain: Providing an Explanation of What the Code Is Doing
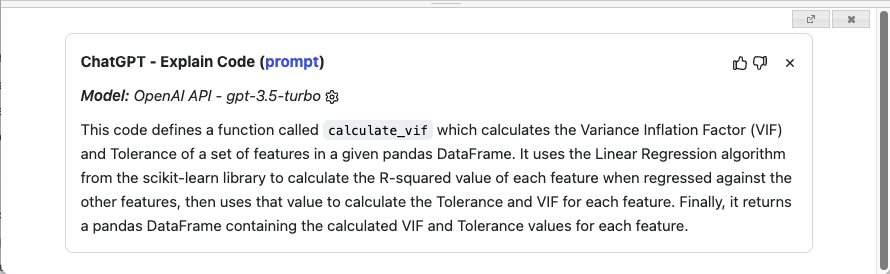
When you click on the Explain button, ChatGPT attempts to explain the code in the currently selected cell. For my function, it explains it very well (see Figure 23).
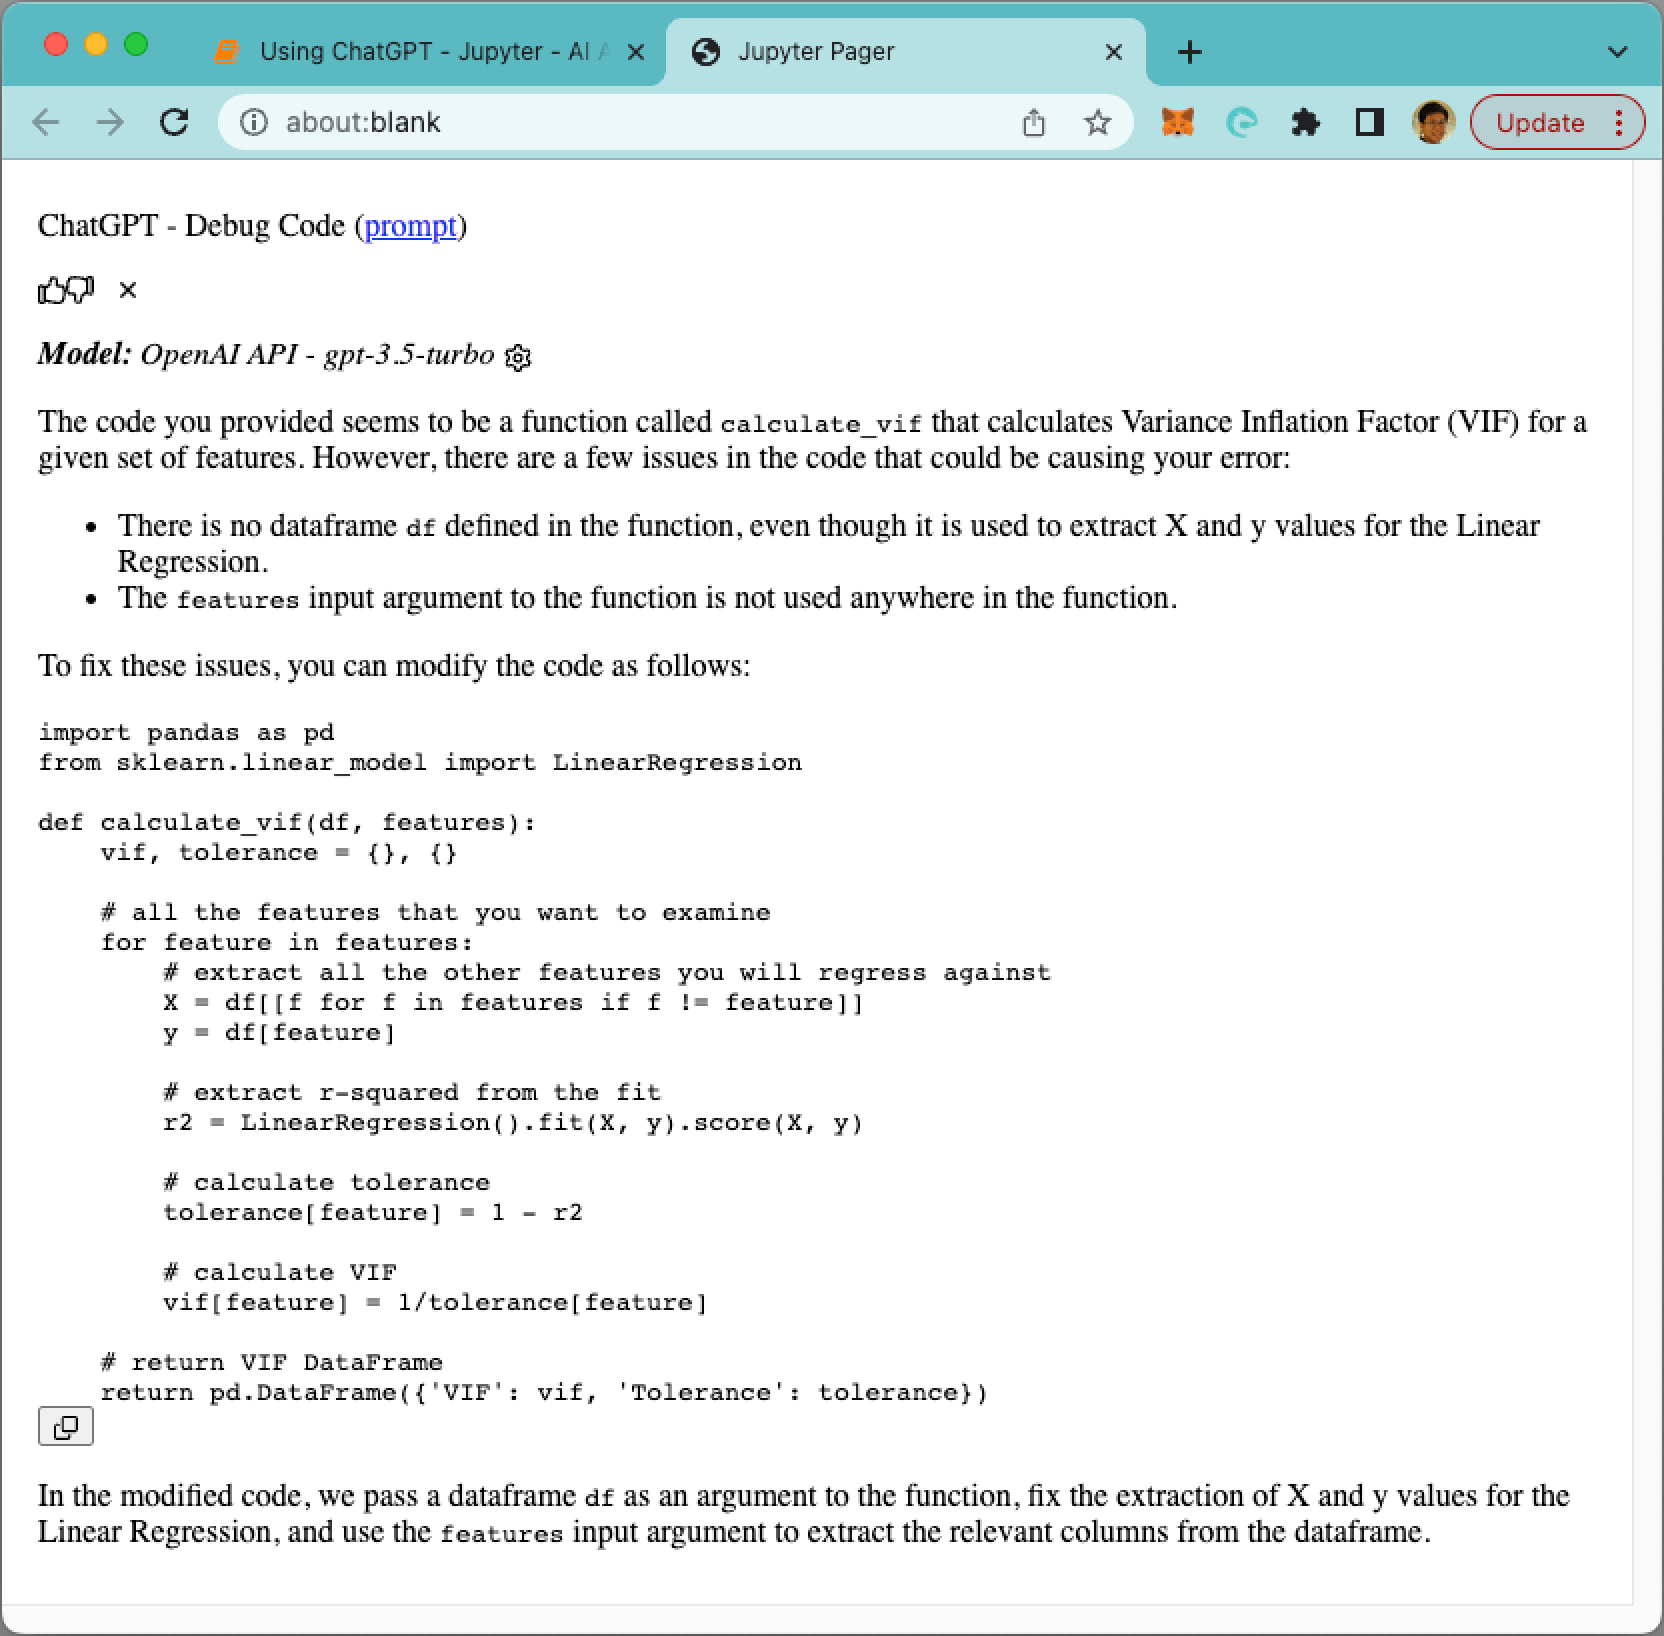
Debug: Fixing the Bug in the Code
Let's remove the df parameter from the calculate_df() function in my sample code snippet:
def calculate_vif(features): vif, tolerance = {}, {}
    ...
When I now click on the Debug button, ChatGPT attempts to debug the code. It rightfully pointed out that there is no df defined in the function (see Figure 24). And it even offers a solution to fix the code.
Complete: Writing the Code for You
Suppose you want to write the VIF function but aren't sure how to do it. You could simply define the function like the following and then click on the Complete button:
def calculate_vif(df,features):
Based on the function name, ChatGPT attempts to write the code for you (see Figure 25)
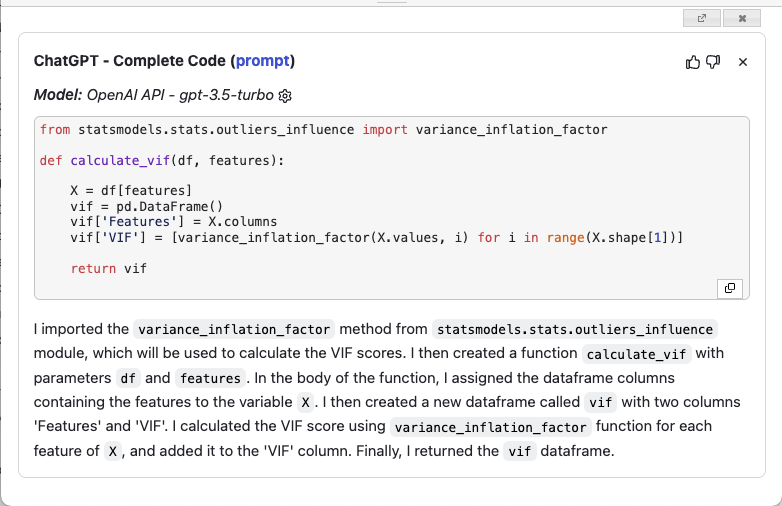
Pretty amazing, isn't it?
Review: Performing a Code Review and Suggesting Improvements
With your function written, you could ask ChatGPT to do a code review of your code. When I click the Review button, ChatGPT shows me the suggestions, as shown in Figure 26.
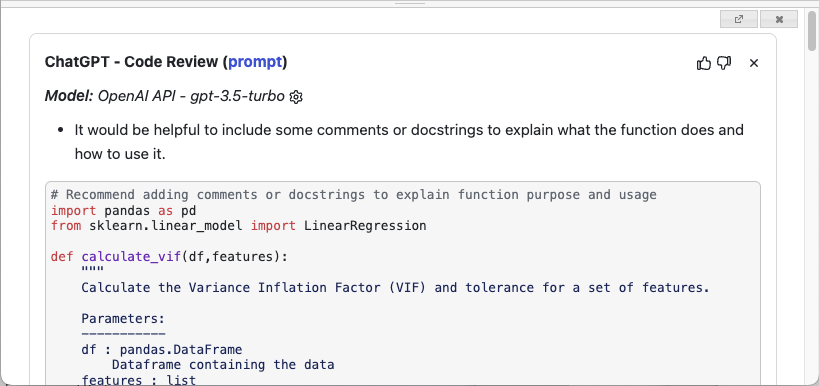
Specifically, it suggested the following:
- It would be helpful to include some comments or docstrings to explain what the function does and how to use it.
- It may be useful to include some error handling in case the function is called with an empty or invalid features list.
- Consider making the function more flexible by allowing an optional argument for the regression model.
- The variable X is defined twice, in lines 18 and 23. It would be cleaner to extract it only once.
- The variable X is a list of feature names, but it would be more consistent to use it as a pandas.DataFrame with corresponding column selection.
For each suggestion, it provides the modified code snippet.
Questions
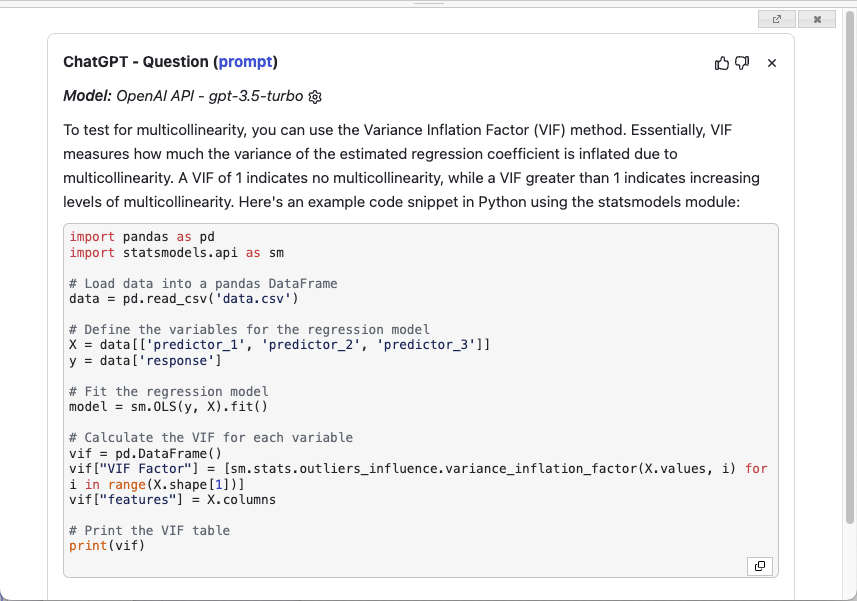
Finally, in addition to going to https://chat.openai.com to ask a question, you can directly ask in Jupyter Notebook. Clicking the Question button displays the pop-up shown in Figure 27. Type your question and press Ctrl-Enter to submit the question.
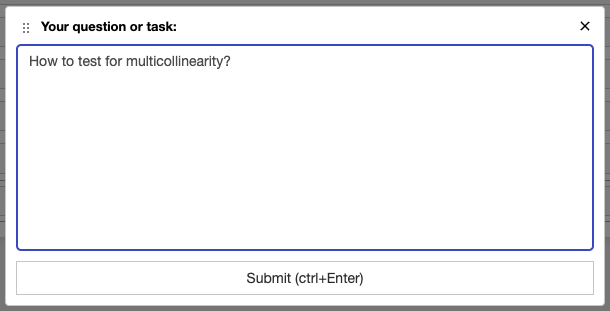
Figure 28 shows the response provided by ChatGPT.
Summary
In this article, I've discussed the various ways you can interact with ChatGPT. Take note that for the OpenAI API, first time users get a free $5 worth of tokens to try out the services. These tokens expire after three months. Thereafter, you need to upgrade to a paid plan where you will be charged based on usage. This is important to note because for every call you make to the API, you will be charged. However, you can set a limit on your usage. Have fun with OpenAI!