


It's very easy to get started using Minimal Web APIs in .NET 6, but as the number of routes grows, your Program.cs file can easily become overwhelming to maintain. Instead of keeping all your app.Map*() methods in the Program.cs file, you should create a router class to separate your groups of app.Map() methods into. For example, if you have a set of CRUD routes for working with products and another set for working with customers, create a ProductRouter class and a CustomerRouter class. In this article, you're going to see how to move each group of Web APIs into their own router class to provide a much more consistent and maintainable way to create Minimal Web API calls.
A Sample Minimal Web API
Let's look at a simple Minimal Web API system that works with product data. You normally have a Product class with basic properties such as ProductID, Name, Color, and ListPrice, as shown in the following code snippet.
public partial class Product
{
    public int ProductID { get; set; }
    public string Name { get; set; }
    public string Color { get; set; }
    public decimal ListPrice { get; set; }
}
In the Program.cs file, you write an app.MapGet() method to return a set of Product objects. In this example, I'm using hard-coded Product objects, whereas in a real application, you'd most likely use the Entity Framework to retrieve these from a database table.
// Get a collection of data
app.MapGet("/product", () =>
{
    return Results.Ok(new List<Product>
    {
        new Product
        {
            ProductID = 706,
            Name = "HL Road Frame - Red, 58",
            Color = "Red",
            ListPrice = 1500.00m
        },
        new Product
        {
            ProductID = 707,
            Name = "Sport-100 Helmet, Red",
            Color = "Red",
            ListPrice = 34.99m
        }
    });
});
You then have the rest of your app.Map*() methods that retrieve a single product, post a new product, update an existing product and delete a product, as shown in Listing 1. For a great primer on Minimal APIs, check out Shawn Wildermuth's article entitled “Minimal APIs in .NET 6” in the Jan/Feb 2022 issue of CODE Magazine.
Listing 1: A very basic set of Minimal Web APIs
// GET a single row of data
app.MapGet("/product/{id:int}", (int id) =>
{
    // Simulate returning data from the
    // data store with the specified ID
    return Results.Ok(new Product
    {
        ProductID = id,
        Name = "New Bicycle",
        Color = "Red",
        ListPrice = 1500.00m
    });
});

// INSERT new data
app.MapPost("/product", (Product prod) =>
{
    // TODO: Insert into data store

    // Return the new object
    return Results.Created($"/product/{prod.ProductID}", prod);
});

// UPDATE existing data
app.MapPut("/product/{id:int}", (int id, Product entity) =>
{
    IResult ret;

    // TODO: Look up data by the id
    Product current = Get(id);

    if (current!= null)
    {
        // Update the entity with new data
        current.Name = entity.Name;
        current.Color = entity.Color;
        current.ListPrice = entity.ListPrice;

        // TODO: Update data store

        // Return the updated entity
        ret = Results.Ok(current);
    }
    else
    {
        ret = Results.NotFound();
    }

    return ret;
});

// DELETE a single row
app.MapDelete("/product/{id:int}", (int id) =>
{
    IResult ret;

    // TODO: Look up data by the id
    Product entity = Get(id);
    if (entity != null)
    {
        // TODO: Delete data from the data store

        // Return NoContent
        ret = Results.NoContent();
    }
    else
    {
        ret = Results.NotFound();
    }

    return ret;
});
This is a lot of code in the Program.cs file for just working with products. You can imagine how that code grows as you add the same CRUD logic for customers, employees, books, or whatever other tables you have in your database. Let's now look at how to make this code more manageable.
Create a Web API Project
To get the most out of this article, I suggest that you follow along with the steps as I outline them. You need to install .NET 6 on your computer, which you can get at https://dotnet.microsoft.com/en-us/download/dotnet/6.0. You also need either VS Code or Visual Studio. If you wish to use VS Code for your editor and your application creation, use the following section for guidance. If you wish to use Visual Studio 2022, skip to the next section for guidance.
Using VS Code
Open VS Code in the top-level folder where you normally create your projects (for example D:\MyVSProjects). Select Terminal > New Terminal from the menu. In the terminal window in VS Code, create a .NET 6 Web API app using the following dotnet command:
dotnet new webapi -minimal -n AdvWorksAPI
Select File > Open Folder... from the menu, navigate to the new AdvWorksAPI folder created by the above command and click the Select Folder button.
Add Required Assets
At the bottom right-hand corner of Visual Studio Code, you should see a warning bar appear (Figure 1). This tells you that you need to add some required assets. Click the Yes button.
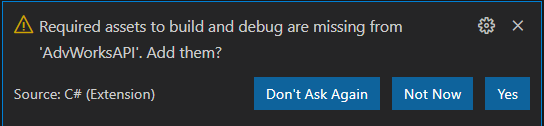
This warning box can take a minute to appear; either be patient and wait for it, or you can run a build task by selecting the Terminal > Run Build Task... > build from the menu bar.
Save the Workspace
Click File > Save Workspace As... and give it the name AdvWorksAPI. Click the Save button to store this new workspace file on disk.
Using Visual Studio 2022
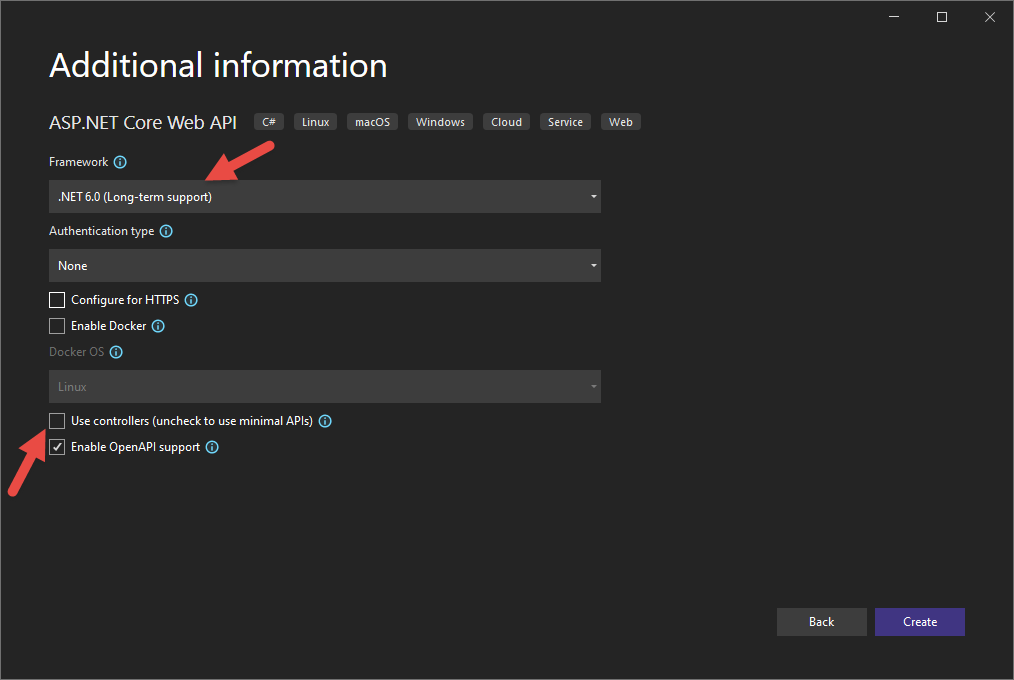
If you prefer to use Visual Studio 2022 for your development, start an instance of Visual Studio 2022 and select Create a new project from the first screen. Select the ASP.NET Core Web API project template and click the Next button. Set the Project name field to AdvWorksAPI and the Location field to the folder where you generally create your projects and click the Next button. From the Framework dropdown list (Figure 2) choose .NET 6.0 (Long-term support). From the Authentication type dropdown list choose None. Uncheck the Use controllers (uncheck to use minimal APIs) field and click the Create button.
Try It Out
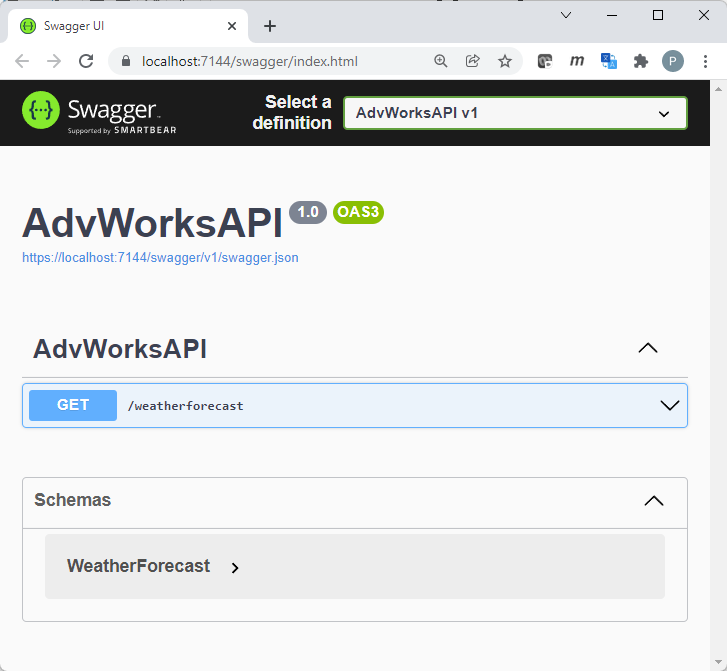
Whether you've used VS Code or Visual Studio 2022, press F5 to build the Web API project and launch a browser. If you get a dialog box that asks if you should trust the IIS Express certificate, select Yes. In the Security Warning dialog that appears next, select Yes. If you get an error related to privacy and/or HTTPS. Open the \Properties\launchSettings.json file and remove the “https://...” from the applicationURL property.
If you're using Visual Studio 2022, you should be presented with a Swagger home page (Figure 3) that allows you to immediately try out the weather forecast API that's included as a sample in the Program.cs file. If you're using VS Code, you get a 404 error that the page cannot be found. Type in the URL http://localhost:nnnn/swagger/index.html (where nnnn is your port number) and the Swagger home page (Figure 3) should be displayed.
Create Entity Classes Folder
It's always a best practice to group similar classes into a namespace, a folder, and/or a class library project. Right-mouse click on the AdvWorksAPI project and add a new folder named EntityClasses. Create the Product.cs class in this new folder and add the following code to this new file. Feel free to create a separate class library to contain all your entity classes if you wish.
#nullable disable
namespace AdvWorksAPI
{
    public partial class Product
    {
        public int ProductID { get; set; }
        public string Name { get; set; }
        public string Color { get; set; }
        public decimal ListPrice { get; set; }
    }
}
If you're wondering what the directive #nullable disable is at the top of the file, .NET 6 requires all empty strings to either be initialized in the constructor of the class or created as a nullable string. If you don't wish to use this behavior, include this directive at the top of your file.
Create Router Base Class
Any time you're going to create a set of classes that perform the same basic functionality, it's a great idea to create either an interface or a base class to identify those methods and properties that should be in each class. For each of the router classes, you should have a public property called UrlFragment that identifies the first part of the path to your API. In the example shown in Listing 1, the value /product was repeated many times in each of the app.Map*() methods. This is the value that you're going to put into the UrlFragment property. If you have another router class, Customer for example, you place the value /customer into this UrlFragment property.
At some point, you might wish to log messages or errors as your Web API methods are called. Include a protected property named Logger of the type ILogger in this base class. The property is to be injected into either the constructor of your router classes or injected into just those methods that need it.
A single public method, AddRoutes(), is needed in order to initialize the routes for router class. This method is called from the Program.cs file to initialize the routes you previously created in the Program.cs file. You're going to see the use of this method as you work your way through this article.
Right-click on the AdvWorksAPI project and add a new folder named Components. Add a new file named RouterBase.cs and add the code shown in the following code snippet.
#nullable disable
namespace AdvWorksAPI
{
    public class RouterBase
    {
        public string UrlFragment;
        protected ILogger Logger;

        public virtual void AddRoutes(WebApplication app)
        {
        }
    }
}
Create Product Router Class
As mentioned before, it's a good idea to group similar classes together into a folder and/or a class library. Add a folder under which all your router classes are created. Right-click on the AdvWorksAPI project and add a new folder named RouterClasses. Add a new file named ProductRouter.cs file in this new folder and add the following code into this new file:
namespace AdvWorksAPI
{
    public class ProductRouter : RouterBase
    {
        public ProductRouter()
        {
            UrlFragment = "product";
        }
    }
}
You can see that this ProductRouter class inherits from the RouterBase class. It sets the UrlFragment property to the value “product” because that's going to be used for the endpoint for all your mapping methods. Setting this property once helps you eliminate repeated code and gives you one place to change your route name should you desire.
Get All Products
Add a protected virtual method to the ProductRouter class named GetAll() to return a collection of Product objects, as shown in Listing 2. I'm using a hard-coded collection of Product objects here just so you can see the Minimal API in action without having to worry about connecting to a database.
Listing 2: The GetAll() method returns a collection of product objects.
/// <summary>
/// Get a collection of Product objects
/// </summary>
/// <returns>A list of Product objects</returns>
protected virtual List<Product> GetAll()
{
    return new List<Product>
    {
        new Product
        {
            ProductID = 706,
            Name = "HL Road Frame - Red, 58",
            Color = "Red",
            ListPrice = 1500.0000m
        },
        new Product
        {
            ProductID = 707,
            Name = "Sport-100 Helmet, Red",
            Color = "Red",
            ListPrice = 34.9900m
        },
        new Product
        {
            ProductID = 708,
            Name = "Sport-100 Helmet, Black",
            Color = "Black",
            ListPrice = 34.9900m
        },
        new Product
        {
            ProductID = 709,
            Name = "Mountain Bike Socks, M",
            Color = "White",
            ListPrice = 9.5000m
        },
        new Product
        {
            ProductID = 710,
            Name = "Mountain Bike Socks, L",
            Color = "White",
            ListPrice = 9.5000m
        }
    };
}
Create a Get() Method to Return the IResult
Next, create a method named Get() that returns an IResult object because that's what's expected from a Minimal API. The Get() method uses the Results.Ok() method to return a status code of 200, signifying that the method was successful. The list of Product objects is returned to the calling program, wrapped within this result object.
/// <summary>
/// GET a collection of data
/// </summary>
/// <returns>An IResult object</returns>
protected virtual IResult Get()
{
    return Results.Ok(GetAll());
}
Create Method to Add Product Routes
You need to inform the Web API engine that this Get() method is an endpoint. To accomplish this, override the AddRoutes() method in the ProductRouter class as shown in the following code snippet:
/// <summary>
/// Add routes
/// </summary>
/// <param name="app">A WebApplication object</param>
public override void AddRoutes(WebApplication app)
{
    app.MapGet($"/{UrlFragment}", () => Get());
}
The AddRoutes() method calls the app.MapGet() method using the WebApplication app variable passed in from the Program.cs file. The first parameter to the MapGet() method is the route name the user sends the request to, such as http://localhost:nnnn/product or http://localhost:nnnn/customer.
Use string interpolation to build this endpoint from the UrlFragment property. The second parameter to app.MapGet() is the method to produce some result. This method returns the IResult object from the Get() method you just wrote. If an IResult isn't returned from the method, the app.MapGet() method automatically wraps the return value into a Result.Ok() object.
Modify Program.cs to Call the AddRoutes() Method
Now that you've created your ProductRouter class, it's time to try it out. Open the Program.cs file and remove all variables and methods related to the weather forecast API. Toward the bottom of the file, just above the app.Run() method call, add the code to instantiate the ProductRouter class and call the AddRoutes() method. Make sure to pass in the instance of the WebApplication object contained in the app variable.
//*********************************************
// Add Product Routes
//*********************************************
new ProductRouter().AddRoutes(app);
Try It Out
Run the application and, on the Swagger home page, click on the Get button for the /product path. Click on the Try it Out button and click on the Execute button. You should see the list of products you created in the Get() method appear as JSON in the Response body section of the Swagger page, as shown in Figure 4.

Congratulations! You're now on your way to creating a more maintainable approach to Minimal API development. Let's add more functionality in the ProductRouter class to give you a complete CRUD API.
Get a Single Product
In addition to retrieving all products, you're most likely going to need to retrieve a single product. Add an overload of the Get() method to the ProductRouter class that accepts a single integer value named id. Use this id variable to search in the Product collection for where the id value matches one of the ProductId property values. The Product object that's located is returned from this method wrapped within the Results.Ok() object. If the id value isn't found, a Results.NotFound() is returned that's reported as a 404 Not Found status code back to the calling program.
/// <summary>
/// GET a single row of data
/// </summary>
/// <returns>An IResult object</returns>
protected virtual IResult Get(int id)
{
    // Locate a single row of data
    Product? current = GetAll().Find(p => p.ProductID == id);
    if (current != null)
    {
        return Results.Ok(current);
    }
    else
    {
        return Results.NotFound();
    }
}
Modify AddRoutes() Method
Now that you have the new method to retrieve a single product, you need to add this new route. Locate the AddRoutes() method and a call to app.MapGet(), as shown in the code below. The first parameter is built using the UrlFragment property, followed by a forward slash (/) and then you need the variable name and data type enclosed within curly braces, so it looks like {id:int}. Because you're using string interpolation, you must escape the curly braces by adding an extra opening and closing brace around this value.
public override void AddRoutes(WebApplication app)
{
    app.MapGet($"/{UrlFragment}", () => Get());
    app.MapGet($"/{UrlFragment}/{{id:int}}",(int id) => Get(id));
}
Try It Out
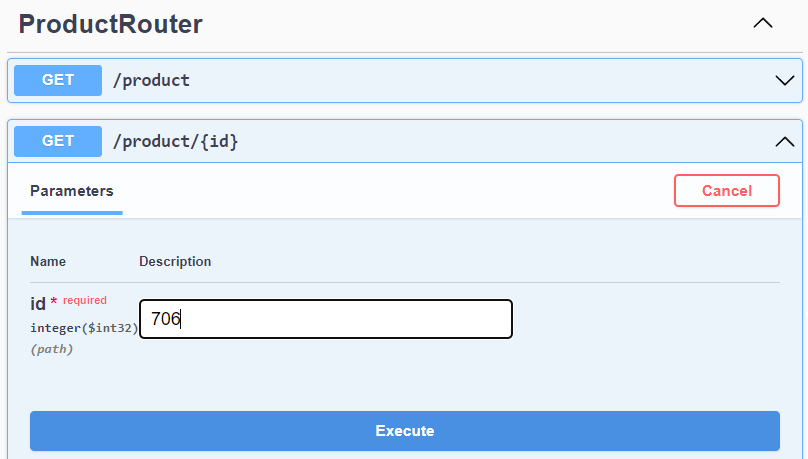
Run the application and, on the Swagger home page, click on the Get button for the /product/{id} path. Click on the Try it Out button, type in the number 706 into the id field (Figure 5) and click on the Execute button. You should see the first product from the product collection appear as JSON in the Response body section of the Swagger page. Type in an invalid number into the id field, such as 999, and you should see a 404 Not Found status code returned.
Insert a Product
Now that you have a way to read data from your Web API, it's time write code to insert, update, and delete data. Write a method in the ProductRouter class named Post() to which you pass a Product object to insert into your data store. Obviously, you don't have a data store in this simple example, but I'm sure you can easily extrapolate how this would work when using the Entity Framework. To simulate this process, calculate the maximum ProductID used in the collection, add one to this value, and assign this to the ProductID property of the Product object passed in. This is like what happens if you have an identity property on the ProductID field in a SQL Server Product table.
From a POST method, it's standard practice to return a 201 Created status code when a new value is added to the data store. Use the Results.Created() method passing in two parameters to return this 201 status code. The first parameter is the endpoint that can be used to retrieve the newly created object, for example, /product/711. The second parameter is the actual entity with any data that has been changed by performing the insert into the data store.
/// <summary>
/// INSERT new data
/// </summary>
/// <returns>An IResult object</returns>
protected virtual IResult Post(Product entity)
{
    // Generate a new ID
    entity.ProductID = GetAll().Max(p => p.ProductID) + 1;

    // TODO: Insert into data store

    // Return the new object created
    return Results.Created($"/{UrlFragment}/{entity.ProductID}", entity);
}
Just as you did with the previous two methods you created, call the appropriate app.Map*() method to register this new endpoint. Locate the AddRoutes() method and a call to the app.MapPost() method, as shown in the following code snippet.
public override void AddRoutes(WebApplication app)
{
    app.MapGet($"/{UrlFragment}", () => Get());
    app.MapGet($"/{UrlFragment}/{{id:int}}", (int id) => Get(id));
    app.MapPost($"/{UrlFragment}", (Product entity) => Post(entity));
}
Try It Out
Run the application and, on the Swagger home page, click on the POST button for the /product path. Click on the Try it Out button and you should see a Request body field appear with some basic JSON for you to enter some data into. Type in the following JSON:
{
    "productID": 0,
    "name": "A New Product",
    "color": "White",
    "listPrice": 20
}
Click on the Execute button and you should see the Response body appear with the following JSON:
{
    "productID": 711,
    "name": "A New Product",
    "color": "White",
    "listPrice": 20
}
This method simulates adding data to a database, such as SQL Server, and the productID property is assigned a new value from the database. The complete object is then passed back to you along with the HTTP status code of 201: Created.
Update a Product
The public interface for updating an entity through a Web API method is to pass in the ID of the object to update along with the object itself. Add a method to the ProductRouter class named Put() that accepts an integer ID variable and a Product entity variable, as shown in Listing 3.
Listing 3: The Put() method updates an existing product with the new data passed in.
/// <summary>
/// UPDATE existing data
/// </summary>
/// <returns>An IResult object</returns>
protected virtual IResult Put(int id, Product entity)
{
    IResult ret;

    // Locate a single row of data
    Product? current = GetAll().Find(p => p.ProductID == id);

    if (current != null)
    {
        // TODO: Update the entity
        current.Name = entity.Name;
        current.Color = entity.Color;
        current.ListPrice = entity.ListPrice;

        // TODO: Update the data store

        // Return the updated entity
        ret = Results.Ok(current);
    }
    else
    {
        ret = Results.NotFound();
    }

    return ret;
}
This method first looks up the Product object in the Products collection. If the product is found, a Project object is returned into the current variable. If the product is not found, a null value is assigned to the current variable. Check to see if the current variable is not null, and if not, update the properties of the current variable with the values passed via the entity variable. This process is, of course, just a single line of code when using the Entity Framework, but for our purposes here, you need the three lines of code to move the data from one object to another. You then return the updated entity in the Results.Ok() method. If the current variable is null, inform the calling program that the object was not located by returning the value from the Results.NotFound() method, which returns the 404 Not Found.
As you have done previously, locate the AddRoutes() method and add a call to the app.MapPut() method. The first parameter to MapPut() is exactly the same as for the MapGet() method. In the lambda expression, two parameters are accepted into this anonymous function, the id and the entity. The integer value is expected to come from the URL line, and the Product object is expected to be received from the body of the API call.
public override void AddRoutes(WebApplication app)
{
    app.MapGet($"/{UrlFragment}", () => Get());
    app.MapGet($"/{UrlFragment}/{{id:int}}", (int id) => Get(id));
    app.MapPost($"/{UrlFragment}", (Product entity) => Post(entity));
    app.MapPut($"/{UrlFragment}/{{id:int}}", (int id, Product entity) =>
        Put(id, entity));
}
Try It Out
Run the application and on the Swagger home page, click on the PUT button for the /product/{id} path. Click on the Try it Out button and enter a number such as 710 into the id field. In the Request body field modify the JSON to look like the following.
{
    "productID": 710,
    "name": "A Changed Product",
    "color": "Red",
    "listPrice": 1500.00
}
Click on the Execute button and you should see the Response body appear with the same JSON you entered above. If you then modify the ID field to be a bad product ID, such as 999, and click the Execute button, you should see the 404 status code returned.
Delete a Product
The last method to write to complete the CRUD logic is one to delete a product. Add a method named Delete() that accepts an integer value, id, to the ProductRouter class, as shown in Listing 4. This method first looks up the Product object in the Products collection using the value passed to the id variable. If the product is found, a Project object is returned into the current variable. If the product is not found, a null value is assigned to the current variable. Check to see if the current variable is not null, and if not, remove the object from the collection, which, in this case, simulates removing the product row from the data store.
Listing 4: The Delete() method removes a single product from the data store.
/// <summary>
/// DELETE a single row
/// </summary>
/// <returns>An IResult object</returns>
protected virtual IResult Delete(int id)
{
    IResult ret;

    // Locate a single row of data
    Product? current = GetAll().Find(p => p.ProductID == id);

    if (current != null)
    {
        // TODO: Delete data from the data store
        GetAll().Remove(current);

        // Return NoContent
        ret = Results.NoContent();
    }
    else
    {
        ret = Results.NotFound();
    }

    return ret;
}
The most common HTTP status to return in response to a successful call to the DELETE verb is a 204 No Content. You can return this status code with a call to the Results.NoContent(). If the product object is not found because the ID passed in doesn't exist in the data store, a 404 Not Found status is returned by calling the Results.NotFound() method.
To register this new route, locate the AddRoutes() method and add a call to the app.MapDelete() method. The first parameter to MapDelete() is the same as for the MapGet() and MapPut() methods.
public override void AddRoutes(WebApplication app)
{
    app.MapGet($"/{UrlFragment}", () => Get());
    app.MapGet($"/{UrlFragment}/{{id:int}}", (int id) => Get(id));
    app.MapPost($"/{UrlFragment}", (Product entity) => Post(entity));
    app.MapPut($"/{UrlFragment}/{{id:int}}", (int id, Product entity) =>
        Put(id, entity));
    app.MapDelete($"/{UrlFragment}/{{id:int}}", (int id) => Delete(id));
}
Try It Out
Run the application and on the Swagger home page, click on the DELETE button for the /product/{id} path. Click on the Try it Out button and enter a number such as 710 into the id field. Click on the Execute button and you should see the code returned is 204 No Content. Change the id field to an invalid product ID such as 999 and click on the Execute button. You should now see the 404 Not Found status code returned.
Add Logging to Product Router
An ILogger property was added to the RouterBase class at the beginning of this article. Let's now use that property to perform some logging to the console window from the Get() method in the ProductRouter.cs file. Open the ProductRouter.cs file and use dependency injection to inject an ILogger object into the constructor, as shown in the following code snippet.
public ProductRouter(ILogger<ProductRouter> logger)
{
    UrlFragment = "product";
    Logger = logger;
}
Locate the Get() method and call the Logger.LogInformation() method to log a message to any log listeners you set up.
protected virtual IResult Get()
{
    // Write a log entry
    Logger.LogInformation("Getting all products");
    // REST OF THE CODE HERE
}
Add Logging as a Service
Open the Program.cs file and just after the code that creates the builder, WebApplication.CreateBuilder(args), add the following lines of code to add logging to the list of services that can be injected.
// Add Logging
builder.Logging.ClearProviders();
builder.Logging.AddConsole();
Just after these calls to register logging as a service, add code to make your ProductRouter class a service as well.
// Add "Router" classes as a service
builder.Services.AddScoped<RouterBase, ProductRouter>();
Dependency injection doesn't just happen because you add the ILogger<ProductRouter> to the constructor of the ProductRouter class. It happens when you let the ASP.NET engine take care of creating all instances of services. This means that you can't create an instance of the ProductRouter class like you did earlier in this article. Go to the bottom of the Program.cs file and remove the lines of code where you created a new ProductRouter, remove the call to app.Run() as well.
//*********************************************
// Add Product Routes
//*********************************************
new ProductRouter().AddRoutes(app);
app.Run()
To ensure that your ProductRouter class, or any other classes that inherit from your RouterBase class, can participate in dependency injection, you need to create a service scope by calling the app.Services.CreateScope() method, as shown in Listing 5. Wrapped within a using block, retrieve a list of services that are of the type RouterBase. Loop through each of those services and invoke each ones' AddRoute() method. Finally, call the app.Run() method in order to ensure that the entire set of registered endpoints are all running within the same application scope.
Listing 5: Create a loop to invoke all Router Classes' AddRoutes() method.
//*************************************
// Add Routes from all "Router Classes"
//*************************************
using (var scope = app.Services.CreateScope())
{
    // Build collection of all RouterBase classes
    var services = scope.ServiceProvider.GetServices<RouterBase>();

    // Loop through each RouterBase class
    foreach (var item in services)
    {
        // Invoke the AddRoutes() method to add the routes
        item.AddRoutes(app);
    }

    // Make sure this is called within the application scope
    app.Run();
}
Try It Out
Run the application and on the Swagger home page, click on the Get button for the /product path. Click on the Try it Out button, then click on the Execute button. You should then see the list of products you created in the Get() method appear as JSON in the Response body section of the Swagger page. Look in the Console window and you should see the message “Getting all products” has appeared.
Create a Customer Router Class
The RouterBase and ProductRouter classes provides a nice design pattern that you can use to build any router class for any other CRUD logic you require. Let's create a Customer class and a CustomerRouter class to work with customer data. Because of the generic code you just wrote to invoke the AddRoutes() method, all you have to do is to create a new router class that inherits from the RouterBase class and all new routes will be automatically registered when the application starts.
Create a Customer Class
Right mouse-click on the EntityClasses folder and add a new file named Customer.cs. Into this file, add the following code to create a new Customer class with several properties.
#nullable disable
namespace AdvWorksAPI
{
    public partial class Customer
    {
        public int CustomerID { get; set; }
        public string FirstName { get; set; }
        public string LastName { get; set; }
        public string CompanyName { get; set; }
        public string EmailAddress { get; set; }
    }
}
Create a Customer Router Class
Expand the RouterClasses folder, copy the ProductRouter.cs file and paste it right back into the RouterClasses folder. Rename the file as CustomerRouter.cs. Open the CustomerRouter.cs file and perform a case-sensitive search and replace within this document, changing all instances of Product with Customer. Next, perform a case-sensitive search and replace and change all instances of product with customer. Scroll down and locate the GetAll() method and fix up the hard-coded data to look like that shown in Listing 6.
Listing 6: Create a hard-coded collection of customer objects.
private List<Customer> GetAll()
{
    return new List<Customer>
    {
        new Customer
        {
            CustomerID = 1,
            FirstName = "Orlando",
            LastName = "Gee",
            CompanyName = "A Bike Store",
            EmailAddress = "orlando0@adventure-works.com",
        },
        new Customer
        {
            CustomerID = 2,
            FirstName = "Keith",
            LastName = "Harris",
            CompanyName = "Progressive Sports",
            EmailAddress = "keith0@adventure-works.com",
        },
        new Customer
        {
            CustomerID = 3,
            FirstName = "Donna",
            LastName = "Carreras",
            CompanyName = "Advanced Bike Components",
            EmailAddress = "donna0@adventure-works.com",
        },
        new Customer
        {
            CustomerID = 4,
            FirstName = "Janet",
            LastName = "Gates",
            CompanyName = "Modular Cycle Systems",
            EmailAddress = "janet1@adventure-works.com",
        },
        new Customer
        {
            CustomerID = 5,
            FirstName = "Lucy",
            LastName = "Harrington",
            CompanyName = "Metropolitan Sports Supply",
            EmailAddress = "lucy0@adventure-works.com",
        }
    };
}
Next, scroll down and locate the Put() method and within the if (current != null) statement, modify the lines of code that are showing errors. The new lines of code should look like the following:
current.FirstName = entity.FirstName;
current.LastName = entity.LastName;
current.CompanyName = entity.CompanyName;
current.EmailAddress = entity.EmailAddress;
Finally, register this new CustomerRouter class as a service by opening the Program.cs file and modify the code towards the top to look like the following:
// Add your "Router" classes as services
builder.Services.AddScoped<RouterBase, ProductRouter>();
builder.Services.AddScoped<RouterBase, CustomerRouter>();
Try It Out
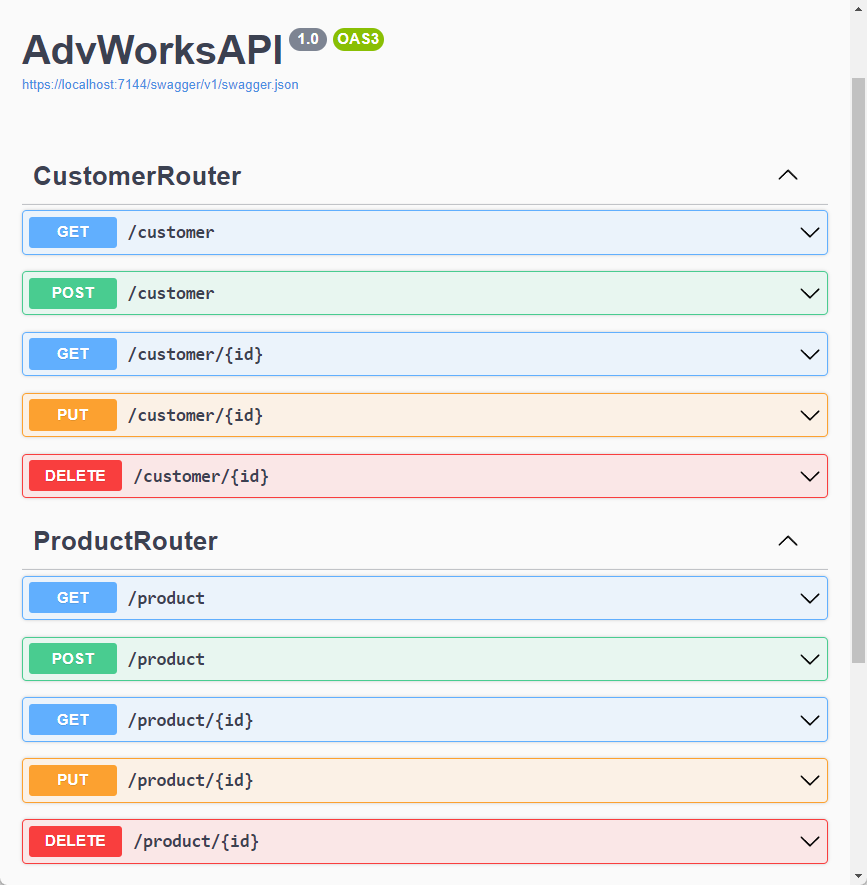
Run the application and, on the Swagger home page, all the customer and product endpoints are now displayed as shown in Figure 6. Go ahead and try out any of the customer routes to verify that they work as expected.
Summary
In this article, you learned how to make Minimal API applications more maintainable. By using a good base class, called RouterBase, you have a good start of a design pattern for your Web API CRUD logic. By moving all your routes into separate classes, you prevent your Program.cs file from growing out of control. Because you inherit from the RouterBase class, you write code one time in the Program.cs file to instantiate all router classes and register their routes. Creating additional router classes for objects such as employees, cars, sales orders, etc. is as simple as copying the ProductRouter class, searching for all instances of “product”, and replacing with “employee,” “car,” etc.
