Automated build tools have been around for a long time.
Many of the early tools were simple batch scripts that made calls out to other command-line tools like compilers and linkers. As the need for more and more complexity in the build scripts was realized, specialized tools like Make were introduced. These tools offered more than just sequential processing of commands. They provided some logic and decision making as well as coordination of the various parts of the build process. Since Make was first introduced, many variations and specialized versions have been introduced for various languages and platforms. Rake - the “Ruby Make” system - may not have much more than its namesake to claim a connection to Make, but it is a build tool that is quickly growing in popularity and providing .NET developers with new options.
.NET Build Tools
From the early days and beta versions of .NET, the NAnt tool has been available and has been one of the most popular build systems in the .NET realm. MSBuild has been gaining in popularity since its first release, as well. It is now included as part of the .NET SDK and is used by Visual Studio and other build systems to automate some .NET project and solution builds. While NAnt and MSBuild are both configured through XML, other build tools have taken a code-based approach to build scripts. For example, PSake runs in Microsoft’s PowerShell, Bake uses the Boo language on the .NET platform and FAKE is bringing build automation through the F# language. Then there’s Rake…
Rake natively runs in Ruby - just about every Ruby runtime that you can find, on any operating system that has a Ruby runtime, including the .NET platform through the IronRuby runtime. This helps to give Rake a very broad user base across a large number of platforms and languages. Even prior to the IronRuby runtime, though, Rake has been in use by .NET developers and has been growing in popularity. It is a powerful tool with many add-ons and options available including the Albacore project - a suite of Rake tasks that is targeted at building .NET systems.
Listing 1 shows a complete build script for a simple Web project using Ruby, the Rake build system and the Albacore suite of Rake tasks. This script will generate common assembly information to be used in the project, build the project, run all unit tests for the project, and deploy the project’s runtime files out to a folder so that it can be pushed out to a Web server.
In this article, I will show you how to get your .NET project building with Ruby, Rake and Albacore. I will also demonstrate some of the more advanced features of Albacore to help manage the configuration of your build process, generate project configuration files at build time, publish your project output, and more. The goal is to create a build script that is simple to set up, easy to read and easy to update.
Before I show you the details of Albacore and its many options, you will need both Ruby and Rake installed on your Windows-based computer. If you already have them set up and are familiar with the basic Rake task usage, you can skip to the section titled “The Albacore Project”. If you would like to know more about the basics of Rake or you just want a quick refresher, continue reading the next sections.
Installing Ruby
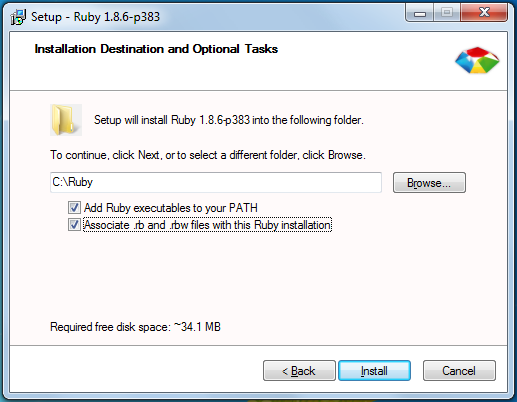
If you already have Ruby running on your Microsoft Windows-based computer you should not need to reinstall it. If you don’t have Ruby, you can get the RubyInstaller package from http://rubyforge.org/projects/rubyinstaller/. Grab the latest installer for Ruby v1.8 (at the time of writing, “ruby-1.8.6-p383-rc1.exe”) and run it. When you get to the screen shown in Figure 1, be sure to check the option to modify your PATH variable. Whether you select the option to associate .rb and .rbw files with this Ruby installation is up to you. This option allows you to double-click your .rb and .rbw files to run them. I’ll run all of the examples shown in this article directly from a command prompt.
After you have completed the installation, open a command prompt and run “ruby --version”. You should see a response similar to that of Figure 2. This will verify that you have installed Ruby and that it has modified your PATH variable correctly.
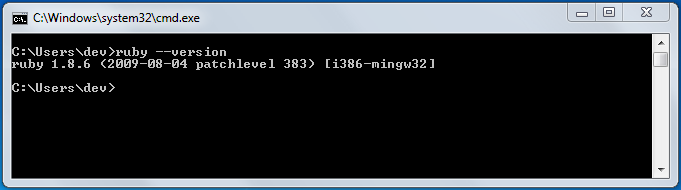
If you receive an error saying that your system does not Ruby as a command or executable, you may need to manually update your PATH variable or restart your system. Once you have Ruby running, though, you can move on to installing Rake.
Installing Rake
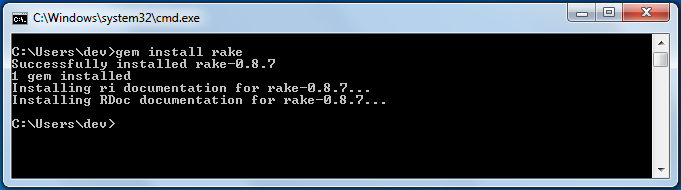
The Ruby installation includes a package management system called RubyGems, making it easy to install and update frameworks and other tools for use in Ruby. The command to install the Rake gem on your system is “gem install rake”. That’s it! There’s nothing more to it, assuming you have a working Internet connection. After running this command via a command prompt, you should see output similar to that of Figure 3.
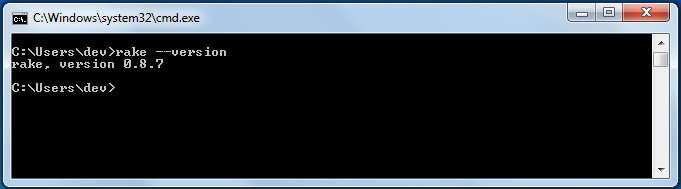
After running this command you can verify that Rake was installed correctly by running “rake --version” from the command line. This should provide the version number of the Rake system, as shown in Figure 4.
Writing Your First Rake Build Script
To write your first Rake script, you need to create a rakefile and add some Ruby code to it. Start by creating a file called “rakefile.rb” and open this file in your favorite text editor. Type the following contents into this file and save it.
desc "a sample Rake task"
task :default do
  puts "Hello From Rake!"
end
To run this Rake script, open a command prompt in the folder that contains the rakefile and run “rake.” Rake will find your rakefile and run the :default task with an output similar to that shown in Figure 5.

The Anatomy of a Rake Task
A task in a rakefile is a something for the Rake system to do. This may include code that is provided in the task’s code block, and / or may include other functionality that the task itself has provided. The Albacore suite of Rake tasks, for example, provides many tasks that can be configured to execute external tools. You do not need to explicitly call the tools because the tasks themselves take care of this for you.
A task can be described with the desc method and defined with the task method.
The Task Description
The first line of code is a desc method call. This is a short description of the task that is being defined. Notice in Figure 5, though, that the description does not show up when running the task. As shown in Figure 6, Task descriptions are displayed when calling rake -T to see the list of defined tasks.

The task description is optional. If you do not supply it you will not see your task listed when you call rake -T. This can be somewhat advantageous if you wish to have a task that is used within your script, but not shown in the task list. The task can still be called directly from the command line if you know the name, though.
The Task Name
The task method can be called with various parameters for different purposes. The first parameter provided to a task is always the name of the task. Every task must have a distinct name so that it can be called by its name.
Note that in the example script above, the task was named :default. When rake is called with no command-line parameters, it expects to find a rakefile in the current folder and it expects that rakefile to have a :default task. If you do not provide a :default task, Rake will abort the processing of the rakefile stating that it does not know how to build the default task. You can, however, specify the task you wish to build via the command line. If you choose to do this, you do not need to provide a task named :default.
The Task’s Code
While there are other optional parameters for a Rake task, you can ignore them for now and skip to the meat of the task - the code that gets executed.
Notice the do … end block that starts after the task name and ends a few lines later. This Ruby code block is what the Rake task executes. It is the work to be done by the task. In the example, a simple “Hello From Rake!” message is printed out to the console via puts. However, the code that you call here is not limited to simple constructs. This code block is a first-class citizen in the Ruby world and allows you to call any Ruby code that you want, including the ability to initialize objects and call out to other gem packages.
Build a Solution
The simple example does demonstrate how to build a Rake task, but it is not very useful for someone wanting to build a .NET solution. To accomplish this, a few more Ruby and Rake method calls will be used, as well as the .NET command-line tool that builds a Visual Studio solution: msbuild.exe.
To execute the MSBuild command-line tool and build the solution, you will need to know what command-line parameters you need to pass in. You can find this information on the MSDN website at http://msdn.microsoft.com/en-us/library/ms164311.aspx. The most basic of options that you need for the build script is just to pass in the location of the Visual Studio solution file. Other useful options include /targets and /properties. There are a significant number of other options available, but these will suffice for now.
The next step is to determine what solution you want to build, and point your rakefile at it. If your rakefile is sitting at the root folder of the project, and your “example.sln” solution file is sitting in the root\example1 folder, you can get to your solution file with the path “example1\example.sln”.
Now that you know where our solution is in relation to your rakefile, call out to the msbuild executable and point it at the solution. To do this you can use the “sh” method that Rake provides. This method will shell out to the command line and run any arbitrary command that you want. If you are using .NET 3.5, you should have an MSBuild executable located at C:\Windows\Microsoft.NET\Framework\v3.5\msbuild.exe. Call this and pass in the location of your solution with any other parameters that you want.
Add this code to your rakefile to build the example solution:
task :default do
msbuild =
“C:/Windows/Microsoft.NET/Framework/v3.5/
msbuild.exe”
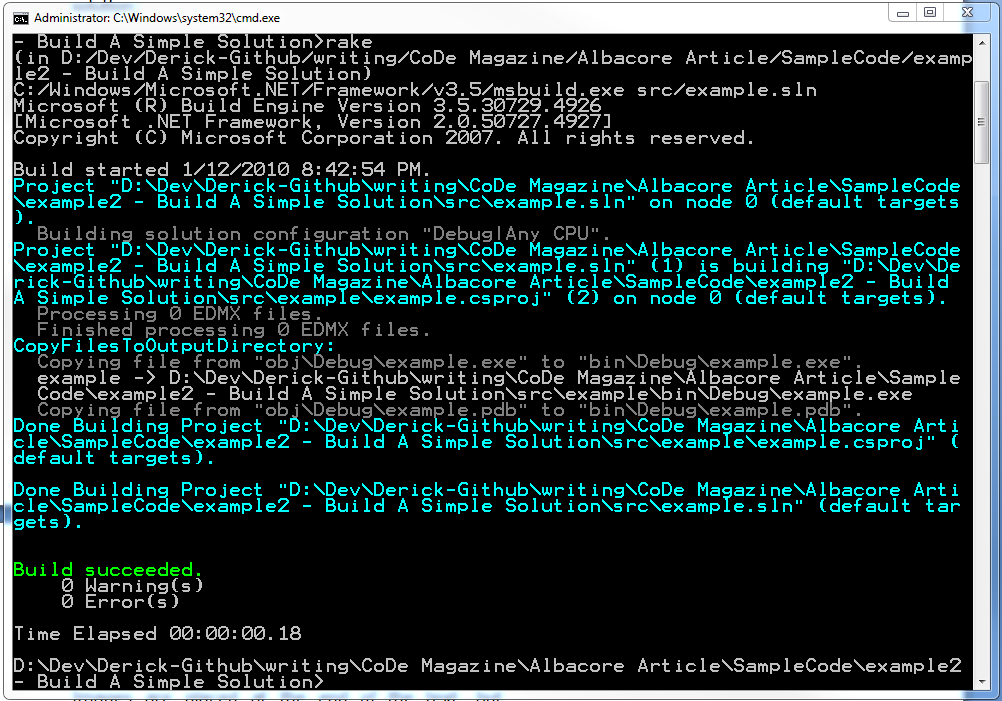
sh “#{msbuild} src/example.sln”
end
This code defines an msbuild variable to hold the location of msbuild.exe, and parses that variable into the call to the sh call. You can see the results of running this rakefile in Figure 7.
If you want to specify Debug vs Release mode in your build script, add a property parameter with the /p:name=value syntax to the sh call. You can also specify a different set of build targets such as Clean, Build and/or Rebuild by using the /target:targets parameter. A more complete solution build may look like the following:
task :default do
  msbuild =
“C:/Windows/Microsoft.NET/Framework/v3.5/
msbuild.exe”
  sh “#{msbuild} src/example.sln
/p:Configuration=Release /target:Clean;Build”
end
Run this rakefile again and you should see MSBuild calling the clean target and then calling the default build target, successfully.
A Multi-Step Build Script
One task in a rakefile may be suitable for a simple example, but a real-world project will likely have multiple steps that need to be taken. Rake allows you to specify as many tasks as you need and then gives you a simple syntax for tying them together in the right order. Before you tie multiple tasks together, though, you need another task in the build process.
It is common for solutions to have unit tests, implemented with one of many available unit testing frameworks. There are numerous resources available for complete descriptions of how to write and run unit tests. For this example, you’ll use NUnit to create a simple passing test that needs to be run via the build script.
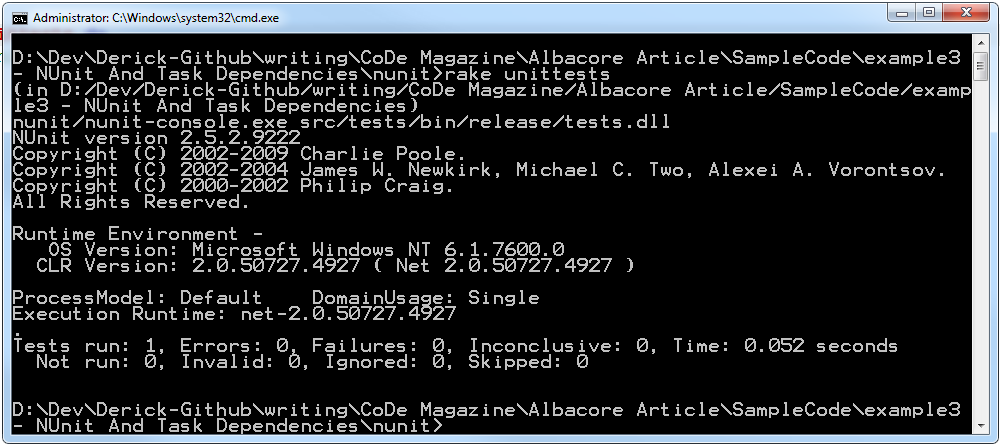
Create a new task in the rakefile and name it :unittests. Point the sh command at the nunit-console.exe and pass in the location of the compiled test assembly from the project solution.
task :unittests do
  sh “nunit/nunit-console.exe ?
src/tests/bin/release/tests.dll”
end
To run a specifically named task with Rake, specify the task name as a parameter to the Rake command line: rake unittests Look at Figure 8 to see the output of this command.
Running the individual tasks from the command line is useful when you need to test out the task. However, it would be far more useful to have Rake automatically run both tasks in the correct order. To do this, you can specify a dependency task list for any task in a rakefile. The syntax for doing so is to add a list of dependent tasks after the task name.
task :task4 => [:task1, :task2, :task3] do … end
In this example, the task list is named according to the order in which they will be executed. Task1 will execute before task2, task2 will execute before task3, and task3 will execute before task4. You can put this task dependency knowledge in play by telling the :unittests task to depend on the :default task.
task :unittests => :default do
Re-run “rake unittests” and you will now see the solution being built before the unit tests are run!
This rakefile, while functional, would always require that you call rake unittests to build the solution and run the tests. It would be better to have a default task that depends on the build and unit tests so that rake can be called without a task name and still have the solution built and tested. To do this, you can take advantage of one more Rake task feature: a task without a code block.
First, rename the current :default task to :build. Then, create a new default task and have it depend on the build and unittests tasks. Do not provide a do … end code block for the new default task. Listing 2 shows what the result should look like.
Now you can run the rake command with no parameters and it will execute the default task. Since this task depends on the build and unittests tasks, the solution will be built and tested in the correct order.
At this point you should be able to tackle any task that you need. However, all of that string manipulation to set up the sh calls could get rather clumsy and difficult to read quickly. It would be nice to have a suite of Rake tasks that encapsulates the common build process targets for a .NET system, hiding the string manipulation and sh calls, while creating syntax that expresses the individual concerns of each step in the process.
The Albacore project aims to do precisely that.
The Albacore Project
Albacore is a suite of Rake tasks that hides the complexity of building up the command line strings behind an easy-to-use API, designed specifically for building .NET systems. It includes many of the most common targets that are needed for building .NET systems, and more are continuously being added.
Installing and Using Albacore
To get started with Albacore, the first thing you need to do is install the gem. Open a command prompt and run “gem install albacore”. This will download and install the latest version on your system (at the time of writing, v0.1.1 is the latest). However, new releases are very regular and include new features and functionality along with bug fixes and API improvements. You should see results similar to when you installed Rake, earlier.
After installing the Albacore gem on your system, you can use it by “requiring” it in your rakefile. At the top of the file add the following line of code:
require ‘albacore’
Require is a Ruby command that instructs the runtime to load and make available all of the code in the specified file. Since Albacore was installed by the RubyGems system, you do not need to specify a path to the included file. Specifying ‘albacore’ will load the entire suite of tasks and make them available for use.
Build and Test a Solution with Albacore
The simplest example of using Albacore in your build process is the MSBuild task. This task assumes, by default, that you are using the msbuild.exe from the .NET 3.5 SDK - the same one that was called out to earlier. With this assumption in place, you do not need to specify the location of msbuild.exe. If, however, you are not using that version or you want to call msbuild.exe from a specific location, you can override the location.
After requiring the Albacore runtime file at the top of your rakefile, delete the existing build task and replace it with the following:
msbuild :build do |msb|
  msb.solution = “src/example.sln”
  msb.targets :clean, :build
  msb.properties :configuration => :release
end
The “|msb|” code next to the do statement is a named parameter to the code block. Each of the Albacore tasks provides a parameter for the task so that you can configure the task with the necessary settings.
This is all you need to build your solution with the same targets and configuration mode as the previous task. To run your NUnit tests, replace the unittests task with the following:
nunit :unittests do |nunit|
  nunit.path_to_command = “nunit/nunit-
console.exe”
  nunit.assemblies
“src/tests/bin/release/tests.dll”
end
This task makes no assumptions about the location of nunit-console.exe. You must specify it through the .path_to_command setting. You can easily add more assemblies via a comma delimited list if you need to. There are other options available, as well, but they are not needed at this point, so they are omitted.
With both of these tasks now using Albacore tasks (see Listing 3 for the complete rakefile contents), run rake against the new rakefile. This should produce the same results as the previous rakefile. You will see the solution being built and you will see the unit tests being executed. The value that Albacore provides is not in the output, but the input. With an API that is specifically tailored to building .NET systems, Albacore makes it significantly easier to get your build working and Albacore makes it easier to maintain in the future.
Other Albacore Tasks
Building and unit testing your system gets you in on the ground floor of build automation. However, there are often many other steps involved in building large systems. The needs range from generating common assembly information to other unit test systems and code / static analysis tools, and far beyond. Albacore includes many other tasks which will help to create a more complete build process. If you don’t see the task that you need, there is a task that allows you to execute any arbitrary command with parameters. Always remember, though, you are writing Ruby code - if you don’t have the functionality you need, it is only a few lines of code away.
As I write this article, Albacore includes many tasks which I’ve listed in Table 1.
Advanced Usage and Options
The task list, while it may be impressive in its own right, is not where the real value of Albacore is found. Rather, it is the advanced usage scenarios and additional features and functionality that Albacore builds into each of these tasks that give it significant value. Whether it is taking advantage of the command-line tool being called or providing configuration management capabilities in your build scripts, Albacore and Rake can help to automate and simplify many tasks that were previously done by hand.
Publishing Web Projects
Visual Studio provides an option to Publish a Web project. This will copy all files that are necessary for running your Web project out to a folder that you specify. If you wish to publish your Web project with your build script, the MSBuild command line can help you with that, which in turn means that Albacore can help you out. The code in Listing 4 shows an MSBuild task configured to publish a Web project.
Notice that there are a couple of changes in this script compared to the previous MSBuild examples.
First, the targets that are called are specific to the Web publishing process. In this case, you are ensuring that all references are available and then copying out (“publishing”) the application files.
Second, there are two output directories in this example. The first one, WebProjectOutputDir, tells MSBuild where to copy the Web project’s files - the .aspx files, images, JavaScript, and other file-based resources for the project. The second property, OutDir, tells MSBuild where to copy the compiled code - the assemblies needed to run the project. Since the assemblies need to be in the ‘bin’ folder of the Web project, they are published to the ‘bin’ folder of the destination.
Lastly, notice that this task is not actually building a Visual Studio solution. Rather, it is building a project from a solution. You are not trying to publish the entire solution - just the Web project.
The net result of this configuration is a folder that contains everything you need to run your Web project. You should be able to copy this folder, zip it up, and / or otherwise package and move the published location out to an environment that can run it.
Publishing a ClickOnce WinForms Project
In addition to publishing a Web project, the MSBuild command-line tool can also publish a ClickOnce WinForms project. (The setup of a ClickOnce project is out of scope for this article. There are plenty of resources online for helping you to set up a project in this manner.) Listing 5 shows the configuration needed to publish a ClickOnce project.
Notice that there are several properties and targets here, similar to that of the Web project publishing example.
With either of these publishing examples - WinForms or Web projects - you may want to have multiple MSBuild tasks defined in your rakefile. This is useful if you want to have one task that only builds the code for unit tests, and then another task defined for the publishing of the project. To do this, you only need to specify different task names for each task.
msbuild :build do |msb|
  # ... build options go here
end

msbuild :publish do |msb|
  # ... publish options go here
end
Configuration Management
One of the goals of automated build systems is to create and deploy builds that have been customized for the target environment. This may include changing configuration files, building in Release vs. Debug mode, running database update scripts against the target environment, etc. Automating such tasks to reduce human error - to eliminate the “I forgot to…” problems associated with manual build processes - is important as your system becomes larger and more complex.
To help facilitate the automation of configuration management in .NET systems, Ruby, Rake and Albacore include features that allow you to make changes to the build process at runtime. First, remember that you are working with a full object-oriented language. If there is a logical path of execution that can be defined in code, you can build that path with Ruby and have it run in your rakefile. Second, Rake provides several mechanisms for reading command-line parameters and other environment variables. And lastly, Albacore takes advantage of the first two items by allowing you to change your task configuration via executing code, and it supports the complete Rake task syntax including task parameters. With these options at your fingertips, it is trivial to make sweeping changes in the output of your build process.
Command-Line Parameters and Environment Variables
Rake makes it easy to read environment variables and command-line parameters through the use of the ENV collection. This collection is a name/value hash of all current environment variables, merged with all command-line parameters, creating a single source for both sets of data.
For example, your script may need to access the TEMP folder on the system to read / write temporary files during the build process. This code will read the location of the TEMP folder and write it out to the console.
tempfolder = ENV[“TEMP”]
puts “The TEMP folder is located at #{tempfolder}”
Additionally, many Continuous Integration servers, such as CruiseControl (available as CruiseControl.NET, CruiseControl.rb and CruiseControl), TeamCity and Hudson provide command-line parameters to the build process that is being executed. This information may include source control revisions, build numbers, project information, and any of a number of other values including values that can be configured by the end user of the server.
The command-line parameters are read from the ENV hash in the same manner as environment variables. For example, CruiseControl.NET provides a “CCNetLabel” parameter, which can be read like this:
ccnetlabel = ENV[“CCNetLabel”]
You can use this information inside of Albacore tasks, like the AssemblyInfo task, to automate the version information that is used for your projects.
@ccnetlabel = ENV[“CCNetLabel”]

assemblyinfo :versioning do |asm|
  asm.output_file = “src/assemblyinfo.cs”
  asm.version = “1.0.0.#{@ccnetlabel}”
  # ... other options here
end
Any project that references the “src/assemblyinfo.cs” file will be built with its version having the fourth number set the value of the CCNetLabel.
Task Parameters
In addition to standard command-line parameters, Rake also supports parameters that are passed to specific tasks. This is done by including an ordered list of parameters in square brackets - the Ruby array syntax - when calling a task from the command line. For example, if you wanted to call a MSBuild task with a build configuration parameter, you would call rake build[debug] and you would set up the task like this:
msbuild :build, [:config] do |msb, args|
  msb.properties :configuration => args.config
  # ... other options here
end
Note the second parameter in the definition of the MSBuild task in the square brackets. This parameter is an array of named parameters that the task accepts. If you want to include more than one parameter in the task, you would add names to the array. Second, the code block for the task is receiving a second parameter called args. This block parameter gives you direct access to the parameters that were defined by the task. Third, the msb.properties option is setting the configuration property to the value in the config parameter. The args parameter in the code block will automatically have access to all task parameters by the name of the task parameter. If you add a config, target and version parameter to this task (setup as “[:config, :target, :version]”) then you would be able to access args.config, args.target and args.version inside of the code block.
The standard Rake task syntax still allows you to specify task dependencies in this scenario, too. You just have to move the dependency list so that it comes after the parameter array.
msbuild :build, [:config] => :versioning do
|msb, args|
  # ... options here
end
When working with task parameters, you may not always be able to provide the parameter values at runtime. For this scenario, the args parameter in the code block provides a simple way of obtaining a default value. By calling the args.with_defaults method you can specify a default value for the named task parameter, like this:
msbuild :build, [:config] => :versioning do
|msb, args|
  args.with_defaults :config => :debug
  # ... options here
end
This method takes in a standard hash set of key/value pairs, telling Rake to assign the config parameter a default value of debug. You can specify additional parameter defaults by adding comma separated name => value pairs. After setting up your default value for config, a call to args.config will either return the default value or the value that was supplied to the task from the command line.
Task Configuration with YAML
Similar to the XML-based .config files in .NET applications, Albacore can configure your tasks with YAML files. The only action that you need to take to enable this feature is to name a YAML file (.yml) after your task.
Here is one example of how small a task definition can be using the YAML configuration feature. Define an MSBuild task in your rakefile and give it a name.
msbuild :build
Now add a YAML file to the same folder as the rakefile and call it build.yml.
#the build.yml file

solution: “src/example.sln”
targets: [:clean, :build]
properties:
  “configuration”: “release”
Notice that the task has no configuration specified in the rakefile. There is only a call to the MSBuild task and a name for it. The YAML configuration looked in the current directory for a file named after the task and loaded the information from this file into your task for you.
Albacore can help you manage multiple build configurations through the use of YAML files by allowing you to specify different files and folders to load the configuration data from at build time. This allows you to target different runtime environments with your build process. For example, you can have one set of YAML files for a development, test, and production environment. Combine this with other configuration management practices in your projects and you can target specific customers and package different files for them based on the YAML configuration files. The options are almost endless.
To have Albacore load the YAML files from a specific folder, set the Albacore::yaml_config_folder option at the top of your rakefile. The value of this setting should be a folder location, relative to your rakefile.
Albacore::yaml_config_folder = “config/”
This setting is a global configuration option for your rakefile and will affect the folder that is searched for the configuration of every task that you have defined. You only need to set this once, and every task will load from that folder.
Combine this with command-line parameters or environment variables and your script will be able to determine which folder to use at runtime. Listing 6 shows a rakefile with several tasks that are configured by with YAML files, using a command-line parameter to determine the folder from which the files are loaded.
If you don’t need a different configuration for different environment in a given task, you can also specify a YAML configuration file manually. To do this, call the .configure method in the task’s configuration. For example, the MSBuild and NUnit tasks can be configured with YAML by using this code:
msbuild :build do |msb|
  msb.configure “config/msbuild.yml”
  # ... other options here
end

nunit :unittests do |nunit|
  nunit.configure “config/nunit.yml”
  # ... other options here
end
You’ll need to have the specified files in the “config” folder.
When specifying a YAML config file for a task, by using the .configure method, the Albacore::yaml_config_file setting will be ignored and the configuration file that you specify will be used to configure the task.
Not every option for every task supports a completely stripped down rakefile task definition, though. For example, the NCoverConsole and NCoverReport tasks require various objects to be instantiated and assigned to various settings. In situations such as this, you have to use the rakefile configuration. (For complete information on how to run the NCover tasks, see the API and Task Documentation sidebar.)
Expand Templates
When targeting different environments with a build script, the changes in the script itself may not be enough. It is common to need different configuration settings in your application’s configuration files for the various environments that you are targeting. Albacore can help facilitate this with the ExpandTemplates task. This task allows your build scripts to replace tokens in template files with data from YAML files, and save the results to a specified location.
To expand a web.config template file for a Web project, start by defining the following task in your rakefile:
expandtemplates :templates do |exp|
  exp.expand_files “templates/web.config” =>
  “src/web.config”
  exp.data_file = “templates/data.yml”
end
Then create a folder called “templates” and add a “web.config” file to this folder, with the following contents:
<?xml version="1.0"?>
<configuration>
  <!-- other settings here-->
  <appSettings>
    <add key="MySetting" value="#{mysetting}" />
  </appSettings>
  <connectionStrings>
    <add name="MyDB"
connectionString="#{connectionstring}" />
  </connectionStrings>
  <!-- other settings here-->
</configuration>
(Notice the use of the #{name} syntax in the web.config file. This is the same syntax that Ruby uses to insert variable values into strings, so it should be familiar.)
Next, create a YAML file called “data.yml” in the templates folder. The contents of this file should contain name / value pairs that match the name to the #{name} tokens that appear in the web.config template.
connectionstring: “server=’myserver’; etc”
mysetting: some setting
Take care to get the capitalization matched in the token names. If you don’t get them matched correctly, the task will not be able to find the value.
After running this rakefile, the web.config file in the ‘src’ folder will look like this:
<?xml version="1.0"?>
<configuration>
  <!-- other settings here-->
  <appSettings>
    <add key="MySetting" value="some setting" />
  </appSettings>
  <connectionStrings>
    <add name="MyDB"
      connectionString="server=myserver; etc" />
  </connectionStrings>
  <!-- other settings here-->
</configuration>
Listing 7 shows an ExpandTemplates task with multiple files to expand. This task takes advantage of the command-line parameters discussed earlier to determine which target environment’s data files to use. Listing 8 then shows the data file associated with this task, for one of the specific environments.
The data contained in the Listing 8 YAML file has been organized by the name of the template file that is being expanded. By doing this, the Expand Templates task will know which values to apply to which files.
There are times when some of the configuration settings needed will change, and some will not change, between target environments. For example, you may want to specify an e-mail address that all errors are sent to. To prevent duplication of data across the template data files, the Expand Templates task recognizes a simple include syntax in the YAML file. This will cause the ExpandTemplates task to read the included file, which uses the same formatting as the other ExpandTemplates data files. Any data that is found in the include file will be used as the default values. You can override these default values by specifying the data in the file that called the include file.
To use an include file from a template data file, use @include: as the key in the key: value pair on the first line of the template file.
@include: ../common.yml

connectionstring: …
mysetting: …
Any combination of the global data, template-specific data, and include file data may be used. In scenarios where they are mixed, the order of precedence is:
- Template-specific data
- Global data
- Include file data
That is, if template-specific data is found in the data file that was specified, it will be used. When template-specific data is not found, the global data from the file will be used. When global data for the specific token is not found, the include file data will be used. And finally, when an include file is specified, the order of precedence repeats itself within that file.
Many More Configuration Possibilities
There is a lot of potential to be tapped into with the configuration management capabilities of Albacore. However, this article only scratches the surface. For more information on what is being done with Albacore, be sure to visit the website regularly and / or subscribe to the RSS feed.
Running Albacore on IronRuby
As I’m developing this article, the IronRuby project is in Release Candidate stage. This project aims to bring full Ruby language support to the .NET runtime environment, and provide extensions to Ruby to call out to the .NET platform and its runtime and components.
While Albacore has been specifically written to run on the RubyInstaller for Windows, there has been some experimental support for IronRuby put into the 0.1.0 release. There are a few known issues including some tasks that are not fully functioning and some that do not function at all. However, if you would like to run Albacore in a pure .NET environment, then IronRuby may be an option for you.
As the Albacore project continues to grow, and as IronRuby moves closer to a full 1.0 release, support for IronRuby will be enhanced. It is difficult to say at this point what tasks will and will not work.
Please see the Albacore website and documentation for more information on IronRuby support.
Contribute to Albacore
As you can see, the Albacore project provides a significant amount of functionality and a wide variety of options for configuring your builds. However, Albacore is not yet a complete project. The current features and functionality were implemented by a team of developers across various continents, based on their specific needs. You may not find everything that you need in Albacore… yet.
Albacore is an open source project, released under a MIT license. This means that anyone can use, modify and redistribute Albacore as they see fit (subject to the license details, of course). This also means that you are not limited to the development timelines of the Albacore team. If you need specific functionality for a task, a new task altogether, or have ideas on how to improve the overall functionality of Albacore, you can change Albacore to suit your needs.
If you do not wish to contribute source code, but wish to be involved in the overall direction that Albacore is heading, please consider joining the albacoredev discussion group on Google Groups. Feel free to join this group and question, comment, or otherwise offer your opinions. This group is also a great place to find support for getting your rakefile and tasks working the way you need them to.