


You can use ClickOnce to revolutionize how you install and update Visual FoxPro (VFP) applications.
A dream come true, ClickOnce can put a stop to many of the deployment nightmares associated with distributing applications.
ClickOnce, Microsoft’s newest deployment technology, allows developers to publish an application on a server so users can install the application by clicking a hyperlink in a Web page. And not only can you use a ClickOnce deployment strategy to initially install a distributed application, but you can also use ClickOnce to issue updates by merely incrementing the publish version number in the Visual Studio project and then republishing it. Users install the application -Click! Users run the application - Click! Users receive update notifications -Click! ClickOnce strives to make deploying and updating desktop applications as easy as updating and visiting a Web page.
Using ClickOnce to Deploy Visual FoxPro Applications
How does ClickOnce apply to Visual FoxPro applications? Isn’t it just for Visual Studio projects? While Microsoft primarily designed ClickOnce for Visual Studio applications, Visual FoxPro developers can take advantage of the benefits ClickOnce provides by using the information contained in this article. Let me take you on a tour of ClickOnce from a Visual FoxPro developer’s perspective.
Create a Visual FoxPro Project
Creating a Visual FoxPro application that you want to deploy using ClickOnce does not require any additional steps in Visual FoxPro than you would normally go through to create a project and build an application from it. The brunt of the deployment and configuration work is either already provided for by ClickOnce or can be accomplished using Visual Studio 2005 and an install builder such as InstallShield or Inno Setup. A distributed application that is in dire need of a good deployment solution is a prime candidate for ClickOnce deployment.
Using just a single line of C# code and the power of ClickOnce, Visual FoxPro developers can provide an end-to-end deployment solution that serves the needs of both developer and user.
On the off-chance that there is someone reading this article who doesn’t know how to create a Windows desktop application in Visual FoxPro, here are the steps.
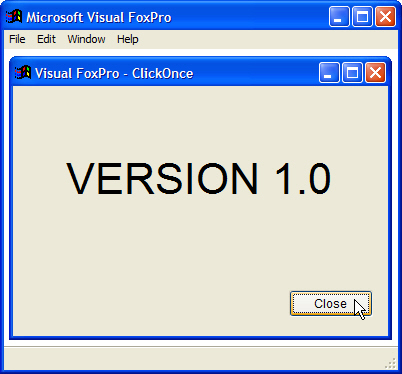
When finished, the form should look similar to the one shown in Figure 1. The application includes the label so that when you update the application you can easily see the version. Now that you’ve created the Visual FoxPro application you want to distribute, a ClickOnce application (that will act as a loader for your Visual FoxPro application) will be created in Visual Studio. A ClickOnce application is essentially any application that someone has deployed using ClickOnce. This article explains how to deploy a ClickOnce application from a C# perspective. While the code syntax is different, most of the steps are either exactly the same or somewhat similar in Visual Basic.
Create a Visual Studio Project
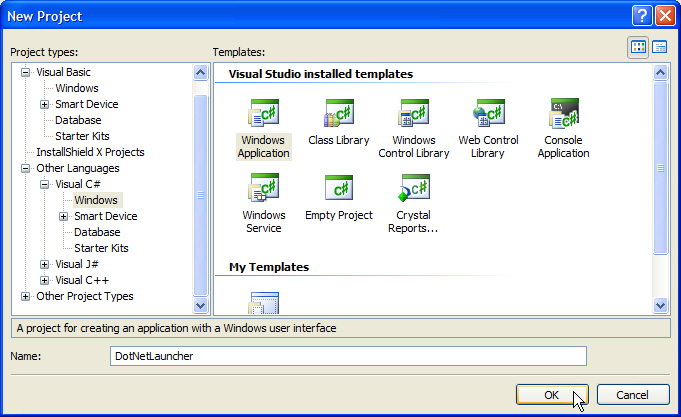
The following steps are used to create a new C# project in Visual Studio 2005:
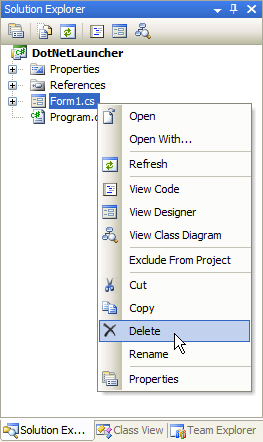
With the DotNetLauncher project open in Visual Studio 2005, go into the Solution Explorer and delete the C# form that Visual Studio automatically generated with the new project by right-clicking on the form item in the Solution Explorer and selecting Delete (Figure 3). Add the Visual FoxPro application created earlier and the Visual FoxPro runtimes to the DotNetLauncher project as shown in Figures 4 and 5. There is a much better way to distribute the Visual FoxPro runtimes than adding them directly to the .NET project, and I will explore this preferred method of inclusion/deployment in the Bootstrapper section later in this article.

Once you’ve added the runtimes to the DotNetLauncher project, open the main C# program file named Program.cs and replace its contents with the code in Listing 1. Note in the code that the main entry point of the .NET application uses the static Start method of the System.Diagnostics.Process class to start the vfpapp.exe. This .NET assembly will act as a launcher/loader for the vfpapp.exe. The DotNetLauncher is now ready to be built and published using the ClickOnce features available in Visual Studio.
Publishing the DotNetLauncher Assembly
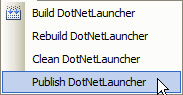
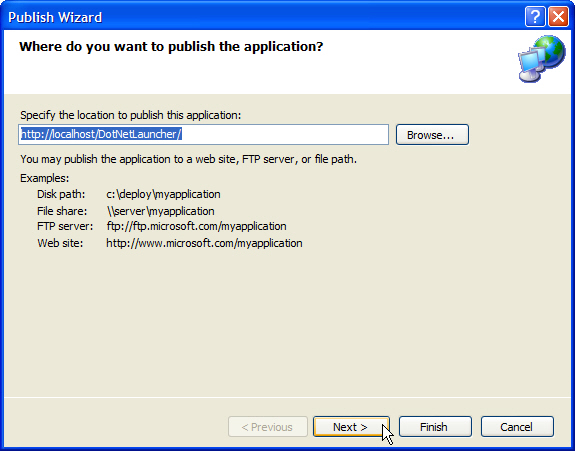
Save the DotNetLauncher project and then from the Build menu choose Publish (Figure 6) or you can right-click on the project and select Publish from the popup menu. You’ll see the Publish Wizard and the first thing you need to decide is where to publish the application. You can publish to a local path, UNC path, FTP server, or a Web site. In this article I’ll publish the DotNetLauncher application to the local Web server. Click Next (Figure 7) after you’ve indicated the location.
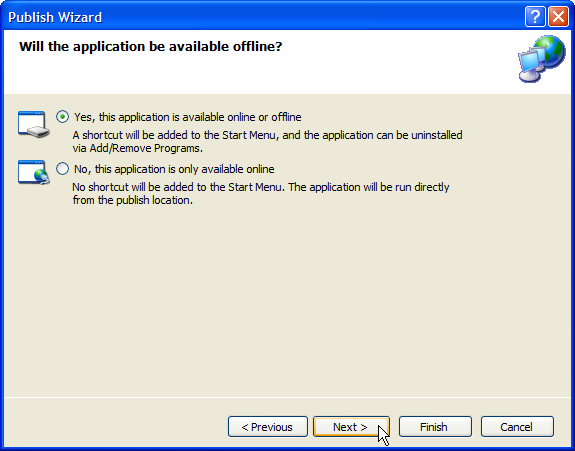
Before you build and publish the DotNetLauncher application you need to indicate to the Publish Wizard whether you want to make the application available to offline users. Applications deployed via ClickOnce are available online by default. Users cannot run an online-only application offline because they run from the publish location by means of the .application file. ClickOnce applications that are available online and offline will be available from the publish location and ClickOnce will create a familiar looking shortcut to the application in the user’s Start menu Programs list. This allows them to execute the application without visiting the publish Web page or otherwise connecting to the publish location. Select the first option as shown in Figure 8 to instruct the Publish Wizard that it should publish the ClickOnce application so it will be available to users both online and offline after it is installed. Click Next and then click Finish and the Publish Wizard will build and publish the DotNetLauncher application based on the selections you made.
Published Files
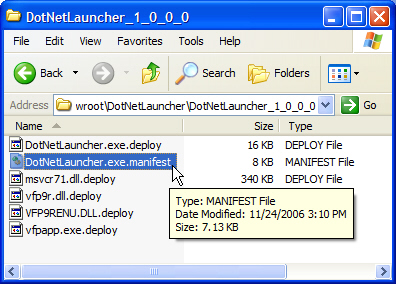
When Visual Studio publishes a ClickOnce application, it creates a number of files and saves them to the application’s Publish Location. As Figures 9 and 10 illustrate, Visual Studio creates quite a few files, including extensions such as .exe, .htm, .application, and .deploy, when it publishes the application. Some of these files deserve a little further explanation.
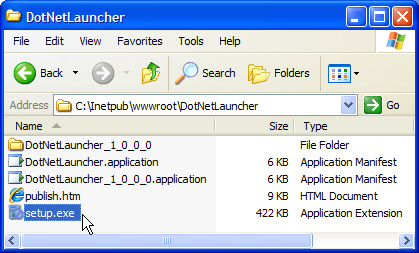
Setup.exe, known as the Bootstrapper, is a single installer that provides (among other things) the services and features needed to detect, coordinate, and install the prerequisites and all of the components that constitute the ClickOnce application. I’ll cover Boostrapper in further detail later in this article.
DotNetLauncher.application is a deployment manifest, which is an XML file containing elements that describe the deployment of the ClickOnce application. This includes information regarding the current version, location, and identity of the application manifest (see below), and update deployment. DotNetLauncher.application also provides the publisher, product, and support URL information used to create the application entry in the Control Panel’s Add and Remove Programs screen for offline-available ClickOnce applications.
A distributed application that is in dire need of a good deployment solution is a prime candidate for ClickOnce deployment.
DotNetLauncher.exe.manifest, an application manifest, is an XML file containing elements that describe the components that make up the ClickOnce application. This includes information regarding the entry point, security requirements, OS compatibility, application files, and dependencies. Application manifests are version specific so each version of a deployment will have its own application manifest.
DotNetLauncher.exe.deploy, along with the rest of the files that have a .deploy extension (Figure 10) is an application file. ClickOnce changes the extension for the application files because it simplifies server configuration. If you had to deploy the application files using their original extensions, your system administrator would have to ensure that all of these extensions were unblocked by the server so that the ClickOnce application could access them. By appending the .deploy extension to the application files, ClickOnce makes the administrator’s job much easier given that they only need to provide access to the .deploy, .manifest, and .application extensions for the ClickOnce application to gain access to all of the files it needs to use. ClickOnce does allow you to change this default publishing behavior. You can choose to deploy application files with their extensions intact. To do this, from the Publish page of the Project Properties screen in Visual Studio 2005, clear the Use “.deploy” file extension check box.
Publish.htm is provided as an example and perhaps for convenience sake. You can use Publish.htm as-is to provide users with a Web page that will allow them to download, install, run, and update the ClickOnce application. You can edit Publish.htm just like any other HTML file to include company logos, Flash content, additional text, styling, or anything else that a vendor of a ClickOnce application may wish to do in the name of branding and/or enriching the user’s experience. Furthermore, you can rename, move, or even password protect Publish.htm. Anything that you can normally do within the confines of an HTML page you can be do to the Publish.htm page. However, to keep the base functionality that Publish.htm provides, Web masters need to be mindful of two important hyperlinks contained within Publish.htm that point to the Bootstrapper and the deployment manifest.
There is nothing magical or special about these hyperlinks. Publish.htm is an ordinary Web page and so are the hyperlinks it contains. They are just a couple of download links that point to the ClickOnce application’s deployment manifest, DotNetLauncher.application, and the Bootstrapper, setup.exe. Visual Studio generated these files along with the Publish.htm when it published the application (Figure 9).
From the User’s Perspective
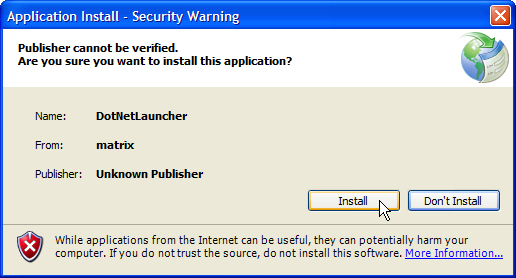
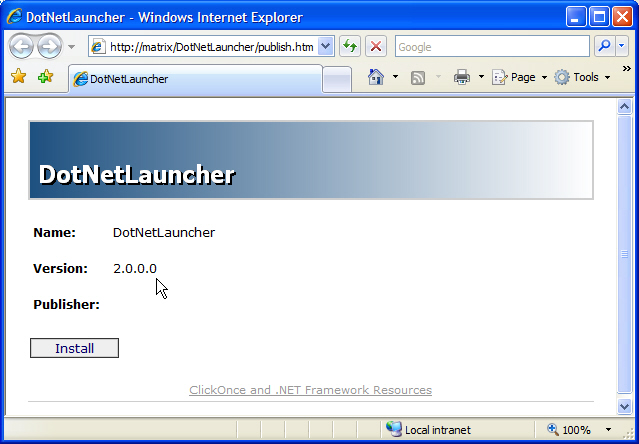
An authorized vendor of a ClickOnce application will distribute the location of Publish.htm to users in a number of ways such as word of mouth, through an e-mail, or from a hyperlink on the vendor’s Web page. The user will then navigate to the Publish.htm using Internet Explorer. Figure 11 shows how Publish.htm appears in Internet Explorer 7.0. Figure 12 shows the resulting Application Install dialog box that the user will see when they click Install. If they have not yet installed the application then ClickOnce will give them an opportunity to first install any prerequisites (such as the .NET 2.0 Framework). With the prerequisites completed, ClickOnce can install the application. After the user has successfully installed the application, the Web page still serves as a location from which users can open their installed ClickOnce application and retrieve updates. That is, provided the update location and the publish location remain the same.

When the user opens/runs a ClickOnce application such as DotNetLauncher, ClickOnce checks for updates and if any are available it will download them and update the user’s system, and then ClickOnce will launch the Visual FoxPro application, vfpapp.exe. Amazing! Using just a single line of C# code and the power of ClickOnce, Visual FoxPro developers can provide an end-to-end deployment solution that serves the needs of both developers and users.
ClickOnce Shortcuts Are Different
ClickOnce creates a shortcut in a user’s Start menu Programs when a user installs a ClickOnce application, like DotNetLauncher. This shortcut is only created when the developer that published the ClickOnce application indicated that the ClickOnce application should be available offline. The user uses this shortcut to launch the ClickOnce application when they are not connected to the publish location.
If you closely examine the created shortcut you’ll see that it is quite different from a regular Windows shortcut. That’s because it’s not a .lnk file. It is actually something known as an Application Reference and it has an extension of .appref-ms. These Application References are sometimes referred to as ClickOnce shortcuts.
You’ll find the default installation location for a ClickOnce shortcut in the user’s Start menu Program list under
PublisherName>ProductName.AppRef-MS
- PublisherName is the folder that is created in the user’s programs list.
- ProductName.AppRef-MS is the filename of the ClickOnce shortcut that is created.
Both PublisherName and ProductName are based on what was entered in the textboxes of the same names provided in the Publish Options dialog box. You can access the Publish Options dialog box from the Publish page of the Project Properties screen in Visual Studio 2005. I’ll discuss the Publish Options dialog box in more detail later in this article.
Where Are the Application Bits Installed?
In the case of an installed, offline-available, ClickOnce application, the ClickOnce installs the application in the user’s profile directory. Every user that installs the application on a given computer will end up with their own profile’s isolated installation. The directory into which an offline-available ClickOnce application is installed looks very similar to the following:
C:\Documents and Settings\Profile
Name\Local Settings\Apps\2.0
ClickOnce’s installation routine does not simply creating an application directory based on the Product Name and install all of the application bits into it. That would have been too easy. The scheme that Microsoft has devised is much more complex and it involves having the components that make up the application installed in a lot of different directories and subdirectories beneath the 2.0 folder shown above. ClickOnce installs the application in one location, the data in another, and the manifests in yet another. The install is essentially compartmentalized.
Data != Database
I probably need to clarify what I meant above when I said that the data is installed in another directory. In this case the word “data” does not refer to place where Visual FoxPro developers should install a system’s database. While you certainly could install your Visual FoxPro database into the data directory of a ClickOnce application, remember that ClickOnce will install the application into each isolated user profile.
The application files of a ClickOnce application that get installed into a data directory, if any, are the application files that have been given a Publish Status of “Data File” in the Application Files screen in Visual Studio 2005. I’ll provide more information regarding the Publish Status later in this article. Application files that Visual Studio marks as Data Files likely hold application data, such as user-level preferences. Now you can certainly choose to hold these types of settings in Visual FoxPro tables and I am not against using them in this capacity. Arguably, if you design an application to run as a standalone system where each user would have their own separate database, the Data directory might be just the place for it. However, as a developer you should remain cognizant of the fact that the Data directory of a ClickOnce application is not suitable for a system’s multi-user database.
A closer look at what the DotNetLauncher application installed reveals that the directories below were created beneath the 2.0 directory, and each is filled with files and subdirectories. When taken as a whole, the following directories can be considered to constitute the installed application.
- Data files are installed in: \Data\J67ZDKCH.YZK\6QQA3YY2.1ZW\dotn..tion_ba0945fa453d878a_0005.0000_259695a52ffcc248\Data
- Application files are installed in: \H10C9AH4.5DE\BPP88652.VWC\dotn..tion_ba0945fa453d878a_0005.0000_259695a52ffcc248
- Manifests files are installed in: \H10C9AH4.5DE\BPP88652.VWC\manifests
Updating a ClickOnce Deployed Application
Given the importance of application updates to developers of distributed applications and the value of such a feature in a deployment solution, I want to discuss the way ClickOnce handles application updates. ClickOnce basically gives you four different update strategies to choose from:
Never check for updates.
ClickOnce applications use a smart update process known as File Patching when downloading an available update.
Check for updates on application startup.
Check for updates after startup using a background thread.
Handle updates manually through code.
Update strategy 1 requires that you block automatic update checking. You do this in Visual Studio 2005 by either clearing the checkbox that says “The application should check for updates” or by removing the <Subscription> tag from the deployment manifest. That’s all there is to it. Publish the application and update checking will not occur.
To implement update strategy 4, a developer must first implement one of the methods just outlined in update strategy 1. That might seem counter-productive but it is necessary because writing your own update strategy requires that you block ClickOnce from automatic update checking. This allows you to have complete control over the update logic of your ClickOnce application. Next you must decide on the logic and design that your application will use to perform updates. In order to actually implement the logic in code and hook all the user interface portions of the design up so they actually work, you need to work with the classes contained in the System.Deployment.Application namespace provided by the ClickOnce deployment APIs.
For update strategies 2 and 3, a ClickOnce application determines if an update is available and what to download pretty much the same way. The ClickOnce application checks the installed version of the product against the version information contained in the deployment manifest (DotNetLauncher.application). If the versions don’t match then it considers an update to be available.
File Patching
ClickOnce applications use a smart update process known as File Patching when downloading an available update. File patching is performed by checking the file hash signatures that are contained in the installed version’s application manifest against the file hash signatures that are in the updated version’s application manifest. If the hash signatures match then the file contained in the update will not be downloaded as part of the update because it has not changed. The ClickOnce application can simply copy the local existing version to the new updated local version, thus saving bandwidth and time. ClickOnce has to copy the file, as opposed to leaving it where it is, because ClickOnce saves previous versions (states) of the application so that the application can be rolled back if necessary. Looking at the local install directory for ClickOnce applications that have been updated will reveal that previous versions have been kept intact and the ClickOnce application essentially just creates a new directory in which to reside whenever it updates itself.
Now, in the case where ClickOnce finds that the file hash signatures in the application manifests are different, it will download the updated version of the file and use it in lieu of the older copy. Any new files, including files that have never before existed in the local version, are also downloaded as part of this process. If the updated version of an application no longer contains a file that was in the previous version, the ClickOnce application will not make a copy of the file from its current version when it is updating the application.
The only difference between update strategies 2 and 3 when downloading updates is that with update strategy 2, the ClickOnce application will download and install any available update prior to launching the application so that the user will run the newest version of the system. Whereas, update strategy 3 allows the ClickOnce application to download the update in the background, but not actually install the update until the next time the application was run.
When Does a ClickOnce Application Check for Updates?
ClickOnce applications using either update strategy 2 or 3 will check for available updates based solely on the settings that the developer has chosen in the Application Updates screen in Visual Studio 2005. In the case of update strategy 2, the ClickOnce application will check for an update whenever the application starts. Whereas ClickOnce applications using update strategy 3 can check for updates after the application starts on a defined periodic schedule. Obviously, if the ClickOnce application is unable to connect to its update location then it would be unable to check for an update. In this case the ClickOnce application will attempt to check for an update the next time the application starts.
Make ‘Em an Offer They Can’t Refuse
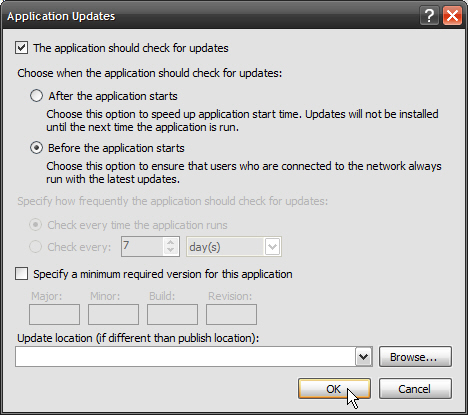
Figuring out how to create a required update in Visual Studio leaves one with the feeling that the process could have somehow been made more intuitive. Luckily, the steps required are minimal. To create a required update in Visual Studio you must specify a version number in the Application Updates screen that is greater than the version number of the application on the user’s machine. Also, in order to ensure that a user cannot run an older version of the application without installing the required update, you must configure the ClickOnce application to check for updates before the application starts by making sure that you select the “Before the application starts” option in the Application Updates screen.
Using the information presented above, you can force updates that users are unable to skip. From the user’s perspective they cannot avoid a required update. The user will have to either update the application or close the application. After the user has successfully installed the required update they can launch the latest version of the application.
Updating Visual FoxPro Applications
In order for a Visual FoxPro developer to create and publish an update for a ClickOnce deployed application, they must perform the following steps.

Unfortunately Visual Studio does not automatically synch the publish version, assembly version, file version, and the Visual FoxPro application version. They are all completely separate entities. While it is the Publish Version property that drives ClickOnce, it is a good idea to keep the different version numbers in synch to avoid confusion.
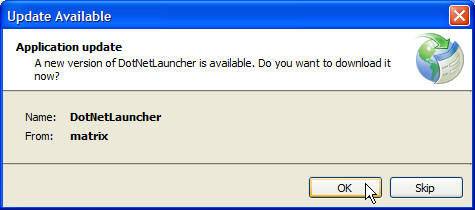
ClickOnce will create another subdirectory that has a name based on the new version number, it will create the project in the publish location and it will create a new application manifest and an updated Bootstrapper. When the users visits Publish.htm, after the update has been published, they will see what’s presented in Figure 14. Now, whether the users click the Install button on that Web page or simply use the ClickOnce shortcut installed on their computer to access the DotNetLauncher application, they will see the Update Available dialog box (Figure 15). The presence of the Skip button on the Update Available dialog box means this was a non-required update. The user can choose to forego the update and run their current version instead.
Uninstalling a ClickOnce Deployed Application
ClickOnce provides the ability to either uninstall ClickOnce applications completely or to restore the applications to a previous state (think version). The former is rather unremarkable though certainly needed in any deployment technology worth its salt. However, the ability to roll the application back to a previous state is pretty nice. Something like that could sure come in handy when an application update has been found to be critically flawed. Tech support could simply advise the users to roll back to the previous version of the application until the problem was addressed and another update published.
Restoring an Application to a Previous State
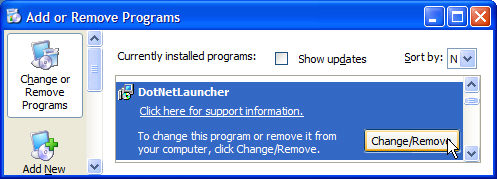
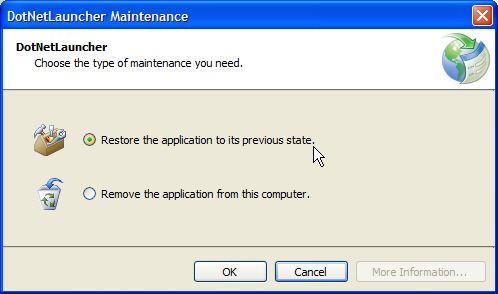
In order to remove the application completely or restore the application to a previous state, the user clicks on the Windows Start button, chooses Control Panel, clicks Add and Remove Programs, selects the application entry in the list, and clicks Change/Remove (Figure 16). This will bring up the application’s maintenance dialog box and the options to the Restore or Remove the application (Figure 17). If the user selects the “Restore the application to its previous state” option and clicks OK, ClickOnce will roll back the application to the previous installed version. If the user wishes to completely uninstall the application they would select the “Remove the application from this computer” option and click OK. This removes the application from the user’s system.
More About the Publish Properties
Readers may find it helpful to refer back to Figure 13 while reading this section. The Publish page in the Project Properties screen in Visual Studio provides access to the bulk of the ClickOnce settings provided. The Publishing Location textbox at the top of the page allows developers to set where to publish their ClickOnce application. You can see the Installation URL below the Publishing Location. You’ll usually leave this blank but in some cases you may need to fill this in, such as when an application’s publish location is not the same as its installation location. The Install Mode and Settings area on the screen provides an option group where you can specify whether the application will be available online only or offline as well. On the right you can see a vertical stack of four buttons that provide easy access to the following setting screens: Application Files, Prerequisites, Updates, and Options. Let’s take a look at these buttons and the features they provide access to.
Application Files
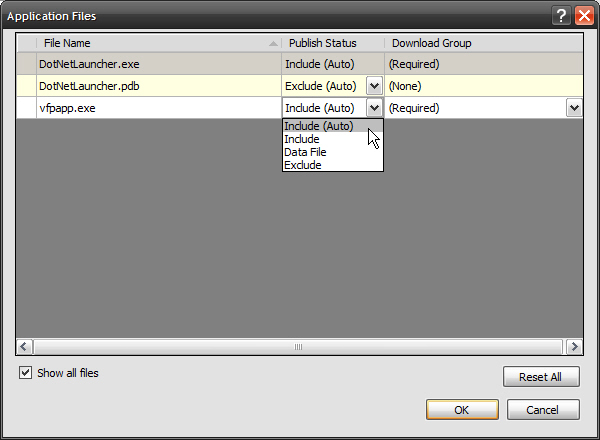
Click the Application Files… button (Figure 13) to open the Application Files screen as shown in Figure 19. This screen provides a grid that lists the files that are included in that ClickOnce application, and you can view and sort the files by name, Publish Status, and Download Group. Additionally, you can edit the Publish Status and the Download Group in the grid.
Publish Status
The Publish Status of an application file determines if and how it is published and updated. You can use the drop down in the Publish Status column to edit the default setting that file received when it was added to that application to one of four possible options:
- Include
- Data File
- Prerequisite
- Exclude
The Include option is the default for most file types. ClickOnce will include all files marked as Include in the application manifest when it publishes the application.
Similar to indicating to Include a file, marking a file with the Data File option tells ClickOnce to include the file in the application manifest and publish it. Additionally ClickOnce will put a file marked as a Data File in the application’s Data directory when it installs the application. You can edit any non-assembly files that have their Build Action set to Content to be this option. To edit a file’s Build Action, select the file in the Solution Explorer and then use the appropriate property drop down for the file in the Properties pane. Data File is the default status for files with the following extensions: ldf, .mdb, .mdf, and .xml.
The Bootstrapper is significant to Visual FoxPro developers because you can use it to execute additional installation packages for such things as runtimes and databases.
The Prerequisite option means that the file must exist in the Global Assembly Cache (GAC) on the user’s system. If the file is not registered in the user’s GAC then installing the ClickOnce application will fail. This option only applies to referenced assemblies and if a referenced assembly’s Copy Local property is set to False then they are defaulted to Prerequisite. Figure 19 does not include Prerequisite in the drop down because the Prerequisite option is only available for referenced assemblies. ClickOnce will include Prerequisite assemblies in the application manifest, but it does not copy those files when it publishes the application.
The Exclude option tells ClickOnce to exclude the file from the application manifest and not copy the file to the publish/update location when the application is published. ClickOnce excludes the MyAssemblyName.xml file and .pdb files by default.
You can determine whether a particular file in the Application Files list is still set to its default Publish Status by looking for (Auto) appended to it, such as a Publish Status of Include (Auto). To return all application files to their default Publish Status, click Reset All (Figure 19).
Download Group
ClickOnce provides the Download Group column as a way to create groups of files that you want downloaded at the same time. Files that the application needs to run must stay in the (Required) Download Group. By creating additional Download Groups and placing files in those groups the developer is in effect creating optional downloads. These file groups will be included in the manifest and copied when published, but will not be downloaded and installed on the user’s system with the ClickOnce application. An optional download group must be downloaded dynamically in code using the DownloadFileGroup or DownloadFileGroupAsync methods of the ApplicationDeployment class located in the System.Deployment.Application namespace.
To create a new Download Group click on the drop down provided and select (New…). Then, in the New Group dialog box type in the desired name and click OK.
Prerequisites
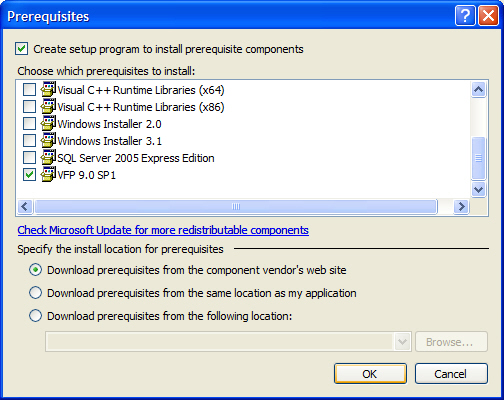
Click the Prerequisites… button (Figure 13) to open the Prerequisites dialog box as shown in Figure 20. You use the Prerequisites dialog box to force inclusion of additional components your application needs to run. Don’t confuse these prerequisites with the Publish Status Prerequisites that exists on the Application Files screen. The prerequisites here are packages that the Bootstrapper will facilitate installation of if the prerequisite doesn’t exist on a user’s system when they install/update a ClickOnce application, whereas application files that have a Publish Status of Prerequisites are referenced assemblies that must be present in the user’s GAC for the install/update of the ClickOnce application to succeed. Both maybe called prerequisites, but they are entirely different things.
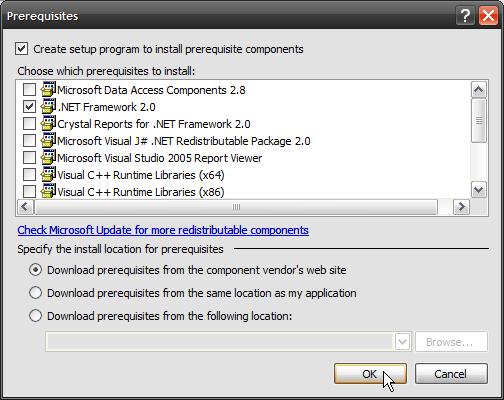
Since I created DotNetLauncher using Visual Studio 2005, this application requires the .NET Framework 2.0 so you see it checked in the Prerequisites screen. A hyperlink on this screen will redirect you to http://lab.msdn.microsoft.com/vs2005/ where presumably you could find additional redistributable components. However, at the time of writing this article, clicking on the link results in a “404 - Page Not Found” error. You can use the options at the bottom of the screen to modify the location for where ClickOnce will download the prerequisites.
This would be a good way to include the Visual FoxPro runtimes rather than adding them to the project directly. Unfortunately the list of prerequisites that are included with Visual Studio 2005 is pretty sparse, and the Visual FoxPro runtimes are nowhere to be found. However, a prerequisite is basically just a couple of manifests and an install set (package), so if you could create an install set for the Visual FoxPro runtimes as well as the appropriate Bootstrapper manifests then Visual Studio would include the set as a custom prerequisite (a.k.a. Custom Bootstrapper Package). I’ll provide more detailed information about creating a custom prerequisite in the Bootstrapper section of this article.
Application Updates
Click the Updates… button (Figure 13) to open the Application Updates dialog box as shown in Figure 21. The Application Updates dialog box highlights some of the many useful update features and settings that Microsoft makes available through ClickOnce. You can decide whether your application should check for updates, choose when the application should check for updates, specify the minimum required version for the update, and even an optional update location if you want ClickOnce to download from a different location than the Publish Location.
Publish Options
Click the Options… button (Figure 13) to open the Publish Options dialog box as shown in Figure 22. The Publish Options dialog box allows you to set the default language, which is pretty important when publishing a localized application. You also set the Publisher Name (Author) and the Product Name for the ClickOnce application in the Publish Options dialog box. ClickOnce includes these properties in the deployment manifest it uses to create the folder/shortcut in the user’s Start menu Programs list.
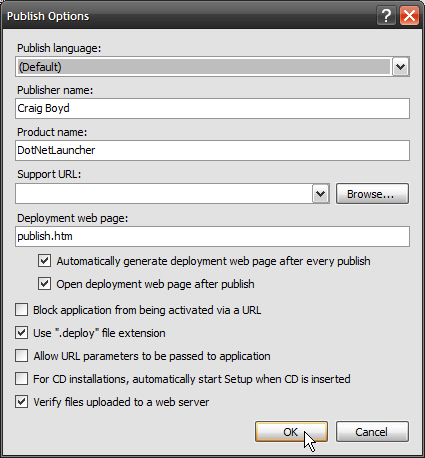
The Publish Options dialog box also allows you to specify an optional support URL. If entered, users will see this URL on the Support Info dialog when they click the “Click here for support information” hyperlink available on the application entry in Add and Remove Programs. In this same Publish Options dialog box you can change the name of the deployment Web page using the textbox provided. You can use the check boxes below the Deployment web page text box to stop Visual Studio from creating and/or opening the Web page when ClickOnce deploys the application. You can see a few more check boxes on this screen that you might use in special situations (such as the .deploy extension that I discussed earlier in this article). Some of these are just time savers such as automatically creating a suitable autorun.inf for ClickOnce installations that you want to burn to a CD.
Bootstrapper
What the heck is a Bootstrapper and what’s its significance for Visual FoxPro developers?
The Bootstrapper is that setup.exe that Visual Studio produces when a .NET project is published. This setup.exe is the same one that I referred to back in the “Publishing the Assembly” section of this article. That little setup.exe file is responsible for most of the magic that happens in a ClickOnce deployment strategy. The entire brains and operations of how ClickOnce will deploy and update your application are pretty much between that setup.exe and the manifest files it consumes. The manifests provide the what, when, and how that the Bootstrapper needs to do its job. As one of its primary tasks, the Bootstrapper orchestrates the download and installation of prerequisites.
Visual FoxPro developers will use the Bootstrapper’s ability to coordinate the installation of packages because it can execute additional installation packages for such things as runtimes and databases. These custom packages are not bound by the rules of ClickOnce deployment. They can install Visual FoxPro runtimes, they can copy a database to a location other than the user’s profile, they can register COM servers-in short, Bootstrappers can do everything Visual FoxPro application installs have been doing for years because the packages that the Bootstrapper helps install are just regular install sets.
Because I added the Visual FoxPro runtimes directly to the DotNetLauncher, ClickOnce will install them into the ClickOnce application’s directory instead of the C:\Program Files\Common Files\Microsoft Shared\VFP directory as they should be. But, a custom prerequisite containing the runtimes can accomplish what is needed. The first step to creating a custom prerequisite is to simply create an install set. So, the next section of this article will quickly look at how to create an install set containing the Visual FoxPro runtimes.
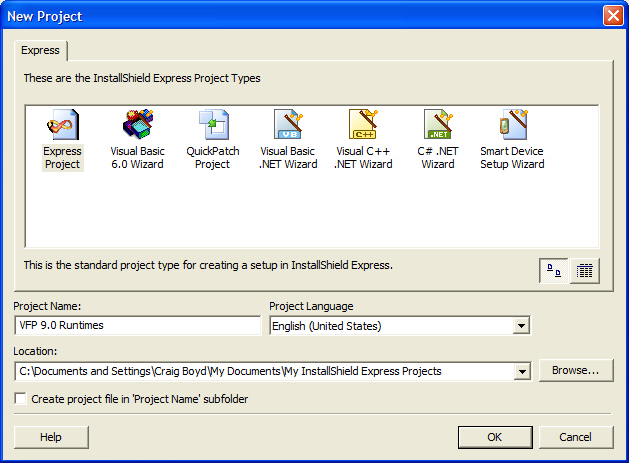
InstallShield Express 5.0 Visual FoxPro Limited Edition
I’ll use InstallShield Express 5.0 to create the install set. Microsoft included this product included in the INSTALLSHIELD directory on the Visual FoxPro 9.0 installation CD. You could use any number of other installation builders (such as Inno Setup) to do this. The installation builder need only be capable of creating a Windows compatible install set. For the sake of brevity I’ll avoid anything beyond the absolutely necessary steps to create the desired install set for the Visual FoxPro runtimes. Creating an install set for a production application would take extra time and would take additional steps.
Please note that this merge module already contains the dependencies for the Microsoft C Runtime Library 7.1 (msvcr71.dll) and the GDI Plus Redist Module (GDIPlus.dll) so InstallShield will automatically find them and build them into the install set automatically. Depending on the needs of a particular Visual FoxPro application, you could select additional merge modules such as the HTML Help and Report Application. However, this is a bare bones install just to show the concept. Before proceeding on, make note of the version number shown for vfp9r.dll. You’ll use this version number later in this article when you create the Bootstrapper manifest files.
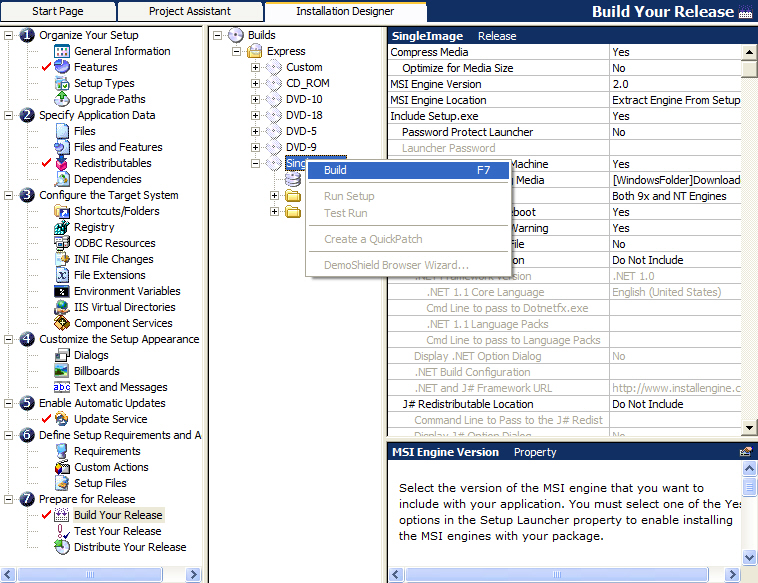
Now you need to build the installation set.
Assuming there were no errors, InstallShield created an install set named setup.exe that you can use to install the Visual FoxPro run time libraries. To avoid confusion with the Bootstrapper, find this setup.exe and rename it vfp9r.exe.
Creating the Bootstrapper Manifests
You must create two manifests, product.xml and package.xml, in order for Visual Studio to view vfp9r.exe as a custom prerequisite. If you study the other prerequisites that Microsoft provided for Visual Studio 2005 in the [Visual Studio 8 InstallDir]\SDK\v2.0\Bootstrapper\Packages directory and the MSDN documentation for the schemas, you could quite possibly create these manifests manually. They are simply XML files. However, I’ll show you a much better way to generate these manifests.
Enter the Bootstrapper Manifest Generator
David Guyer from Microsoft’s Visual Basic Test Team and some other altruistic developers created and released a wonderful tool known as the Bootstrapper Manifest Generator. It’s primary feature and ability (though it has others) is to generate the product.xml and package.xml manifest files. You can download the Bootstrapper Manifest Generator at http://www.davidguyer.us/bmg/publish.htm. It is even deployed using ClickOnce.
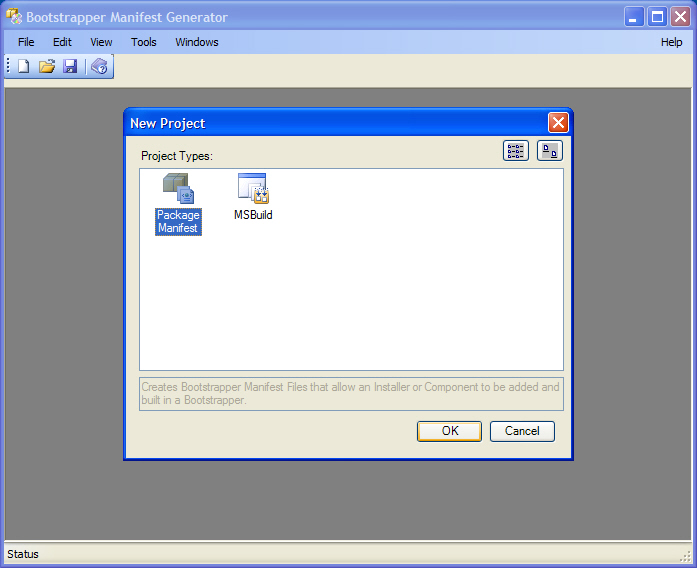
Once you have the Bootstrapper Manifest Generator installed and running, create a new project. In the New Project dialog box, select the Package Manifest project type and click OK (Figure 26).
Generating the Product.xml
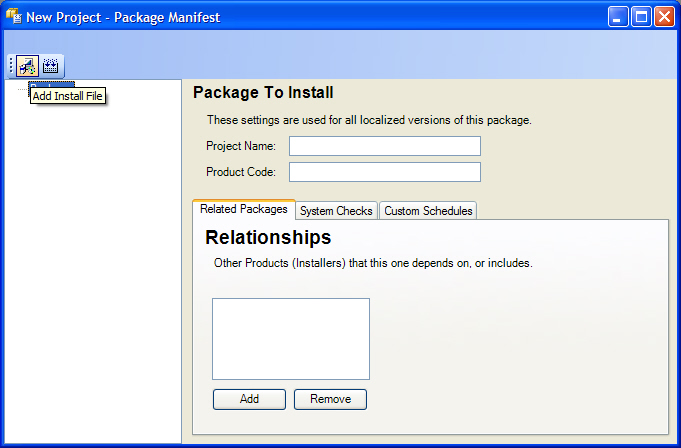
With your new project created, select the Package root node and fill in the Project Name and Project Code fields provided on the right. The Project Code is just a unique identifier and the Bootstrapper Manifest Generator will automatically create a default for this by replacing the spaces in the Project Name with periods.
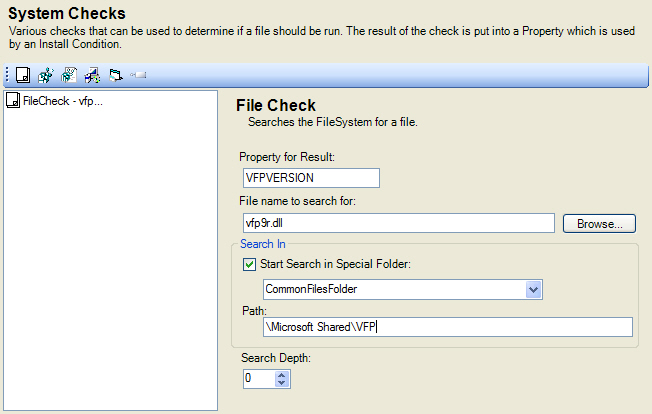
Go to the System Checks page (Figure 27) and create a new File Check by clicking the File Check toolbar button provided in the System Checks page. A File Check item should appear in the list as well as the File Check settings controls on the right.
A File Check simply looks for a given file and returns its version number if found. When the version number is returned it is assigned to the variable defined in the Property for Result text box. Enter “VFPVERSION” in the Property for Result text box and “vfp9r.dll" in the File name text box. This means that when the Bootstrapper locates vfp9r.dll it will set the variable VFPVERSION to the value of vfp9r.dll’s version number. Later I’ll show you how to use the VFPVERSION variable in the Install Conditions (see further along in the article) to determine whether the Visual FoxPro runtimes need to be installed or not. You should do a more thorough job of this by checking for all of the Visual FoxPro runtime files as well as the msvcr71.dll and the GDIPlus.dll, but for the purposes of this article checking just vfpr9.dll is enough.
Figure 27 shows that the File Check Bootstrapper has a very specific location to look for the vfp9r.dll. Check the “Start Search in Special Folder” check box and select CommonFilesFolder as the special folder. This means that the path placed in the Path textbox will be relative to the special folder. The special folder selection could have been foregone, but then C:\Program Files\Common Files\Microsoft Shared\VFP would have needed to be entered into the Path textbox, and this might have failed in a number of cases, such as a dual-boot machine where the Windows operating system had been installed on drive D:.
Bootstrapper can perform system checks other than File Check including:
- Registry Check Retrieves the data from a specified registry value.
- Registry/File Check Retrieves the version number of a file that is specified in a registry value (full path is contained in the registry value).
- MSI Component Check Retrieves the InstallState of a product.
- External Check Retrieves the exit code from an application after executing it.
- GAC Check Checks whether a specified assembly is present in global assembly cache.
The Bootstrapper Manifest Generator will use all of the entered settings, in conjunction with the chosen install file, to generate the needed product.xml manifest when it builds the project.
Generating the Package.xml
Now I’ll show you how to generate the Package.xml file using the Bootstrapper Manifest Generator.
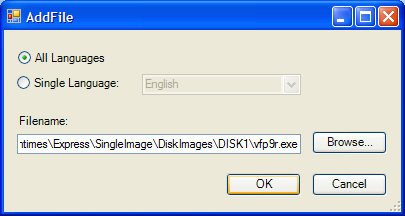
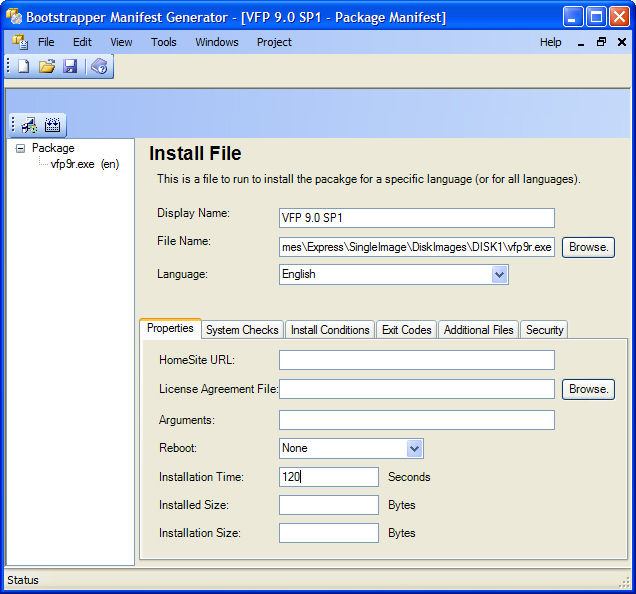
The display name is the name as it will appear when Visual Studio shows it in the prerequisites list, so choose a name that is as descriptive as possible. The File Name is the full path to the install set created with InstallShield (vfp9r.exe), and the Language field is needed when creating a localized prerequisite.
You could add additional information and instructions, such as the EULA, arguments to be sent to the install set, installed size in bytes, or installation size in bytes, but they are not required. If you enter the HomeSite URL you must provide the PublicKey element as well. The PublicKey element is required whenever the HomeSite element is not empty. For this example, leave the HomeSite URL empty.
Now you’ll use the grid provided to set up four installation conditions (Figure 31). You’ll set the first condition up to have the Bootstrapper bypass installing the custom prerequisite (Visual FoxPro runtimes) if the VFPVERSION variable has a value greater than or equal to 9.0.0.4611. This condition tells the Bootstrapper that if vfp9r.dll is the SP1 version then the custom prerequisite is already installed.
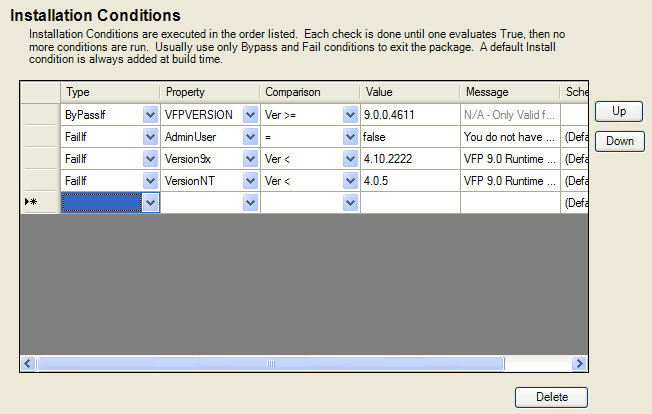
The next condition checks the user’s permission level. If the user does not have administrative privileges then the install will fail and show a message- “You do not have the permissions required to install VFP 9.0 Runtime Files. Contact your administrator.”
The final two conditions just ensure that the Visual FoxPro 9.0 runtimes are being installed on a supported version of Windows. If either of those conditions are not met then the install will fail and the user will be shown the message- “VFP 9.0 Runtime Files are not supported on this platform. Contact your application vendor.” You can add additional conditions for a wide range of things but this is all that’s required for installing Visual FoxPro runtime files.
Figure 32 shows the Exit Codes page with a few examples for how the entries should look. Note that you can also customize the System Message, which ClickOnce will use if the install fails for some unknown reason.

The File Security page allows you to set a Public Key or Hash. If you filled in the HomeSite element then ClickOnce requires that you enter the Public Key here. However, in this case I’ll enter the Hash value instead. The hash value is a hex-encoded SHA-1 (SHA120) message digest derived from the install file. Be advised that some of the existing Microsoft documentation concerning the hash value is incorrect. It erroneously states that you should use the MD5 hash function to produce the hash. However, that’s not correct. If you use an MD5 hash of the install set, Visual Studio will warn you that the hash value does not match. Just remember that you must use the SHA-1 hash function to generate the hash. The Bootstrap Manifest Generator does this correctly.
The Bootstrapper Manifest Generator will use the entered settings to generate the package.xml manifest when you build the project.
Build the Bootstrapper Manifest Generator Project
Once you’ve set the necessary settings using the steps outlined above you want to save and build the project. Either click the Build toolbar button or from the Project menu choose Build.
When the Bootstrapper Manifest Generator builds the project it creates the product.xml and package.xml files needed for the custom prerequisite. Then it copies the product.xml to a newly created “VFP 9.0 SP1” directory and copies the package.xml as well as the install set to a newly created “en” subdirectory. You’ll find the files in the [Visual Studio 8 InstallDir]\SDK\v2.0\Bootstrapper\Packages directory so that Visual Studio will recognize it and make it available in its prerequisite list. If Visual Studio was running when you built the custom prerequisite then you need to restart it before the new custom prerequisite will show up in the list.
Using the Custom Prerequisite
Once your custom prerequisite is available for installing the Visual FoxPro runtimes you can modify the DotNetLauncher project to take advantage of it. Delete the Visual FoxPro runtimes from the project and proceed into the Prerequisites screen. Scroll down the list of prerequisites to VFP 9.0 SP1 and check the check box to its left (Figure 34).
ClickOnce on FireFox: Some Nasty Compatibility Issues and a Workaround
One annoying aspect of ClickOnce is that it doesn’t work with browsers other than Internet Explorer. Probably the most notable browser that ClickOnce fails on is the Mozilla FireFox browser. ClickOnce doesn’t work with FireFox because:
- ClickOnce deployment technology uses an implemention of the Internet Explorer mime handler interface for the mime type “application/x-ms-application” which is associated with the .application extension. You can see this in the registry key [HKEY_CLASSES_ROOT\Mime\Database\Content Type\application/x-ms-application] and its value, “Extension”=".application".
- ClickOnce cannot resolve the relative paths to the application manifest contained in the .application when the non-IE browsers download the .application to a directory other than the intended directory (temp directory for instance).
- A ClickOnce security restriction does not allow the .application and the rest of the application files to be in different security zones.
The mime type handler is the main problem and the other issues just compound the problem making difficult to work around it. Microsoft clearly did not design ClickOnce with cross-browser support in mind, which is a serious problem for ClickOnce adoption. While Microsoft employees say they’ll address cross-browser support in the next version of ClickOnce, many other developers have tried to work around the problem using a variety of methods. Some developers have released browser plug-ins in response to the problem.
A suggestion by Saurabh Pant, a software design engineer on Microsoft's .NET Frameworks team, offers the best workaround I’ve come across. Saurabh suggests using the ClickOnce shortcut (extension .AppRef-MS), that is created when the application is deployed. By publishing the ClickOnce shortcut to the server you can create a hyperlink that points to the ClickOnce shortcut instead of the deployment manifest. This works in FireFox and other browsers.
Saurabh’s workaround works. However, there are two drawbacks to this workaround. The FireFox Open/Save dialog box still appears, so ClickOnce becomes more of a ClickTwice and, given this workaround’s reliance on the ClickOnce shortcut, it will only work for offline-available ClickOnce applications. So, online-only ClickOnce applications cannot benefit from this workaround.
ConclusionOnce
This article has covered nearly every facet of ClickOnce-what it has to offer developers and vendors distributing and updating applications, what it takes to create and deploy a Visual FoxPro application with it, and what some of the pitfalls and limitations of it are. I hope you’ll agree that ClickOnce is a step in the right direction when it comes to deploying desktop applications, and that Visual FoxPro developers can benefit from leveraging its powerful capabilities. Until next time, Visual FoxPro Rocks!
Listing 1: The C# code used in Program.cs to launch VFPApp.exe, an external Visual FoxPro application
using System;
using System.Diagnostics;

namespace DotNetLauncher
{
    static class Program
    {
        /// <summary>
        /// The main entry point for
        /// the application.
        /// </summary>
        [STAThread]
        static void Main()
        {
          Process.Start("VFPApp.exe");
        }
    }
}
