In my previous article, (“ASP.NET 2.0 Web Part Infrastructure”, Nov/Dec 2006, CoDe Magazine) I talked about the ASP.NET 2.0 Web Part framework.
I made the case for the emergence of Web Part or widget-like solutions, and explained the support for Web Parts in the ASP.NET 2.0 framework. However, I stopped short with a teaser into connecting these Web Parts with each other and where this story fits in with SharePoint 2007.
In this article, I intend to cover the rest of that ground. As I indicated in my last article, SharePoint 2007 is built on ASP.NET 2.0. In this article I intend to take the discussion from ASP.NET 2.0 to SharePoint 2007. I will demonstrate Web Part connections, and how all that I have discussed in these two articles ties into writing Web Parts for SharePoint 2007.
In a production environment, you could restrict the number of keys you use, and then use the keys as evidence to create a tiered-level security structure based on keys to keep things clean.
SharePoint 2007 is built in ASP.NET 2.0. Thus any discussion about SharePoint 2007 starts in ASP.NET 2.0 land. In my last article, I wrote a simple example that introduced you to the major key components of the ASP.NET 2.0 Web Part framework. In that example, I wrote a simple Web site that demonstrated key concepts such as the GenericWebPart, Web Part catalogs, personalization, and writing custom editors for the Web Parts. However, I stopped short at Web Part connections, and I really didn’t talk much about SharePoint 2007.
In this article I intend to continue the journey forward, discuss Web Part connections, and finally finish at writing and deploying custom Web Parts in SharePoint 2007.
If you haven’t had a chance to read my last article, I strongly suggest that you start there or this article won’t much too much sense.
Web Part Connections
Picking up from where I left off in the last article, I will continue to enhance the code I have already written. You can find the code for both my first article and the finished code for this article on my Web site at www.winsmarts.com.
Towards the end of my last article, I invited you to attempt to set the display mode of the WebPartManager to “Connect”. In response you saw an exception as shown in Figure 1.

This exception was reasonable to expect since I haven’t yet added a ConnectionsZone to my Web pages. Since all my zones are in the SiteMaster.master file, open the master page and add the connections zone as shown below:
<asp:ConnectionsZone
    ID="ConnectionsZone1"
runat="server"/>
With this new zone added to the master page, try selecting the “Connect” display mode once again. You no longer receive the error. But what does the connect verb do, and what can you use this zone for?
This zone will provide you with a UI allowing you to connect different Web Parts with each other. In other words, if two Web Parts on the same page wish to communicate with each other, and are able to communicate with each other, you can set up this communication using the connections zone.
That is a mouthful. But I just covered two very interesting points.
The first point is: “If two Web Parts are able to communicate with each other…” The obvious question here is: “What qualifies two Web Parts as being able to communicate with each other?” Two Web Parts can communicate with each other as long as they speak the same language-the same language being a common interface as you will see shortly. In case they do not understand a common interface, they can still communicate with each other as long as there is a transformer in the middle. A transformer simply performs the task of translating between two Web Parts that understand communication, but do not speak the same interfaces.
The second important point is: “…being able to set up this communication using a connections zone.” Communication can be set up at run time using the connections zone. You also have the option of setting up communication statically at design time between various Web Parts using the <StaticConnections> element inside the WebPartManager. For the purposes of this article, I will focus on the more interesting way of setting up communication, which is at run time using the connections zone.
Similar to the last article, the best way to learn to swim is to dive right in. Let me first present you with a practical problem to solve, and in the process of solving this problem I will illustrate the various concepts pertinent to Web Part communication and Web Parts in SharePoint 2007.
Defining the Problem: the Business Requirements
I wish to easily set up a Web site which serves as an RSS Reader. There are a number of such Web-based RSS Readers available such as Bloglines, NewsGator, etc.
Thus the business requirements for such an RSS Reader include the following:
- The RSS Reader will allow me to maintain my RSS feeds (the OPML).
- The RSS Reader will allow me to select one of the RSS feeds out of my OPML.
- When the user selects an RSS feed, I should then be able to view that RSS feed rendered on the page.
Breaking Down the Problem: the Functional Requirements
Similar to my last article, this article does not feign to be a course in the software development life cycle. But now that I have business requirements specified, it makes sense to follow them with functional requirements that my system will need to meet, in order to satisfy the business requirements stated above. Thus here are the functional requirements of my system.
- The system will contain a Web Part allowing the user to select a given RSS feed out of their OPML. The user can select only one feed at a time. This will satisfy business requirement #2.
- The Web Part written in functional requirement #1 will also come with a custom editor, which will allow the end user to maintain their OPML feeds. This will satisfy business requirement #1.
- Finally, the Web Part written in functional requirement #1 and the RSSRender WebPart from the previous article will be able to communicate. They will be able to pass between them the RSS feed URL that the end user has selected and the RSSRender WebPart, which will render that RSS feed in its UI. This will satisfy business requirement #3.
Designing and Implementing the System
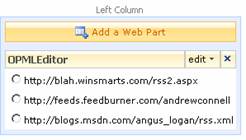
It is clear from the functional requirements that I need to write a brand new Web Part that allows the user to maintain their OPML and provides them with a UI that has radio buttons against the various RSS feeds in the OPML. This Web Part will also have a simple editor that allows the end user to edit their OPML.
I will also need to enhance a Web Part I have already written, which is the RSSRender WebPart, so it can communicate with the OPML WebPart.
Thus, I have two chunks of work, the Winsmarts.OPMLEditor WebPart, and the Winsmarts.RSSRender WebPart.
I am going to dig into these one by one below.
Writing the OPML Editor Web Part and Its Editor
The Winsmarts.OPMLEditor WebPart is implemented as a class library. I am going to avoid covering the basics of writing Web Parts and their editors in this article and simply present you with the necessary code excerpts. You can find the entire code in the associated code download from my Web site at www.winsmarts.com.
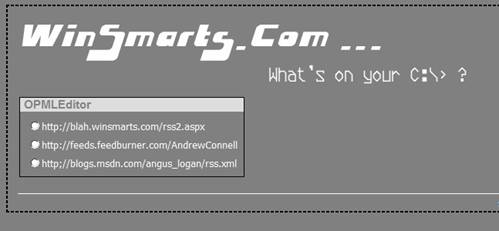
Listing 1 shows the rendering portion of the OPMLEditor WebPart. As you can tell, this Web Part maintains a list of all RSS feed URLs in a private variable of type List<String>. It then provides the user with a simple UI with radio buttons to allow the user to select any one of those URLs. The idea being, when this Web Part is connected to the RSSRender WebPart, that selecting a radio button will cause the RSSRender to display the feed contents.
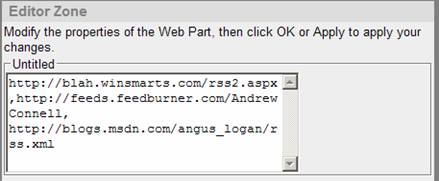
For the user to manage their feeds, I also went ahead and wrote a very simple editor part. You can see this editor part’s ApplyChanges and SyncChanges methods in Listing 2. A quick examination of the code tells you that all I am doing here is converting to and from a simple CSV list of RSS feed URLs. In a real-world application you would probably want to create a more sophisticated UI, but for a concept demonstration I am using a simple multi-line text box.
You can see this Web Part with some sample data in Figure 2. You can also find the corresponding editor in Figure 3.
Establishing Communication with the RSSRender WebPart
In the previous article you saw a Web Part that rendered an RSS feed, where I specified the URL for this feed as a public editable property to the Web Part. I’ve reproduced the code for that Web Part for your convenience in Listing 4.
Now you have a Web Part that displays an RSS feed. You also have a Web Part that displays a list of RSS feeds and allows the user to pick one of them. The obvious next question is, how can I make these talk to each other and create a blog reader? In other words, how can I connect these Web Parts together?
Before I dive into code, let me cover some basic theory about Web Part communication first.
ASP.NET 2.0 Web Part communication allows you to connect Web Parts together so they can share data. To establish such communication, you need to do four things.
- Figure out, what information needs to be communicated. This information needs to be understood by both ends of the communication. A good way to achieve this is by writing up an interface that both sides will understand. This interface is also referred to as the communication contract. If both sides do not speak the same communication contract, you may also use transformers to perform the translation.
- Write a provider Web Part. This Web Part has the responsibility of providing a service or data, so in our example the RSSRender WebPart provides the service of displaying an RSS feed. Anyone who wants to use this service can become a consumer and ask the RSSRender WebPart to provide the rendering of the appropriate feed. The Provider Web Part needs to contain a method decorated with the ConnectionProvider attribute, which returns the contract that you defined in step 1.
- Write or use one or more consumer Web Parts. This consumer Web Part needs to contain a method decorated by the ConnectionConsumer attribute. This method needs to accept a parameter of the same type as the contract you defined in step 1.
- Finally, you need to connect the consumers with the provider. You can make this connection statically in the WebPartManager, programmatically, or using the ConnectionsZone.
With the theory explained, I will now begin to modify the code for the two Web Parts I have-the OPMLEditor WebPart and the RSSRender WebPart so they can begin talking with each other.
The first step is to write an interface that conveys the information that needs to be communicated. In our case, the information I wish to communicate is simply an RSS feed URL. You can see this interface below:
public interface IRssFeedContract
{
    String RSSUrl {get;set;}
}
The second part is to modify the RSSRender WebPart so it becomes a provider Web Part in this communication scenario. To keep things simple, I am going to have the RSSRender WebPart itself implement the IRssFeedContract. This involves creating a new property as shown below:
string IRssFeedContract.RSSUrl
{
    get { return rssUrl; }
    set { rssUrl = value ; }
}
As you can tell from Listing 1, the “rssURL” private variable is what contains the feed URL of the RSS feed being rendered.
Also, I need to create a method decorated by the ConnectionProvider attribute which returns an instance of the shared understanding contract (the IRssFeedContract). You can see this below:
[ConnectionProvider("Rss service
Provider")]
public IRssFeedContract
GetRssCommunicationPoint()
{
    return this as IRssFeedContract;
}
The third step is to finish up the consumer Web Part. The consumer Web Part is what will manipulate the provider and set the relevant data on the provider Web Part, so the provider Web Part can display the RSS feed. In order to do so, the Consumer Web Part needs to contain an instance of the provider. You set this instance by a method that is called by the Web Part framework. The Web Part framework identifies the method appropriately because it is decorated by the ConnectionConsumer attribute. You can see the implementation below:
private IRssFeedContract theProvider ;

[ConnectionConsumer("Rss service
Consumer")]
public void
   InitializeProvider(IRssFeedContract
provider)
{
    theProvider = provider ;
}
When the above method is called, the consumer Web Part now contains an instance of the provider. With this instance available, the consumer can now set the appropriate property on the provider Web Part. You can see this below:
protected override void
OnPreRender(EventArgs e)
{
    base.OnPreRender(e);

    if (theProvider != null)
    {
        theProvider.RSSUrl =
        rbl.SelectedValue ;
    }
}
As you can see, if the connection has indeed been made, the consumer Web Part specifies the RSS URL to the provider Web Part.
The last and final step is to establish the communication between the provider and the consumer.
Go ahead and add the RSSRender/Import WebPart to a WebPartZone on your page. I am going to add it to WebPartZone2 as shown in Figure 4.

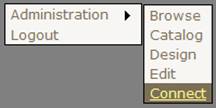
Next, go ahead and switch the WebPartManager’s display mode to “Connect” in the simple framework I wrote in the previous article. You can see this in Figure 5.
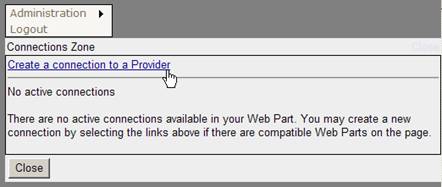
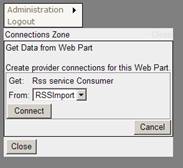
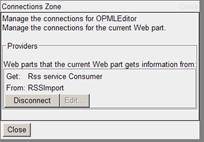
When the WebPartManager is in DisplayMode connect, you can see that the Web Parts start showing the “Connect” verb in their menus as shown in Figure 6. Go ahead and click the Connect verb for either Web Part. In my case I am going to click Connect for the Consumer WebPart, that is, the OPMLEditor WebPart. When you click Connect, the ConnectionsZone displays a UI similar to the one shown in Figure 7. Next, go ahead and click the “Create a connection to a provider” link. The ConnectionsZone should now ask you for the appropriate provider information. Fill in the values as shown in Figure 8 and click Connect. The ConnectionsZone should display the currently setup connections (Figure 9).

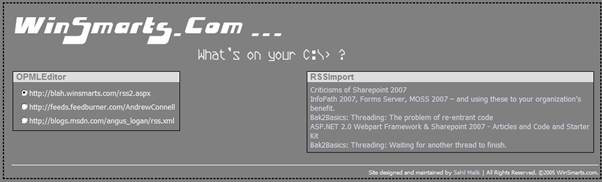
Now log off, and then select one of the RSSFeeds from the OPMLEditor WebPart.
As you can see in Figure 10, you have very easily created a simple Web-based blog reader using the ASP.NET 2.0 Web Part framework. Your Web Parts are now successfully communicating.
Creating a blog reader is not the only thing you can do with this framework. In fact, you can create a sophisticated framework that can power almost any application. You could use other ASP.NET features, such as site-map providers and URL rewriting, to create a generic framework to set up any Web application you want. On my Web site (www.winsmarts.com), you can find a simple starter kit called “SpareJoint” that allows you to set up any such site and add custom functionality. It goes without mentioning that this starter kit is offered for no support or expressed or implied warranties-use it at your own risk.
But, so far I haven’t even begun talking about SharePoint 2007. Time to switch gears and understand the connection between ASP.NET 2.0 and SharePoint 2007.
SharePoint 2007 Built on ASP.NET 2.0
Did I mention: “SharePoint 2007 is built on ASP.NET 2.0?”
Yes it is true; a SharePoint 2007 Web application is nothing but an ASP.NET 2.0 Web application running on a port. This includes SharePoint Central Web Administration (SCAW). More than the Web application itself, the deep-down connection between ASP.NET 2.0 and SharePoint 2007 is visible at many places. And when I say SharePoint 2007, I am using this as a catch all phrase to refer to both WSS 2007 and MOSS 2007. Here are a few examples of where you see ASP.NET 2.0 in SharePoint 2007.
- A SharePoint ASPX-A SharePoint ASPX is a combination of an "aspx" file and a back-end DLL. The back-end DLL for most ASPX pages is available precompiled under the Microsoft.SharePoint. ApplicationPages namespace. There is a complicated inheritance structure available within various SharePoint pages, but eventually they all end up inheriting from System.Web.UI.Page. So they are all ASP.NET 2.0 Web Pages.
- A SharePoint WebControl-SharePoint comes with a number of WebControls. These are not Web Parts mind you-just WebControls, which inherit from System.Web.UI.Control.
- A SharePoint Web Part-A SharePoint Web Part inherits from an ASP.NET 2.0 Web Part. There is also support built in for supporting SharePoint 2003 Web Parts. Since Web Parts are the focus of my article, I will elaborate more on this shortly.
- A SharePoint WebPartManager-A SharePoint WebPartManager is a sealed class that inherits from System.Web.UI.WebControls. WebPartManager, which is the ASP.NET 2.0 WebPartManager.
- MasterPage based Customization-Customizing SharePoint 2003 was so difficult that I like to say that SharePoint 2003 was barely customizable. This picture is changing with SharePoint 2007, thanks to ASP.NET 2.0 MasterPages. Not only that, if you customize a SharePoint 2007 ASPX, you are “customizing” a page, which stores the differences you create in the database. When a Web request comes in, SharePoint 2007 takes the differences in the database, adds them to the file stored on the disk, and then presents ASP.NET 2.0 with the final customized page. This means ASP.NET 2.0 never knew whether the page was customized; to ASP.NET 2.0, it is just another page. In addition to better manageability, the biggest plus side of this is minimal performance hit due to customization.
The list goes on. There are many other places where you can see ASP.NET 2.0 running behind the scenes in SharePoint 2007, such as membership provider-based authentication, site-map provider, URL rewriting, and pretty much any other ASP.NET 2.0 concept you can think of.
I suggest that you dig into the DLLs of SharePoint using a tool such as Reflector. You will note that SharePoint 2007 uses many concepts from ASP.NET 2.0. But for now, I am going to refocus our attention on Web Parts and make the discussion specific to Web Parts in SharePoint 2007.
Web Parts in SharePoint 2007
So far, I have covered the most essential basics of the ASP.NET 2.0 Web Part framework. Now I’ll take this discussion to Web Parts in SharePoint 2007.
If you dig deeper into the libraries that come with SharePoint 2007, there is a class called Microsoft.Sharepoint.WebpartPages.WebPart which inherits from System.Web.UI.WebParts.WebPart. Now why are there two base classes for Web Parts, and which one should I use when writing Web Parts for SharePoint 2007?
The answer lies in “backward compatibility.” There is probably a huge install base for SharePoint 2003 and a number of Web Parts written for SharePoint 2003. In order to support those Web Parts, they are rebased from the Microsoft.Sharepoint.WebPartPages.WebPart class. This turns them into ASP.NET 2.0 Web Parts and yet offers the backward compatibility they need.
However, for most scenarios I strongly recommend that you simply inherit from the ASP.NET 2.0 Web Part class instead. The Microsoft.SharePoint.WebPartPages.WebPart class is only for backward compatibility with SharePoint 2003. In addition, you may want to use the SharePoint Web Part when you need cross-page connections, connections between Web Parts that are outside of a WebPartZone, a client-side connection, or the data-caching infrastructure. However, for the most part you should use ASP.NET 2.0 Web Parts instead.
The one notable exception is that GenericWebPart-based user controls won’t work in SharePoint. This “tie down” is due to security restrictions, but should you choose to use user controls in SharePoint, you could easily write the equivalent of GenericWebPart yourself.
In this article, I have written two ASP.NET 2.0 Web Parts, so they should be usable directly within SharePoint 2007. The obvious question is: What do I need to do to use those Web Parts in SharePoint 2007?
Deploying Your Web Parts in SharePoint 2007
I am going to install these Web Parts on a local MOSS installation that I have. These steps will be similar for a WSS installation.
The first thing you need when installing a Web Part is a site that you can install this Web Part to. To keep things clean, I am going to set up a separate site called “code-magazine”. You can set up this site using the following steps.
- Browse to the SharePoint Central Administration Web site (SCAW) by going to Control Panel | Administrative Tools | SharePoint 3.0 Central Administration.
- Within SCAW go to the Application Management tab, and under “SharePoint Web Application Management” click “Create or Extend a Web Application”. When inside that page, click “Create a New Web Application”.
- Fill in the necessary fields, I chose “CodeMagArticle” for the description and 42000 for the port.
- On the “Application Created” page, click the “Create Site Collection” link.
- Type “Code Magazine Article” as the title and use the “Collaboration | Blank site” template to get started. Also specify yourself, or the currently logged on user, as the administrator for that Web site.
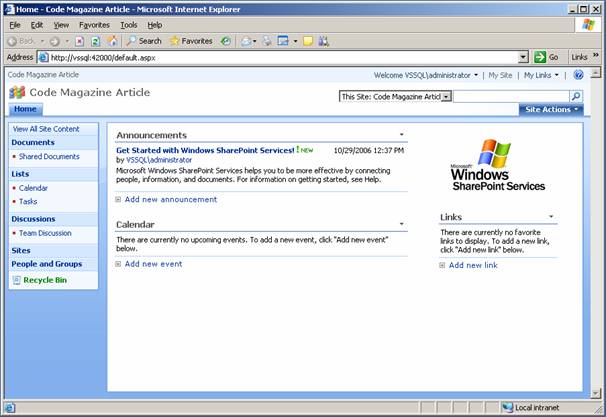
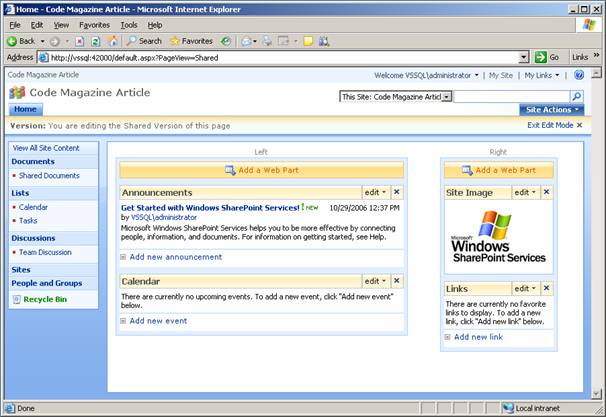
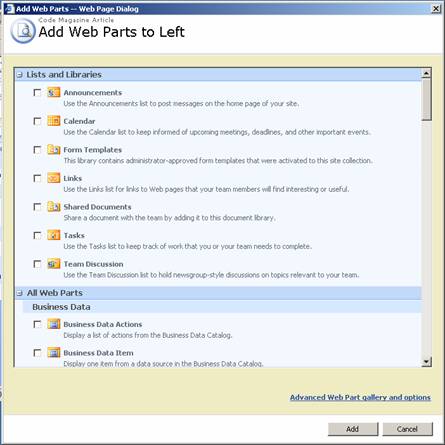
Essentially what you have done in the above steps is create a Web application on port 42000 in IIS. Under this Web application, you have created a site collection with a top-level site based on the “Blank Site” template. You may browse to the site at this time, as shown in Figure 11. You should also notice a “Site Actions” link on the top, right-hand corner. If you click that link and choose “Edit Page”, you see various WebPartZones on the page and a couple of Web Parts added to each WebPartZone, as shown in Figure 12. Clicking the “Add a Web Part” link brings up a list of Web Parts that this SharePoint Web application currently understands and is able to offer for use on this page.
The challenge is to make sure that the OPMLEditor and RSSRender WebParts appear in the list and work within SharePoint 2007.
To do so, you must first register the Web Part in the web.config for the application that you are running on port 42000. Remember, it is this web.config that affects all the sites in the site collection at port 42000, of which the Code Magazine Article site is at the root. So first you need to find the physical directory that the relevant web.config file lives in. You can easily find that by going to Control Panel, select Administrative Tools, select IIS Manager, and then look for the CodeMagArticle site running on port 42000. In its properties, you would find the physical directory that virtual directory is running from. In my case it was “C:\Inetpub\wwwroot\wss\VirtualDirectories\42000”.
If you open the web.config that lives in that directory you will notice a “SafeControls” section. Here you need to add information about your assemblies so SharePoint can begin to use them.
However, SharePoint must be physically able to access those assemblies. There are two easy ways to ensure that SharePoint should be able to access those assemblies: You can choose to put the file in GAC or you can put it in the “bin” directory. While the GAC is a simpler approach, arguably “bin” is a cleaner approach. It is important to note that putting assemblies in “bin” also requires you to do some extra work to make your Web Parts work under the default locked-down secure mode SharePoint sites work in.
Note that I said SharePoint works under a default locked-down mode, specifically “WSS_Minimal”. If you poke around the config files on your system you’ll find the specific rights WSS_Minimal entails. Even though the details of WSS_Minimial are out of scope for this article, it is sufficient to say that a Web Part that makes a call to an external Web service (RSS) that lives on a separate domain will probably not work under default locked-down mode.
At this point, I have two choices: I could either use GAC or specify custom security policies. Specifying custom security policies ultimately is a better way of doing things, but, to keep my life and this article simple, I am going to go with the GAC approach.
To deploy my assemblies in the GAC and use them throughout SharePoint, I need to do two things. First, I will need to strongly name my assemblies so they get a definite PublicKeyToken. This naming keeps things cleaner in the long run anyway. The easiest way to strongly name the class libraries follows:
- On the project, right-click and select Properties.
- Under the Signing tab on the left, select the “Sign the Assembly” check box and specify a strong name key file.
In a production environment, you could restrict the number of keys you use, and then use the keys as evidence to create a tiered-level security structure based on keys to keep things clean.
Secondly, I will need to add the System.Security.AllowPartiallyTrustedCallers attribute to the AssemblyInfo.cs file in both assemblies, so partially trusted SharePoint code can use my assemblies.
Now go ahead and build the two assemblies containing the Web Parts (and the communication and the custom editors), and then deploy them in the GAC using gacutil.exe.
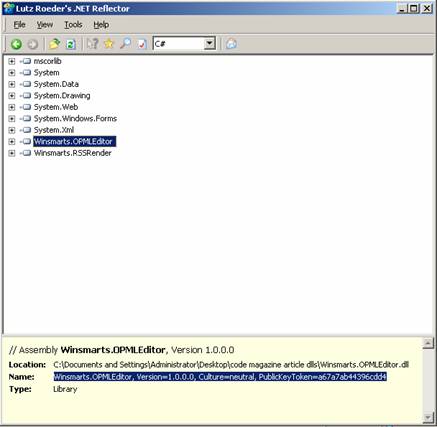
Once you’ve deployed the assemblies to the GAC, you need to find the assembly signature string. You can piece together the assembly signature string using sn.exe, but I find the easiest way to find this string is to use Reflector. Once you run Reflector, open the two assemblies in Reflector and then you should find the assembly signature string in its status bar as shown in Figure 14. It is this assembly signature that you need to put in the “SafeControls” section of your SharePoint Web site.
So, for instance, you can add the Winsmarts.OPMLEditor WebPart using the following element in the web.config’s “SafeControls” element:
<SafeControl
  Assembly="Winsmarts.OPMLEditor,
Version=1.0.0.0, Culture=neutral,
PublicKeyToken=a67a7ab44396cdd4"
  Namespace="Winsmarts.OPMLEditor"
TypeName ="*" Safe="True" />
Obviously, if you just copy/paste the above, it probably won’t work-you need to specify the correct PublicKeyToken as generated on your machine.
Similarly, go ahead and add a SafeControl element for the Winsmarts.RSSRender assembly.
You may wonder what “SafeControl” has to do with the name “WebPart”. As it turns out, this approach is not specific to just Web Parts. If you want to register a custom workflow or any other assembly, you have to use a similar approach.
Now since you have made changes to web.config you need to restart the application pool, or run iisreset.exe to restart IIS.
At this time, IIS and ASP.NET 2.0 can understand your Web Parts. But SharePoint 2007 needs one more step. You need to register these Web Parts in the Web Part catalog/gallery for SharePoint. To do so, you can use the following steps:
- Go to the Code Magazine Article site, and click Site Actions and select Site Settings.
- Under Galleries, click “Web Parts”.
- In the page that opens up, you see a Web Part Gallery that shows you a list of all Web Parts that you can use on this site collection. Go ahead and click “New”.
- In the page that loads, you see a list of Web Parts that IIS and ASP.NET 2.0 have made available for use for SharePoint 2007. Somewhere on the page, you should also see the two Web Parts you wrote. You can see this in Figure 15. Now you can’t have two Web Parts with the same file name. So at this point, SharePoint gives you the option of changing the names to something more meaningful-I chose to rename them to OPMLEditor.webpart and RSSRender.webpart. Interestingly, you can also export this Web Part from the pure ASP.NET 2.0 framework written previously and simply use that .webpart file (which is just an XML file) to import a Web Part directly.
- Go ahead and select the check boxes next to the two Web Parts you are trying to add, give them meaningful names such as OPMLEditor and RSSRender, and then click the “Populate Gallery” button at the top of the page.

Congratulations, your Web Parts are now ready to use. The next step is to actually use them. You can do this using the following steps:
- Go to the home page of the “Code Magazine Article” site, select Site Actions, and then click Create.
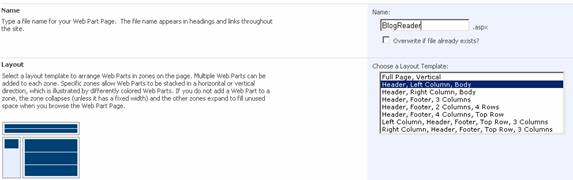
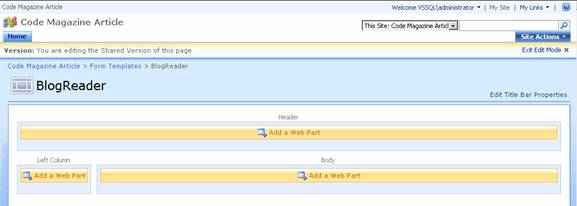
- Under Web Pages, click “Web Part Page”. Add a new page called “BlogReader.aspx” and choose the “Header, Left Column, Body” layout template as shown in Figure 16. Click “Create”.
- SharePoint should now take you to the page you just added in edit mode (Figure 17).
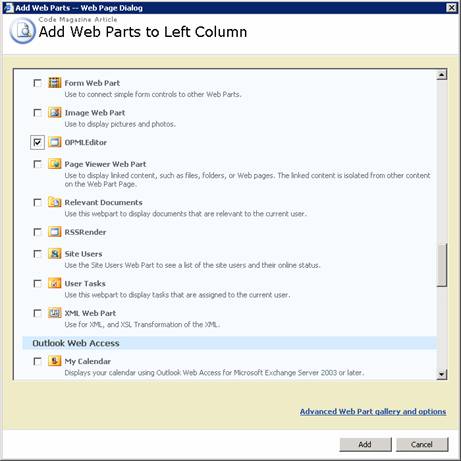
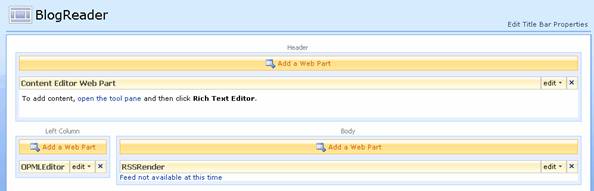
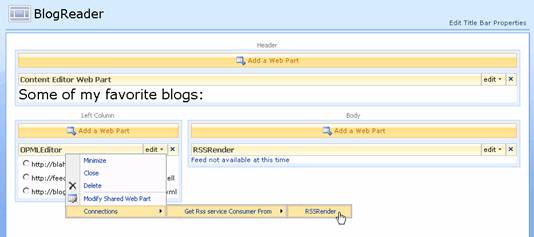
- In the “Left Column” WebPartZone, click “Add a WebPart”, and choose the OPMLEditor WebPart as shown in Figure 18. Similarly, add the RSSRender WebPart in the “Body” WebPartZone. For good measure, add the “Content Editor Web Part” in the “Header” WebPartZone. This is a Web Part that you didn’t write-it came with SharePoint. Your page should look like Figure 19 now.
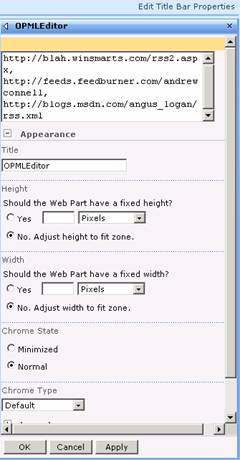
This is where the fun begins. Note that the Web Parts have an “Edit” button next to their title bars. Click that and choose the “Modify Shared WebPart” menu item for the OPMLEditor WebPart.
Voila! You see the very same editor you wrote for your ASP.NET WebPart, now working in SharePoint. Fill in your favorite RSSUrls (Figure 20). Click “OK” to populate the various RSS feeds in your OPMLEditor WebPart as shown in Figure 21. Similarly, go ahead and edit the Content Editor WebPart and give your page a meaningful title in the rich-text editor.
The next step is to connect the OPMLEditor WebPart to the RSSRender WebPart. Under the “Edit” menu on either OPMLEditor or RSSRender, there is a “Connections” submenu. If you explore that menu further, you will note that SharePoint 2007 was smart enough to understand that the OPMLEditor WebPart can indeed communicate with the RSSRender WebPart. In doing so, it took into consideration not only the common communication interfaces any Web Part may support, but also the various transformers your site may be using at this time. Go ahead and establish this communication by checking on the RSSRender menu item as shown in Figure 22.
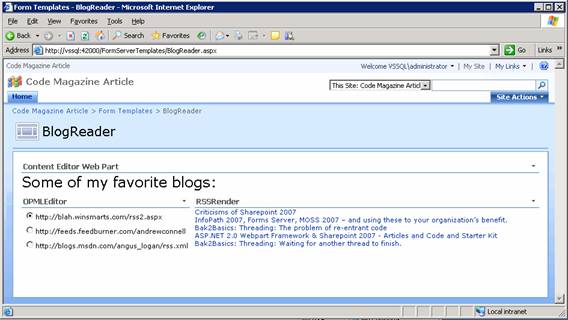
Congratulations. You just built yourself a Web-based blog reader. Click the “Exit edit mode” link at the upper right-hand of your page. Now select one of the blog RSS feed URLs from the left, and you should see the blog content loaded on the right. You can see the final site running in Figure 23.
Now, you may argue that SharePoint lets you create lists-so why did you have to write the OPMLEditor WebPart to begin with? Why couldn’t you just have created a list in SharePoint 2007 and used that instead? Well, you absolutely could have done that instead. That is the entire point of SharePoint-it lets you achieve mostly everything without ever happening to open Visual Studio. In fact, there is even an RSS feed Web Part that comes with SharePoint 2007. So you need to write custom Web Parts for only very custom specific scenarios.
Not only that, SharePoint 2007 provides many time-saving features: You can make the look and feel be 100 percent branded to your organization needs; you get a massive load of functionality right out of the box; hackneyed tasks such as security, provisioning sites and pages, establishing workflows, integration with Microsoft Office etc., take almost no effort. In many instances the effort doesn’t involve C# at all. So, for the most part, you are solving the actual problem at hand, rather than the specifics of the platform that you are building your application on.
Can you say that about plain vanilla ASP.NET 2.0? Probably not!!
Conclusion
SharePoint 2007 is a huge topic. In this and the previous article, I have barely scratched the surface of SharePoint 2007 by demonstrating ASP.NET 2.0 Web Part framework concepts and applying them to SharePoint.
The biggest advantage of SharePoint is developer productivity. SharePoint 2007 is a product that is much more usable than SharePoint 2003, and allows organizations to create final solutions, rather than waste time working on products that will deliver the solutions.
Also, SharePoint 2007 can interlink with existing repositories of data in an organization and present relevant information customized in both content and presentation. It provides a significant advantage to any organization.