One of the more interesting and challenging places to use Ink is in Web applications. Did I say Web applications?
Yes, in fact, I did. But how can this technology, which is dependent on the physical relationship between the stylus, the digitizer, and the operating system, work over the Internet?
The trick to bringing Ink to Web applications is embedding Windows controls. Although the Tablet PC SDK has a COM API and a managed API for .NET, it is only the .NET API that allows you to bring Ink to the Internet.
This article teaches you the basics that you need to Ink-enable your Web applications, including the important concepts about security that you need to understand to make it work. The article also walks you through deploying an Ink-enabled Web application and then dives into some of the more complicated problems of what to do with the Ink that you have collected in your Web application.
It’s Just a Windows Forms Control with One Big Caveat
If you have ever embedded a Windows Forms control onto a Web page, you are already nearly a pro at Ink-enabling your Web application. Let’s look at the basics.
Start by creating a new Windows Control Library project and add a reference to the Microsoft Tablet PC API. Then you will Ink-enable the entire surface of the new User Control just the way you would in a Windows Forms application, with just one twist.
When you instantiate the InkOverlay object, one of the overrides in the constructor is to hook it up with a control, rather than a Windows handle.
Public Sub InkOverlay(ByVal attachedControl As _
Control)
This is one of the most important things to remember for using this control in a Web application. You must attach the InkOverlay object to the control itself, not its handle.
The reason for this is related to the sometimes confusing topic of Code Access Security and what an object has permission to do on your computer. This is something that Microsoft overcame with version 1.7 of the Tablet PC SDK. .NET protects your computer from all of the terrible things that Web sites might want to do to you. It does that by giving Internet Explorer only Partial Trust on your computer.
Things with Partial Trust have restricted permissions on your computer. For example, they aren’t allowed to delete a file. As you will see a little further on, your Ink-enabled control is automatically downloaded to the client computer, where it is able to interact with the digitizer. However, nothing that is served from Internet Explorer will ever have a trust level higher than its host (Internet Explorer).
A Windows handle is part of the Win32 API, which is, of course, unmanaged code. Unmanaged code requires Full Trust. Because of Internet Explorer’s Partial Trust restriction, it is not allowed to serve up components requiring Full Trust and therefore, if your Windows Forms control contains something that requires Full Trust, its compiled assembly will also require Full Trust and Internet Explorer will be unable to serve the Ink enabled control to your computer. If the attached control’s window gets re-created, it can be automatically re-connected to the new Window. (.NET controls can re-create their windows unpredictably.)
By linking the InkOverlay to the control rather than its unmanaged Window handle, you are removing the requirement for Full Trust. As long as you don’t put anything else in your project that requires Full Trust, the compiled dll will run under Partial Trust and be deployed to the client computer. That is why it is so very important to remember to choose the overload of the control when you are constructing the InkOverlay object.
Remember: you created a simple control and have Ink-enabled its entire surface. The code for your Windows control, therefore, should look like this
Imports Microsoft.Ink
Namespace InkontheWeb
  Public Class MyInkControl
  Inherits System.Windows.Forms.UserControl
    [Region: Windows Form Designer generated code]
    Dim inko As InkOverlay
    Private Sub InkControl_Load (ByVal sender As

    Object, ByVal e As System.EventArgs) Handles _
    MyBase.Load
      inko = New InkOverlay(Me)
      inko.Enabled = True
   End Sub
 End Class
End Namespace
There will be some default code for the control hidden inside of the Windows Form Designer generated code region. The most important code in there is the code that explicitly disposes the control. Be sure not to remove that code!
Protected Overloads Overrides Sub Dispose _
(ByVal disposing As Boolean)
  If disposing Then
    If Not (components Is Nothing) Then
      components.Dispose()
    End If
  End If
  MyBase.Dispose(disposing)
End Sub
Why a Custom Control?
You may be wondering why you are building a custom control rather than using the InkEdit or InkPicture controls that are in the Tablet PC SDK. This is an issue related to embedding the Windows Forms control and not specific to the Ink. The control needs to be served up by the Web application, which means the server must have access to it. If you use the InkEdit or InkPicture controls, those are managed code and live on the client computer. Your Web application will not be able to find them. The Web application needs to have local access to the control on the server. By creating a custom control and deploying it along with the Web application, this is possible.
Once you have compiled this project, you can move over to ASP.NET for the Web site.
And it’s Just a Regular Web Site with a Twist
The next step is to create a simple page that contains the Ink-enabled control.
Add a new Web project to the solution. Once the project has been created, you need to add the dll that was created when you compiled the Windows Form control. Although you may be used to adding dlls to projects as a reference, this time, you add this dll as a file just the way you would do with an image, for example. This is an important concept to understand, because helps you to understand how all of the puzzle pieces work together. And as you know from your programming experience, this kind of knowledge is invaluable when you find yourself in a troubleshooting mode.
After adding the dll, which you should find in the bin directory of the control’s project folder, the control is embedded on the Web page with HTML tags. Remember that it is not a Web server control, but will be downloaded to the client’s computer. Your Web page merely needs to know how to find it, but the .NET Framework on the client’s computer does the actual interaction with it. The key to embedding a control on the page is to use the <object> tag with a classid parameter containing a pointer to the assembly file, a # sign, a separator, and a pointer to the fully qualified class name of the control.
The sample control’s project was named CoDe_InkControl and the resulting assembly is CoDe_InkControl.dll. If you look at the code above, you will see that the class name is InkWebControl and is contained in a namespace called InkontheWeb. The last parameter that <object> requires is VIEWASTEXT. Therefore, the resulting HTML tag, which also contains an ID and some dimensions, looks like this:
<object id="MyInkControl" height="100" width="100"
classid="CoDe_InkControl.dll#
CoDe_InkControl.InkontheWeb.InkWebControl"
VIEWASTEXT>
</object>
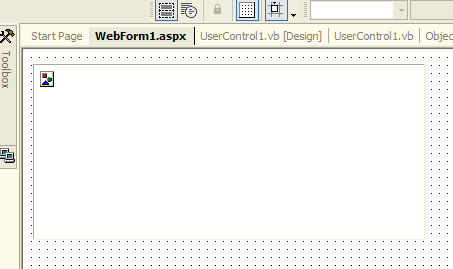
The control cannot be dragged and dropped onto the design surface of the Web page. In fact, you don’t have access to the control, only the dll. You must hand-code the HTML. Once you have added the HTML as above, you will see the control on the design surface. I generally start out with the height and width values equal to 100 and then I can move and resize the control on the design surface as needed.
If you have embedded the control properly, you will see the image icon in the control on the design surface, as shown in Figure 1.
If you have the object tag entered incorrectly, it is possible that when you go from the design surface to the HTML, you will see a data parameter with a string of text. You can delete that parameter and its value.
At this point, you should be able to run the Web project and draw in the area of the control on the Web page. If the project runs but you cannot draw on the control, the most likely problem is within the object tag. Check the spelling of your control information and be sure that you are using the fully qualified name of the class. This means the assembly name, any namespace names, and the class name. See the above sample for a reference.
Add Format and Functionality
So, now you can draw on a Web page, but there’s not really very much that you can do with this. You only have a black pen to play with and when the page is gone, so is your Ink. Let’s add some more functionality to this Inkable page.
This is a great time to remember that the Ink-enabled control is getting downloaded to the client computer. Because of this, it is impossible to interact with the control from the Web server. Normally, you put all kinds of functionality in the code behind the Web page. But code behind is server-side code. The control is not on the server. Any interaction you need to do between the page and the control must be done in client-side code. And because client-side scripting can be extremely cumbersome, it is advantageous to build as much of the control’s functionality as you can into the control itself.
Let’s say that you wanted to allow your users to use additional pen colors, erase their Ink using the stroke erase method, and also move Ink using the lasso tool. All of this functionality will be part of the control itself. You have two ways to expose it to the end user interacting with the Web page: create public methods inside of the control that are called by the client side script and create internal functions that are completely handled by the control.
As an example of the first approach, you could have a method in the control to change the pen’s Ink color to red.
Public Sub ChangeInktoRed
  inkO.DefaultDrawingAttributes.Color=Color.Red
End Sub
On the Web page, such as in Figure 3, you may have a button to allow the user to change the pen color to red. The onclick method of the button calls a client-side function called RedInk.
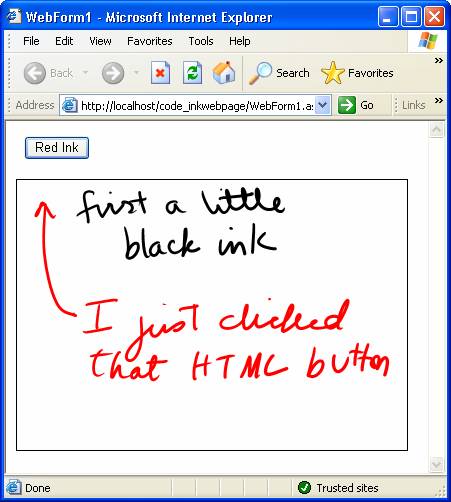
<INPUT onclick="RedInk()" type="button"
value="Red" >
The client-side RedInk function, here written with JavaScript, calls into the control’s exposed method. Note that in the sample Web page, the control, which was given the ID of MyInkControl, is inside a <Form> tag with an ID of inkForm.
function RedInk()
{
  inkForm.MyInkControl.ChangeInktoRed;
}
Everything here is case-sensitive-a demand that could have you scratching your head for quite some time if you haven’t met it.
If you are designing a Web page where the Web UI elements are an important part of the design, you will most likely want to use the above method. My recommendation is to do as much of the work as you can inside the control and keep the JavaScript interaction minimal. The reason for this recommendation is three-fold.
The first is that if you have problems with the control, you could easily drop the control into a Windows Form to debug it. It will be more useful if the functionality you need to test and debug is in the control.
The second reason is that client-side coding is cumbersome and difficult to debug.
The third is that any end user can see your client-side code. You can hide your intellectual property if you have it compiled into your dll. There are fewer people who know how to find the dll and how to get at the code that is inside.
The other way to enable users to interact with your control is to build additional UI elements directly into the control. The button for turning the pen color to red can be part of the control itself. Rather than having a public method to change the Ink color, this can be a private method or part of an event handler.
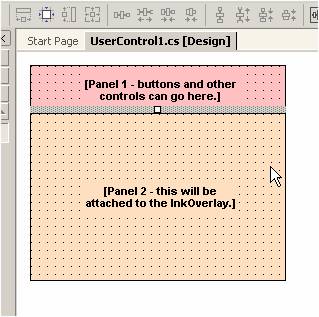
Remember that the current example control has its entire surface Ink enabled. If you would like to have additional controls, you also want to have a defined area, such as a panel control or a picture control, that has the Ink overlay attached to it.
Let’s go back to the custom control and make some changes. Drop two panel controls onto the control changing the dock parameter of the first to top and of the second to fill. Figure 2 shows what the control should look like with the panels. Drop a button onto the top panel and then resize it to 24 x 24. Next, change the background color to red. This will be an obvious visual element for users. I didn’t use a toolbar because you cannot affect the background color of the toolbar buttons. In the Load method, modify the InkOverlay instantiation to attach the InkOverlay to the panel.
Private Sub MyInkControl_Load _

(ByVal sender As Object, ByVal e As _
System.EventArgs) Handles MyBase.Load
  inkO = New Microsoft.Ink.InkOverlay(InkPanel)
  inkO.Enabled = True
End Sub
Now add a click handler to the red button and move the line of code that changes the Ink color into this method.
Private Sub RedPen_Click(ByVal sender As _
System.Object, ByVal e As System.EventArgs) _
Handles RedPen.Click
  inkO.DefaultDrawingAttributes.Color = Color.Red
End Sub
This is a simple take on this method. A more realistic control might have a variety of colored buttons to choose from and possibly one event handler written to accommodate changing all of the colors. This is no different than you would do for any other Tablet PC application that you write for a Windows application, and there are many examples of this type of coding elsewhere in this issue.
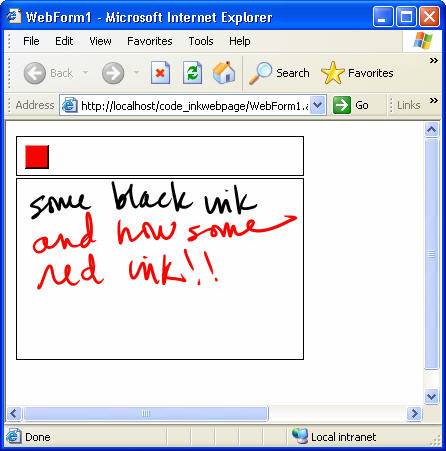
Figure 4 shows the inkable Web page in action. Note that I put borders around the two panels so that I can see where my inkable region is on the Web page.
To test out how this works, rebuild the control and then re-add the resulting dll to the Web application. You don’t have to do anything to the Web page because the Ink functionality is completely contained in the control.
Saving the Ink
Now that you have built this incredibly robust, full-featured control (hopefully, you will add more functionality than a Red Ink button), you still are not much better off than if you were using an Etch-a-Sketch™. Once the user leaves the page where they have been creating their masterpiece, all traces of their hard work will disappear into the ether. Surely, you wouldn’t want that to happen.
Depending on the goal of your Web application, there are a variety of options for persisting the ink data. You may want to store the Ink in a database, save it as an image, or even send it to a Web service that processes it somehow. You also may want to send it to an Ink control on another page or just display it as an image on another Web page.
(I have written about all of these processes in detail in an article referenced in a sidebar. There, I explain some of the complexities that you have to deal with and show one method for getting the Ink out of the control and over to the server where you can process it however you like: save to a database, save as an image, etc.)
The InkOverlay is able to persist its ink data in a few formats. With the SAVE method, you can serialize the Ink data to the proprietary format, InkSerializedFormat (ISF), so that it can be loaded into another Ink control. Another option of the SAVE method lets you output binary data to GIF format. Not only can this be pulled back into another Ink control, but it contains a byte array that represents a GIF.
When working with this data, consider that you will be handling it on the client side of your Web application and not on the server side. This poses some complicated problems. For example, HTML does not understand binary data. If you need to move the data around, it will need to be converted to Base64-encoded text and streamed out of the client side. Getting data from the client side to the server side is tricky as well.
The first thing you need to do is get the Ink out of the embedded control. This requires exposing a function that returns the Ink data. Because this data moves across the pipe to the server, it has to be in a string format, specifically Base64. (Saving as GIF will not save Ink with a transparent background. Using the persistence format of Base64InkSerialzedFormat provides both transparency and Base64 in one call.) With the function to turn the Ink red, everything was internal and it was okay to have the button in the control. With this function, you need to be connected to the Web page. The control has a public function and you will be calling it from the client-side script.
Add the following method to the Windows Form control
Public Function GetCurrentBase64Ink() As String
  If inkO.Ink.Strokes.Count = 0 Then
    Return ""
  Else
     Dim inkbytes() As Byte = _
     inkO.Ink.Save(PersistenceFormat.Gif)
     Return Convert.ToBase64String(inkbytes)
  End If
End Function
On the Web Form, you need a hidden field where you build a button to get this thing started, a function to make the call into the control, and a hidden field to store the returned string. The form will then post to server-side code. The server-side code then digs the data out of the hidden field and posts it to a database.
Add an HTML button to the Web Form and to its onclick event, add the function InktoDB().
<INPUT style="Z-INDEX: 101; LEFT: 424px; POSITION:
absolute; TOP: 24px" type="button" value="Ink to
DB" onclick="InktoDB()">
Next, add a hidden field to the form named InkDataASCII.
<INPUT id="InkDataASCII" type="hidden"
runat="server">
Note that this field is exposed to the server side with runat=”server”. This allows you to get the data on the server side. Also, it is very important to remember that hidden data is visible to the client. You do not want to do this with any private data.
Next, add the following JavaScript function inside of <script> tags within the body of the page.
function InktoDB()
{
  Form1.InkDataASCII.value=

   Form1.MyInkControl.GetCurrentBase64Ink();
  if (Form1.InkDataASCII.value!="empty")
    Form1.submit();
}
The first line of the function calls the GetCurrentBase64Ink method from the control and stuffs the returned string into the hidden control. The second line submits the form. This is dependent on a change to the <form> tag.
Edit the <form> tag. In order to make this trick work, you need to remove the runat=server parameter from the form tag and add a post action that calls to a Web page where you process the Ink data.
<FORM id="Form1" action="ProcessInk.aspx"
method="post">
This is all of the work that you need to do on this Web page.
Now create the server-side code that receives the data. In this sample, you will use another Web page to handle this processing for you. If you do not require any UI on the second Web page, you can also use an HTTPHandler. That is out of the scope of this article, but look for a reference in a sidebar for more information on how to do this with HTTPHandlers.
Create a new Web Form called ProcessInk. In the load event of the page, you get the Ink data from the calling Web page using the Request.Form.GetValues method, which returns a string array of public items on the requesting page. Extract the hidden field from the array and store it into a string
Dim inkStringArray() as String
Dim inkData as String
inkStringArray()= _
Request.Form.GetValues("InkDataASCII")
inkData=InkStringArray(0)
Now you have the Base64 string representation of the Ink data. To convert it back to the byte array originally returned by the InkOverlay.Save method, you can use the following method
dim inkBytes() as _
Byte=Convert.FromBase64String(inkData)
This gives you full access to the GIF persistence-formatted data from the Ink control. At this point, you should be able to do anything with it on the server side that you could do in a regular Windows application that uses Ink data.
Deploying your Inkable Web Application
So far, you have been working with all of this code in the Visual Studio IDE. There is one more important step to Ink-enabling your applications and that is getting them out onto the Web. The Web application gets deployed just as you would any other Web application.
However, the dll for your Windows Forms control is a little different. With yet another reminder that this is not server-side code, you only need to copy it into the directory along with the Web page that it gets embedded on, just like you would do with an image file. It is possible to tuck it into a folder, but be sure to modify the classid of the <object> tag so that the dll can be found. For example, if you place the dll into a folder called inkControls on the server, the classid would look like this:
Classid=inkControls/CoDe_InkControl.dll#

CoDe_InkControl.InkontheWeb.InkWebControl
Conclusion
This article has introduced you to the key steps of adding Ink to your Web applications. You have learned some important concepts about security that will help you with troubleshooting. You have also learned how to build functionality into the control for internal use or to be exposed to the Web page.
With these new tools, you can now give even more power, creativity, and enterprise solutions to your Tablet PC users.