


Enable advanced skinning in your Web applications using an MVC pattern.
MVC, or Model-View-Controller, is a design architecture that promotes separation among parts of an application, with particular focus on the presentation tier. The concept of MVC is inherent in the ASP.NET architecture and I'll show you how to take advantage of that in order to provide skinning or themes capability to your Web sites.
This article assumes knowledge of standard three-tier separation as well as the ASP.NET code-behind model. The techniques shown here will only work when working with server-side code-behind classes and not with in-line code between <script runat=server> tags.
At compile time, the compiler actually creates a class from the ASPX page and that class inherits from the code-behind class defined in the Inherits= argument.
The transition from ASP to ASP.NET has brought forward an entirely new design paradigm for applications. No longer do Web developers include scripting code directly embedded within their HTML code. ASP.NET has a code-behind model that allows you to drop controls on your Web Form and attach code for their events in a separate code module. This design paradigm allows you to apply design patterns to your Web pages that were not possible in the past. While this article is about skinning, the technique taught requires a little bit of understanding about the MVC design pattern, which I'll show you how to use.
An MVC Primer
Model-View-Controller (MVC) is a paradigm that promotes the further separation of parts of the presentation tier. The easiest way to explain this is show you how it applies to ASP.NET. As I stated above, the very architecture of ASP.NET promotes an MVC design. The Model is the business layer, which of course provides all the data and objects required to make an application work. I have no doubt that most of you have seen and used this in your standard three-tier or N-tier designs. The View and the Controller parts of the architecture are the ASPX page and the code-behind class. The ASPX page contains the HTML code and the ASP.NET Web server controls that provide your page with the look you desire?basically the View portion of the model. The code-behind class provides the Control portion of the model by driving the Web server controls on the ASPX pages. This class uses the business layer, or Model, to fill the ASPX page's Web server controls with the data they need to display. It also reads the user inputs on some of the page controls and handles any events that the controls may raise.
I hope this comparison gives you an understanding of the concepts behind the MVC architecture or pattern. The purpose of this article is not to teach you the various implementations of the MVC pattern but instead, having explained how this pattern appears in the ASP.NET architecture, I'll show you how to use it to provide themes and skins to your Web applications.
Let's take a closer look at how a Web Form connects with its code-behind class and then I'll review the concept of themes and skins. Later, I'll put everything together as I show you how you can add extensive skinning and theme capability to your Web applications and truly bring out the MVC architecture that is already part of the ASP.NET architecture. Note that some of the information in the first part is stuff that you may already be familiar with, so bare with me for the benefit of those that may not be as familiar; besides I may show you a tidbit or two that you may have not known about.
The @Page Directive
I'm not going to get into all the details of how ASP.NET works, but it is important to understand how the two sides of a page connect. You may have noticed that if you switch the view of your Web Form to HTML, you'll find a series of directives at the top. The main directive here is the Page directive. This is the line that may look this:
<%@ Page Language="CS" AutoEventWireup="false"
   CodeBehind="MyPage.aspx.cs"
   Inherits="MyNamespace.MyPage" %>
This directive contains several attributes noted in a 'name=value' notation. The two attributes I want to concentrate on here are the CodeBehind and the Inherits attributes.
The Inherits attribute tells the Web Form what class to use as its controller. This class will hold declarations for the Web server controls the page contains as well as all the code to handle events raised by any Web controls. The value of the Inherits attribute is the full qualifier for the controlling class, or code-behind class.
The CodeBehind attribute contains the physical file name of the file item containing the code-behind class. This attribute is not required and merely tells Visual Studio where to find the code-behind file when the developer either clicks on the 'view code' button on the Solutions Explorer or double-clicks on one of the server controls on the Web Form (or even the Web Form itself). You can remove this attribute if you wish, but you would have to go hunting for the code-behind class manually. Though most of the time you want to leave it there, later I will show a situation where you may actually want to remove it. The Inherits attribute, however, you definitely need; as without it your Web Form would not know where to go for its controlling code.
When you create a new Web Form, the code-behind file is created automatically with the same name of the Web Form, with a .cs or .vb appended to the end. So a Web Form named MyPage.aspx would have a corresponding code-behind file called MyPage.aspx.cs for C# and MyPage.aspx.vb for VB .NET.
Now that you have a pretty good understanding of how ASP.NET makes the connection, let's talk about skinning.
Skinning
Don't you just love euphemisms? Back in good old days I remember using the term "page-styles" or even "looks." Later, Windows itself introduced the concept of Themes. It seems that the term-du-jour is skins.
Skinning is the ability for your Web (or Windows) application to change the layout and look of its pages or forms to suit a user's desire. There are different ways to achieve these kinds of results, and the technique (or combination of techniques) you choose to use depends on the extent and versatility of the skinning you wish your application to have.
One of the more common ways to provide some amount of skinning to your apps is to use style sheets. Style sheets are great and of course are the preferred way of providing any formatting for your Web pages, but they do have their limits. The HTML elements of Web server controls can have style sheet elements assigned to them in order to provide their formatting. You can provide many different style sheets that contain the same named elements and provide your application with a way to switch between them. This will give you a lot of variety in formatting and even positioning, but nothing as radical as varying the graphical images on the page in combination with varying positioning, all with WYSIWYG design-time functionality.
Suppose you want to display different graphics on the page or have one skin display square boxes as its panels while another displays rounded boxes. Or even provide completely different layouts and positioning for all screen elements? How about one skin with the menus across the top and another with menus on the side? One skin may be a winter theme with snow images around all the panel boxes housing text and controls, while another skin can be a summer theme with sunshine and beach images all over the place. As you can imagine, the possibilities are endless and extend way beyond picking a Desert, Eggplant, or Rose theme as Windows lets you do. The technique I'm going to show allows you to do all of this.
Now, keep in mind that with this kind of power and flexibility comes more work. I think it's pretty obvious that creating a skin is a little beyond just coming up with a new style sheet and changing some color, font, or size codes. I do think, however, that the work is well worth it if you're looking to provide the most extensive skinning available to your sites. In the end you will have to use your best judgment to balance the time, cost, and necessities in your projects when deciding how much skinning flexibility (if any at all) to bring to your sites.
A Little Known Secret
I hope I won't insult anyone's intelligence with this information but you would be surprised how many do not know what I am about to explain here.
You probably have noticed that when you view your code files in the Solutions Explorer, you usually only see the Web Form pages (the .aspx files) listed, and not the code-behind files. Look at the button at the top of the Solutions Explorer whose tool tip says "Show All Files." Click this and you will see all your Web Form files show a + sign to their left. If you expand these, you will see each Web Form's corresponding code-behind file (as well as the .resx resource file). You're going to need to show all files in order to continue with what I am about to explain.
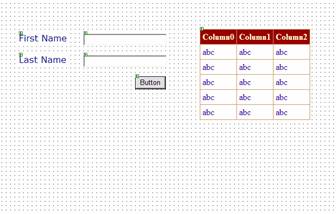
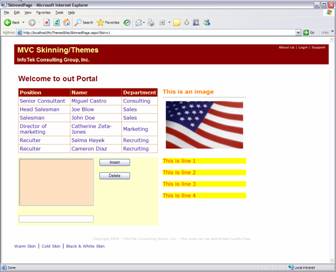
Basically it boils down to a very simple thing: driving more than one ASPX page with a single code-behind class. I'm going to cover a few guidelines in order to make sure that your implementation of this technique goes without any flaws. In order to realistically illustrate each step, let's refer to an actual Web Form called MemberList1.aspx. If you create a Web Form like this one and press the "Show All Files" button on the Solutions Explorer, you will see two files appear: MemberList1.aspx.cs and MemberList1.aspx.resx (let's assume you're working in C#, but of course the VB counterparts would end in .vb). Now let's assume that your Web Form has two Labels, two TextBoxes, a Datagrid, and a button. Using techniques I'm sure you are already familiar with, you can make these five controls look any way you wish, either by direct styling or using cascading style sheets. You can, of course, position these controls wherever you want on the form. If you view the code-behind for your new Web Form, either by clicking on the View Code button at the top of the Solutions Explorer, or by double-clicking the newly exposed MemberList1.aspx.cs file, you can attach code to any or all of the five controls. So let's style up the controls on the form and assign some data to the textboxes from the code-behind page. You'll also trap the button's Click event and fill the DataGrid. The styling used in the page can be anything you wish. In the ASPX page shown in this article, I used style sheet classes that I attached to each control on the Web Form. Though this is the preferred method of Web styling, you can use hard-coded font tags if you wish (Figure 1).
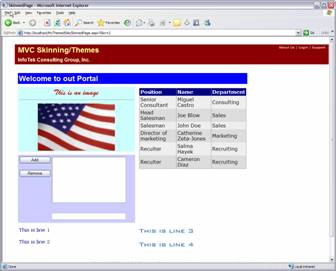
There's probably nothing here that you haven't seen or done before. In fact, you may be saying, "Get to the point, already." Well, you see, I love this stuff too much to skim through it quickly, so I purposely dwell on the obvious in order to absorb the beauty that is the code. If you run this page you'll see your two textboxes filled with the text that was placed in them in the code-behind page. If you click on the button, the DataGrid will display three rows of data. All this data gets loaded in the code-behind page. Now it gets interesting: let's add another Web Form called MemberList2.aspx. This form will have the same controls as MemberList1.aspx, but this time let's lay them out in a completely different arrangement (Figure 2).
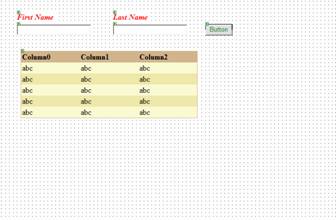
So far so good, right? Two Web Forms with identical controls, only each lays them out differently. Before you start coding the code-behind page on the second Web Form, remember the point of this article is to illustrate a skinning technique that will enable you to have radically different page layouts. As you have probably guessed, this second page will represent our second skin, hence the same controls with a different layout. Since you've already coded the controller for Web Form1.aspx by way of the Web Form1.aspx.cs code-behind class, you don't have to repeat this work. You want to show the same data and provide the same behavior, just make it look different.
When I described the little known secret, I stated that you want to learn to drive more than one Web Form with the same code-behind page, so here's how to set it up. Since you've displayed all files, you should see a MemberList2.aspx.cs file underneath the Web Form in the Solutions Explorer. Double-click MemberList2.aspx to display it in a window pane and switch over to HTML view on the Web Form (it's on the lower-right corner of the Web Form window pane). The first line of the HTML page should look like this:
<%@ Page language="c#"
Codebehind="MemberList2.aspx.cs"
AutoEventWireup="false"
Inherits="MVCSkinningCS.MemberList2" %>
The two items I want to point out here are the CodeBehind= and the Inherits= arguments. The CodeBehind= argument points at the physical file that contains the code-behind for this page, while the Inherits= argument designates the name of the class the page will use to drive it. Move your cursor up to that line and change the two arguments so the Page directive looks like this:
<%@ Page language="c#"
Codebehind="MemberList1.aspx.cs"
AutoEventWireup="false"
Inherits="MVCSkinningCS.MemberList1" %>
As you can guess, this is what the Page directive line looks like for the MemberList1.aspx Web Form as well. Switch the Web Form back to Design view and double-click on the button in order to bring up the code-behind class. In the Solutions Explorer you can see that MemberList2.aspx now has two code-behinds listed beneath it: MemberList1.aspx.cs and MemberList2.aspx.cs. MemberList1.aspx.cs has in fact moved from underneath MemberList1.aspx. Next, since you don't need to use MemberList2.aspx.cs, delete it. Right-click on it and choose Delete from the popup-menu. Now if you switch back and forth between the two Web Forms in their Design windows and choose View Code from the Solutions Explorer, you will see the same class (MemberList1.aspx.cs) come up and also switch to display underneath the selected Web Form.
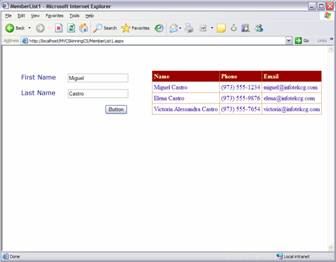
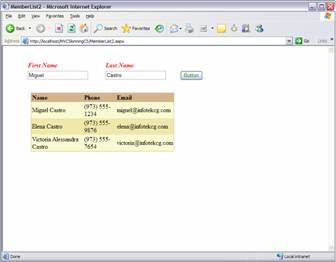
You've now done everything necessary to drive the MemberList2.aspx Web Form with the code-behind that Visual Studio originally exclusively assigned to MemberList1.aspx. See Figure 3 and Figure 4 to see the two member list pages, with their totally different layouts, yet controlled by the same code-behind class. Of course you could have repositioned these controls using style sheets, but imagine both of these pages with a totally different graphical theme behind them. Now you can see how the power in this technique comes into play.
Let's quickly review. You now have two separate Web Forms driven by a single code-behind page. Both Web Forms have the same controls on them, and these controls are defined and addressed in the code-behind page that drives both Web Forms. Each Web Form, though displaying the same controls, displays them in a totally different layout. Indeed, you can add any styling or graphics you want to either of these two views. Each of these two Web Forms represents a different skin for representing the same data. As the programmer, you choose how a particular skin gets chosen for display. You could have this information stored in a database that defines the available skins and which one to assign to a given user. Depending on which user is logged into your system, you can retrieve the appropriate skin name and use it to build complete page names for redirecting purposes.
Getting back to the MVC pattern, I've effectively shown you how to implement multiple Views driven by a single Controller. The Model in this basic example is non-existent, but in a real-life scenario you would probably have a business logic layer of some sort that provides you with the Model you need to power the Controller. It's important to understand that this is one implementation of an MVC design. There are other documented implementations of an MVC pattern where the one-to-many relationship may be on the views-to-controllers (just the opposite of what you are using here). The point is that the pattern separates the Model from the View from the Controller, so in fact you can relate them any way you want. You can even have multiple models driving one controller driving multiple views. Everything depends on your application needs (I'll show you what I mean in a minute). What you need to understand is that every ASPX page needs the exact same Web Server controls on it, since the code-behind uses them.
While style-sheets can definitely provide a great deal of presentation variations, including positioning variation, a good skinning technique may include a lot of different images that could vary from theme to theme. That makes the skinning technique truly shine.
Practical Application
When you apply this technique to a Web application, you need to incorporate a way to choose a skin when you architect your site. Naming conventions will play an important part here since part of the form's name may both describe it and designate the skin's name.
For example, you may want to determine what skin to use when a user enters the application. You may store the name of the skin in a cookie so that it's easily accessible throughout the application. Suppose you have two skins named Summer and Winter. The site can then have several views of each Web Form, which can represent Home, MemberList, MemberEdit, Admin, and ContactUs. The names of the ASPX pages that represent each of these views can incorporate both the view and skin name in its page name. Thus you might have Home_Summer.aspx, Home_Winter.aspx, MemberList_Summer.aspx, and MemberList_Winter.aspx. Redirection to any of these pages might require you to take the name of the chosen skin, combine it with the name of the view you want to display, and add it to an actual page name to transfer to.
Not Just for Pages
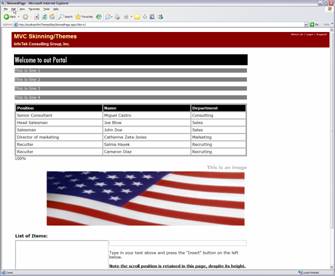
ASP.NET introduced UserControls, which allow you to break your pages up into more reusable parts. UserControls use the same architecture that Web Forms do. They have an HTML side (.ascx files) and a corresponding code-behind file. The ASPX pages have a similar directive located at the top of the page called the @Control directive, which serves the same purpose as the @Page directive used in Web Forms. For this reason, the skinning technique I'm showing you here is totally applicable to UserControls as well. In fact, when you're designing a Web site that would use this technique to provide skinning functionality, you would more than likely use dynamically loaded UserControls throughout the entire site. Figure 5, Figure 6, and Figure 7 show three different UserControls used in a page, each with a radically different look, but each driven by the same code-behind class.
Code Organization
When I design a new system, one of the things I take pretty seriously is the organization of my code. While many developers take their code organization for granted, it can be pretty critical when you're discussing driving several pages from one code set.
Move 'em On Out
As I showed you earlier, once you've accomplished hooking up one code-behind file to more than one Web Form (or UserControl), when you bring up the code-behind module, you will see its file move under the most current Web Form. If you do not wish to see your files move around like that, you can physically move the code-behind files to another location within your project (preferably under their own folder). This can help you keep your Controllers organized in one place. I think this technique probably make a little more sense since you want to use them to drive more than one View. If you still want to make your code-behind files accessible by double-clicking on a control on any of its Web Forms, just change the CodeBehind= argument in the @Page directive to follow the path you moved the files to. If you leave out the CodeBehind= argument altogether, you will need to access the code-behind files directly from the Solutions Explorer.
Code Separation to a New Level
Skinning accomplishes a goal that VB 6 Web Classes attempted but didn't quite perfect until the release of .NET. Skinning allows for true and total code separation, allowing the UI developer to work completely independently of the developer working on logic code. This kind of developer separation was of course possible between layers, but now you can accomplish the same within the presentation layer as well. Of course, this may not be the course your company decides to follow for a project, but the choice is there nonetheless. If you do wish to make this separation absolute, you can go as far as to move the code-behind files into another project, and reference them from your Web project. In this case, you would definitely eliminate the CodeBehind= argument from the @Page directive completely. You can then have one group of programmers working on purely the HTML page and the only extra knowledge they would require is which ASP.NET server controls the pages need and what their declarations are. The developer working on the code-behind class does not care what the HTML looks like. He or she can simply rely on the existence of a certain group of Web Server controls.
Whether you decide to keep the code-behind files within the Web project or separate them out, you can also rename them to whatever you want. Remember that by default, a code-behind file name is the name of the original Web Form it drives with a .vb or .cs suffix. You don't have to follow this naming convention and it is perfectly feasible to change such names if the code-behind files drive more than one Web Form.
In Conclusion
Skinning techniques requires a bit more work than simply changing style sheets, but skinning provides ultimate flexibility to design radically different looks for pages with the same functionality. You must use your best judgment as to where to apply to and how to set up your development process. You can get really creative and combine this with style sheet variations for the ultimate Web skinning. Due to the nature and structure of this article, I didn't find it particularly useful to include source code within the article itself; however, you can download the source code accompanying this article. My code demonstrates not only the Web Form examples, but also an example skinning UserControls with three radically different themes (as shown in Figures 5, 6, and 7). Have fun with this; with a little effort you can provide a rich experience to users of your Web applications and eliminate the monotony they may feel over using the same pages for a long period of time.
