DotNetNuke 2.0 is the latest version of the increasingly popular, open-source, content management portal.
It was originally released as an open source project on Dec 24, 2002. In the past fifteen months it has grown to over 50,000 lines of managed code. One thing is for sure, you won't be alone using it! The DotNetNuke support forum is one of the most active and dynamic forums on the www.asp.net Web site. There are currently over 45,000 registered users on the official DotNetNuke Web site and membership continues to grow at an exponential rate.In this article, Jim will cover some of the new features in DNN 2.0 as well as discuss upgrading portals from prior DNN versions. He also explores the new data access methodology and walks you through the steps involved in developing custom DNN 2.0 modules.
DotNetNuke 2.0 Is Here!
First let me start by saying I have good news and bad news. The good news is that the eagerly-awaited DNN 2.0 officially shipped at the VS-Live! Conference on March 23, 2004. Actually, that's not good news, that's great news. The bad news? There aren't enough hours in the day to work on all the web sites I want to create with DNN 2.0!
DNN provides features that make everyone happy, from the Web site administrator, to the content manager, to the Web site developer.
For those of you unfamiliar with DNN, it provides an off-the-shelf, turn-key, Web portal application containing the key features and tools required to operate and maintain a dynamic and 100% interactive data-driven Web site. DNN provides features that make everyone happy, from the Web site administrator, to the content manager, to the Web site developer. Web site administrators get new features and tools for controlling user membership, security role management, banner advertising, affiliate relationship management, promotion and search engine optimization, and Web hosting. Content managers receive features and tools for content authoring and Web site management. For the Web site developer, DNN is highly extensible, has improved error handling capabilities, and allows them to develop custom modules built in your .NET language of choice. You can upload custom modules, in the form of a private assembly to the server where they are installed directly into the runtime portal environment and ready for use by the Web site administrator and/or content manager. I've included a complete step-by-step tutorial for developing custom modules at the end of this article.
Upgrading From DNN 1.0
Before you even think about upgrading, I strongly advise you to back up your database and Web site folders in case you run into issues with your site. The process of upgrading from DNN 1.0 is fairly straightforward. You simply copy the DNN 2.0 files over your DNN 1.0 files and compile. The upgrade process should work and your database will be automatically upgraded. Custom modules written for DNN 1.0 should work but they may not depending on how they were written.
Performing a Clean DNN 2.0 Install
The steps to performing a clean install of DNN 2.0 are nearly identical to the steps to install a prior version (See March/April 2004 issue of CoDe Magazine for complete step-by-step instructions for installing DNN 1.0.10d). The Readme.txt file in the Documentation directory also contains the steps to perform a clean install.
DNN 2.0 New Features
The DNN 2.0 team completely re-wrote the product and they added a number of new features and enhancements. I have broken them down into four categories: administration changes, skin technology, data access methodology, and custom module (private assembly) development. In this article I will touch on some of the administration changes and I'll explain what skins are and why you will want to use them. I'll spend time exploring the new data access methodology and I'll finish the article by explaining how to develop custom modules in DNN 2.0.
Administration Changes
DNN 2.0 features changes and enhancements revolve around the day-to-day administration of a site and it has some noticeable user interface changes.
Login Page Changes
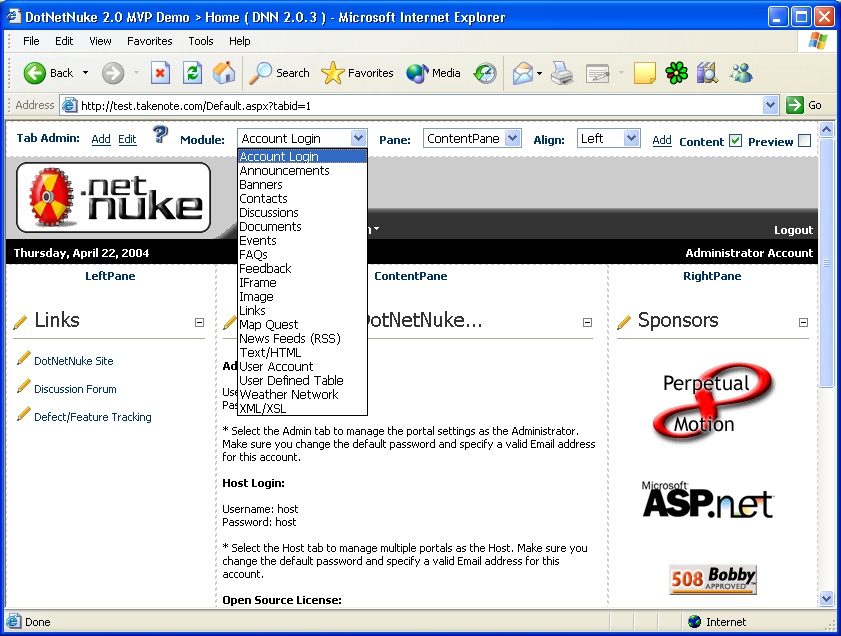
The login page now displays on its own tab when a user attempts to login to a site. DNN 2.0 adds the login component as a standard module so you can customize the login experience for your site. DNN 2.0 includes a User Account module as a standard module. (See Figure 1 for a list of all the standard modules.)
Administrative Design Surface Changes
For an administrator or someone with group editing rights to a tab, DNN 2.0 made a number of changes to the design surface. Some of the changes support new features while others have been implemented to increase productivity.
Being able to delete a module without having to edit the module settings is definitely a welcome addition.
If you used DNN 1.0, you'll notice that DNN 2.0 repositions the tab maintenance section to the top of the design surface. Minor changes to tab maintenance section include grouping the Tab add and edit options together, the option to specify which pane (left, content, or right) a new module is added to, the alignment of the new module within the pane, and the ability to toggle the display of page content during a design session (Figure 2).
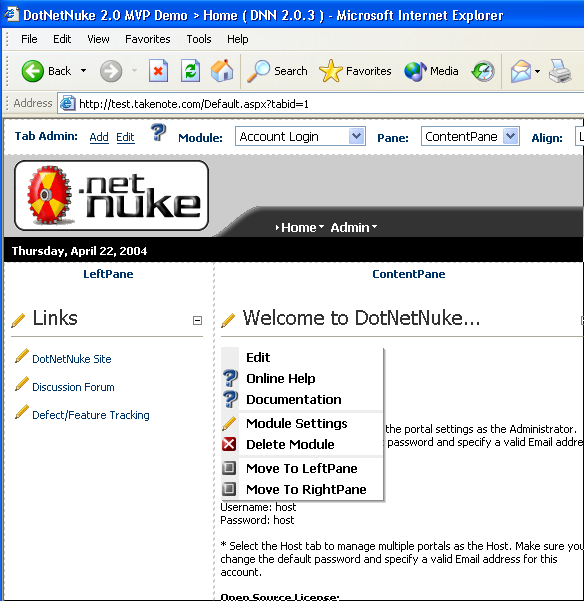
Module Context Menus
Content menus now appear when you move the mouse over the pencil next to the module title. The module context menu provides access to a variety of capabilities including positioning of the module, editing the module settings, and deleting the module (Figure 3). Being able to delete a module without having to edit the module settings is definitely a welcome addition.
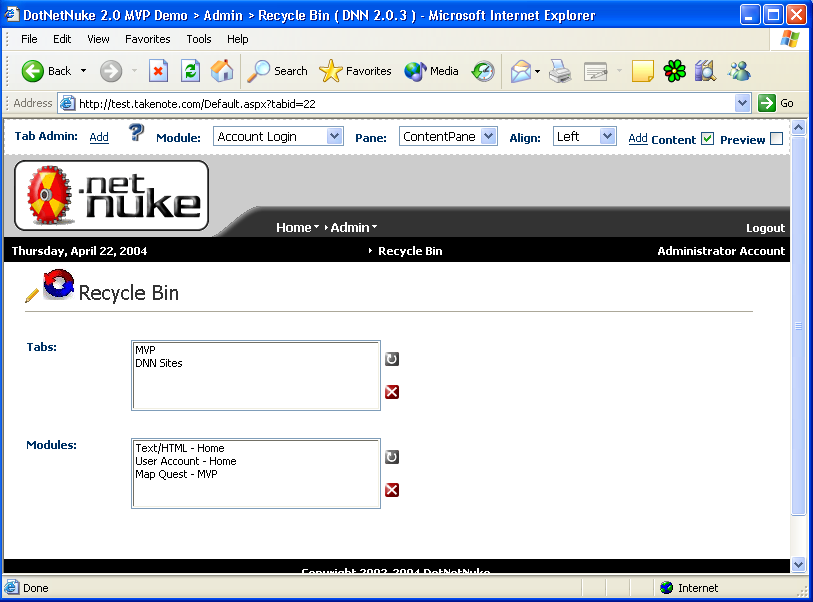
Recycle Bin
Are you nervous about being able to delete a module or tab so easily? Not to worry! The Admin menu lets you access the new Recycle Bin tab. The Recycle Bin provides the ability to restore previously deleted tabs or modules, another very welcome addition (Figure 4).
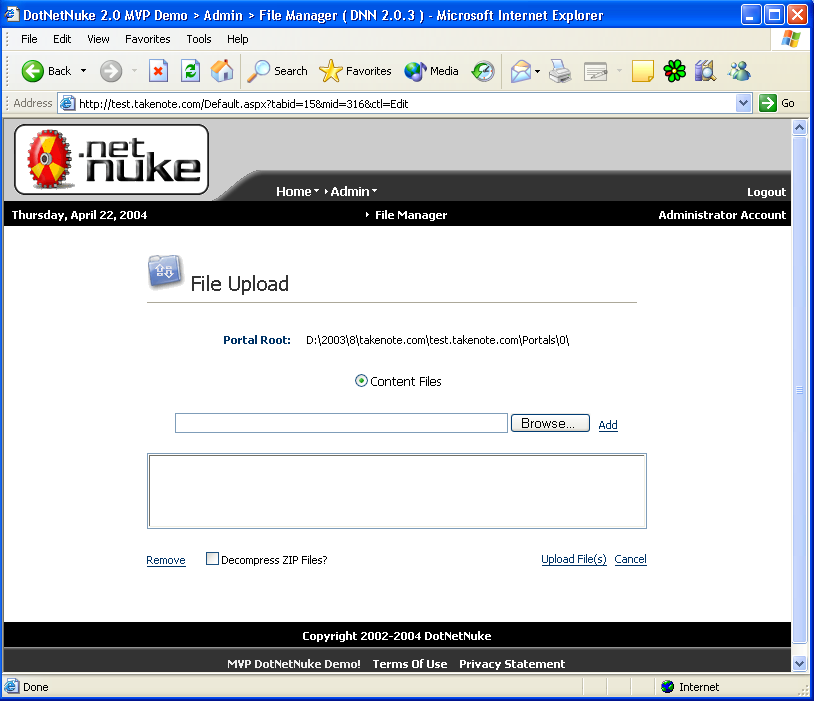
File Upload Dialog
The Admin and Host File Upload dialogs have been expanded to include the storage location of the file being uploaded. The Host File Upload Dialog also provides the ability to specify the type of content being uploaded (Figure 5).

Exception Viewer
The Exception Viewer displays any errors that have occurred during the execution of the site.
Skins
Support for skins is one of the most-anticipated new features in DNN 2.0. So what is a skin? An official sounding definition for skins goes something like this: Skinning is a software architecture that provides a technique to separate application logic and content from its presentation. In clearer terms, it is a design that splits the three segments of an application into distinct pieces. The first piece, the application logic, determines how the site works. For example, this is what happens when a user clicks a specific button. The second piece, the site content, determines the information the site displays. This is the text displayed in a text box for example. The third piece, the presentation, determines how the site looks. For example, you might want to display a logo in the upper left corner. The separation of the three segments makes it easy to quickly change the look and feel of the site.
Changing the look and feel of a site is as simple as uploading and applying a new skin.
I have found an analogy to explain skins that helps when I teach a DNN 2.0 training class. Imagine a person as a Web site. The actions they know how to perform, jumping up and down for example, represents the application logic. The things they say, reciting the Gettysburg address for example, represents the site content. The clothes they wear, a formal gown for example, represents the presentation. A quick change of clothes into blue jeans, a t-shirt and a baseball cap would present a very different look for the person but would have zero impact on them reciting the Gettysburg address or knowing how to jump up and down. Skins are all about how a site looks.
DNN 2.0 provides a free-form skinning solution that provides full control over the user interface, and DNN 2.0 supports skinning at the host, portal, and tab levels. You can also skin your module containers. What all this boils down to is that DNN 2.0 provides you with the ability to apply different skins quickly and easily, therefore giving you the ability to mildly or radically change the look and feel of a site with just a few clicks of the mouse. Changing the look and feel of a site is as simple as uploading the new skin and selecting the skin to apply on the Site Settings tab (Figure 6).
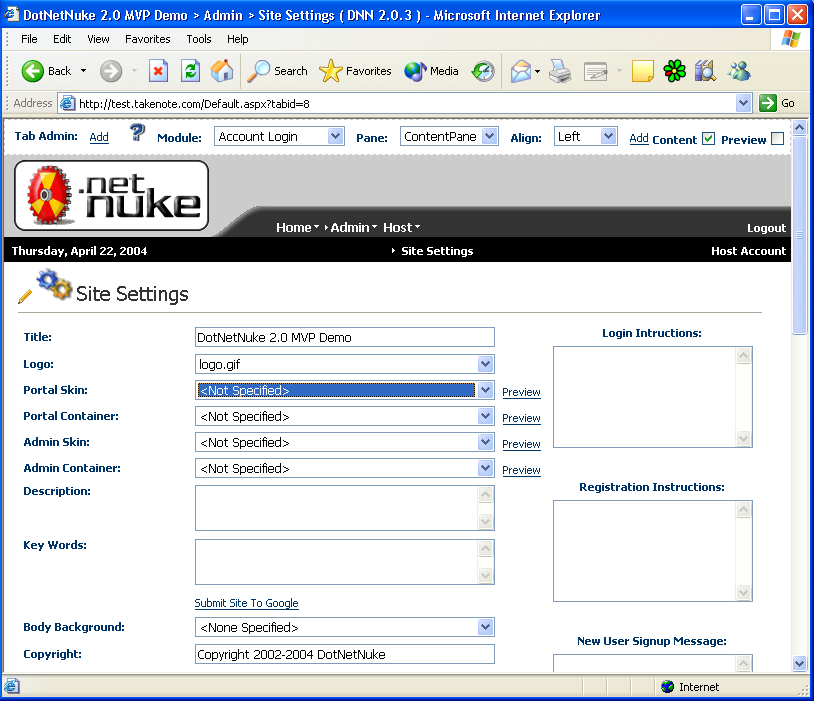
You can find free DNN 2.0 skins available from a number of places on the Web. I downloaded a couple of skins from www.dnnskins.com. Installation is as simple as uploading a zip file from the Host File Manager. DNN automatically unzips the file during the installation process.
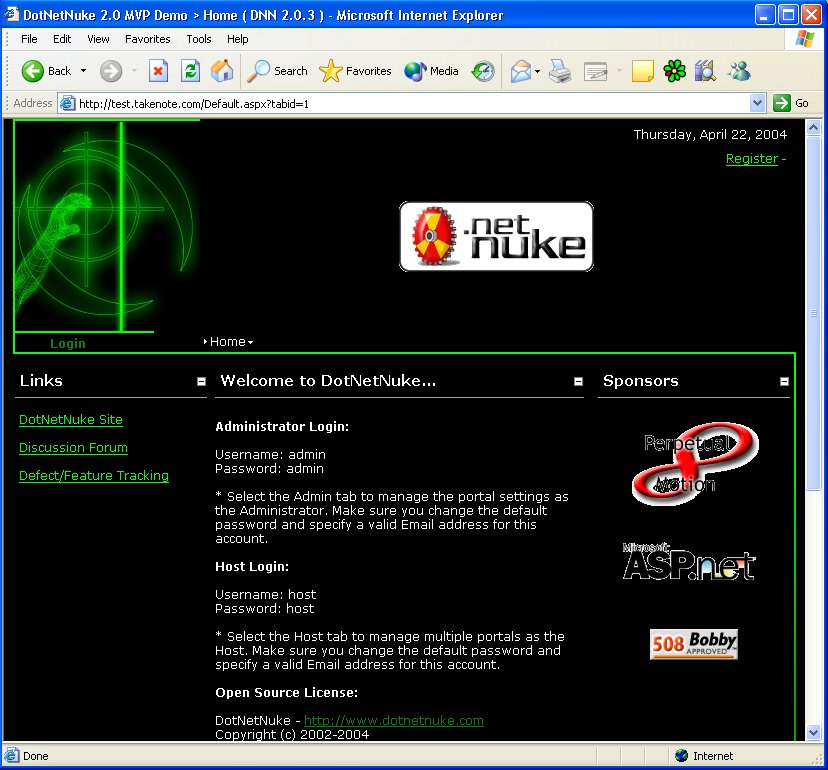
I downloaded the ClearCell...Multiskins skin and then uploaded it to my site. I then selected Site Settings from the Admin menu, I selected ClearCell - DarkBlue, and clicked Update. The results (Figure 7) are pretty amazing wouldn't you say? I also downloaded the Subzero Solutions - Reach4It skin, installed in on my site, and specified it as the skin I wanted to use (Figure 8).

As you can see, just likes snakes and lizards can shed their skin, so can your Web site, revealing a totally new look and feel. Additional information on DNN's implementation of skins is available in the DotNetNuke Skinning Whitepaper found on the official DotNetNuke Web site. Stay tuned to CoDe Magazine for one of my next articles detailing the steps involved in creating your own skins.
Data Access
While the new skin features might be the most important new feature for site administrators and site designers, to developers responsible for coding custom modules, one of the most significant issues with DNN 2.0 is the new data access methodology. The DNN core team has implemented the Whidbey (ASP.NET 2.0) Provider model for data access. Adopting this methodology enables DNN to integrate with any data store. DNN 2.0 ships with a Microsoft SQL Server/MSDE data provider and a Microsoft Access data provider.
DNN 2.0 includes significant revisions to the web.config file. The most obvious of these changes is the addition of the Providers collection to support additional databases (Listing 1).
The data model in DNN 2.0 takes an n-tiered or layered approach to working with data. If upgrading to DNN 2.0 is going to be your initial introduction to the world of layered data access, be prepared to spend some time absorbing and learning. Your maiden voyage into the uncharted waters of a multi-tiered or layered approach to working with data can be as unsettling as being on a ship in rough. The good news is that it does not have to be that upsetting.
There are four fundamental layers in a typical multi-tiered application: the Presentation layer, the Business Logic layer, the Data Access layer, and the Data Store layer. If you have ever taken a standardized test such as the S.A.T. exam, for example, then you have a perfect frame of reference for understanding how a layered approach to application development works. I will explain each layer and break down the layers in the standardized test taking process to help you associate application layers with your real world experience. Later in the article I will demonstrate how to implement the layers in .NET code.
I will start with the layer closest to the user, the Presentation layer, and work my way back toward the database.
The Presentation Layer
The Presentation layer displays information to the user and provides a mechanism for them to enter or update information. A Windows Form implements this layer in a traditional Windows application and a Web Form (ASP.NET) implements this layer in a Web-based application. I often refer to this layer as the “make the data look pretty” layer. Limited data validation occurs at this layer.
Your maiden voyage into the uncharted waters of a multi-tiered or layered approach to working with data can be as unsettling as being on a ship in rough seas. The good news is that it does not have to be that way.
In the example of a standardized exam, the exam itself represents the Presentation layer, though recalling my experiences with standardized exams; the results were rarely “pretty.” Data is collected when an individual taking the exam records their answers on the separate exam answer form. That seems simple enough. No real rocket science here.
The Business Logic Layer
The Business Logic layer (BLL) acts as a conduit between the Presentation layer and the Data Access layer. It is responsible for validating the data passed to it by the Presentation layer before it sends the data along to the Data Access layer. The BLL also retrieves data from the Data Access layer and passes it to the Presentation layer. Typically, a developer creates a Custom Business Object (CBO) (CBO is DNN's name for a Business Logic layer object) for each table in the database. For example, the CustomerBusinessObject works with data from the Customer table.
The CustomerBusinessObject would handle data validation chores such as ensuring that the customer's first name and last name are not blank. The code in a CBO is highly customized to fit the requirements of the table it is representing.
Back to the standardized exam example. The exam administrator sitting in front of the classroom who monitors the students during the exam represents the Business Logic layer. A student turning in their completed exam answer form is an example of the Presentation layer passing data to the Business Logic layer. Validation steps the exam administrator might take include verifying the exam was completed in the allotted time, that the student's name is on the exam, and that the student used a #2 pencil. Did you notice that I didn't mention anything about scoring the exam or determining if any or all of the questions had been answered? In this case, scoring is not the responsibility of the exam administrator. Once the exam has passed the validation rules implemented by the exam administrator, the test is sent to a testing company for scoring.
Does the exam administrator care what type of database contains the exam results or how the exam results get recorded? No. That is not their responsibility. Handing out the answer forms, applying a few validation rules to exams handed in, and sending the exam answer form to be scored is the entirety of their job.
The Data Access Layer
The Data Access layer (DAL) accepts the pre-validated data coming from the Business Logic layer and calls the correct data updating capability on the Data Store layer. DAL objects are designed and coded for a particular data store to take advantage of specific capabilities and features of the data store including performance and security.
In my standardized exam example, the testing company who receives the pre-validated exam answer form from the exam administrator represents the Data Access layer. Getting the results entered into their system and scoring the exam is their responsibility.
The Data Store Layer
The Data Store layer (DSL) represents the data storage entity itself. For this article, Microsoft SQL Server 2000 is the DSL.
In the standardized test example, the DSL is represented by the database (tables, stored procedures, and so on) that the company stores the exam scores in. Using stored procedures to access and update data is an accepted “best practice” and DNN uses stored procedures exclusively to work with data.
Layered Architecture Advantages
Flexibility is one of the primary advantages of a layered architecture. In the standardized exam example, does it really matter who the exam administrator is? No, so long as they can carry out the duties and responsibilities expected of an exam administrator. Does the exam administrator know what database the standardized exam company uses? No, they do not need to know. Does it really matter what database the exam company uses to store test results? No, as long as they can score the exams and distribute the results to exam takers. Are all of the layers independent of each other? No, they aren't. Keep in mind that the Data Access layer is coded to work with a specific Data Store layer. If someone decides to swap out the Data Store layer (switch from Oracle to SQL Server for example) someone might have to recode the Data Access layer to take advantage of SQL Server features and capabilities. Would swapping the database have any impact on the exam administrator or change the rules they implement? No. Would the change affect the student taking the exam? No.
A clear and manageable division of human labor is another advantage of a layered architecture. Because you can develop each layer independently of the others, individual team members can handle specific tasks. A graphic artistic can collaborate with a Web designer on the visual aspects of the application (Presentation layer) while developers work on the custom business objects (Business Logic layer). Meanwhile, another team of developers can collaborate with the DBA on the data access objects (Data Access layer). Lastly, a DBA can implement the table schemas and code the stored procedures in the database.
Layered Architecture Disadvantages
The layered approached to accessing data obviously has advantages but it also has disadvantages. The most significant is the level of complexity and potential confusion that comes with having several layers. Because each table has its own Data Access layer object and Custom Business Object, the number of classes can grow very quickly.
Extending DNN with Custom Modules
DNN 2.0's redesign in the custom module architecture is another significant update. In this section I will walk you through all the steps necessary to construct and deploy your own custom modules. First I'll show you how to create a SQL Server table and its associated stored procedures (Data Store layer). I'll show you how to continue to build the Data Access layer by constructing a Business Logic layer object to retrieve and validate entered data. Next, you'll see how to build the presentation layer and edit the data being served up by the Business Logic layer object. Finally, I will show you how to package all the components of the custom module into a single zip file and upload the zip file for testing.
One of the best resources to help you understand how to build your own custom modules is to check out how the pre-built ones work.
Before I begin let me list some prerequisites. I will use Microsoft SQL Server 2000 so you will need access to SQL Server to follow along. The DNN 2.0 data access provider model allows you to work with other databases, such as Microsoft Access, but I'm not using Microsoft access as my data repository. You will also need to install the Microsoft Data Access Application Block for .NET. You can find this by searching for Data Access Application Block for .NET on http://msdn.microsoft.com. You will also need a utility that lets you create zip files.
The custom module I'll show you how to build tracks exam results. The primary user interface will consist of a grid listing the individuals and it will provide a mechanism to add new exam records and edit / delete existing ones. So without delay, I bring you the construction and implementation of a DNN 2.0 custom module.
Step 1: Design and Implement the Data Store Layer
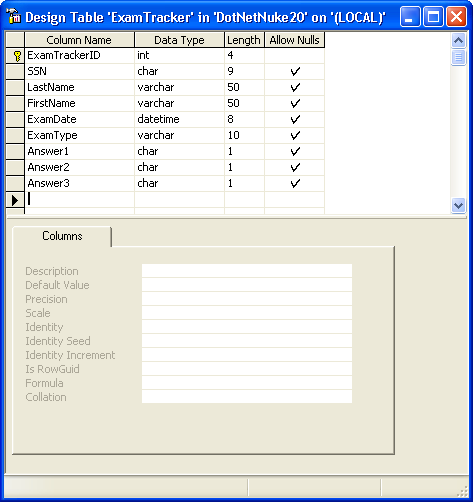
Create a table to store the individual exam records. I created a table called ExamTracker (Figure 9) as well as the required stored procedures to access the data (Listing 2).
Step 2: Construct the Data Access Layer and Business Logic Layer
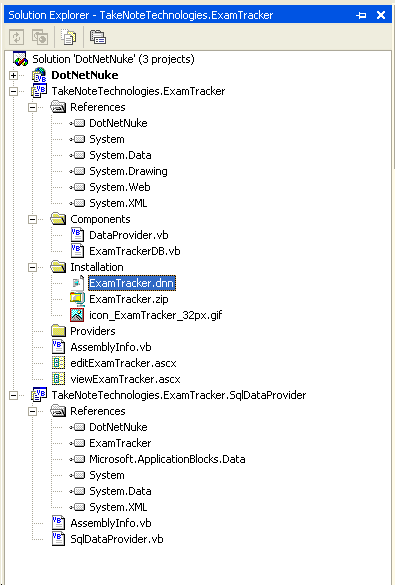
Create the Data Access layer (representing the testing company in the earlier example) and associated Business Logic later (representing the testing administrator). In this step I will create a couple of new projects and populate them with classes. The following list walks you through creating these layers.
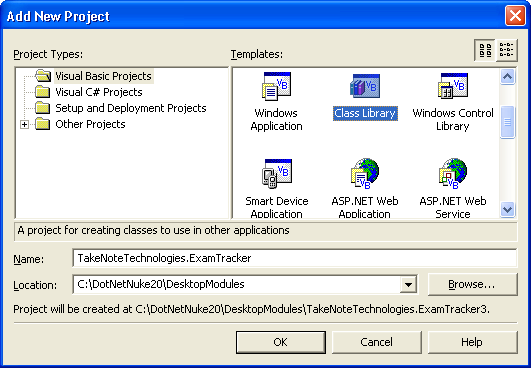
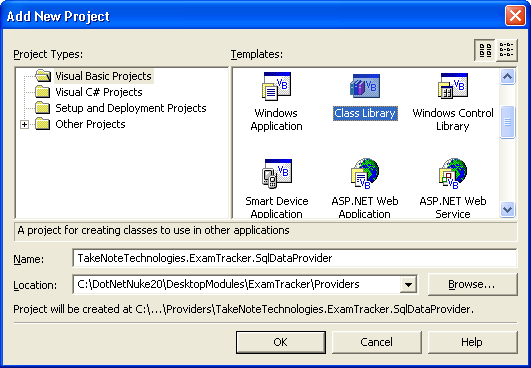
Build the DotNetNuke solution at this point. Enter information about your module in the AssemblyInfo.vb file for both projects just make sure you are consistent and enter the same information.
Referring to the standardized exam example, the DataProvider and SqlDataProvider classes combined act as the exam company. The ExamTrackerInfo and ExamTrackerController classes combined act as the exam administrator.
Step 3: Construct the Presentation Layer
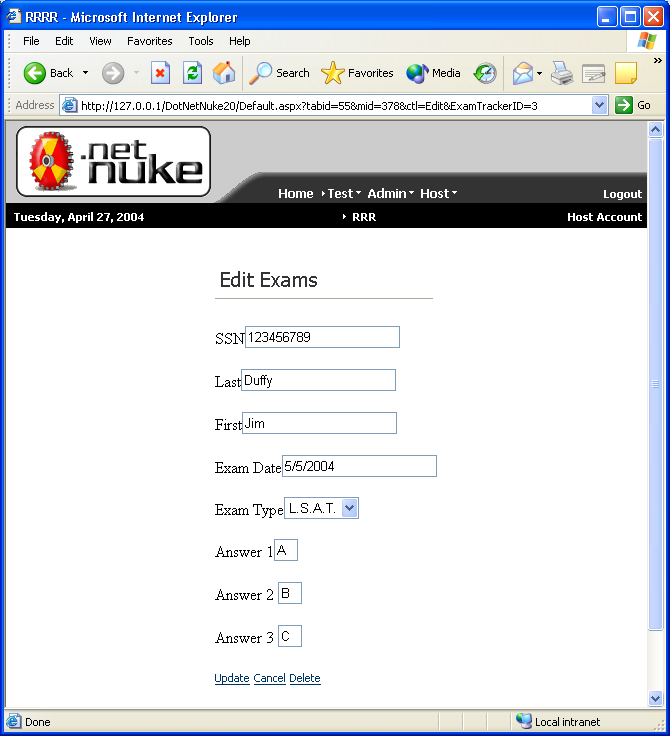
With the Data Store layer and Data Access layer implementation complete, let's create the Presentation layer portion of the module. The user interface will consist of two pieces. The initially displayed piece will list all the individual exam results and the second piece will provide a place to edit existing records or add new exam results.
The DotNetNuke.PortalModuleControl class contains properties and methods required by DNN to inject custom modules into a page. The ModuleID is a significant property. It tracks the ModuleID of the current module. To keep things simple I choose not to use this feature here. You can create modules so that you can use them on multiple tabs. Many of the included modules take advantage of this design feature. For example, you can add the Announcements module on multiple tabs across a site and each Announcement module retains its information independently of the others. I could have implemented this in the ExamTracker module by adding a ModuleID field to the ExamTracker table, modifying the stored procedures to accept and return the ModuleID, and modifying the data access methods to accept a ModuleID parameter. I will leave implementing that to you as an experiment once you get the module working.
The MyBase.Actions.Add call in the Page_Init is the first item of interest in this file.
' declare module actions
MyBase.Actions.Add(GetNextActionID,
     "Add New Exam", _
   "", URL:=EditURL(), _
   secure:=SecurityAccessLevel.Edit, _
   Visible:=True)
This snippet adds the option to add a new exam when the user selects the menu next to the module title. Add additional lines here for additional options.
The Page_Load contains the code that retrieves the existing ExamTracker records and binds them to the datagrid.
Step 4: Prepare the Module to be Installed
Now comes the moment you have been waiting for?testing to see if all this work pays off. Before you can test a module you first need to upload it to a DNN 2.0 site. The process of installing a private assembly, (ExamTracker is a private assembly) is fairly straightforward. But what is a private assembly? A private assembly can only be used by a single application as opposed to a global assembly which you can use across multiple applications.
The DNN 2.0 development team has made installing custom modules (private assemblies) very easy. First, zip up all the files that make up the module. Next, log in as Host and upload the zip file through the File Manager. That's all there is to it. I'll walk you through the steps.
The 01.00.00.SqlDataProvider file contains the T-SQL code to create all the necessary database objects required by the module. I scripted the ExamTracker table and the related stored procedures to create the 01.00.00.SqlDataProvider file. The Uninstall.SqlDataProvider is the SQL code to drop the stored procedures and the ExamTracker.
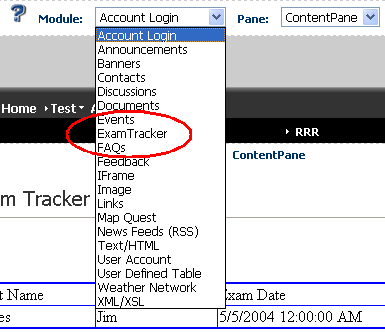
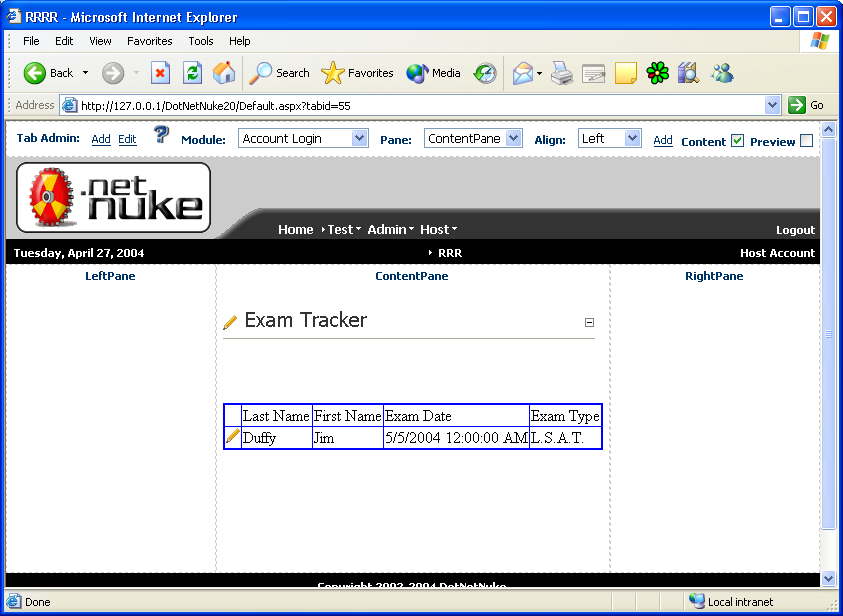
Step 5: Using Your New Module
Now select a tab and drop your new module on it. If all went well you should see the ExamTracker module listed in the module drop down (Figure 13). You should be able to place the module on a tab and see it work (Figure 14 and Figure 15).
Custom Module Recap
Time and space have limited the depth I could go into regarding developing custom modules. Once you master creating the ExamTracker module I am sure you will want to expand your horizons and check out other modules. One of the best resources to help you understand how to build your own custom modules is to check out how the pre-built ones work. The Survey and UsersOnLine modules that ship with DNN 2.0 are a great place to get started looking at other modules. Table 2 has a number of other resources you can use when creating your own modules.
Summary
I told you I was excited about DNN 2.0 in my last DNN article and now you know why. With DNN 2.0, more and more people are discovering what others already know?DotNetNuke rocks! The DotNetNuke open source community infrastructure is continuing to grow. It is currently over 45,000 members!
I'd like to take this opportunity to again thank Shaun Walker and the DNN Core Team for their hard work and dedication to delivering a fine piece of software. Great job!!
Listing 1: The web.config file has undergone substantial changes, most notable is the addition of the Providers collection
<dotnetnuke>
   <data defaultProvider="SqlDataProvider" >
      <providers>
         <clear/>
         <add name = "SqlDataProvider"
              type = "DotNetNuke.Data.SqlDataProvider,
DotNetNuke.SqlDataProvider"
              connectionString = "Server=localhost;Database=
DotNetNuke20;uid=sa;pwd=sysadm;"
           providerPath = "~\Providers\DataProviders\SqlDataProvider\"
              objectQualifier = ""
              databaseOwner = "dbo"
          />
          <add name = "AccessDataProvider"
               type = "DotNetNuke.Data.AccessDataProvider, DotNetNuke.AccessDataProvider"
               connectionString = "PROVIDER=Microsoft.Jet.OLEDB.4.0;"
            providerPath = "~\Providers\DataProviders\AccessDataProvider\"
               objectQualifier = "DotNetNuke"
               databaseFilename = "DotNetNuke.mdb"
                />
      </providers>
   </data>
</dotnetnuke>
Listing 2: The ExamTracker stored procedures used in the Exam Tracker custom module
/* AddExamTracker */
CREATE PROCEDURE dbo.AddExamTracker
   @SSN char(9),
   @LastName varchar(50),
   @FirstName varchar(50),
   @ExamDate datetime,
   @ExamType varchar(10),
   @Answer1 char(1),
   @Answer2 char(1),
   @Answer3 char(1)
AS

INSERT INTO dbo.ExamTracker (
   SSN,
   LastName,
   FirstName,
   ExamDate,
   ExamType,
   Answer1,
   Answer2,
   Answer3
) VALUES (
   @SSN,
   @LastName,
   @FirstName,
   @ExamDate,
   @ExamType,
   @Answer1,
   @Answer2,
   @Answer3)

select SCOPE_IDENTITY()

/* DeleteExamTracker */
CREATE PROCEDURE dbo.DeleteExamTracker
   @ExamTrackerID int
AS

DELETE FROM dbo.ExamTracker
WHERE   ExamTrackerID = @ExamTrackerID

/* GetExamTracker */
CREATE PROCEDURE dbo.GetExamTracker
   @ExamTrackerID int
AS

SELECT
   ExamTrackerID,
   SSN,
   LastName,
   FirstName,
   ExamDate,
   ExamType,
   Answer1,
   Answer2,
   Answer3
FROM ExamTracker
WHERE ExamTrackerID = @ExamTrackerID

/* GetExamTrackerList */
CREATE PROCEDURE dbo.GetExamTrackerList
AS

SELECT
   ExamTrackerID,
   SSN,
   LastName,
   FirstName,
   ExamDate,
   ExamType,
   Answer1,
   Answer2,
   Answer3
FROM ExamTracker

/* InsertExamTracker */
CREATE PROCEDURE dbo.InsertExamTracker
   @SSN char(9),
   @LastName varchar(50),
   @FirstName varchar(50),
   @ExamDate datetime,
   @ExamType varchar(10),
   @Answer1 char(1),
   @Answer2 char(1),
   @Answer3 char(1),
   @ExamTrackerID int OUTPUT
AS

INSERT INTO dbo.ExamTracker (
   SSN,
   LastName,
   FirstName,
   ExamDate,
   ExamType,
   Answer1,
   Answer2,
   Answer3
) VALUES (
   @SSN,
   @LastName,
   @FirstName,
   @ExamDate,
   @ExamType,
   @Answer1,
   @Answer2,
   @Answer3
)

SET @ExamTrackerID = @@IDENTITY

/* UpdateExamTracker */
CREATE PROCEDURE dbo.UpdateExamTracker
   @ExamTrackerID int,
   @SSN char(9),
   @LastName varchar(50),
   @FirstName varchar(50),
   @ExamDate datetime,
   @ExamType varchar(10),
   @Answer1 char(1),
   @Answer2 char(1),
   @Answer3 char(1)
AS

UPDATE dbo.ExamTracker SET
   SSN = @SSN,
   LastName = @LastName,
   FirstName = @FirstName,
   ExamDate = @ExamDate,
   ExamType = @ExamType,
   Answer1 = @Answer1,
   Answer2 = @Answer2,
   Answer3 = @Answer3
WHERE
   ExamTrackerID = @ExamTrackerID
Listing 3: The DataProvider abstract class contains the Instance method and data access method stubs
'Exam Tracker DataProvider
Imports System
Imports System.Web.Caching
Imports System.Reflection

Namespace TakeNoteTechnologies.ExamTracker

    Public MustInherit Class DataProvider

        ' provider constants - eliminates need for Reflection later
        Private Const [ProviderType] As String = "data" _
       ' maps to <sectionGroup> in web.config
        Private Const [NameSpace] As String = "TakeNoteTechnologies.ExamTracker" ' project namespace
        Private Const [AssemblyName] As String = "TakeNoteTechnologies.ExamTracker" ' project assemblyname


        Public Shared Shadows Function Instance() As DataProvider

            Dim strCacheKey As String = [NameSpace] & "." & [ProviderType] & "provider"

            ' Use the cache because the reflection used later is expensive
            Dim cache As System.Web.Caching.Cache = System.Web.HttpContext.Current.Cache

            If cache(strCacheKey) Is Nothing Then

                ' Get the provider configuration based on the type
                Dim objProviderConfiguration As DotNetNuke.ProviderConfiguration = DotNetNuke.ProviderConfiguration.GetProviderConfiguration([ProviderType])

                ' The assembly should be in \bin or GAC, so we simply need to get an instance of the type
                Try

                    ' Override the typename if a ProviderName is specified ( this allows the application to load a different DataProvider assembly for custom modules )
                    Dim strTypeName As String = [NameSpace] & "." & objProviderConfiguration.DefaultProvider & "," & [AssemblyName] & "." & objProviderConfiguration.DefaultProvider

                    ' Use reflection to store the constructor of the class that implements DataProvider
                    Dim t As Type = Type.GetType(strTypeName, True)

                    ' Insert the type into the cache
                    cache.Insert(strCacheKey, t.GetConstructor(System.Type.EmptyTypes))

                Catch e As Exception

                End Try
            End If

            Return CType(CType(cache(strCacheKey), ConstructorInfo).Invoke(Nothing), DataProvider)

        End Function

        Public MustOverride Function GetExamTrackerList() As IDataReader
        Public MustOverride Function GetExamTracker(ByVal ExamTrackerID As Integer) As IDataReader
        Public MustOverride Sub DeleteExamTracker(ByVal ExamTrackerID As Integer)
        Public MustOverride Function AddExamTracker(ByVal SSN As String, ByVal LastName As String, ByVal FirstName As String, ByVal ExamDate As DateTime, ByVal ExamType As String, ByVal Answer1 As String, ByVal Answer2 As String, ByVal Answer3 As String) As Integer
        Public MustOverride Sub UpdateExamTracker(ByVal ExamTrackerID As Integer, ByVal SSN As String, ByVal LastName As String, ByVal FirstName As String, ByVal ExamDate As DateTime, ByVal ExamType As String, ByVal Answer1 As String, ByVal Answer2 As String, ByVal Answer3 As String)

    End Class
End Namespace
Listing 4: The SqlDataProvider concrete class contains the implementation code for the data access methods
'Exam tracker SqlDataProvider
Imports System
Imports System.Data
Imports System.Data.SqlClient
Imports Microsoft.ApplicationBlocks.Data
Imports DotNetNuke

Namespace TakeNoteTechnologies.ExamTracker

    Public Class SqlDataProvider

        Inherits TakeNoteTechnologies.ExamTracker.DataProvider

        Private Const [ProviderType] As String = "data" ' maps to <sectionGroup> in web.config

        Private _providerConfiguration As ProviderConfiguration = ProviderConfiguration.GetProviderConfiguration([ProviderType])
        Private _connectionString As String
        Private _providerPath As String
        Private _objectQualifier As String
        Private _databaseOwner As String

        Public Sub New()

            ' Read the configuration specific information for this provider
            Dim objProvider As Provider = CType(_providerConfiguration.Providers(_providerConfiguration.DefaultProvider), Provider)

            ' Read the attributes for this provider
            _connectionString = objProvider.Attributes("connectionString")

            _providerPath = objProvider.Attributes("providerPath")

            _objectQualifier = objProvider.Attributes("objectQualifier")
            If _objectQualifier <> "" And _objectQualifier.EndsWith("_") = False Then
                _objectQualifier += "_"
            End If

            _databaseOwner = objProvider.Attributes("databaseOwner")
            If _databaseOwner <> "" And _databaseOwner.EndsWith(".") = False Then
                _databaseOwner += "."
            End If

        End Sub

        Public ReadOnly Property ConnectionString() As String
            Get
                Return _connectionString
            End Get
        End Property

        Public ReadOnly Property ProviderPath() As String
            Get
                Return _providerPath
            End Get
        End Property

        Public ReadOnly Property ObjectQualifier() As String
            Get
                Return _objectQualifier
            End Get
        End Property

        Public ReadOnly Property DatabaseOwner() As String
            Get
                Return _databaseOwner
            End Get
        End Property

        ' general
        Private Function GetNull(ByVal objField As Object) As Object
            Return Null.GetNull(objField, DBNull.Value)
        End Function

#Region "Exam Tracker Methods"
        Public Overrides Function GetExamTrackerList() As IDataReader
            Return CType(SqlHelper.ExecuteReader(ConnectionString, DatabaseOwner & ObjectQualifier & "GetExamTrackerList"), IDataReader)
        End Function

        Public Overrides Function GetExamTracker(ByVal ExamTrackerID As Integer) As IDataReader
            Return CType(SqlHelper.ExecuteReader(ConnectionString, DatabaseOwner & ObjectQualifier & "GetExamTracker", ExamTrackerID), IDataReader)
        End Function

        Public Overrides Sub DeleteExamTracker(ByVal ExamTrackerID As Integer)
            SqlHelper.ExecuteNonQuery(ConnectionString, DatabaseOwner & ObjectQualifier & "DeleteExamTracker", ExamTrackerID)
        End Sub

        Public Overrides Function AddExamTracker(ByVal SSN As String, ByVal lastName As String, ByVal firstName As String, ByVal examDate As DateTime, ByVal examType As String, ByVal answer1 As String, ByVal answer2 As String, ByVal answer3 As String) As Integer
            Return CType(SqlHelper.ExecuteScalar(ConnectionString, DatabaseOwner & ObjectQualifier & "AddExamTracker", GetNull(SSN), GetNull(lastName), GetNull(firstName), GetNull(examDate), GetNull(examType), GetNull(answer1), GetNull(answer2), GetNull(answer3)), Integer)
        End Function

        Public Overrides Sub UpdateExamTracker(ByVal examID As Integer, ByVal SSN As String, ByVal lastName As String, ByVal firstName As String, ByVal examDate As DateTime, ByVal examType As String, ByVal answer1 As String, ByVal answer2 As String, ByVal answer3 As String)
            SqlHelper.ExecuteNonQuery(ConnectionString, DatabaseOwner & ObjectQualifier & "UpdateExamTracker", examID, GetNull(SSN), GetNull(lastName), GetNull(firstName), GetNull(examDate), GetNull(examType), GetNull(answer1), GetNull(answer2), GetNull(answer3))
        End Sub
#End Region

    End Class

End Namespace
Listing 5: The ExamtrackerDB.vb file contains two classes: ExamTrackerInfo and ExamTrackerController
'Exam Tracker BLL
Imports System
Imports System.Data
Imports DotNetNuke

Namespace TakeNoteTechnologies.ExamTracker

#Region "ExamTracker Info"
    Public Class ExamTrackerInfo

        ' local property declarations
        Dim _ExamTrackerID As Integer
        Dim _SSN As String
        Dim _LastName As String
        Dim _FirstName As String
        Dim _ExamDate As DateTime
        Dim _ExamType As String
        Dim _Answer1 As String
        Dim _Answer2 As String
        Dim _Answer3 As String

        ' initialization
        Public Sub New()
        End Sub 'New

#Region "Public Properties"
        Public Property ExamTrackerID() As Integer
            Get
                Return _ExamTrackerID
            End Get
            Set(ByVal Value As Integer)
                _ExamTrackerID = Value
            End Set
        End Property

        Public Property SSN() As String
            Get
                Return _SSN
            End Get
            Set(ByVal Value As String)
                _SSN = Value
            End Set
        End Property

        Public Property LastName() As String
            Get
                Return _LastName
            End Get
            Set(ByVal Value As String)
                _LastName = Value
            End Set
        End Property

        Public Property FirstName() As String
            Get
                Return _FirstName
            End Get
            Set(ByVal Value As String)
                _FirstName = Value
            End Set
        End Property

        Public Property ExamDate() As DateTime
            Get
                Return _ExamDate
            End Get
            Set(ByVal Value As DateTime)
                _ExamDate = Value
            End Set
        End Property

        Public Property ExamType() As String
            Get
                Return _ExamType
            End Get
            Set(ByVal Value As String)
                _ExamType = Value
            End Set
        End Property

        Public Property Answer1() As String
            Get
                Return _Answer1
            End Get
            Set(ByVal Value As String)
                _Answer1 = Value
            End Set
        End Property

        Public Property Answer2() As String
            Get
                Return _Answer2
            End Get
            Set(ByVal Value As String)
                _Answer2 = Value
            End Set
        End Property

        Public Property Answer3() As String
            Get
                Return _Answer3
            End Get
            Set(ByVal Value As String)
                _Answer3 = Value
            End Set
        End Property
#End Region
    End Class
#End Region

#Region "ExamTracker Controller"
    Public Class ExamTrackerController

        Public Function GetExamTrackerList() As ArrayList

            Return CBO.FillCollection(TakeNoteTechnologies.ExamTracker.DataProvider.Instance().GetExamTrackerList(), GetType(ExamTrackerInfo))

        End Function

        Public Function GetExamTracker(ByVal ExamTrackerID As Integer) As ExamTrackerInfo

            Return CType(CBO.FillObject(TakeNoteTechnologies.ExamTracker.DataProvider.Instance().GetExamTracker(ExamTrackerID), GetType(ExamTrackerInfo)), ExamTrackerInfo)

        End Function

        Public Sub DeleteExamTracker(ByVal ExamTrackerID As Integer)

            TakeNoteTechnologies.ExamTracker.DataProvider.Instance().DeleteExamTracker(ExamTrackerID)

        End Sub

        Public Function AddExamTracker(ByVal objExamTracker As ExamTrackerInfo) As Integer

            Return CType(TakeNoteTechnologies.ExamTracker.DataProvider.Instance().AddExamTracker(objExamTracker.SSN, objExamTracker.LastName, objExamTracker.FirstName, objExamTracker.ExamDate, objExamTracker.ExamType, objExamTracker.Answer1, objExamTracker.Answer2, objExamTracker.Answer3), Integer)

        End Function

        Public Sub UpdateExamTracker(ByVal objExamTracker As ExamTrackerInfo)

            TakeNoteTechnologies.ExamTracker.DataProvider.Instance().UpdateExamTracker(objExamTracker.ExamTrackerID, objExamTracker.SSN, objExamTracker.LastName, objExamTracker.FirstName, objExamTracker.ExamDate, objExamTracker.ExamType, objExamTracker.Answer1, objExamTracker.Answer2, objExamTracker.Answer3)

        End Sub

    End Class
#End Region

End Namespace
Listing 6: The viewEventTracker.ascx file contains the grid that lists the exam results
<%@ Control Language="vb" AutoEventWireup="false" Codebehind="<a href="http://viewExamTracker.ascx.vb">viewExamTracker.ascx.vb</a>" Inherits="TakeNoteTechnologies.ExamTracker.viewExamTracker" %>
<P>&nbsp;</P>
<asp:DataGrid id="grdExamTracker" runat="server" AutoGenerateColumns="False" BorderColor="Blue"
BorderWidth="2px" Width="100%">
<AlternatingItemStyle BackColor="DarkOrange"></AlternatingItemStyle>
<Columns>
<asp:TemplateColumn>
<ItemTemplate>
<asp:HyperLink id=hlExamTrackerID runat="server" Visible="<%# IsEditable %>" NavigateUrl='<%# EditURL("ExamTrackerID",DataBinder.Eval(Container.DataItem,"ExamTrackerID")) %>' ImageUrl="edit.gif">
</asp:HyperLink>
</ItemTemplate>
</asp:TemplateColumn>
<asp:BoundColumn DataField="LastName" ReadOnly="True" HeaderText="Last Name"></asp:BoundColumn>
<asp:BoundColumn DataField="FirstName" ReadOnly="True" HeaderText="First Name"></asp:BoundColumn>
<asp:BoundColumn DataField="ExamDate" ReadOnly="True" HeaderText="Exam Date"></asp:BoundColumn>
<asp:BoundColumn DataField="ExamType" ReadOnly="True" HeaderText="Exam Type"></asp:BoundColumn>
</Columns>
</asp:DataGrid>
Listing 7: The viewEventTracker.ascx,vb file contains the code that controls the viewExamTracker user control
Imports System
Imports System.Web
Imports <a href="http://System.Web.UI">System.Web.UI</a>
Imports <a href="http://System.Web.UI">System.Web.UI</a>.WebControls
Imports DotNetNuke
Namespace TakeNoteTechnologies.ExamTracker
Public Class viewExamTracker
Inherits DotNetNuke.PortalModuleControl
#Region " Web Form Designer Generated Code "
'This call is required by the Web Form Designer.
<System.Diagnostics.DebuggerStepThrough()> Private Sub InitializeComponent()
End Sub
Protected WithEvents grdExamTracker As <a href="http://System.Web.UI">System.Web.UI</a>.WebControls.DataGrid
'NOTE: The following placeholder declaration is required by the Web Form Designer.
'Do not delete or move it.
Private designerPlaceholderDeclaration As System.Object
Private Sub Page_Init(ByVal sender As System.Object, ByVal e As System.EventArgs) Handles MyBase.Init
'CODEGEN: This method call is required by the Web Form Designer
'Do not modify it using the code editor.
InitializeComponent()
' declare module actions
MyBase.Actions.Add(GetNextActionID, "Add New Exam", "", URL:=EditURL(), secure:=SecurityAccessLevel.Edit, Visible:=True)
End Sub
#End Region
Private Sub Page_Load(ByVal sender As System.Object, ByVal e As System.EventArgs) Handles MyBase.Load
'Put user code to initialize the page here
Dim objExamTracker As New ExamTrackerController
Dim list As ArrayList
If Not Page.IsPostBack Then
list = objExamTracker.GetExamTrackerList()
Me.grdExamTracker.DataSource = list
Me.grdExamTracker.DataBind()
End If
End Sub
End Class
End Namespace
Listing 8: The editEventTracker.ascx file contains the data entry controls for editing or adding a new ExamTracker record
<%@ Control Language="vb" AutoEventWireup="false" Codebehind="<a href="http://editExamTracker.ascx.vb">editExamTracker.ascx.vb</a>" Inherits="TakeNoteTechnologies.ExamTracker.editExamTracker"%>
<P><asp:label id="lblSSN" runat="server">SSN</asp:label><asp:textbox id="txtSSN" runat="server"></asp:textbox></P>
<P><asp:label id="Label1" runat="server">Last</asp:label><asp:textbox id="txtLastName" runat="server"></asp:textbox></P>
<P><asp:label id="Label2" runat="server">First</asp:label><asp:textbox id="txtFirstName" runat="server"></asp:textbox></P>
<P><asp:label id="Label3" runat="server">Exam Date</asp:label><asp:textbox id="txtExamDate" runat="server"></asp:textbox></P>
<P><asp:label id="Label4" runat="server">Exam Type</asp:label><asp:dropdownlist id="cboExamType" runat="server">
<asp:ListItem></asp:ListItem>
<asp:ListItem Value="S.A.T.">S.A.T.</asp:ListItem>
<asp:ListItem Value="G.R.E.">G.R.E.</asp:ListItem>
<asp:ListItem Value="L.S.A.T.">L.S.A.T.</asp:ListItem>
</asp:dropdownlist></P>
<P><asp:label id="Label5" runat="server">Answer 1</asp:label><asp:textbox id="txtAnswer1" runat="server" MaxLength="1" Width="24px"></asp:textbox></P>
<P>
<asp:Label id="Label6" runat="server">Answer 2</asp:Label>
<asp:TextBox id="txtAnswer2" runat="server" MaxLength="1" Width="24px"></asp:TextBox></P>
<P>
<asp:Label id="Label7" runat="server">Answer 3</asp:Label>
<asp:TextBox id="txtAnswer3" runat="server" MaxLength="1" Width="24px"></asp:TextBox></P>
<P>
<asp:linkbutton id="cmdUpdate" CssClass="CommandButton" runat="server" BorderStyle="None">Update</asp:linkbutton>
<asp:linkbutton id="cmdCancel" CssClass="CommandButton" runat="server" CausesValidation="False"
BorderStyle="None">Cancel</asp:linkbutton>
<asp:linkbutton id="cmdDelete" CssClass="CommandButton" runat="server" CausesValidation="False"
BorderStyle="None" Visible="False">Delete</asp:linkbutton></P>
Listing 9: The editExamTracker.ascx,vb file contains the code that loads, saves, deletes, or cancels changes in the ExamTracker user control
'Edit Exam Tracker
Imports System
Imports System.Web
Imports <a href="http://System.Web.UI">System.Web.UI</a>
Imports <a href="http://System.Web.UI">System.Web.UI</a>.WebControls
Imports DotNetNuke
Namespace TakeNoteTechnologies.ExamTracker
Public Class editExamTracker
Inherits DotNetNuke.PortalModuleControl
Private ExamTrackerId As Integer
#Region " Web Form Designer Generated Code "
'This call is required by the Web Form Designer.
<System.Diagnostics.DebuggerStepThrough()> Private Sub InitializeComponent()
End Sub
Protected WithEvents lblSSN As <a href="http://System.Web.UI">System.Web.UI</a>.WebControls.Label
Protected WithEvents txtSSN As <a href="http://System.Web.UI">System.Web.UI</a>.WebControls.TextBox
Protected WithEvents Label1 As <a href="http://System.Web.UI">System.Web.UI</a>.WebControls.Label
Protected WithEvents txtLastName As <a href="http://System.Web.UI">System.Web.UI</a>.WebControls.TextBox
Protected WithEvents Label2 As <a href="http://System.Web.UI">System.Web.UI</a>.WebControls.Label
Protected WithEvents txtFirstName As <a href="http://System.Web.UI">System.Web.UI</a>.WebControls.TextBox
Protected WithEvents Label3 As <a href="http://System.Web.UI">System.Web.UI</a>.WebControls.Label
Protected WithEvents txtExamDate As <a href="http://System.Web.UI">System.Web.UI</a>.WebControls.TextBox
Protected WithEvents Label4 As <a href="http://System.Web.UI">System.Web.UI</a>.WebControls.Label
Protected WithEvents cboExamType As <a href="http://System.Web.UI">System.Web.UI</a>.WebControls.DropDownList
Protected WithEvents Label5 As <a href="http://System.Web.UI">System.Web.UI</a>.WebControls.Label
Protected WithEvents txtAnswer1 As <a href="http://System.Web.UI">System.Web.UI</a>.WebControls.TextBox
Protected WithEvents Label6 As <a href="http://System.Web.UI">System.Web.UI</a>.WebControls.Label
Protected WithEvents txtAnswer2 As <a href="http://System.Web.UI">System.Web.UI</a>.WebControls.TextBox
Protected WithEvents Label7 As <a href="http://System.Web.UI">System.Web.UI</a>.WebControls.Label
Protected WithEvents txtAnswer3 As <a href="http://System.Web.UI">System.Web.UI</a>.WebControls.TextBox
Protected WithEvents cmdUpdate As <a href="http://System.Web.UI">System.Web.UI</a>.WebControls.LinkButton
Protected WithEvents cmdCancel As <a href="http://System.Web.UI">System.Web.UI</a>.WebControls.LinkButton
Protected WithEvents cmdDelete As <a href="http://System.Web.UI">System.Web.UI</a>.WebControls.LinkButton
'NOTE: The following placeholder declaration is required by the Web Form Designer.
'Do not delete or move it.
Private designerPlaceholderDeclaration As System.Object
Private Sub Page_Init(ByVal sender As System.Object, ByVal e As System.EventArgs) Handles MyBase.Init
'CODEGEN: This method call is required by the Web Form Designer
'Do not modify it using the code editor.
InitializeComponent()
End Sub
#End Region
Private Sub Page_Load(ByVal sender As System.Object, ByVal e As System.EventArgs) Handles MyBase.Load
Dim objCtlExamTracker As New ExamTrackerController
Dim objExamTracker As New ExamTrackerInfo
' Determine ItemId
If Not (Request.Params("ExamTrackerID") Is Nothing) Then
ExamTrackerId = Int32.Parse(Request.Params("ExamTrackerID"))
Else
ExamTrackerId = Convert.ToInt32(Null.SetNull(ExamTrackerId))
End If
If Not Page.IsPostBack Then
cmdDelete.Attributes.Add("onClick", "javascript:return confirm('Are You Sure You Wish To Delete This Item ?');")
If ExamTrackerId <> -1 Then
objExamTracker = objCtlExamTracker.GetExamTracker(ExamTrackerId)
If Not objExamTracker Is Nothing Then
'Load data
With objExamTracker
Me.txtSSN.Text = .SSN
Me.txtLastName.Text = .LastName
Me.txtFirstName.Text = .FirstName
Me.txtExamDate.Text = .ExamDate.ToShortDateString
Me.cboExamType.SelectedValue = .ExamType
Me.txtAnswer1.Text = .Answer1
Me.txtAnswer2.Text = .Answer2
Me.txtAnswer3.Text = .Answer3
End With
Me.cmdDelete.Visible = True
Else ' security violation attempt to access item not related to this Module
Response.Redirect(NavigateURL(), True)
End If
End If
End If
End Sub
Private Sub cmdUpdate_Click(ByVal sender As Object, ByVal e As EventArgs) Handles cmdUpdate.Click
Try
' Only Update if the Entered Data is Valid
If Page.IsValid = True Then
Dim objExamTracker As New ExamTrackerInfo
objExamTracker = CType(CBO.InitializeObject(objExamTracker, GetType(ExamTrackerInfo)), ExamTrackerInfo)
With objExamTracker
'bind text values to object
'objExamTracker.ModuleId = ModuleId
.ExamTrackerID = ExamTrackerId
.SSN = Me.txtSSN.Text
.LastName = Me.txtLastName.Text
.FirstName = Me.txtFirstName.Text
.ExamDate = CDate(Me.txtExamDate.Text)
.ExamType = Me.cboExamType.SelectedValue
.Answer1 = Me.txtAnswer1.Text
.Answer2 = Me.txtAnswer2.Text
.Answer3 = Me.txtAnswer3.Text
'add code
End With
Dim objCtlExamTracker As New ExamTrackerController
If Null.IsNull(ExamTrackerId) Then
objCtlExamTracker.AddExamTracker(objExamTracker)
Else
objCtlExamTracker.UpdateExamTracker(objExamTracker)
End If
' Redirect back to the portal home page
Response.Redirect(NavigateURL(), True)
End If
Catch exc As Exception 'Module failed to load
ProcessModuleLoadException(Me, exc)
End Try
End Sub
Private Sub cmdCancel_Click(ByVal sender As Object, ByVal e As EventArgs) Handles cmdCancel.Click
Try
Response.Redirect(NavigateURL(), True)
Catch exc As Exception 'Module failed to load
ProcessModuleLoadException(Me, exc)
End Try
End Sub
Private Sub cmdDelete_Click(ByVal sender As Object, ByVal e As EventArgs) Handles cmdDelete.Click
Try
If Not Null.IsNull(ExamTrackerId) Then
Dim objCtlExamTracker As New ExamTrackerController
objCtlExamTracker.DeleteExamTracker(ExamTrackerId)
End If
' Redirect back to the portal home page
Response.Redirect(NavigateURL(), True)
Catch exc As Exception 'Module failed to load
ProcessModuleLoadException(Me, exc)
End Try
End Sub
End Class
End Namespace
Listing 10: The ExamTracker.dnn manifest file that is used by DNN when uploading a module
<?xml version="1.0" encoding="utf-8" ?>
<dotnetnuke version="2.0" type="Module">
  <folders>
    <folder>
<name>ExamTracker</name>
   <description>Exam tracker from CoDe magazine</description>
   <version>01.00.00</version>
   <modules>
        <module>
      <friendlyname>Exam Tracker</friendlyname>
         <controls>
         <control>
            <title>View Exams</title>
            <src>viewExamTracker.ascx</src>
            <type>View</type>
         </control>
            <control>
            <key>Edit</key>
            <title>Edit Exams</title>
            <src>editExamTracker.ascx</src>
            <type>Edit</type>
         </control>
      </controls>
      </module>
   </modules>
   <files>
      <file>
      <name>viewExamTracker.ascx</name>
      </file>
      <file>
      <name>editExamTracker.ascx</name>
      </file>
      <file>
      <name>01.00.00.SqlDataProvider</name>
      </file>
      <file>
      <name>Uninstall.SqlDataProvider</name>
      </file>
      <file>
      <name>TakeNoteTechnologies.ExamTracker.dll</name>
      </file>
      <file>
  <name>TakeNoteTechnologies.ExamTracker.SqlDataProvider.dll</name>
      </file>
   </files>
   </folder>
</folders>
</dotnetnuke>
Table 1: Files to add to ExamTracker.zip
| www.dotnetnuke.com | Official Web site for DNN |
| dotnetvet.net/duh/ | Helpful DNN site |
| www.asp.net | Official DotNetNuke forums under Source Discussions |
| www.gotdotnet.com | DotNetNuke workspace |
| www.snowcovered.com | Commercial site for DotNetNuke custom modules and skins |
| www.wwwcoder.com | Portal developer resource directory |
| www.dotnetnuke.dk | Module creation resource |
| www.dnnskins.com | Free skins for DNN |
Table 1: Files to add to ExamTracker.zip
| File to add | Folder |
|---|---|
| YourCompanyName.ExamTracker.dll | \bin |
| YourCompanyName.ExamTracker.SqlDataProvider.dll | \bin |
| editExamTracker.ascx | YourCompanyName.ExamTracker |
| viewExamTracker.ascx | YourCompanyName.ExamTracker |
| ExamTracker.dnn | YourCompanyName.ExamTracker\Installation |
| 01.00.00.SqlDataProvider | YourCompanyName.ExamTracker\Installation |
| Uninstall.SqlDataProvider | YourCompanyName.ExamTracker\Installation |
Table 2: DNN 2.0 module creation resources.
| URL | Description |
|---|---|
| DNN 2.0 Project Templates (very handy to have) | http://lacolla.europe.webmatrixhosting.net/DesktopDefault.aspx?tabid=66&;PageID=6 |
| CodeSmith: FREEWARE template-based code generator | http://www.ericjsmith.net/codesmith/ |
| Scott McCulloch's site (DNN templates for CodeSmith and free modules) | http://www.smcculloch.net/DesktopDefault.aspx?tabid=58 |
| DotNetDoc | http://www.dotnetdoc.com |
| DotNetNuke.dk | http://beta.dotnetnuke.dk |
| DotNetNuke HandCoded | http://www.hgworks.com/handcoded/ |
| DotNetNuke Data Providers (MySQL data provider for DNN) | http://www.dnndp.com/ |