In the the previous installment, I Introduced Semantic Kernel (SK), Microsoft's framework for working with LLMs, which was in preview at the time. I didn't include any code in that article because Semantic Kernel was still changing fast and almost every line of code would likely have been out of date before you read it. So I promised a follow-up article that explored the code. Since then, SK went into beta and then Release Candidate, and, as I write this, V1 has just released and I expect that namespaces, type names, and arguments are now in their final form, or very close to it.
To follow along with the code in the article, you'll need access to an LLM. I'm using Azure OpenAI. As an alternative, you can connect to an OpenAI account.
Note: Although I don't have code for using OpenAI in this article, if you have an OpenAI development account, you can just replace the calls to AddAzureOpenAIChatCompletion with AddOpenAIChatCompletion and pass in your clientId instead of endpoint and apiKey.
From the Azure portal, choose Create a resource and search for OpenAI, and then click Create. As of this writing, the GPT-4 model is only available in three regions: Sweden Central, Canada East, and Switzerland North. For our purposes, select one of the above regions. Next, choose Keys and Endpoint from the menu on the left and copy Key 1 and the endpoint, as you'll need those soon.
Back on the Overview page for the Azure OpenAI resource, you'll be directed to the Azure OpenAI Studio web page. There's also now a preview version of the page, so it may change soon, but I'll stick with the current page for this article. On that Azure OpenAI Studio page, from the menu on the left-hand side, choose Deployments and create a new deployment. You can think of a deployment as an instance of a model. You can create as many deployments as your account is authorized for. Currently, that's about six deployments per resource. The most capable model available as I'm writing this is GPT-4 or GPT-4-32k. When it becomes available, GPT-4 Turbo should be both more powerful and less expensive. Most of the work you're going to do today can be done with GPT-35-turbo, except for the work you'll do with the Handlebars Planner. Planners work much better with GPT-4 or above. For the purposes of this article, choose the GPT-4 model.
Accept the default of using the latest version of the model and give it a name. To keep things simple, just name the deployment gpt-4 to match the model's name. You can choose Chat from the left-hand menu and try out your model. Type, “Tell me a joke” in the chat session window and submit.
Now that the LLM is ready, let's write some code. In Visual Studio or VS Code, create a new .NET 8 console application. Add the following NuGet packages:
- Microsoft.Extensions.Logging.Console
- Microsoft.SemanticKernel
- System.Configuration.ConfigurationManager
Modify your Program.cs file to look like this:
internal class Program
{
    private static string _endpoint;
    private static string _apiKey;

    static async Task Main(string[] args)
    {
        _endpoint = ConfigurationManager.AppSettings["endpoint"];
        _apiKey = ConfigurationManager.AppSettings["apiKey"];

        Console.Clear();

        await InlineFunctions();
    }
}
You'll need to add an App.config file to your project if there isn't one already and enter the endpoint and API key that you copied earlier. You can find in the Azure portal on your newly created Azure OpenAI resource under the Keys and Endpoint menu item.
<?xml version="1.0" encoding="utf-8" ?>
<configuration>
  <appSettings>
    <add key="endpoint" value="<your endpoint>"/>
    <add key="apikey" value="<your key>"/>
  </appSettings>
</configuration>
Next, add the body of the InlineFunctions() method, just below Main(), as shown in Listing 1.
Listing 1: Execute an online semantic function.
private static async Task InlineFunctions()
{
    var builder = Kernel.CreateBuilder();

    builder.Services
      .AddLogging(configure => configure.AddConsole())
      .AddAzureOpenAIChatCompletion(
          "gpt-4",  //deployment (not model) name
          _endpoint, _apiKey);

    var kernel = builder.Build();

    var prompt = """
        {{$input}}

        Rewrite the above in the style of Shakespeare.
        Be brief.
    """;

    var settings = new PromptExecutionSettings
        {
            ExtensionData = new Dictionary<string, object>
            {
                { "temperature", 0.9 }
            }
        };

    var shakespeareFunction = kernel
        .CreateFunctionFromPrompt(prompt, settings);

    var result = await kernel.InvokeAsync(
        shakespeareFunction,
        new KernelArguments
        {
            ["input"] = "I'm fascinated by AI technologies."
        });

    Console.WriteLine(result);
}
The code starts by creating a builder, much like the way you use builders to create web application hosts in ASP.NET Core. In this case, you're configuring the builder by adding console logging so you can see what the Semantic Kernel is doing as it works. This is why you included the Microsoft.Extensions.Logging.Console NuGet package. Like ASP.NET, you can use any logger available from Microsoft or create your own. I find the console logger great for development.
You then add an Azure OpenAI chat completion service and pass it the endpoint and API key you read from the config file, as well as the name of the deployment you created in Azure OpenAI Studio.
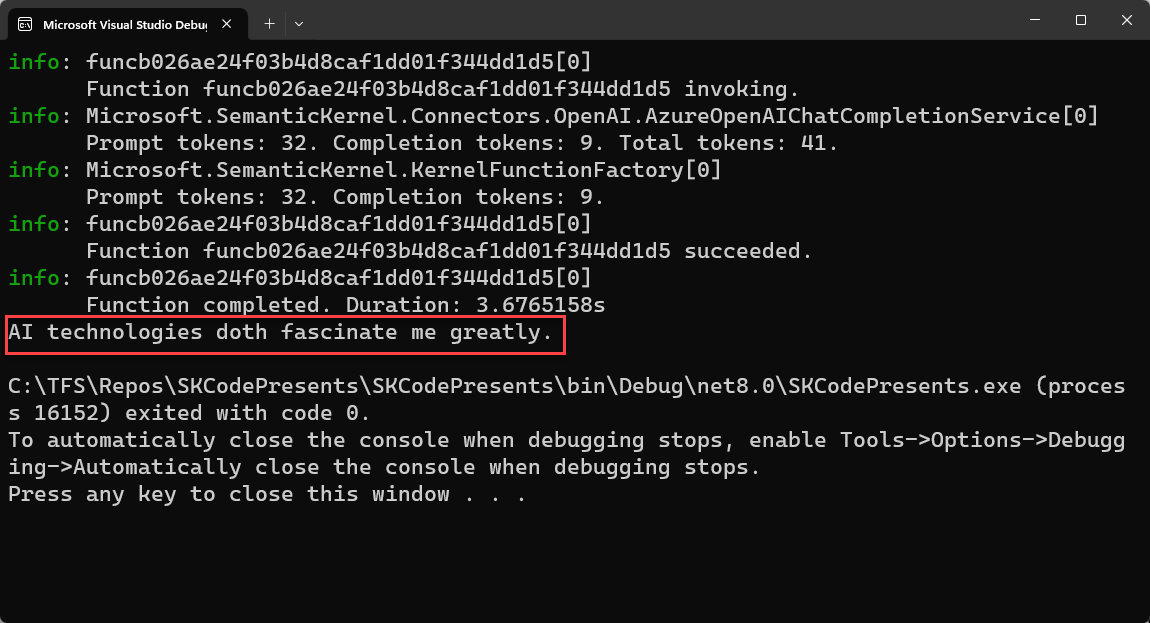
Next, create an instance of the kernel by calling the Build() method on the builder. The next few lines create a prompt and some settings for the prompt on the fly. This is called an inline semantic function and it's the equivalent of “hello world” in SK. Finally, call kernel.InvokeAsync(), passing the newly created function and the parameters you want it to use. In this case, the parameter is named “input” in the prompt, so assign the text to that parameter. Then write the response to the console window, as shown in Figure 1.
You can try changing the input text, or even getting input from the user, using Console.ReadLine().
Next, let's do something a little more realistic and read in the prompts and settings you're going to call from files on disk instead of hard coding them in the application. Back in the Main method, comment out the await InlineFunctions(); line and add a new line await BasicFunctions();. Then add the code from Listing 2 below the InlineFunctions method. Notice that I've commented out the AddLogging() call to minimize the output on screen.
Listing 2: Load prompts from disk and execute as semantic functions.
private static async Task BasicFunctions()
{
var builder = Kernel.CreateBuilder();
builder.Services
//.Services.AddLogging(configure =>
//configure.AddConsole())
.AddAzureOpenAIChatCompletion(
"gpt-4", _endpoint, _apiKey);
var kernel = builder.Build();
var functionDir = Path.Combine(Directory.GetCurrentDirectory(),
"Plugins", "Fun");
var semanticFunctions =
kernel.ImportPluginFromPromptDirectory(functionDir);
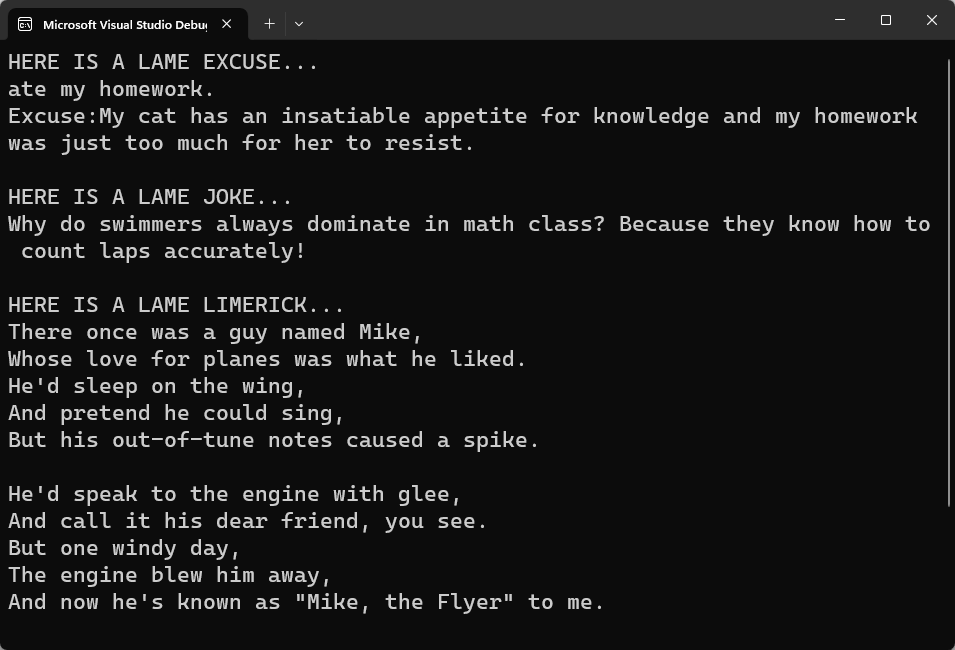
Console.WriteLine("HERE IS A LAME EXCUSE...");
var excuseResult = await kernel
.InvokeAsync(semanticFunctions["Excuses"],
new KernelArguments { ["input"] = "my cat" });
Console.WriteLine(excuseResult);
Console.WriteLine();
Console.WriteLine("HERE IS A LAME JOKE...");
var jokeResult = await kernel
.InvokeAsync(semanticFunctions["Joke"],
new KernelArguments { ["input"] = "swimming" });
Console.WriteLine(jokeResult);
Console.WriteLine();
Console.WriteLine("HERE IS A LAME LIMERICK...");
var arguments = new KernelArguments
{
["name"] = "Mike",
["input"] = "airplanes"
};
var limerickResult = await kernel
.InvokeAsync(semanticFunctions["Limerick"], arguments);
Console.WriteLine(limerickResult);
}
Next, add the files containing the prompts and settings you're going to use. You can copy the files from the source code that accompanies this article or create them by hand. To create them by hand, first, create a folder in the console project named Plugins. Under the Plugins folder, create a folder named Fun and under the Fun folder, create three folders named Excuses, Joke, and Limerick. In the Excuses folder, create a file named skprompt.txt and enter the text from the following code:
Generate a creative reason or excuse for the given event.
Be creative and be funny. Let your imagination run wild.

Event:I am running late.
Excuse:I was being held ransom by giraffe gangsters.

Event:{{$input}}
Also in the Excuses folder, create a second file named config.json and enter this text.
{
  "schema": 1,
  "description": "Turn a scenario into a creative
    or humorous excuse to send your boss",
  "type": "completion",
  "completion": {
      "max_tokens": 60,
      "temperature": 0.5,
      "top_p": 0.0,
      "presence_penalty": 0.0,
      "frequency_penalty": 0.0
  }
}
In the Joke folder, add an skprompt.txt file with the contents of this next snippet:
WRITE EXACTLY ONE JOKE or HUMOROUS STORY ABOUT THE TOPIC BELOW

JOKE MUST BE:
- G RATED
- WORKPLACE/FAMILY SAFE
NO SEXISM, RACISM OR OTHER BIAS/BIGOTRY

BE CREATIVE AND FUNNY. I WANT TO LAUGH.
Incorporate the style suggestion, if provided: {{$style}}
+++++

{{$input}}
+++++
Now add a config.json file with this:
{
  "schema": 1,
  "description": "Generate a funny joke",
  "type": "completion",
  "completion": {
      "max_tokens": 1000,
      "temperature": 0.9,
      "top_p": 0.0,
      "presence_penalty": 0.0,
      "frequency_penalty": 0.0
  },
  "input": {
      "parameters": [
          {
              "name": "input",
              "description": "Joke subject",
              "defaultValue": ""
          },
          {
              "name": "style",
              "description": "Give a hint about the desired joke style",
              "defaultValue": ""
          }
      ]
  }
}
In the Limerick folder, add an skprompt.txt file with the contents of Listing 3 and a config.json file with the contents of Listing 4.
Listing 3: Contents of skprompt.txt. A predefined prompt on disk.
There was a young woman named Bright,
Whose speed was much faster than light.
She set out one day,
In a relative way,
And returned on the previous night.

There was an odd fellow named Gus,
When traveling he made such a fuss.
He was banned from the train,
Not allowed on a plane,
And now travels only by bus.

There once was a man from Tibet,
Who couldn't find a cigarette
So he smoked all his socks,
and got chicken-pox,
and had to go to the vet.

There once was a boy named Dan,
who wanted to fry in a pan.
He tried and he tried,
and eventually died,
that weird little boy named Dan.

Now write a very funny limerick about {{$name}}.
{{$input}}
Invent new facts about their life. Must be funny.
Listing 4: Contents of config.json. Pre-defined prompt settings.
{
  "schema": 1,
  "description": "Generate a funny limerick about a person",
  "type": "completion",
  "completion": {
      "max_tokens": 200,
      "temperature": 0.7,
      "top_p": 0,
      "presence_penalty": 0,
      "frequency_penalty": 0
  },
  "input": {
      "parameters": [
      {
          "name": "name",
          "description": "",
          "defaultValue": "Bob"
      },
      {
          "name": "input",
          "description": "",
          "defaultValue": "Dogs"
      }
      ]
  }
}
Right-click on each new file, choose Properties from the context menu, and set the Copy to Output Directory property of each file to Copy if newer. Note that you'll also have to do this step if you copied the files and folders from the accompanying source code. When you run the code, you should see output like that in Figure 2.
Looking at the code, you'll see that the first part is the same as before. The difference comes where you create the plug-ins (also known as functions). Instead of creating them in code, you call the ImportPluginFromPromptDirectory() method on the kernel and give it the path to the files you just created. Notice that each folder within the Fun directory contains two files: one for the prompt and one for the settings associated with the prompt. By using this type of folder structure, you can load all three plug-ins within the Fun folder at once. After loading, you're returned a dictionary containing all the plug-ins that were loaded and you can reference each plug-in from the dictionary when you make the Invoke.Async() calls. Also notice that the Limerick plug-in accepts two parameters, unlike the previous plug-ins, which accepted only one.
Now that you've done the basics and are proficient with generating text with SK, let's explore how to connect semantic code (prompts and prompt engineering) with native code (in this case, C#). Back in the Main method, comment out the await BasicFunctions(); line and add the new line await NativeFunctions();. Next, create a new file in the project named MyCSharpFunctions.cs and enter this code:
public class MyCSharpFunctions
{
  [KernelFunction]
  [Description("Return the first row of a qwerty keyboard")]
  public string Qwerty(string input)
  {
    return "qwertyuiop";
  }

  [KernelFunction]
  [Description("Return a string that's duplicated")]
  public string DupDup(string input)
  {
    return input + input;
  }
}
These are extremely simple examples. The first returns the letters on the top row of the keyboard and the second duplicates whatever text is passed in, but you can program anything you can imagine. You have the full power of .NET at your disposal. Semantic Kernel treats sematic code and native code equally and the two can be intermixed. Notice that you add the KernelFunction attribute to each method you want to expose to Semantic Kernel. I've also added a Description attribute that not only helps document the code, but you'll also use it in the next article when I discuss planners.
Semantic Kernel treats semantic code and native code equally and the two can be intermixed.
Back in Main(), comment out await BasicFunctions(); and enter a new line await NativeFunctions();. Below the BasicFunctions method, add the code from the next snippet. Again, the code to create the kernel is the same as before and the difference comes when loading the native functions. You call the generic method ImportPluginFromType() with the type containing the functions. Then you call InvokeAsync(), exactly as you do for semantic functions.
private static async Task NativeFunctions()
{
    var builder = Kernel.CreateBuilder();

    builder.Services
      //.AddLogging(configure => configure.AddConsole())
      .AddAzureOpenAIChatCompletion(
        "gpt-4", _endpoint, _apiKey);

    var kernel = builder.Build();

    var nativeFunctions = kernel
      .ImportPluginFromType<MyCSharpFunctions>();

    var result = await kernel.InvokeAsync(
      nativeFunctions["Qwerty"],
      new KernelArguments { ["input"] = "hello" });
    Console.WriteLine(result);
    Console.WriteLine();

    result = await kernel.InvokeAsync(
      nativeFunctions["DupDup"],
      new KernelArguments { ["input"] = "hello" });
    Console.WriteLine(result);
    Console.WriteLine();
}
You may have noticed that the Qwerty function accepts an input parameter but doesn't use it. At one time, it was the standard in SK to accept a single-string named input and return a string as the output. That made it easier to chain multiple calls together and pass the output of one function as the input of the next. Parameter handling has gotten much more sophisticated since those early days, but you'll still see this pattern, so I kept it here.
Speaking of chaining multiple calls together (something SK calls pipelines, though not as automatic as they once were when inputs and outputs were simpler), it's often useful to run multiple semantic and/or native functions in succession. In this example, you ask the LLM to create a short poem and then ask it to tell you more about the poem it just created. Back in Main(), comment out await NativeFunctions(); and add a new line await Pipelines();, and then add the code in this next snippet to the NativeFunctions method.
private static async Task Pipelines()
{
var builder = Kernel.CreateBuilder();
builder.Services
//.Services.AddLogging(configure => configure.AddConsole())
.AddAzureOpenAIChatCompletion(
"gpt-4", _endpoint, _apiKey);
var kernel = builder.Build();
var functionDir =
Path.Combine(Directory.GetCurrentDirectory(),
"Plugins", "Writer");
var semanticFunctions = kernel
.ImportPluginFromPromptDirectory(functionDir);
var functionPipeline = new KernelFunction[]
{
semanticFunctions["ShortPoem"],
semanticFunctions["TellMeMore"]
};
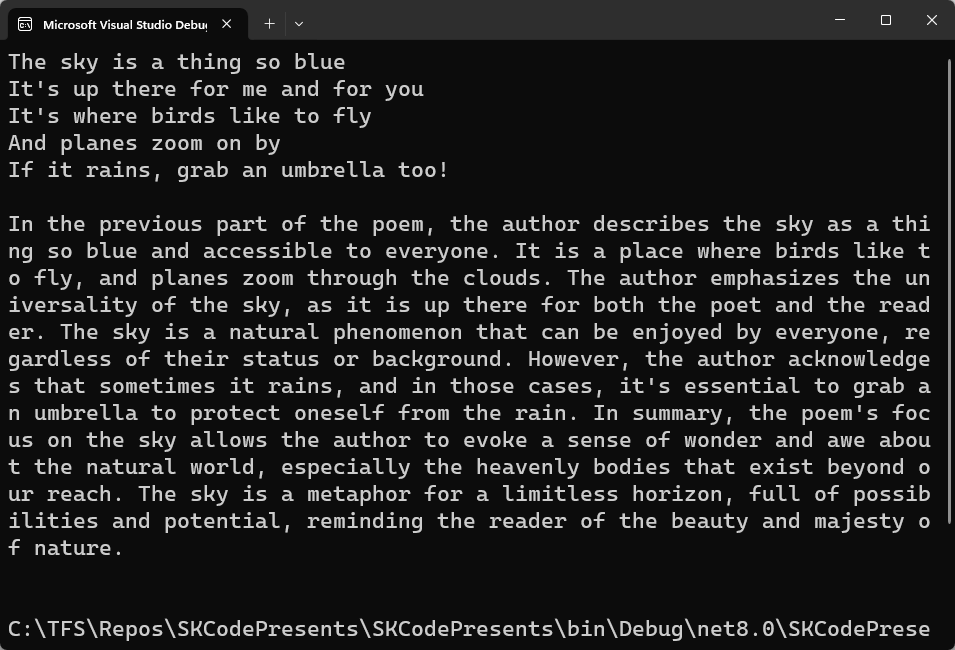
var currentArg = "the sky";
foreach (var function in functionPipeline)
{
var result = await kernel.InvokeAsync(function,
new KernelArguments { ["input"] = currentArg });
currentArg = result.ToString();
Console.WriteLine(currentArg);
Console.WriteLine();
}
}
Although this pipeline only calls two functions, it can be extended to much more complex scenarios. Again, building the kernel is the same, and then you load the functions from disk as you did in the BasicFunctions example. In this case, you're using two new prompts that you haven't used before. Under the Plugins folder, add a new folder named Writer and under that, add two new folders named ShortPoem and TellMeMore. In the ShortPoem folder, add a new file named skprompt.txt and use the text from this snippet.
Generate a short funny poem or limerick to
explain the given event. Be creative and
be funny. Let your imagination run wild.
Event:{{$input}}
Then add a new file named config.json and use the text from this snippet.
{
    "schema": 1,
    "type": "completion",
    "description": "Turn a scenario into a
     short and entertaining poem.",
    "completion": {
        "max_tokens": 60,
        "temperature": 0.5,
        "top_p": 0.0,
        "presence_penalty": 0.0,
        "frequency_penalty": 0.0
    },
    "input": {
        "parameters": [
            {
                "name": "input",
                "description": "The scenario to turn into a poem.",
                "defaultValue": ""
            }
        ]
    }
}
In the TellMeMore folder, add a new file named skprompt.txt and use the text from this snippet.
>>>>>The following is part of a {{$conversationtype}}.
{{$input}}

>>>>>The following is an overview of a previous part of
the {{$conversationtype}}, focusing on "{{$focusarea}}".
{{$previousresults}}

>>>>>In 250 words or less, write a verbose and detailed
overview of the {{$conversationtype}} focusing solely on
"{{$focusarea}}".
Then add a new file named config.json and use this text:
{
    "schema": 1,
    "type": "completion",
    "description": "Summarize given text or any text document",
    "completion": {
        "max_tokens": 500,
        "temperature": 0.0,
        "top_p": 0.0,
        "presence_penalty": 0.0,
        "frequency_penalty": 0.0
    }
}
As before, make sure to right-click on each file and set the Copy to Output Directory property to Copy if newer. You should get output like that in Figure 3.
Conclusion
In this article, you did some hands-on AI programming with Semantic Kernel. In the Azure portal, you created a deployment of a GPT-4 Large Language Model. Then you created a simple prompt in code and executed it against the model. You then experimented with loading pre-engineered prompts and associated settings from disk. Next, you executed your own C# code in the same way you executed the prompts, showing how the two types of code, semantic and native, could be easily intermingled. You ended with an example of chaining functions together, using the output of one as the input of the next.
In the next article, I'll work with more advanced topics, including using the Retrieval Augmented Generation (RAG) pattern where you store some documents in a semantic database and then search them, not by keyword, but by meaning. You'll see how the RAG pattern allows you to “ground” the responses from the LLM and customize the information it uses to respond. I'll also show related utilities, like “chunkers,” to cut large documents down to size so you can put them into the semantic database. Finally, I'll look at planners, where I ask the LLM to break down a large, complex problem into smaller steps and choose from both semantic and native code to automatically create and execute a pipeline of functions to complete those steps.