


In parts 1 and 2 of this series on building a WPF business application, you created a new WPF business application using a pre-existing architecture. You added code to display a message while loading resources in the background. You also learned how to load and close user controls on a main window. In part 2 of this series, you displayed a status message by sending a message from a view model class to the main window. You also displayed informational messages and made them disappear after a specified period. You created a WPF login screen complete with validation.
In part 3 of this series, you'll build a user feedback screen to allow a user to submit feedback about the application. You build a view model and bind an Entity Framework entity class to the screen. The entity class contains data annotations and you learn to display validation messages from any data annotations that fail validation. You also start learning how to build a design pattern for standard add, edit, and delete screens. You build a user list control and a user detail control to display all users in a table, and the detail for each one you click on.
This article is the third in a multi-part series on how to create a WPF business application. Instead of starting completely from scratch, I've created a starting architecture that you can learn about by reading the blog post entitled "An Architecture for WPF Applications". Download the samples that go along with the blog post to follow along step-by-step with this article. This series of articles is also a Pluralsight.com course.
Related Articles
- A Design Pattern for Building WPF Business Applications: Part 1
- A Design Pattern for Building WPF Business Applications: Part 2
- A Design Pattern for Building WPF Business Applications: Part 4
Create a WPF User Feedback Screen
Create a screen for the user to input feedback to your support department about your WPF application, as shown in Figure 1. On this screen, validate the data using the Entity Framework. The rules that fail in EF are going to be converted into validation messages to be displayed in the same manner as presented in the last article.
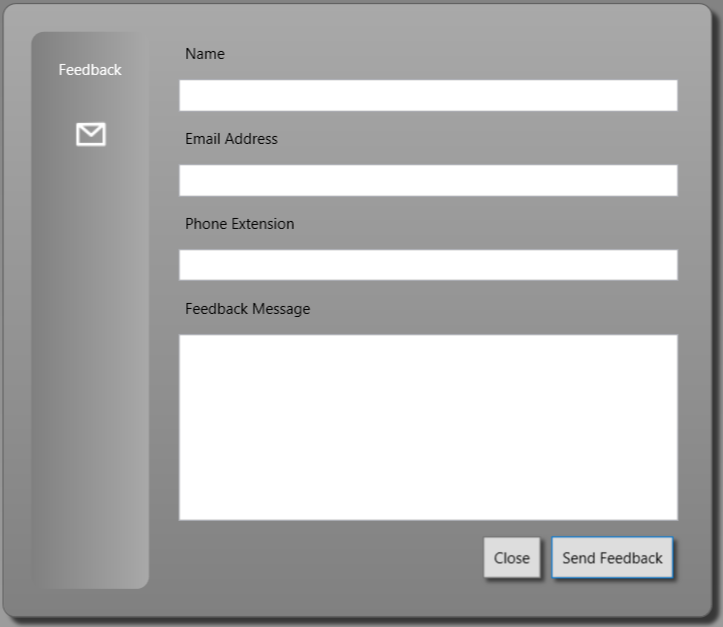
The user feedback screen (Figure 1) places the labels above each input field. The label styles in the StandardStyles.xaml file sets the margin property to 4. However, this would place the labels too far to the right above the input fields. You're going to create a new style just on this screen to move the margin to the left. This style overrides the global Margin setting for labels. Open the UserFeedbackControl.xaml file and locate the <UserControl.Resources> element. Add a new keyed style for labels.
<UserControl.Resources>
  <vm:UserFeedbackViewModel x:Key="viewModel" />
  <Style TargetType="Label" x:Key="feedbackLabels">
    <Setter Property="Margin" Value="0,0" />
  </Style>
</UserControl.Resources>
Remove the <StackPanel> with the text box and button in that you added in the previous article. There are two columns on this feedback screen; one for the large vertical “Feedback” column, and one for all the input fields. Add a <ScrollViewer> and a <Grid> within the <Border> as shown in the following code.
<ScrollViewer VerticalScrollBarVisibility="Auto">
  <Grid DataContext="{Binding Source={StaticResource viewModel}}">
    <Grid.ColumnDefinitions>
      <ColumnDefinition Width="Auto" />
      <ColumnDefinition Width="*" />
    </Grid.ColumnDefinitions>
  </Grid>
</ScrollViewer>
Add a Large Vertical Column
On the left side of this screen, there's a raised area that you build using a <Border> with a linear gradient brush, a label, and an image. Build the large vertical column using the code shown in Listing 1. Add this code just below the closing </Grid.ColumnDefinitions> element.
Listing 1: Build the large vertical column using a border.
<Border Grid.Column="0" Margin="10" CornerRadius="10">
  <Border.Background>
    <LinearGradientBrush EndPoint="1,0.5" StartPoint="0,0.5">
      <GradientStop Color="Gray" Offset="0" />
      <GradientStop Color="DarkGray" Offset="1" />
    </LinearGradientBrush>
  </Border.Background>
  <StackPanel>
    <Label Content="Feedback" Style="{StaticResource inverseLabel}" Margin="10" />
    <Image Source="pack://application:,,,/WPF.Common;component/Images/Envelope_White.png" />
  </StackPanel>
</Border>
Add a Grid for Input Fields
The second column (on the right) of this screen is where you place the area for the user to input the data. Add a new <Grid> below the closing </Border> element. Add 10 row definitions for this new grid, as shown in Listing 2.
Listing 2: Multiple rows are needed for vertical screens.
<Grid Grid.Column="1" Margin="10">
  <Grid.RowDefinitions>
    <RowDefinition Height="Auto" />
    <RowDefinition Height="Auto" />
    <RowDefinition Height="Auto" />
    <RowDefinition Height="Auto" />
    <RowDefinition Height="Auto" />
    <RowDefinition Height="Auto" />
    <RowDefinition Height="Auto" />
    <RowDefinition Height="Auto" />
    <RowDefinition Height="Auto" />
    <RowDefinition Height="*" />
  </Grid.RowDefinitions>
</Grid>
Add Labels and Input Fields
Below this new closing </Grid.RowDefinitions> element, add the label and text box controls shown in **Listing 3**. Each of the text box controls is bound to an Entity` property that you're going to add to the user feedback view model class later in this post.
Listing 3: Use labels and text boxes to build inputs for the user feedback screen.
<Label Grid.Row="0" Style="{StaticResource feedbackLabels}" Content="Name"/>
<TextBox Grid.Row="1" Text="{Binding Path=Entity.Name}" />
<Label Grid.Row="2" Style="{StaticResource feedbackLabels}" Content="Email Address" />
<TextBox Grid.Row="3" Text="{Binding Path=Entity.EmailAddress}" />
<Label Grid.Row="4" Style="{StaticResource feedbackLabels}" Content="Phone Extension" />
<TextBox Grid.Row="5" Text="{Binding Path=Entity.PhoneExtension}" />
<Label Grid.Row="6" Style="{StaticResource feedbackLabels}" Content="Feedback Message" />
<TextBox Grid.Row="7" Text="{Binding Path=Entity.Message}" AcceptsReturn="True" TextWrapping="Wrap" Height="150" />
Add Buttons
You need a Close button and a Send feedback button just below the input fields. Add a <StackPanel> element, shown below, in which to place these two buttons. After entering this XAML, create the event procedure for the SendFeedbackButton_Click event by pressing the F12 key while positioned over the SendFeedbackButton_Click text in the Click attribute. The CloseButton_Click event procedure was created in a previous article.
<StackPanel Grid.Row="8" Orientation="Horizontal" HorizontalAlignment="Right">
  <Button Content="Close" IsCancel="True" Style="{StaticResource cancelButton}" Click="CloseButton_Click" />
  <Button Content="Send Feedback" IsDefault="True" Style="{StaticResource submitButton}" Click="SendFeedbackButton_Click" />
</StackPanel>
Add a List Box for Validation
In the last row in this screen, add a list box control just like you did on the Login screen in the last article. If you want, create this <ListBox> control as another user control and include that control on this screen and the Login screen.
<!-- Validation Message Area -->
<ListBox Grid.Row="9"
         Style="{StaticResource validationArea}"
         Visibility="{Binding IsValidationVisible, Converter={StaticResource visibilityConverter}}"
         ItemsSource="{Binding ValidationMessages}"
         DisplayMemberPath="Message" />
Try it Out
Run the application, log in as a valid user, and click on the Feedback menu item to display the screen. If you've done everything correctly, the screen should look like Figure 1.
Add UserFeedback Table
To store the data entered on this screen, you need to build a UserFeedback table in the Sample.mdf database. NOTE: This table is already in the Sample.mdf file that comes with the starting application. The following steps instruct you on how to build the table.
Double-click on the Sample.mdf located in the App_Data folder to bring up the Server Explorer window. Right mouse-click on the Tables folder and select New Query from the menu. Add the following SQL code and click the Execute icon.
CREATE TABLE [dbo].[UserFeedback] (
  [UserFeedbackId] INT IDENTITY (1, 1) NOT NULL,
  [Name]           NVARCHAR (50)  NOT NULL,
  [PhoneExtension] NVARCHAR (10)  NULL,
  [Message]        NVARCHAR (MAX) NOT NULL,
  [EmailAddress]   NVARCHAR (255) NOT NULL,
  PRIMARY KEY CLUSTERED ([UserFeedbackId] ASC)
);
Go back to the Server Explorer window and right mouse-click on the Table folder and select the Refresh menu to see the new table.
Add User Feedback to the Data Layer
Once you have the new table created in the database, you need to perform three more steps to interact with this table.
- Create an entity class named
UserFeedback. - Add a
DbSetproperty to theSampleDbContextclass. - Add validation code to ensure that good data is entered in the
UserFeedbacktable.
Add UserFeedback Entity Class
Open the WPF.Sample.DataLayer project and right mouse-click on the EntityClasses folder and select Add > Class... from the menu. Enter the name UserFeedback and click the OK button. Replace the contents of the file generated with the code shown in Listing 4. This code is a standard EF entity class to map properties to the columns in the SQL table. Feel free to use the EF generation tools to generate this code if you want. Be sure to add the ErrorMessage property to the [Required] attributes so you can display a user-friendly error message if the user doesn't provide the required data.
Listing 4: Create the appropriate input entity class for the user feedback screen.
using System.ComponentModel.DataAnnotations;
using System.ComponentModel.DataAnnotations.Schema;
using Common.Library;

namespace WPF.Sample.DataLayer
{
    [Table("UserFeedback")]
    public class UserFeedback : CommonBase
    {
        private int _UserFeedbackId;
        private string _Name = string.Empty;
        private string _EmailAddress = string.Empty;
        private string _PhoneExtension = string.Empty;
        private string _Message = string.Empty;

        [Required]
        [Key]
        public int UserFeedbackId
        {
            get { return _UserFeedbackId; }
            set
            {
                _UserFeedbackId = value;
                RaisePropertyChanged("UserFeedbackId");
            }
        }

        [Required(ErrorMessage="User Name must be filled in.")]
        public string Name
        {
            get { return _Name; }
            set
            {
                _Name = value;
                RaisePropertyChanged("Name");
            }
        }

        [Required(ErrorMessage="Email Address must be filled in.")]
        public string EmailAddress
        {
            get { return _EmailAddress; }
            set
            {
                _EmailAddress = value;
                RaisePropertyChanged("EmailAddress");
            }
        }

        public string PhoneExtension
        {
            get { return _PhoneExtension; }
            set
            {
                _PhoneExtension = value;
                RaisePropertyChanged("PhoneExtension");
            }
        }

        [Required(ErrorMessage="Feedback Message must be filled in.")]
        public string Message
        {
            get { return _Message; }
            set
            {
                _Message = value;
                RaisePropertyChanged("Message");
            }
        }
    }
}
Update the SampleDbContext Class
For EF to select records from and modify data in the UserFeedback table, add a DbSet property in the SampleDbContext class. Open the SampleDbContext.cs file and add a new DbSet property.
public virtual DbSet<UserFeedback> UserFeedbacks { get; set; }
Add a Method to Convert EF Validation Errors to ValidationMessage Objects
The Entity Framework uses data annotation attributes to generate validation errors automatically for you. It raises an error that contains a collection of validation errors. The structure of this collection doesn't lend itself well to data binding on a WPF screen, so write a method to convert these validation errors to a collection of ValidationMessage objects. Add a few using statements at the top of the SampleDbContext.cs file, as shown below.
using System.Collections.Generic;
using System.Data.Entity.Validation;
using System.Linq;
using Common.Library;
Add a method to the SampleDbContext class, Listing 5, to perform the conversion of the EF validation errors into a collection of ValidationMessage objects. This method takes the ErrorMessage and PropertyName properties from the Entity Framework object and assigns them to a new ValidationMessage object. This object is added to a list of ValidationMessage objects that's returned from this method.
Listing 5: Convert EF validation objects to ValidationMessage objects
public List<ValidationMessage> CreateValidationMessages(DbEntityValidationException ex)
{
    List<ValidationMessage> ret = new List<ValidationMessage>();

    // Retrieve the error messages from EF
    foreach (DbValidationError error in ex.EntityValidationErrors.SelectMany(x => x.ValidationErrors))
    {
        ret.Add(new ValidationMessage {Message = error.ErrorMessage, PropertyName = error.PropertyName});
    }

    return ret;
}
Modify the User Feedback View Model Class
Add a property named Entity to the UserFeedbackViewModel class to hold the data input on the screen. A Save() method is needed to submit the data to the database. You're going to also add a stub of a SendFeedback() method in case you want to email the feedback to your support department.
Add the Entity Property
Open the UserFeedbackViewModel.cs file and add the following using statements at the top of this file.
using System;
using System.Collections.ObjectModel;
using System.Data.Entity.Validation;
using WPF.Sample.DataLayer;
Add the Entity property that's of the type UserFeedback to the UserFeedbackViewModel class, as shown in the code below.
private UserFeedback _Entity = new UserFeedback();

public UserFeedback Entity
{
    get { return _Entity; }
    set
    {
        _Entity = value;
        RaisePropertyChanged("Entity");
    }
}
Add a Save Method
The data entered by the user on the User Feedback screen is going to be saved into the UserFeedback table you created. The Save() method, shown in Listing 6, uses the SampleDbContext class to attempt to add the data. If the data is correct, a new record is added to the table; if the data isn't correct, a DbEntityValidationException exception is thrown. Take the DbEntityValidationException object and pass it to the ConvertValidationMessages() method you wrote in the SampleDbContext class. Store the return result from this method into the ValidationMessages property on the view model. Set the IsValidationVisible property to true to display the validation messages.
Listing 6: The Save() method adds user feedback and reports validation errors
public bool Save()
{
    bool ret = false;
    SampleDbContext db = null;

    try
    {
        db = new SampleDbContext();

        // Add user feedback to database
        db.UserFeedbacks.Add(Entity);
        db.SaveChanges();
        ret = true;
    }
    catch (DbEntityValidationException ex)
    {
        ValidationMessages = new ObservableCollection<ValidationMessage>(db.CreateValidationMessages(ex));
        IsValidationVisible = true;
    }
    catch (Exception ex)
    {
        PublishException(ex);
    }

    return ret;
}
Add a SendFeedback Method
You may want to send an email to a specific person when one of the feedback messages is stored in the UserFeedback table. The SendFeedback() method, Listing 7, is where you might perform this. This article isn't going to cover writing that code, but use the code shown in Listing 7 to save the data and display an informational message that the feedback message was sent.
Listing 7: After saving, send a feedback message to your support department
public bool SendFeedback()
{
    bool ret = false;

    // Save/Validate the data
    if (Save())
    {
        // TODO: Send the Feedback Message here

        // Display Informational Message
        MessageBroker.Instance.SendMessage(MessageBrokerMessages.DISPLAY_TIMEOUT_INFO_MESSAGE_TITLE, "Feedback Message Sent.");
        ret = true;

        // Close the user feedback form
        Close(false);
    }
    return ret;
}
Update Code Behind
Open the UserFeedbackControl.xaml.cs file and locate the SendFeedbackButton_Click() event procedure. Call the SendFeedback() method from this event.
private void SendFeedbackButton_Click(object sender, RoutedEventArgs e)
{
    // Send/Save Feedback
    _viewModel.SendFeedback();
}
Try It Out
Run the application and click on the Feedback menu item. Click the Send Feedback button without entering any data to ensure that the validation is working. Next, enter some valid information into each field and click the Send Feedback button again. Open the Sample database and check the UserFeedback table to see if the data was stored successfully.
A Design Pattern for Master/Detail Screens
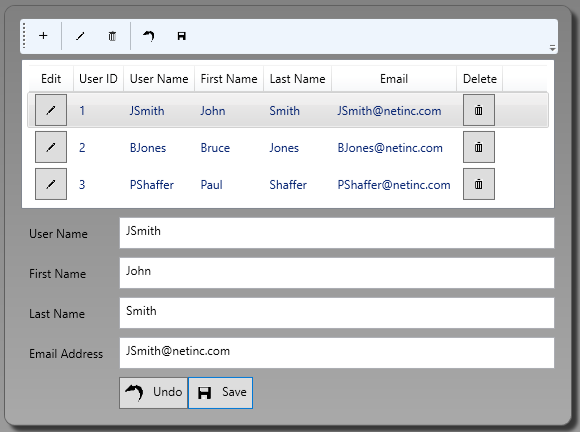
The next screen you're going to create is one to list, add, edit and delete users, as shown in Figure 2. To accomplish this, build two separate user controls; one for the list of users, and one that displays the detail for an individual user. These two controls will be placed onto the user maintenance control that you already built. As you build this screen, you're going to create some generic classes to use for any CRUD screen that you need to create.
Display a List of Users
Right mouse-click on the UserControls folder and add a User Control named UserMaintenanceListControl to this project. Remove the <Grid></Grid> element and add a <ListView> control that looks like the following.
<ListView ItemsSource="{Binding Path=Users}">
  <ListView.View>
    <GridView>
      GRID COLUMNS GO HERE
    </GridView>
  </ListView.View>
</ListView>
Within the <GridView></GridView> element, add several <GridViewColumn> elements (Listing 8) to display the columns shown in Figure 2. There are some images included in the sample application that you can use to display the edit and delete icons. Besides the normal <GridViewColumn> controls bound to each individual property, notice the buttons in the CellTemplate controls for the edit and delete buttons. The Tag property of each button contains {Binding}. When you do not specify a path, the complete object is bound to that property. This means a reference to the instance of the User class is bound to this property. When you click on these buttons, you can retrieve the user object for the row that was clicked upon. You'll use this user object in the next article for editing and deleting. After adding the code from Listing 8, be sure to create the EditButton_Click and the DeleteButton_Click event procedures.
Listing 8: A ListView allows you to put buttons within any column you want
<GridViewColumn Header="Edit">
  <GridViewColumn.CellTemplate>
    <DataTemplate>
      <Button Style="{StaticResource toolbarButton}" Click="EditButton_Click" Tag="{Binding}" ToolTip="Edit Current User">
        <Image Source="pack://application:,,,/WPF.Common;component/Images/Edit_Black.png" />
      </Button>
    </DataTemplate>
  </GridViewColumn.CellTemplate>
</GridViewColumn>
<GridViewColumn Header="User ID" Width="Auto" DisplayMemberBinding="{Binding Path=UserId}" />
<GridViewColumn Header="User Name" Width="Auto" DisplayMemberBinding="{Binding Path=UserName}" />
<GridViewColumn Header="First Name" Width="Auto" DisplayMemberBinding="{Binding Path=FirstName}" />
<GridViewColumn Header="Last Name" Width="Auto" DisplayMemberBinding="{Binding Path=LastName}" />
<GridViewColumn Header="Email" Width="Auto" DisplayMemberBinding="{Binding Path=EmailAddress}" />
<GridViewColumn Header="Delete">
  <GridViewColumn.CellTemplate>
    <DataTemplate>
      <Button Style="{StaticResource toolbarButton}" Click="DeleteButton_Click" Tag="{Binding}" ToolTip="Delete Current User">
        <Image Source="pack://application:,,,/WPF.Common;component/Images/Trash_Black.png" />
      </Button>
    </DataTemplate>
  </GridViewColumn.CellTemplate>
</GridViewColumn>
Create View Model for the User List
Right mouse-click on the WPF.Sample.ViewModelLayer project and add a new class named UserMaintenanceListViewModel.cs. Add the code in Listing 9 to this new file you created. Add a property to this view model class that is an ObservableCollection of User objects. The method LoadUsers() is used to fill the Users property from the Entity Framework DbContext class.
Listing 9: Load users into an ObservableCollection so any bound control gets notification of changes
using System;
using System.Collections.ObjectModel;
using Common.Library;
using WPF.Sample.DataLayer;

namespace WPF.Sample.ViewModelLayer
{
    public class UserMaintenanceListViewModel : ViewModelBase
    {
        private ObservableCollection<User> _Users = new ObservableCollection<User>();

        public ObservableCollection<User> Users
        {
            get { return _Users; }
            set
            {
                _Users = value;
                RaisePropertyChanged("Users");
            }
        }

        public virtual void LoadUsers()
        {
            SampleDbContext db = null;

            try
            {
                db = new SampleDbContext();
                Users = new ObservableCollection<User>(db.Users);
            }
            catch (Exception ex)
            {
                System.Diagnostics.Debug.WriteLine(ex.ToString());
            }
        }
    }
}
Modify the User Maintenance View Model
Open the UserMaintenanceViewModel.cs file and change the inheritance from ViewModelBase to UserMaintenanceListViewModel. Because the UserMaintenanceListViewModel inherits from the ViewModelBase class, you only need to inherit from the UserMaintenanceListViewModel class to get all its functionality as well as that of the ViewModelBase class.
public class UserMaintenanceViewModel : UserMaintenanceListViewModel
Modify the User Maintenance User Control
Open the UserMaintenanceControl.xaml file and in the attributes of the <UserControl>, add a Loaded event.
Loaded="UserControl_Loaded"
Build the solution to ensure that everything compiles correctly. Remove the <StackPanel> from the UserMaintenanceControl.xaml. Open the Toolbox and locate the UserMaintenanceListControl you just created and drag and drop that control within the <Border>. After dragging the list control onto the maintenance control, add the DataContext for the UserMaintenanceListControl to reference the view model object of the UserMaintenanceControl, as shown in the following code snippet.
<Border Style="{StaticResource screenBorder}">
  <UserControls:UserMaintenanceListControl DataContext="{StaticResource viewModel}" />
</Border>
Open the UserMaintenanceControls.xaml.cs file and locate the UserControl_Loaded() event procedure you just created. Call the LoadUsers() method you just added. This method is responsible for loading the users, and because the Users collection is bound to the ListView control, and the user control is bound to the view model on which that Users collection is located, this causes the users to be displayed within the ListView.
private void UserControl_Loaded(object sender, System.Windows.RoutedEventArgs e)
{
    _viewModel.LoadUsers();
}
Try It Out
Run the application and click on the Users menu item to see a list of users appear. If you don't see any users appear, check to ensure that there were no errors when loading users. Also, check that you've added some users to the User table in your SQL Server table.
Display User Detail
In Figure 2, you saw that the bottom of the screen contains the detail for a single user. When you click on a row in the ListView control, you want to display the currently selected user within the details area. Add a new user control named UserMaintenanceDetailControl.xaml within the UserControls folder of the project. Modify the <Grid> element so that it has two columns and six rows, as shown in the code below.
<Grid>
  <Grid.ColumnDefinitions>
    <ColumnDefinition Width="Auto" />
    <ColumnDefinition Width="*" />
  </Grid.ColumnDefinitions>
  <Grid.RowDefinitions>
    <RowDefinition Height="Auto" />
    <RowDefinition Height="Auto" />
    <RowDefinition Height="Auto" />
    <RowDefinition Height="Auto" />
    <RowDefinition Height="Auto" />
    <RowDefinition />
  </Grid.RowDefinitions>
</Grid>
After the closing </Grid.RowDefinitions> element add the label and text box controls shown in Listing 10. In the view model you're going to create in the next section, an Entity property is created of the type User. You can see that the path to the bindings on each text box control is bound to the Entity property followed by the name of a property in the User class.
Listing 10: Create the labels and text boxes for the user detail
<Label Grid.Row="0" Content="User Name" />
<TextBox Grid.Row="0" Grid.Column="1" Text="{Binding Path=Entity.UserName}" />
<Label Grid.Row="1" Content="First Name" />
<TextBox Grid.Row="1" Grid.Column="1" Text="{Binding Path=Entity.FirstName}" />
<Label Grid.Row="2" Content="Last Name" />
<TextBox Grid.Column="1" Grid.Row="2" Text="{Binding Path=Entity.LastName}" />
<Label Grid.Row="3" Content="Email Address" />
<TextBox Grid.Column="1" Grid.Row="3" Text="{Binding Path=Entity.EmailAddress}" />
After the labels and text box controls, add a stack panel (Listing 11) for the Undo and Save buttons. Use Image and TextBlock controls within each Button control to present an image and text to the user for the Save and Undo functionality.
Listing 11: Bind up all your text boxes so the user can input all their data
<StackPanel Grid.Column="1" Grid.Row="4" Orientation="Horizontal">
  <Button IsCancel="True" Style="{StaticResource toolbarButton}">
    <StackPanel Orientation="Horizontal" Style="{StaticResource toolbarButtonStackPanel}">
      <Image Source="pack://application:,,,/WPF.Common;component/Images/Undo_Black.png" Style="{StaticResource toolbarImage}" />
      <TextBlock Text="Undo" />
    </StackPanel>
  </Button>
  <Button IsDefault="True" Style="{StaticResource toolbarButton}">
    <StackPanel Orientation="Horizontal" Style="{StaticResource toolbarButtonStackPanel}">
      <Image Source="pack://application:,,,/WPF.Common;component/Images/Save_Black.png" Style="{StaticResource toolbarImage}" />
      <TextBlock Text="Save" />
    </StackPanel>
  </Button>
</StackPanel>
Create a User Detail View Model
In the UserMaintenanceDetailControl user control, you see that you're binding to the properties of an Entity object. This Entity object is going to be in a view model for the details control. Right mouse-click on the ViewModels folder and add a new class named UserMaintenanceDetailViewModel.cs.
After creating this class, inherit from the UserMaintenanceListViewModel from the previous article. This provides you with all the functionality of the UserMaintenanceListViewModel class, plus anything you add to the UserMaintenanceDetailViewModel class. Make the new view model file look like the following.
using WPF.Sample.DataLayer;

namespace WPF.Sample.ViewModelLayer
{
    public class UserMaintenanceDetailViewModel : UserMaintenanceListViewModel
    {  }
}
Add a property named Entity that is of the type User. This is the Entity property that you bind to the controls on the UserMaintenanceDetail user control. Be sure to add a using statement for the WPF.Sample.DataLayer namespace at the top of this file.
private User _Entity = new User();

public User Entity
{
    get { return _Entity; }
    set
    {
        _Entity = value;
        RaisePropertyChanged("Entity");
    }
}
Override the LoadUsers Method
After loading the list of users, it would be nice to set the Entity property to the first item in the list. This causes the binding on the user detail control to display the values for the user in the bound text box controls. Override the LoadUsers() method, call the base.LoadUsers() method, and then check to ensure that the Users collection has some users. Set the Entity property to the first user in the Users collection. Setting this property causes the RaisePropertyChanged event to be fired. This, in turn, causes the UI to redisplay the new values on the detail screen.
public override void LoadUsers()
{
    // Load all users
    base.LoadUsers();

    // Set default user
    if (Users.Count > 0)
    {
        Entity = Users[0];
    }
}
Modify the User Maintenance View Model
Open the UserMaintenanceViewModel.cs file and change the inheritance from UserMaintenanceListViewModel to UserMaintenanceDetailViewModel. You now have separate view models for each of the three user controls you've built. Because each view model inherits from the other, from the UserMaintenanceViewModel, you get all of the functionality from the detail and list view models.
public class UserMaintenanceViewModel : UserMaintenanceDetailViewModel
{
    ...
}
Modify the User List Control
Open the UserMaintenanceListControl.xaml file and add the SelectedItem attribute to the <ListView> control. This binds the SelectedItem property to the Entity property in the UserMaintenanceDetailViewModel class. When the user clicks on a new row in the ListView control, this property updates the Entity property. When this property is updated, the RaisePropertyChanged event fires, which then forces the UI to update to the new values in the new User object.
<ListView ItemsSource="{Binding Path=Users}" SelectedItem="{Binding Path=Entity}">
Aggregate All Controls and the Toolbar
The UserMaintenanceControl.xaml has three rows, as shown in Figure 2. The first row contains a toolbar, the second row the user list control, and the third row the user detail control. Open the UserMaintenanceControl.xaml file and add a <Grid> control within the <Border> and move the user list control within the <Grid>. Add a DataContext to this grid to bind to the viewModel resource. Set the Grid.Row attribute to 1 so it appears in the second row of this grid. Set the Name of the control to listControl in case you wish to access any methods on this control.
<Grid DataContext="{StaticResource viewModel}">
  <Grid.RowDefinitions>
    <RowDefinition Height="Auto" />
    <RowDefinition Height="Auto" />
    <RowDefinition Height="Auto" />
  </Grid.RowDefinitions>
  <UserControls:UserMaintenanceListControl Grid.Row="1" x:Name="listControl" DataContext="{StaticResource viewModel}"/>
</Grid>
Drag the User Detail Control onto the User Maintenance Control
Open the Toolbox and drag the UserMaintenanceDetailControl below the user list control. Modify this new control by adding the attribute Grid.Row="2" to place this control in the second row of the control. Add the DataContext attribute to bind to the view model object on the user maintenance user control. Set the Name attribute to detailControl in case you wish to access any public methods on this control.
<local:UserMaintenanceDetailControl Grid.Row="2" x:Name="detailControl" DataContext="{StaticResource viewModel}" />
Try It Out
Run the application and click on the Users menu item. The user list and detail screen should now display and show the first user's detail in the detail area. Click on other users in the list view control and you should see that the user detail area is updated with the new user information for each click you perform.
Create Toolbar
Just above the user list control, add a <Toolbar> control into which you add some buttons, as shown in Listing 12. The toolbar doesn't work yet, but you'll add functionality to it in the next article.
Listing 12: Build a toolbar using buttons and images
<ToolBar Grid.Row="0">
  <Button Style="{StaticResource toolbarButton}" ToolTip="Add New User">
    <Image Source="pack://application:,,,/WPF.Common;component/Images/Plus_Black.png" Style="{StaticResource toolbarImage}" />
  </Button>
  <Separator />
  <Button Style="{StaticResource toolbarButton}" ToolTip="Edit Current User">
    <Image Source="pack://application:,,,/WPF.Common;component/Images/Edit_Black.png" Style="{StaticResource toolbarImage}" />
  </Button>
  <Button Style="{StaticResource toolbarButton}" ToolTip="Delete Current User">
    <Image Source="pack://application:,,,/WPF.Common;component/Images/Trash_Black.png" Style="{StaticResource toolbarImage}" />
  </Button>
  <Separator />
  <Button Style="{StaticResource toolbarButton}" ToolTip="Undo Changes">
    <Image Source="pack://application:,,,/WPF.Common;component/Images/Undo_Black.png" Style="{StaticResource toolbarImage}" />
  </Button>
  <Button Style="{StaticResource toolbarButton}" ToolTip="Save Changes">
    <Image Source="pack://application:,,,/WPF.Common;component/Images/Save_Black.png" Style="{StaticResource toolbarImage}" />
  </Button>
</ToolBar>
Try It Out
Run the application and click on the Users menu item. Notice that the toolbar has been added.
Summary
In this article, you built the User Feedback Screen to allow a user to submit feedback about your application. While building this screen, you learned to work with the validation errors returned from the Entity Framework. You also learned to use control aggregation to build a screen from different user controls. Building an application this way allows you to test screen functionality separately. Using inheritance of the view models brings all the functionality for each of the user controls together so one user control can control all of the others. In the next article, you'll learn to enable and disable each of the buttons based on what “state” you are in. You also learn to build the add, edit and delete functionality of the user screen.
