As a software developer, you must have heard about React but probably didn't have much time to dig into it, right? For some reason it didn't get full attention. Maybe because of other popular languages and frameworks available, such as Angular. Maybe you didn't hear good things about React, especially about the nested code that you might end up creating.
Find additional: JavaScript Articles
Unfortunately, if you try to compare, for instance, the Angular framework with React, you'll notice how hard this job is to do. It's because they're totally different things!
Let me demystify React by studying it a little. This article shows you not only how great React is with its architecture, cost-benefits, and its “easy to learn” advantage, but also you'll also create a simple CRUD from scratch.
React is a JavaScript library for building user interfaces.
What is React?
Facebook, React's creator, says that React “is a JavaScript library for building user interfaces.” So, React IS NOT a framework, but a library. It's declarative: you tell it what state the component is in and React figures out how to render it based on that state. It's component-based and there are self-contained components; it's highly scalable. One component can be used in other components and so forth. In addition, each component keeps its own state. Last but not least, it's learn once, write anywhere. You can develop new features without rewriting existing code.
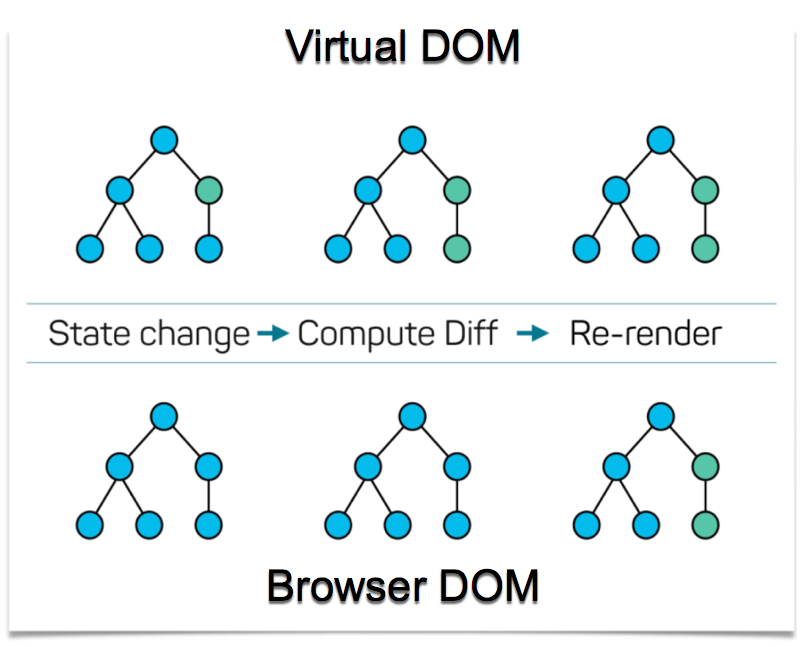
React can also render on the server using Node.JS. Manipulating directly on the DOM (document object model) is very expensive, so changes are made on a Virtual DOM (see Figure 1) instead. Virtual DOM checks the difference between two states and makes only the minimum modification necessary to render the changes. React has very good performance as a result.
The bottom line is that React is supposed to create rich UI views with powerful features. You might be asking yourself if it's possible to create a full application with only UI features. To answer this question, keep in mind that React gathers a set of important pieces:
- JSX
- ES6
- Components
- Props
- State
- Local storage and session storage
- One-way data binding
- Lifecyle
- Bundlers
- State containers
- Tests
You might be asking yourself if it's possible to create a full application with only UI features.
With all these pieces in place (and you don't need to use all of them), it's indeed possible to create a full application using React. Let's examine the pieces.
JSX
JSX stands for JavaScript Syntax eXtension and allows you to write HTML inside JavaScript. It's a little weird in the beginning to get used to this nested code, and you can check it out in Listing 1. In the end, you'll notice that JSX makes a lot of sense, because it's UI-based and you don't have to write any complex code to achieve your UI goals.
Listing 1: JSX example
render() {
    let issues = this.state.issues;
    let issueItems = issues.map((issue) =>
    <option key={issue.value}>{issue.label}</option>        );

    var Spinner = require('react-spinkit');
    var divStyle = { marginBottom: "5px"}

    return (<div><div className="col-sm-12" style={divStyle}>Issues:<br/></div>
    { this.state.error ? (<div className="col-sm-12">Error loading Issues <input type="button"
        onClick={this.reload} value="Reload" />
    </div>) : (
        <Combobox busy={this.state.isLoading}
        onChange={this.onChangeIssue}
        className='col-sm-12'
        data={this.state.issues}
        textField={item => item.Title == undefined ? this.state.isLoading ? 'Loading issues...' :
            'Select an issue' : (item.Title + ' (' + item.Name + ')')}
        groupBy='Year' />)}</div>);
}
ES6
ES6, also called ECMAScript 6 or ES2015, is just a newer version of JavaScript. You use ES6 to create React Components, which are the heart of React. The main goals of the ES6 are to:
- Be a better language to build complex applications
- Fix old issues of JavaScript
- Make development of libraries easier
Components
The main purpose of React is to help in UI creation. For this task, React uses components to make the reuse in other pieces of the application easier. When you create a new React project from scratch, a component is automatically created and looks like Listing 2.
Listing 2: Basic React Component Code
import React, { Component } from 'react';
import logo from './logo.svg';
import './App.css';

class App extends Component {
    render() {
        return (
            <div className="App">
                <header className="App-header">
                <img src={logo} className="App-logo" alt="logo" />
                <h1 className="App-title">Welcome to React</h1>
                </header>
                <p className="App-intro"> To get started, edit code src/App.js and save to reload. </p>
            </div>
        );
    }
}

export default App;
Here's where ES6 enters. ES6 allows you to create classes inside JavaScript just like any other modern language. And because of that, you can extend the Component object, which is not only the heart of any React component, but also helps you to easily create and reuse new React components. The main method here is render because it's the first thing that happens when this particular component is created. As mentioned previously, React uses JSX syntax, where it mixes JavaScript and HTML. You may notice some small differences. For instance, if you use class instead of className in the HTML, it won't work properly.
Props
At some point, you may want to pass a parameter from one place to another. In React, you should pass the parameter as a custom attribute on the parent component (Listing 3) and access through this.props.name_of_attribute on the child component (Listing 4). These parameters can be either functions or simple variables. Passing a function from a parent component to a child component means that the child calls the parent's function to run a task.
Listing 3: Parent component
import React, { Component } from 'react';
import logo from './logo.svg';
import './App.css';
import Component2 from './Component2'

class App extends Component {
    render() {
        return (
            <div className="App">
                <Component2 firstName="Milton" lastName="Abe" />
            </div>
        );
    }
}

export default App;
Listing 4: Child component
import React, { Component } from 'react';
import logo from './logo.svg';
import './App.css';

class Component2 extends Component {

    render() {
        return (
            <div className="App">
                <span>{this.props.firstName} {this.props.lastName}</span>
            </div>
        );
    }
}

export default Component2;
State
You define the state of the application as the place where data comes from and where it can be changed at some point. To set the initial state of a component, you MUST declare the constructor and call the super method shown in Listing 5.
Listing 5: Replacing the props with state
import React, { Component } from 'react';
import logo from './logo.svg';
import './App.css';

class Component2 extends Component {

    constructor(props) {
        super(props);
        this.state = { firstName: 'Milton', lastName: 'Abe'};
    }

    render() {
        return (
            <div className="App">
                <span>{this.state.firstName} {this.state.lastName}</span>
            </div>
        );
    }
}

export default Component2;
To change the state values, call the setState method shown in Listing 6. Don't try to change the state parameter, without calling the setState method. Not only is this considered bad practice, but also, it's more expensive to the process because it requires extra code to make it work.
Listing 6: Setting a new state
import React, { Component } from 'react';
import logo from './logo.svg';
import './App.css';

class Component2 extends Component {

    constructor(props) {
        super(props);
        this.state = { firstName: 'Milton', lastName: 'Abe'};
    }

    changeFirstName() {
        this.setState({firstName: 'Hiro'});
    }

    render() {
        return (
            <div className="App">
                <span onClick={() =>{this.changeFirstName()}}>
                    {this.state.firstName}
                    {this.state.lastName}</span>
            </div>
        );
    }
}

export default Component2;
Setting the state helps React to figure out how the component should be rendered and the rendered component's behavior.
Local Storage and Session Storage
Most of the browsers support Local Storage. The Local Storage object has a setter and a getter to store and retrieve data from the object in case you don't want to use the database for any reason. So even if you close the browser and open the application again, you will have a cached result from the API. Like this:
// setter
localStorage.setItem('myData', data);

//getter
localStorage.getItem('myData');
If you want to cache only the current session, use sessionStorage instead. If you close the browser, the cache will become empty again. Like this:
// setter
sessionStorage.setItem('myData', data);

//getter
sessionStorage.getItem('myData');
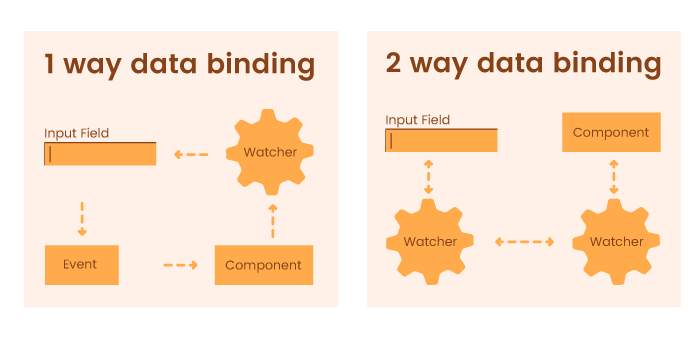
One-Way Data Binding
There's no mechanism in React that allows the HTML to change the component data or vice-versa, as opposed to the two-way data binding architecture.
All changes in one-way data binding should be manually done by the developer, which is good in terms of maintainability and tests. The State feature, previously introduced, is a clear example of the one-way data binding. You can see how each data-binding works in Figure 2.
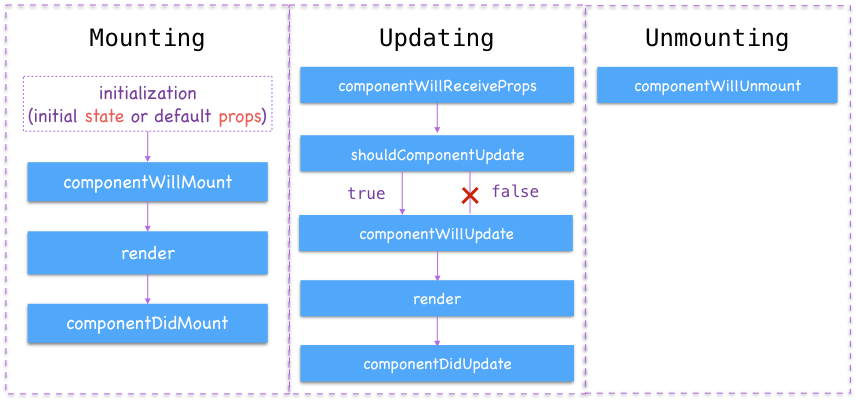
Lifecyle
For a more complex component development, some methods were added in React components as part of the Component Lifecyle. These methods tell the developers when a component will be created, destroyed, updated, etc.
These are the lifecycle methods:
- componentWillMount: called before the first render. It usually makes more sense to use the constructor instead.
- componentDidMount: called right after the first render. It's probably the most used method. A few use cases include AJAX calls, DOM manipulation, setTimeouts, and setIntervals.
- componentWillReceiveProps: called when the props received by the components are updated.
- componentWillUpdate: the same as
componentWillMountexcept that it's called before the component update. - componentDidUpdate: the same as
componentDidMountexcept that it's called right after the component update. - componentWillUnmount: called when the lifecycle ends or will be removed from DOM. It's usually used to remove
setTLifecycleimeoutsorsetIntervalsthat have been added previously. - shouldComponentUpdate: should return a Boolean and tell whether the component should be updated or not. It's usually used for performance issues.
Figure 3 shows how lifecycle methods are related:
Bundlers
Solving dependencies is one of the trivial tasks to deal with, although dependencies may be extremely problematic. On the majority of the projects we have to face:
- Concatenation and minimization of JavaScript (or TypeScript, ES2015, etc.) and CSS
- Images (adding)
- Fonts (adding)
To solve this, module bundlers were created. In the React world, the most common is Webpack, which not only solves the problems listed above, but also provides:
- Caching
- Code Splitting (code by demand)
- Tree Shaking (removes unused code)
- Hot Module Replacement (after saving the new code, you don't need to refresh the browser to reflect the changes)
State Containers
Sometimes the native setState may not be enough to control all of the application logic. There are some state manager frameworks, such as Flux, MobX, and Reflux that you might use. The most famous at the moment is Redux.
Keep in mind that you should check to see whether you need such a library or not. Once you decide to add it, be aware that you're growing the amount of final code and cost. Review the cost-benefit before making any decisions. Dan Abramov, creator of Redux said that.
Don't use Redux unless you've tried local component state and were dissatisfied.
Tests
Another crucial aspect for the Web application development is the unit tests. There are a lot of benefits when you write tests for any application: refactoring, finding and fixing bugs, and even writing new code from tests (Test Driven Development). In React world, the main tool for writing unit tests is JEST, another Facebook Open Source project.
The main advantages of using JEST compared to other tools (such as Enzyme, Mocha, NightmareJS, Protractor, WebDriver.io, etc.) are:
- Easy setup
- JEST has everything that you need: runners, assertions, coverage reports, and it's not necessary to install different libraries to write unit tests anymore
- Snapshots
Snapshots are the most interesting feature. It “takes a picture” of your component and if something changes, your test breaks and warns you about the change, showing how the component was and how it is right now. Check the sample code in Listing 7 to see how it works.
Listing 7: Snapshot feature of Unit Testing
import React from 'react';
import Link from '../Link.react';
import renderer from 'react-test-renderer';

it('renders correctly', () => {
    const tree = renderer.create(
        <Link page="http://www.facebook.com">Facebook</Link>
    ).toJSON();
    expect(tree).toMatchSnapshot();
});
A React CRUD from Scratch
Let's try a few things to see how it works.
Installing and Running React
You can get started by using the Create React App, developed by Facebook. On the console or terminal, type:
npx create-react-app my-first-app
cd my-first-app
npm start
NPX comes with NPM. To install them, go to https://nodejs.org. These command lines create a new React application and run locally under http://localhost:3000. To edit your code, one of the best options is to use Visual Studio Code (https://code.visualstudio.com) or any other text editor of your preference.
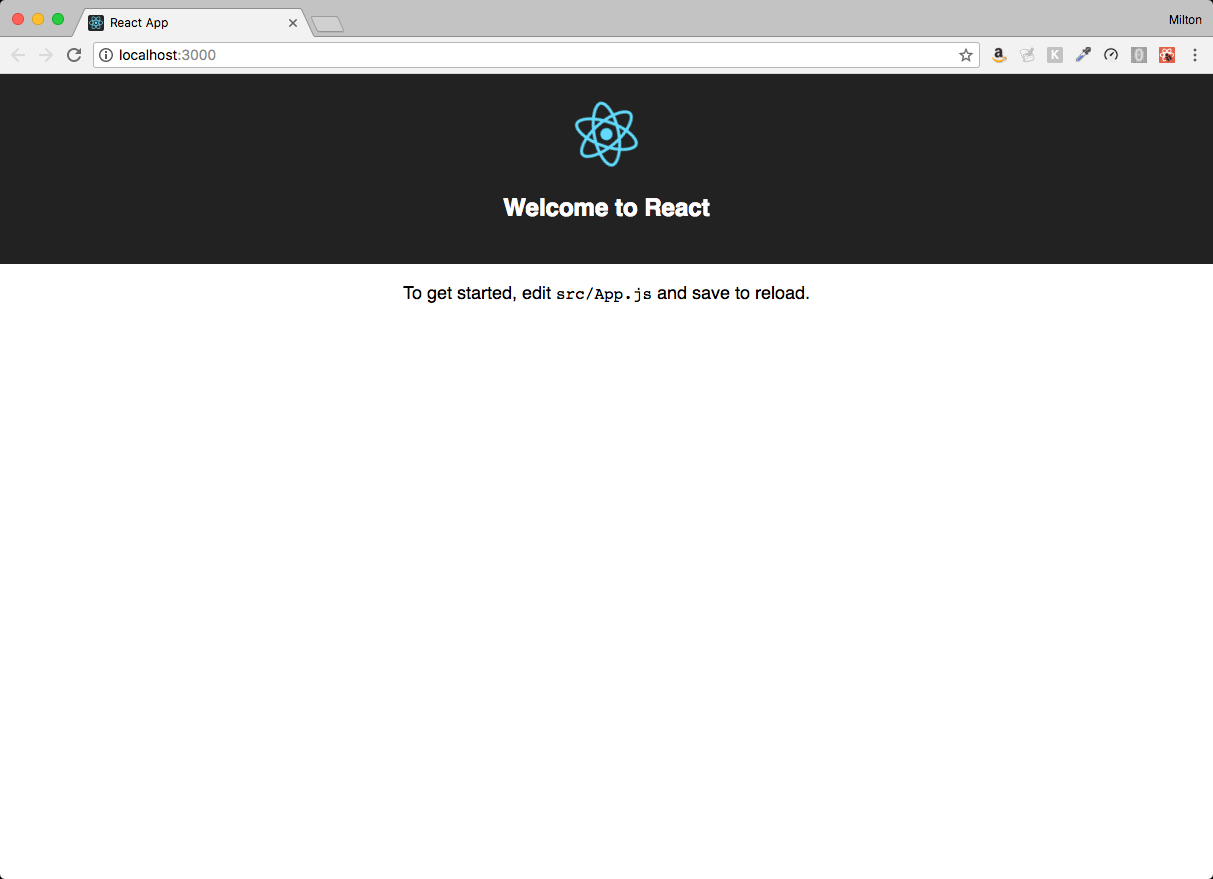
After typing npm start, If everything goes ok, you should see the home page with the React logo spinning. (Figure 4). The homepage itself suggests that you edit the App.js to get started. Notice that you don't need to reload the page to see the changes. As you save the changes, the page reloads automatically.
Listing
Because you're not going to use a database for this lesson, you'll create a list of magazines and store them locally. To do that, open the App.js file and set this list with the const reserved word as well as the localStorage before the class declaration. The console.log command shows on the developer tools that the localStorage is working properly. You can also check out how the state statement works on the render method in Listing 8.
Listing 8: Creating the list of magazines on App.js
import React, { Component } from 'react';
import logo from './logo.svg';
import './App.css';

const magazines = [
    { title: 'Magazine 1', year: 2017 },
    { title: 'Magazine 2', year: 2018 }
]

localStorage.setItem('magazines', JSON.stringify(magazines));

class App extends Component {

    constructor(props) {
        super(props);

        this.state = { magazines: [] }
    }

    getMagazines() {
        const magazines = JSON.parse(localStorage.getItem('magazines'));
        console.log(magazines);
        this.setState({magazines: magazines});
    }

    componentWillMount() {this.getMagazines(); }

    render() {
        return (
            <div className="App">
                <h1>Magazines</h1>
                {
                    this.state.magazines.map(x => {
                        return ( <div key={x.title}>{x.title} | {x.year}</div> )
                    })
                }
            </div>
        );
    }
}

export default App;
To make the code cleaner, create a new component, a file called MagazineItem.js. This new component replaces the lines of code on the foreach statement on the render method of the App.js file.
The new App.js is in Listing 9 and the MagazineItem.js is in Listing 10.
Listing 9: App.js refactored referencing the MagazineItem.js
import React, { Component } from 'react';
import logo from './logo.svg';
import './App.css';
import MagazineItem from './MagazineItem';

const magazines = [
    {
        title: 'Magazine 1', year: 2017
    },
    {
        title: 'Magazine 2', year: 2018
    }
]

localStorage.setItem('magazines', JSON.stringify(magazines));

class App extends Component {

    constructor(props) {
        super(props);

        this.state = {
            magazines: []
        }
    }

    getMagazines() {
        const magazines =
            JSON.parse(localStorage.getItem('magazines'));
            this.setState({magazines: magazines});
    }

    componentWillMount() {
        this.getMagazines();
    }

    render() {
        return (
            <div className="App">
                <h1>Magazines</h1>
                {
                    this.state.magazines.map(x => {
                        return (
                            <MagazineItem {...x} />
                        )
                    })
                }
            </div>
        );
    }
}

export default App;
Listing 10: MagazineItem.js
import React, { Component } from 'react';
import logo from './logo.svg';
import './App.css';

class MagazineItem extends Component {

    constructor(props) {
        super(props);
    }

    render() {

        const { title, year } = this.props;

        return (
            <div key={title}>{title} | {year}</div>
        );
    }
}

export default MagazineItem;
You'll notice the three dots in Listing 9 when you return the MagazineItem, which is called a spread operator. This operator allows you to pass all the properties of the object at once to the component, instead of passing one by one. So instead of using:
<MagazineItem {...x} />
You could use:
<MagazineItem title={x.title} year={x.year} />
These props are accessed in Listing 10 on the render method.
render() {
    const { title, year } = this.props;
    return (
        <div key={title}>{title} | {year}</div>
    );
}
The const line is a shortcut for the div, which could be written like this:
render() {

    return (
        <div key={this.props.title}>{this.props.title} | {this.props.year}</div>
    );
}
Deleting
Delete a magazine by following these steps:
Create the method onDelete in App.js that removes the magazine:
onDelete(title) {
    const magazines = this.getMagazines();
    const filteredMagazines =
        magazines.filter(x => {
            return x.title !== title;
        });
        this.setState(magazines: filteredMagazines});
}
Increment the MagazineItem tag on App.js by adding the onDelete prop:
<MagazineItem onDelete={this.onDelete} {...x} />
Create the onDelete method on MagazineItem.js and add a button with the onClick event on MagazineItem.js:
onDelete() {
        const { onDelete, title } = this.props;
        onDelete(title);
    }

    render() {

        const { title, year } = this.props;

        return (
                <div key={title}>{title} | {year}>
            <button onClick={this.onDelete}>
            Delete
            </button>
        </div>
        );
    }
By adding this feature to your application, you can practice and understand how exactly the states and props work and how you can pass and delegate a method from one component to another.
Adding
To add a new magazine, increment the App.js by adding the input controls and the button bellow the magazine list:
<br />
<span>
<input type="text" ref={titleInput =>
        this.titleInput = titleInput}
        placeHolder="Type the title here..." />
<input type="text" ref={yearInput =>
        this.yearInput = yearInput} value={year}
placeHolder="Type the year here..." />
<button onClick={this.onAdd}>
    Add Magazine
</button>
</span>
The ref word means that this input object can be accessed from any place in the code. In this case, it will be used on the onAdd method:
onAdd() {
    const magazines = this.getMagazines();
    const title = this.titleInput.value;
    const year = this.yearInput.value;

    magazines.push({ title: title, year: year });

    this.titleInput.value = '';
    this.yearInput.value = '';
    this.setState({magazines: magazines});
}
To save the new magazine to the list, you first call the push method and then set the magazine in the state object via setState. To clear the input text boxes, just set the value as empty on the respective references.
Editing
Editing requires a few more lines of code and some logic to make it work. The main file that holds the logic to pull data and save is in App.js. You'll add an onSave method there:
onSave(oldTitle, newTitle, year) {
    let magazines = this.getMagazines();
    magazines.map(magazine => {
        if (magazine.title===oldTitle) {
            magazine.title = newTitle;
            magazine.year = year;
        }
    });
    this.setState({magazines: magazines});
}
Because the magazines list will be changed, the let word is used on the magazines variable rather than const. Notice that you must call the setState method to update the magazines list. On the same file, the MagazineItem should be changed, so the method onSave can be called from any magazine item as follows:
<MagazineItem onSave= {this.onSave} onDelete={this.onDelete} {...x} />
Now the application requires the following steps for editing:
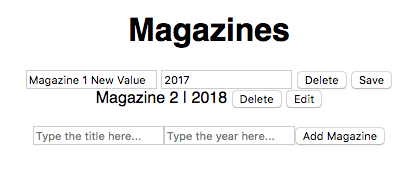
- Show the option to edit the item on the magazine list by clicking the Edit button (Figure 5).
- Show the text box filled with the current value right after clicking the Edit button (Figure 6).
- Replace the Edit button with the Save button (Figure 6).
- Save the item with the new value and update the list (Figure 7).


With all of these features implemented, you have a complete CRUD for the application. The complete code is available in Listing 11 (App.js) and Listing 12 (MagazineItem.js).
Listing 11: The complete App.js for the CRUD
import React, { Component } from 'react';
import logo from './logo.svg';
import './App.css';
import MagazineItem from './MagazineItem';

const magazines = [
    { title: 'Magazine 1', year: 2017 },
    { title: 'Magazine 2', year: 2018 }
]

localStorage.setItem('magazines', JSON.stringify(magazines));

class App extends Component {

    constructor(props) {
        super(props);

        this.state = { magazines: JSON.parse(localStorage.getItem('magazines')) }

        this.getMagazines = this.getMagazines.bind(this);
        this.onDelete = this.onDelete.bind(this);
        this.onAdd = this.onAdd.bind(this);
        this.onSave = this.onSave.bind(this);
    }

    onDelete(title) {
        const magazines = this.getMagazines();
        const filteredMagazines = magazines.filter(x => { return x.title != title; });
        this.setState({magazines: filteredMagazines});
    }

    onAdd() {
        const magazines = this.getMagazines();

        const title = this.titleInput.value;
        const year = this.yearInput.value;

        magazines.push({ title: title, year: year });

        this.titleInput.value = '';
        this.yearInput.value = '';

        this.setState({magazines: magazines});
    }

    onSave(oldTitle, newTitle, year) {
        let magazines = this.getMagazines();
        magazines.map(magazine => {
            if (magazine.title===oldTitle) {
                magazine.title = newTitle;
                magazine.year = year;
            }
        });
        this.setState({magazines: magazines});
    }

    getMagazines() { return this.state.magazines; }

    componentWillMount() {
        const magazines = this.getMagazines();
        this.setState({magazines: magazines});
    }

    render() {
        const { title, year } = this.state;

        return (
            <div className="App">
            <h1>Magazines</h1>
            {
                this.state.magazines.map(x => {
                    return (
                        <MagazineItem onSave={this.onSave} onDelete={this.onDelete} {...x} />
                    )
                })
            }
            <br />
            <span>
            <input type="text"
                ref={titleInput =>
                    this.titleInput = titleInput}
                    placeHolder="Type the title here..." />
            <input type="text"
                ref={yearInput => this.yearInput = yearInput}
                value={year} placeHolder="Type the year here..." />
            <button onClick={this.onAdd}>Add Magazine</button>
            </span>

            </div>
        );
    }
}

export default App;
Listing 12: The complete MagazineItem.js for the CRUD
import React, { Component } from 'react';
import logo from './logo.svg';
import './App.css';

class MagazineItem extends Component {

    constructor(props) {
        super(props);
        this.onDelete = this.onDelete.bind(this);
        this.onSave = this.onSave.bind(this);
        this.onEdit = this.onEdit.bind(this);
        this.state = { isEditing: false }
    }

    onDelete() {
        const { onDelete, title } = this.props;
        onDelete(title);
    }

    onSave() {
        const { onSave, title } = this.props;
        onSave(title, this.refTitle.value, this.refYear.value);
        this.setState({isEditing:false});
    }

    onEdit() {
        const { onEdit, title, year } = this.props;
        this.setState({isEditing:true});
        this.refTitle.value = title;
        this.refYear.value = year;
    }

    render() {
        return (
            <div>
                <span style={{display:this.state.isEditing ? 'none' : 'inline'}}
                     key={this.state.title}>{this.props.title} | {this.props.year}</span>
                <div style={{display:this.state.isEditing ? 'inline' : 'none'}}>
                    <input type='text' ref={refTitle => this.refTitle = refTitle} /> {` `}
                    <input type='text' ref={refYear => this.refYear = refYear}  /> {` `}
                </div>
                {` `}
                <button onClick={this.onDelete}>
                    Delete
                </button> {` `}
                <button onClick={this.onEdit} style={{display:this.state.isEditing ? 'none' :
                    'inline'}}>Edit</button>{` `}
                 <button onClick={this.onSave} style={{display:this.state.isEditing ? 'inline' :
                     'none'}}>Save</button>
            </div>
        );
    }
}

export default MagazineItem;
Conclusion
Even though React is not considered a framework (unlike Angular), it offers a robust method for creating scalable and fast applications. It's all UI-based, but under the hood, some important pieces work together to make everything happen smoothly: components, ES6, Virtual DOM, states, etc. It's important to remember that React doesn't work with two-way binding. On the other hand, it forces you to take full control of what you're doing, which isn't bad at all.
It's easy to find free third-party React components on the Internet. In most cases, you won't need to worry about writing a specific component from scratch. A good place to start looking for React components is https://reactstrap.github.io. Reactstrap is a set of components based on bootstrap standards. Some handy components, such as Carousel, Modals, Alerts, and Dropdowns can be found there.
There are several ways to write Web apps nowadays. React is one of the easiest and fastest ways to create a decent app with fantastic results. It doesn't mean that you can write anything that you can think of or hit run with the thought, “as long as it runs and doesn't crash, it will be okay.” It's always good to follow best practices and patterns. React allows you to follow all the rules in order to produce a readable code, and a fast, maintainable and scalable application.
Happy coding!