In my previous Alexa article, I covered building an Alexa Skill using Azure. In this article, I'm covering similar territory, but this time, instead of Hello World on Azure, I'll show you how to build a City Facts skill as an AWS Lambda Function.
Designing the Skill
One of the more popular beginner Alexa Skill projects is a Facts Skill. This simple skill is a collection of facts about the subject of your choice. Some popular skills of this type include trivia facts, such as Superman Facts, Batman Facts, etc. (Asking Alexa for “Superhero Facts” will result in some really awful jokes. You've been warned.)
Facts Skills are part of the Custom Skills library. Almost all skills you create will be Custom Skills (aside from Smart Home Skills and Flash Briefing Skills.) The Facts Skill outlined in this article will be full of information about my favorite place in the Marvel Cinematic Universe: Wakanda. (Wakanda is property of Marvel Comics, Disney, etc.)
A Brief Recap on Alexa Skills
If you read my previous Alexa article in the Mar/Apr 2017 issue, this section should feel familiar.
First, some terminology: Alexa is the personality, and the intermediary voice service between the device and your skill. The devices can come in many forms, including an Echo, Echo Dot, Echo Show, Echo Spot, and Fire TV, to name a few, with more devices coming out all the time. The skill is the code you've written that responds to a request from Alexa.
That's a bit of a mouthful, so take a look at Figure 1 for a clearer picture of how it all comes together.

When you invoke a skill with Alexa, it requires a structured command, such as: “Alexa, give me a Wakanda Fact” (which, coincidentally, is very similar to the command used to invoke the skill developed later in this article).
When designing an Alexa Skill, you need to ask yourself the following questions:
- What purpose does it serve? (To provide information about Wakanda.)
- Where will it live? (in an AWS Lambda Function)
- How will it be invoked?
- How will it respond?
The first two questions have already been addressed, and the last two are covered in the following section, so keep reading.
Marvel Wakanda Facts
Asking Alexa for a Wakanda Fact currently gets a response about Wauconda, Illinois, so instead this skill will be invoked by asking for a “Marvel Wakanda Fact.”
Because not everyone asks for things in exactly the same way, we'll need a few sample utterances so that Alexa can recognize the request:
- Give me a Marvel Wakanda Fact
- Tell me a Marvel Wakanda Fact
- Tell me about Marvel Wakanda
- Tell me something about Marvel Wakanda
- What do you know about Marvel Wakanda?
That should cover the basics, and you can always add more to the list. I'll map these to an intent (which is essentially how Alexa refers to the functions your skill offers), which I'll call:
- WakandaFactIntent
And to round it out, I'll throw in some of the built-in intents that Alexa supports:
- AMAZON.HelpIntent
- AMAZON.StopIntent
- AMAZON.CancelIntent
You know where it's going to live (AWS) and you've got the utterances, and the intents, so the design is almost done. All that remains is knowing what will be returned and how. The how part is easy enough, as you'll be returning a JSON message back to Alexa containing a randomly selected fact.
I've made the “what” part easy too, by grabbing a handful of Wakanda facts from Wikipedia. As you can see, there aren't very many here, but you can always add some of your favorites.
- “Wakanda is an African nation appearing in American comic books published by Marvel Comics. It is the most prominent of several native African nations and home to the superhero Black Panther. Wakanda first appeared in Fantastic Four #52 (July 1966), and was created by Stan Lee and Jack Kirby.”
- “Due to its intentional isolationism, Wakandan technology has, until recently, developed entirely independently of the rest of the world. As such, the design philosophies and methodologies are different and often incompatible with conventional equipment.”
- “Wakanda is the world's most technologically advanced country. For example, Wakandan computer technology is more powerful than that of the rest of the world and completely immune to outside hacking, as it is not based on binary electronics; it can, however, emulate the behavior of such electronics at hugely enhanced efficiencies, allowing it to easily hack almost any conventional system.”
- “Vibranium was used liberally in Wakandan technology, but the recent destruction of all Vibranium has forced large-scale redesigns.”
With that, the design is essentially done and it's time to create the skill in the next section.
Building the Skill
Because you already have the intents and sample utterances, go ahead and convert them into JSON.
First up, the intent schema, as a JSON array:
{
    "intents":
    [
        {
            "intent":"WakandaFactIntent"
        },
        {
            "intent":"AMAZON.HelpIntent"
        },
        {
            "intent":"AMAZON.StopIntent"
        },
        {
            "intent":"AMAZON.CancelIntent"
        }
    ]
}
Next is the sample utterances mapping, in plain text:
WakandaFactIntent give me a marvel wakanda fact
WakandaFactIntent tell me a marvel wakanda fact
WakandaFactIntent tell me about marvel wakanda
WakandaFactIntent tell me something about marvel wakanda
WakandaFactIntent
Again, feel free to add more if you think of them, just be sure to include the name of the intent first. You don't need to add the built-in intents (i.e., Help, Stop, and Cancel). Alexa is pretty good at interpreting those commands, but if you have a specific phrase you want to map to one of them, go for it.
You can save both of the snippets into a single text file, as you'll just be copying and pasting them into the Amazon Alexa Developer Dashboard in a little bit.
Before heading off to the dashboard, there's still the matter of writing the skill code to return your Wakanda facts.
Node.js Code
I'm using Node.js, as it's one of Amazon's preferred languages for AWS Lambda functions and it shows up in most of their samples. If you don't know it, don't panic. I won't be using enough of it to differentiate it from basic JavaScript.
To start, you need some basic boilerplate code, which includes a reference to the Alexa SDK, and setting up the event handler that will be used to respond to the various intents. You'll use this code practically every time you make an Alexa skill as an AWS Lambda function:
'use strict';

const Alexa = require('alexa-sdk');

exports.handler = function(event, context, callback)
{
    var alexa = Alexa.handler(event, context);
    alexa.APP_ID = 'amzn1.ask.skill.replace-me!'
    alexa.registerHandlers(handlers);
    alexa.execute();
};
The next part is a collection of functions that respond to various Alexa events, such as LaunchRequest, and your intents. The LaunchRequest event is fired automatically whenever your skill starts up (on a new interaction, not only a response).
In this example, I'm emitting the WakandaFactIntent that triggers the function of the same name, and which calls the getRandomWakandaFactEvent that I'll get to shortly.
You can also see handlers for the Cancel, Stop, and Help intents:
var handlers = {
    'LaunchRequest': function () {
        this.emit('WakandaFactIntent');
    },
    'WakandaFactIntent': function () {
        var say = 'Here is your fact. ' + getRandomWakandaFact();
        this.response.speak(say);
        this.emit(':responseReady');
    },
    'AMAZON.CancelIntent': function () {
        this.response.speak('Goodbye');
        this.emit(':responseReady');
    },

    'AMAZON.StopIntent': function () {
        this.response.speak('Goodbye');
        this.emit(':responseReady');
    },
    'AMAZON.HelpIntent': function () {
        this.response.speak('you can ask for a fact by saying, tell me a fact.');
        this.response.listen('try again');
    }
};
Most of this is boilerplate stuff as well, other than the custom event and function names, so feel free to use it over and over to create your own Fact Skills.
Most of this is boilerplate stuff, other than the
customevent and function names, so feel free to use it over and over to create your own Fact Skills.
Lastly, there's the getRandomWakandaFact function that selects a fact, at random, and sends back a string for Alexa to say.
In this example, I'm storing all of the facts in an array, but it could just as easily be a database, a call to a webservice, or whatever you need to get the job done. I'm only showing a snippet of it here.
function getRandomWakandaFact() {
    var myFacts = [
        'Wakanda Fact 1',
        'Wakanda Fact 2',
        ...
    ];

    return(myFacts[Math.floor(Math.random() * myFacts.length)]);
}
You can see the entire function in Listing 1.
Listing 1. RandomWakandaFact function
function getRandomWakandaFact() {
    var myFacts = [
    'Wakanda is an African nation appearing in American comic books published by Marvel Comics.
    It is the most prominent of several native African nations and home to the superhero Black Panther.
    Wakanda first appeared in Fantastic Four #52 (July 1966), and was created by Stan Lee and Jack Kirby.',

    'Due to its intentional isolationism, Wakandan technology has, until recently, developed entirely
    independently of that of the rest of the world. As such, the design philosophies and methodologies
    are different and often incompatible with conventional equipment.',

    'Wakanda is the worlds most technologically advanced country. For example, Wakandan computer technology
    is more powerful than that of the rest of the world and completely immune to outside hacking, as it
    is not based on binary electronics; it can, however, emulate the behavior of such electronics at hugely
    enhanced efficiencies, allowing it to easily hack almost any conventional system.',

    'Vibranium was used liberally in Wakandan technology, but the recent destruction of all Vibranium has forced large-scale redesigns.'
    ];

return(myFacts[Math.floor(Math.random() * myFacts.length)]);
}
Those facts are all stored and delivered as plain text, but you could also format them with Speech Synthesis Markup Language (SSML) as needed, if you find Alexa stumbling over any of the words. If you need a primer on SSML, you can take a look at the July 2017 issue of CODE Magazine (http://www.codemag.com/Article/1707091/Use-Your-Words-Getting-Familiar-with-Speech-Synthesis-Markup-Language).
That's all the code, so it's time to create the AWS Lambda function and set up the skill in the Dashboard.
Set Up and Deployment
In this section, I'll briefly cover setting up an AWS Lambda Function, adding the code, and then configuring the skill in the Alexa Developer Dashboard.
Setting Up an AWS Lambda Function
Before setting up your Alexa skill in the dashboard, you need to create your AWS Lambda function by logging into the AWS Services console at https://aws.amazon.com and selecting Lambda. If you don't have an AWS account, you'll need to create one first.
Create a new function (the big orange button in the top right) and you'll be prompted with a choice of authoring from scratch, using a blueprint, or creating a serverless application repository, as in Figure 2.
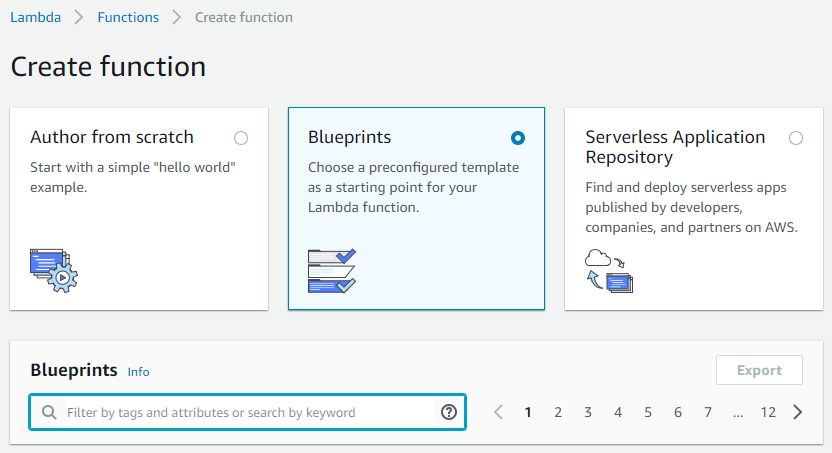
Select the Blueprints option and type Alexa in the filter box to narrow down the choices. You're looking for the one called alexa-skill-kit-sdk-factskill. Selecting a blueprint gives you some sample code and also sets up some of the back-end connections that you'd have to do manually otherwise.
Selecting a blueprint gives you some sample code and also sets up some of the back-end connections that you'd have to do manually otherwise.
With the factskill blueprint selected, you'll need to enter some basic info about your skill, including setting a permissions role, as shown in Figure 3. I chose MarvelWakandaFacts for the function name, but it can be called anything, this is just an internal name.
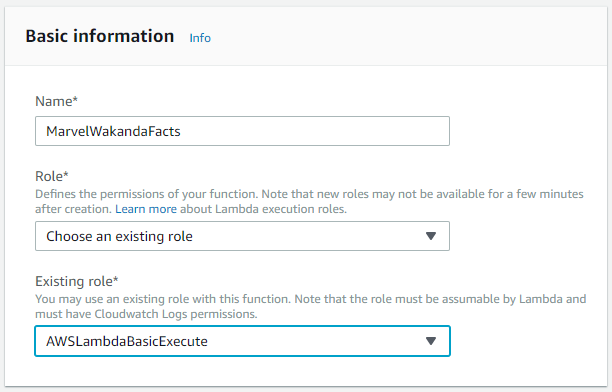
Role is a little bit trickier. You'll want an AWS Lambda Basic Execute role, but if this is your first time here, you won't have one in the list, so you'll have to create it. Fortunately, AWS does a good job of walking you through the process, once you select the Create a new role from templates option.
This isn't my first time creating an AWS Lambda Function to use with an Alexa Skill, and because you can use the same role over and over, no matter how many you create, I'm using the one I created previously.
At the bottom of the page, you'll also see some generated code for your function. Don't worry about trying to edit it right now; just hit the orange Create Function button. You'll get an opportunity to edit it in a bit.
Now that the MarvelWakandaFacts function has been created, you'll be presented with the designer, which is where you add the triggers from the list on the left. This function requires an Alexa Skills Kit trigger to function properly, so select that and you'll end up with something that looks like Figure 4.
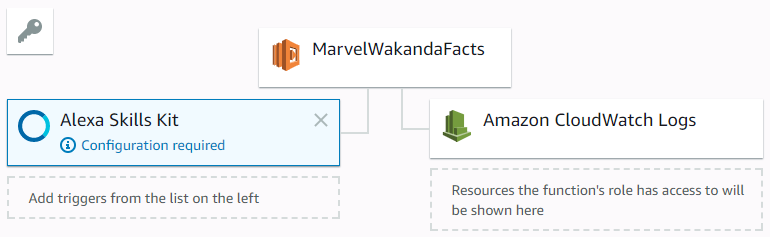
All of the facts in this example are stored in the code, but if I were building a skill that relied on an AWS-hosted database, it would show up here on the right, under Resources.
Clicking on the Alexa Skills Kit trigger presents a configuration dialog where you can set the Skill ID Verification. This allows you to control which skill(s) can call your AWS Lambda function. For now, just set it to Disable, because you don't yet have a skill ID. AWS isn't a big fan of that, so it's important to go back and change it to Enable once the skill is configured and you have a skill ID.
Save it and click on the MarvelWakandaFacts in the diagram so you can take a look at the code. You'll notice that it's pretty close to what you saw earlier (yay Blueprints!) so it won't require much in the way of changes.
I've made a few format changes to the function code, so it's not a direct match, but it's close enough that you could just paste the facts into the data array (or create your own facts, if you're doing a different topic). I'm going to paste my code in, but I still need an ID, so I'll be back.
Once the code is updated, save again, open a new browser tab (because there will be some back and forth to get everything wired up), and head over to https://developer.amazon.com/alexa to create the skill.
Creating Your Alexa Custom Skill
In the Your Alexa Consoles drop-down, select Skills, and you'll be presented with a list of all the Alexa Skills you've created so far, the languages they support, the type of skill, and current status.
Click the Create Skill button and you'll be presented with a wizard to walk you through the creation steps. Enter the skill name, and then select Custom on the next screen.
Once that's done, you'll be presented with the “new and improved” Alexa Custom Skills UI. On the left, you'll see an expandable list that shows your Interaction Model, Interfaces, and Endpoint.
In the Interaction Model section, you'll need to perform the following steps:
- Click Invocation and enter the Skill Invocation Name. (i.e., Marvel Wakanda Facts).
- Click Intents. You will see the three built-in intents and still need to add yours. Click the Add button and enter the name of your intent. (i.e., WakandaFactIntent). Make sure what you enter here is an exact match for your intent name, as defined previously.
- Add the Sample Utterances defined earlier and click Save Model (at the top of the page).
- Click Endpoint and you'll need the ARN from the AWS Lambda function, so switch back to that tab and grab it from the top right of the page. It looks like this: arn:aws:lambda:us-east-1:xxxxxxxxxxxx:function:MarvelWakandaFacts*.*
- Copy and paste the entire ARN into the Default Region box under AWS Lambda ARN in the Service Endpoint Type section and click Save Endpoints.
- Click the Build tab again to refresh the view and take a look at the Skill Builder checklist on the right. Everything should be green except Build Model. Click it and wait a few seconds.
- Once that lights up green, you're ready to test. Click the Test tab.
Test Your Alexa Custom Skill
You'll need to enable the skill for testing by clicking the slide switch at the top. This automatically validates whether or not your skill's interaction model has been properly built and tells you to go back and fix it if it hasn't.
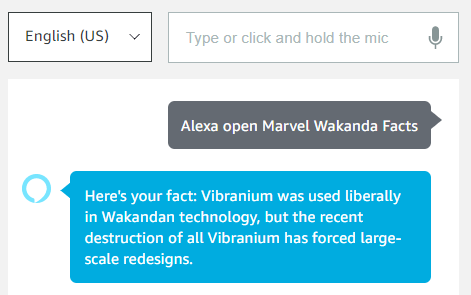
Once that's done, find the Alexa Simulator tab, and type: Alexa open Marvel Wakanda Facts. The simulator will think for a moment, and you'll get a response, like in Figure 5.
While you're there, take a look at the JSON Input and Output sections on the right side of the page. These show you exactly what's being passed back and forth between Alexa and your (AWS Lambda Function) code. If you ever run into a problem, these are immensely helpful to look at when debugging.
This works because I disabled checking for the skill ID in the AWS Lambda Function. So that will need to be fixed, and the skill ID should also be added to the function code. You can find the skill ID embedded in the session block of the JSON Input in the Skill I/O section of the Test Page.
It's listed as the applicationId below:
"session": {
    "new": true,
    "sessionId": "amzn1.echo-api.session.xxxxx...",
    "application": {"applicationId": "amzn1.ask.skill.xxxxx..."},
    "user": {
        "userId": "amzn1.ask.account.xxxxx..."
    }
},
Copy that, and then go back to your AWS tab and update the skill ID check to Enabled and also paste it into the variable in the code. Make sure to save in both places.
At this point, you're done! Hop back over to the Test screen and try it again, just to make sure everything is still working after you made changes. The only thing left to do now is publish your new AWS Lambda-based Alexa Skill.
Publishing
Publishing is handled via the Launch tab. When you're ready to publish, click the Launch tab and fill out the form on the Store Preview page. You'll need an icon and a description. Once that's filled out, click Submit to Certification and you're done.
Certification usually takes a couple of days, and you'll get an email from Amazon when it's done.
Congratulations! I can't wait to see what you build. Hit me up on Twitter and tell me about it so I can check it out.