In my last few articles, I've explored a lot of JavaScript, jQuery, and the Web API. The code I wrote points out some deficiencies when writing in these technologies. That's the problem with JavaScript and jQuery: It's often difficult to write good, reusable, and extensible code. However, things are changing fast in the client-side world, especially now that Angular and other similar frameworks have been invented. In the last article (CODE Magazine May/June 2016), you improved your client-side code by using a closure and by using Mustache for data binding. In this article, you'll learn how these same concepts are applied in Angular.
Related Articles
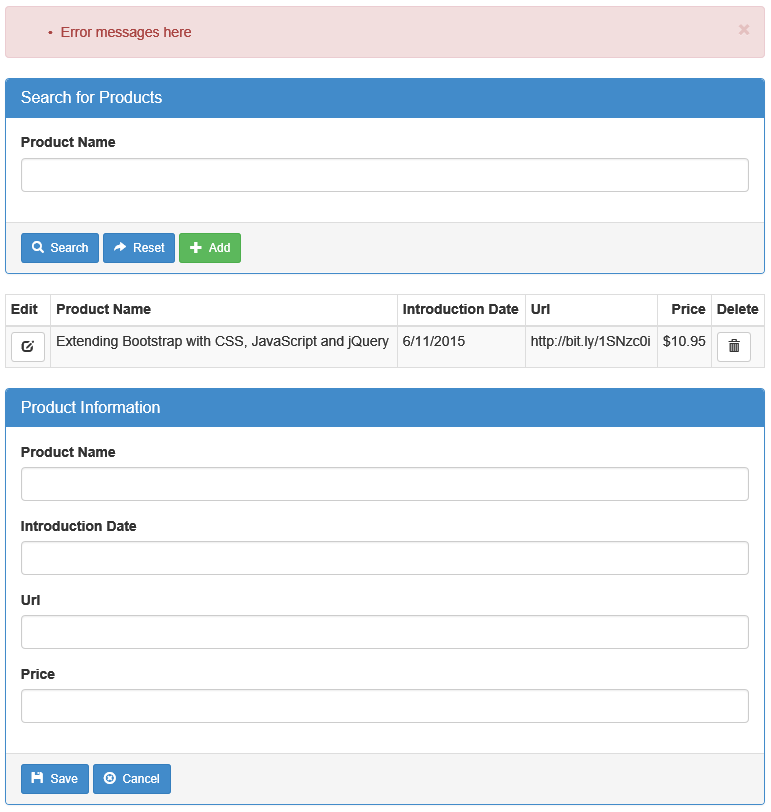
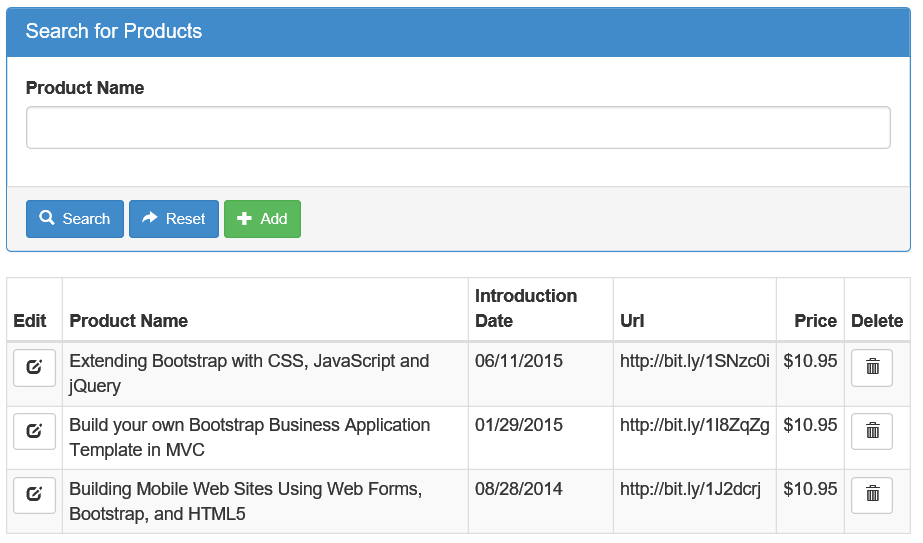
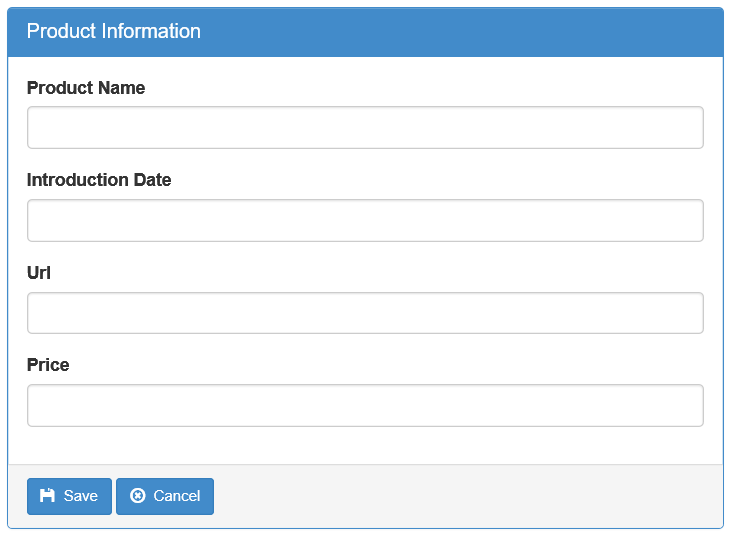
The Web page you'll build for this article is a search, list, add, edit and delete page of Product data for a fictitious company called Paul's Training Company (PTC). All of the features of this page are shown in Figure 1. In Figure 2, you see just the search and list area displayed. In Figure 3, only the detail area is displayed. You'll learn how to show and hide these various areas using Angular.
Create an Angular Application Scope
There are many articles and blog posts on what Angular is, so I won't go into that here. The first thing you do in an Angular application is create a module. For the sample in this article, create a file called app.js and place the following code in that file to create a module named 'ptcApp'.
(function () {
    'use strict';

    angular.module('ptcApp', []);
})();
Create a Controller
Once you have a module defined, create a controller into which you place all the variables you need to use for binding data to your HTML. The controller name used in this article is called PTCController. Feel free to name this controller whatever you want. Declare the controller within the scope of the module you created in the previous code snippet. Use the controller() function on the module to declare the name of your controller, as shown here:
angular.module('ptcApp').controller('PTCController', PTCController);
Pass in the name to use for the ng-controller directive and the function name that will enclose all of your variables. The function declaration needs to accept a $scope variable at a minimum. There are additional parameters that you may need to accept, depending on what services you wish to use in your controller. Here's an example of how to declare your controller function:
function PTCController($scope) {
    var vm = $scope;
}
One best practice is to immediately create a variable that can be used instead of typing $scope over and over. Create a variable called vm, which stands for View Model, and assign it to $scope. This saves you a little typing within your controller and may provide some flexibility later on, if you ever want to change your service. The next snippet is the IIFE you'll create in another JavaScript file called productController.js. This file and the app.js file are both needed on any HTML pages you intend to use with Angular.
(function () {
    'use strict';

    angular.module('ptcApp').controller('PTCController',
        PTCController);

    function PTCController($scope) {
        var vm = $scope;
    }
})();
Add Angular to Your Page
In order to understand the overall HTML structure that you need for the product page, take a look at Listing 1. There are two key pieces you need to have in order for Angular to control the elements on your page. The first is in the <html> element - this is the ng-app directive. This directive's value must be the same name as the application module name you used; in this article it's called ptcApp. The second key item is in the <body> element: the ng-controller directive. This directive's value must be the same name as the controller you defined; in this article, it's called PTCController.
Listing 1: The outline of the HTML for the Product page
<!DOCTYPE html>
<html xmlns="http://www.w3.org/1999/xhtml";>
<head>
    <title>Paul's Training Company</title>

<link href="../Content/bootstrap.css"
      rel="stylesheet" />
<link href="../Content/site.css"
     rel="stylesheet" />
</head>
<body>
<div class="container body-content">
    <!-- ** BEGIN MESSAGE AREA ** -->
    <div class="row">
        <div class="col-xs-12">
        </div>
    </div>
    <!-- ** END MESSAGE AREA ** -->
    <!-- ** BEGIN SEARCH AREA ** -->
    <div class="panel panel-primary">

    </div>
    <!-- ** END SEARCH AREA ** -->
    <!-- ** BEGIN LIST AREA ** -->
    <div class="table-responsive">
    <table class="table table-condensed
                  table-bordered table-striped
                  table-hover">

    </table>
    </div>
    <!-- ** END LIST AREA ** -->
    <!-- ** BEGIN DETAIL AREA ** -->
    <div class="panel panel-primary">

    </div>
    <!-- ** END DETAIL AREA ** -->
</div>

  <!-- ** BEGIN SCRIPT AREA ** -->
  <script src="../Scripts/jquery-1.11.0.min.js">
  </script>
  <script src="../Scripts/bootstrap.min.js">
  </script>
  <script src="../scripts/angular.min.js">
  </script>
  <script src="../scripts/app.js"></script>
  <script src="../scripts/productController2.js">
  </script>
  <!-- ** END SCRIPT AREA ** -->
</body>
</html>
Note the use of bootstrap in the definition of the elements of the page. Also notice the use of the comments I put in to separate each area of the page. I find the use of comments helps me during debugging using the F12 tools, and also helps me quickly identify areas when I'm looking at my HTML page in the editor.
Handle UI State
Immediately after declaring your vm variable, start creating variables within your Angular scope by adding a new property to your view model variable. For example, you might declare an object literal that's used to show or hide different areas of the HTML based on the current page mode or state. In Listing 2, you declare a new variable named uiState. You then create a function to initialize this variable with various properties that are used to control your HTML, also shown in Listing 2.
Listing 2: Use an object literal to control the UI state of the page
vm.uiState = {};

// Private Variables
const pageMode = {
    LIST: 'List',
    EDIT: 'Edit',
    ADD: 'Add',
    EXCEPTION: 'Exception',
    VALIDATION: 'Validation'
};

// Create the uiState object literal
function initUIState() {
    return {
        mode: pageMode.LIST,
        isDetailAreaVisible: false,
        isListAreaVisible: false,
        isMessageAreaVisible: false,
        isSearchAreaVisible: false,
        messages: []
    };
}
As your user interacts with your search, list, add, edit, and delete page, you need to display different parts of the page based on the current mode. In the uiState variable, you create a property called mode that's set to one of several values. These values are defined in the constant pageMode. This constant is used to set the mode after the user clicks on certain buttons to put the page into a new mode. Each of the modes expressed in the pageMode constant sets different views of the same HTML page. Figure 1 shows the page with all of the areas displayed.
The List mode (Figure 2) displays just the search and list areas on the page. This is the mode the user sees when first loading the page. The Exception and Validation mode displays the message area, but doesn't hide any areas currently displayed. In order to set each of these different modes, a function called setUIState() is created, as shown in Listing 3.
Listing 3: A switch statement works well for handling the different UI states
function setUIState(state) {
    // Set page state
    vm.uiState.mode = state;

    switch (state) {
        case pageMode.LIST:
        vm.uiState.isDetailAreaVisible = false;
        vm.uiState.isListAreaVisible = true;
        vm.uiState.isSearchAreaVisible = true;
        vm.uiState.isMessageAreaVisible = false;
        break;
    case pageMode.ADD:
        vm.uiState.isDetailAreaVisible = true;
        vm.uiState.isListAreaVisible = false;
        vm.uiState.isSearchAreaVisible = false;
        vm.uiState.messages = [];
        break;
    case pageMode.EDIT:
        vm.uiState.isDetailAreaVisible = true;
        vm.uiState.isListAreaVisible = false;
        vm.uiState.isSearchAreaVisible = false;
        vm.uiState.messages = [];
        break;
    case pageMode.EXCEPTION:
        vm.uiState.isMessageAreaVisible = true;
        break;
    case pageMode.VALIDATION:
        vm.uiState.isMessageAreaVisible = true;
        break;
    }
}
The Edit and Add mode (Figure 3) displays the detail area and hides the search and list areas. This is the mode the user sees when clicking on the Add button or the Edit button on one of the rows in the table.
Once the uiState is created and the setUIState() function is written, call each of these functions in a function called init(). The init() function should be called close to the top of your PTCController function, as shown in the next snippet.
init();

// Initialize variables
function init() {
    // Initialize UI State
    vm.uiState = initUIState();
    setUIState(pageMode.LIST);
}
Now that you have the Boolean variables set to the appropriate value, add an ng-show directive to the appropriate <div> tags in each area on the page, as shown in the code snippet below. There's no other code to add; you only need to set the appropriate Boolean variable to either true or false and the ng-show takes care of showing or hiding the <div> tag it is associated with.
<!-- ** BEGIN MESSAGE AREA ** -->
<div ng-show="uiState.isMessageAreaVisible"
     class="row">

<!-- ** BEGIN SEARCH AREA ** -->
<div ng-show="uiState.isSearchAreaVisible"
     class="panel panel-primary">

<!-- ** BEGIN LIST AREA ** -->
<div ng-show="uiState.isListAreaVisible"
     class="table-responsive">

<!-- ** BEGIN DETAIL AREA ** -->
<div ng-show="uiState.isDetailAreaVisible"
     class="panel panel-primary">
Hook Up Events
In order to connect button clicks to functions within your Angular controller, those too must be added to the $scope of your module. Use the vm variable and append the name of the event you want to expose for use in an ng-click directive on any button or anchor tag on your HTML page. Listing 4 shows an example of declaring your intention to use an event and assigning it to a function within the controller.
Listing 4: Expose your click event functions through the Angular $scope
vm.addClick = addClick;
vm.cancelClick = cancelClick;
vm.editClick = editClick;
vm.deleteClick = deleteClick;
vm.saveClick = saveClick;

function addClick()
{
    setUIState(pageMode.ADD);
}

function cancelClick() {
    setUIState(pageMode.LIST);
}

function editClick(id) {
    // TODO: Get Data Here

    setUIState(pageMode.EDIT);
}

function deleteClick(id) {
    // TODO: Delete data here
}

function saveClick() {
    saveData();
}

function saveData() {
    // TODO: Save data here
    setUIState(pageMode.LIST);
}
Once you have the functions declared through your scope, call those functions from buttons and anchor tags using the ng-click directive, as shown in Listing 5. You must use the ng-click directive and not the onclick attribute because the functions called are only available within the scope of the Angular controller.
Listing 5: Use the ng-click directive to call each of your click event functions
<button class="btn btn-sm btn-success"
type="button"
ng-click="addClick()">
<i class="glyphicon glyphicon-plus"></i>
Add
</button>
<button class="btn btn-sm btn-primary"
type="button"
ng-click="saveClick()">
<i class="glyphicon glyphicon-floppy-disk"></i>
Save
</button>
<button class="btn btn-sm btn-primary"
type="button"
ng-click="cancelClick()">
<i class="glyphicon glyphicon-remove-circle"></i>
Cancel
</button>
You must use the ng-click directive and not the onclick attribute because the functions called are only available within the scope of the Angular controller.
At this point, you can run the application and see the search and list areas displayed. If you click on the Add button, you see the search and list areas disappear and the detail area appear. You can either click on the Save or Cancel button to redisplay the search and list areas of the page.
Displaying Validation Messages
Let's write a validate() function that can be called before inserting a new product or updating an existing product. I'm not going to cover Angular data validation in this article; instead, I'll show you how to display some mock validation messages. Create three new functions: validate(), insertData() and updateData(), as shown in the following code snippet:
function validate() {
}

function insertData() {
    if (validate()) {
    }
}

function updateData() {
    if (validate()) {
    }
}
Modify the saveData() function, as shown in Listing 6, to check the mode of the button that was last clicked. If it was the Add button, call the insertData() function. Later in this article, you'll hook up the Edit button to set the page into edit mode.
Listing 6: Your save function modifies data and sets the UI state for validation errors
function saveData() {
    // Insert or Update the data
    if (vm.uiState.mode === pageMode.ADD) {
        insertData();
    }
    else if (vm.uiState.mode === pageMode.EDIT) {
        updateData();
    }

    if (vm.uiState.mode === pageMode.EXCEPTION ||
    vm.uiState.mode === pageMode.VALIDATION) {
        // Check for validation error
        setUIState(vm.uiState.mode);
    }
    else {
        setUIState(pageMode.LIST);
    }
}
Create Validation Messages
Hard-code the validate() function to simulate some validation errors. Modify the validate() function, as shown in Listing 7. If you look back at the initUIState() function, you'll see a property named messages that's defined as an empty array. The validate() function is where you check to see whether the product name or URL has not been filled in. You're not doing the checking in this mock, just going to fill in some messages. If either of these were true (the product name or the URL is missing), add an object that has two properties in it to the messages array. In the code shown in Listing 7, you have two properties, property and message, that list the property in error and the message to display. You set the mode property of the uiState variable to Validation. In the saveData() function, test the mode property to see if it's equal to either Exception or Validation.
Listing 7: Simulate validation errors in order to test your message data binding
function validate() {
    // Simulate a data validation error
    vm.uiState.mode = pageMode.VALIDATION;

    vm.uiState.messages.push(
    {
        property: 'ProductName',
        message: 'Product Name must be filled in.'
    });
    vm.uiState.messages.push(
    {
        property: 'Url',
        message: 'Url must be filled in.'
    });

    return false;
}
Display Messages Using an Angular Directive
When you pass in Validation to the setUIState() function, it makes the messages area on the screen become visible. Modify the HTML in the messages area to repeat the <li> tag and display the message property in the object you added in the validate() function.
<ul>
    <li ng-repeat="msg in uiState.messages">
        {{msg.message}}
    </li>
</ul>
The ng-repeat directive causes Angular to repeat the element it's attached to for each object contained in the array. This is similar to the foreach statement in C#. The ng-repeat directive creates a temporary variable named msg for each object you created in the validate() function. If you wish data to be inserted into your HTML that isn't a part of a directive, place any property name within curly braces, such as {{msg.message}}. This data-binding syntax causes Angular to interpret the data within the braces and insert the resulting data into that location in the HTML. In this case, the message property is inserted into a new <li> element for each object in the messages array.
Call Web API to Get List of Products
You've done quite a bit with Angular, but at some point, you need data from a database. This is where you need to use the Web API to get data from your backend data store. Angular provides a service to call the Web API methods to get this data. To use this Angular service, add a second parameter to the controller function. The second parameter is named $http and it uses either XMLHttpRequest or JSONP to call your Web API. Just as you did with the $scope, create your own variable to represent this service. By mapping to your own variable, you give yourself flexibility later if you wish to use a different service for getting data.
function PTCController($scope, $http) {
    var vm = $scope;
    var dataService = $http

}
The first Web API call you make is to retrieve a list of products from your backend data store. The next snippet is some C# code that you might write in a Web API controller to retrieve some data. Where the method named GetDataHere() is located is where you write the appropriate code using the Entity Framework, ADO.NET, or other data-access technology to retrieve a collection of product objects. When using C# from .NET, the .NET runtime automatically serializes your C# List of product objects as a JSON array.
[HttpGet()]
public IHttpActionResult Get()
{
    List<Product> list = new List<Product>();

    list = GetDataHere();

    return Ok(list);
}
Store a JSON Array in Your Angular Scope
Once this array is returned to your Angular controller, store this array of objects in a variable on your scope object. Create the following variable, named products.
vm.products = [];
Add a new function to your Angular controller named getAll(). This function uses the $http data service to call the Get() Web API. Use the .get() function on the data service to make the call to your C# Get() method. The .get() function returns a promise object, and if the status code returned is between 200 and 299, the code within the .then() function is executed. Retrieve the JSON array of product objects from the data property and place it into the products property you created on the view model.
function getAll() {
    dataService.get("/api/Product")
        .then(function (result) {
            vm.products = result.data;
            function (error) {
                handleException(error);
            });
        }
}
Locate the call to the init() function at the top of your controller function and add a call to the getAll() function after the init() call. Calling this function after the init() function causes the product page to display a list of products right when the page is loaded. If you don't want products displayed upon entry, don't call this function.
// Get all products
getAll();
Handle Exceptions
If an HTTP status code that doesn't lie between 200 and 299 is returned, the code in the error function is executed. In the case of an exception, display an error message to the user. Create a handleException() function, as shown in Listing 8.
Listing 8: Gather data from the Angular error object to display to the user
function handleException(error) {
    // Get error information
    var msg = {
        property: error.status,
        message: error.statusText
    };

    // Add any additional error text to message
    if (error.data != null) {
        msg.message += ' - '
        + error.data.ExceptionMessage;
    }

    // Reset array & add error message
    vm.uiState.messages = [];
    vm.uiState.messages.push(msg);

    // Set UI State to Exception or Validation
    setUIState(pageMode.EXCEPTION);
}
The error object returned from the $http data service is an object with a few properties that are of interest. The status property is the HTTP status code returned from the Web API call. This might be something like 500, 404, or any other error code. The statusText is the typical text, like “internal server error” or “resource not found”. If your Web API generates any additional error text, you can retrieve that from the data objects' ExceptionMessage property.
Once you have the error information, create an object that has property and message properties. Store the information you want to display to the user in the message property. Push this object onto your uiState.messages array and call the setUIState() function, passing in the Exception mode, and this makes the message area visible on the screen with the error text displayed.
Build an HTML Table Using Angular Templates
Build a template within the <tbody> tag to bind the product data to the table. Use the ng-repeat directive as you did when building the message list. For the product table, reference the products array to get each product one-by-one and build a <tr> element for each, as shown in Listing 9.
Listing 9: Create an HTML table using Angular data binding and ng-repeat directive
<tbody>
    <tr ng-repeat="product in products">
        <td class='pdsa-action-button-column'>
            <a href='#' class='btn btn-default btn-sm'
                        ng-click="editClick(product.ProductId)">
               <i class='glyphicon glyphicon-edit'></i>
            </a>
        </td>
        <td>{{product.ProductName}}</td>
        <td>{{product.IntroductionDate | date: 'MM/dd/yyyy'}}</td>
        <td>{{product.Url}}</td>
        <td>{{product.Price | currency: "$"}}</td>
        <td class='pdsa-action-button-column'>
            <a href='#' class='btn btn-default btn-sm'
                        ng-click="deleteClick(product.ProductId)">
               <i class='glyphicon glyphicon-trash'></i>
            </a>
        </td>
    </tr>
</tbody>
The code in Listing 9 uses the data binding syntax like you used for displaying messages earlier in this article. The ng-repeat directive creates a product object for each object contained in the products array. As Angular iterates through the array, it uses the property name on the product object to build your HTML table.
As Angular iterates through the array, it uses the property name on the product object to build your HTML table.
When you use the ng-click directive in the edit and delete anchor tags, you don't need to use the double curly braces as you do with normal data-binding in Angular. Because you're using an Angular directive, it already knows that any object you pass within the directive is contained within the scope of the controller.
Summary
In this article, you started your journey to learning to use Angular to create a simple add, edit, and delete page. You also learned how to control visibility of different areas on a single page. You then learned how to display validation and error messages. You finished by making a Web API call to retrieve product data. In the next article, you'll learn how to retrieve a single product and how to insert, update, and delete data using Angular and the Web API.