In my previous CODE Magazine article titled “Mobile Apps for SharePoint and Office 365: Part 1,” I talked about how to build a backend for a mobile app, while that backend was also acting as an Office 365 (or for that matter SharePoint) app. This approach gave me the maximum flexibility and maintainability. One of the most important things to consider when writing mobile apps, is that you have no control over when - or even if - the app gets updated once it's installed. Once installed, it's a child in the wild that you cannot control. Yet it must work or you will get negative reviews in the app store.
In this article, I'll write the first frontend to that mobile backend. I'll author a Hybrid app, specifically using Cordova and Ionic. In order to understand this article, I'll assume you already have a good grasp on AngularJS.
Cordova, or as it is better known, PhoneGap, is a free and open-source framework that allows you to create mobile apps using standard Web technologies. It also lets you target multiple platforms. Most of all, the panacea of write-once-run-everywhere is about as good as it gets in Cordova. No longer throttled by iOS8, the JavaScript engines of embedded Web views work really well. It really relegates native to very OS-specific functions, such as notification widgets, and extensions in iOS. Even those can be added in Cordova.
Enough praising Cordova, let's install it. This article assumes that you have a Mac, and I'll demonstrate building an iOS Hybrid app. If not, you can still follow along for Android development. The steps are not too different. The first thing to do is install NodeJS. NodeJS is quite useful, and a lot of platforms use it; you can grab it from http://nodejs.org/.
Once NodeJS is installed, use node package manager (npm) to install PhoneGap using this command:
sudo npm install -g phonegap
From here on, you can use pure Cordova and start writing your apps. I choose to use a framework called Ionic to author my app. You can read more about Ionic at http://ionicframework.com/. Ionic is a framework built on top of Cordova and AngularJS, which makes writing mobile apps a lot easier, and they have done the leg work for you when it comes to writing UIs that feel and act native. I'm a lazy guy, I love leveraging others' work when I can. You might ask why I didn't use Bootstrap. Isn't that supposed to be the cure-all in writing beautiful responsive user interfaces? Bootstrap is the king of responsive user interfaces, after all. But it's not known for being lightweight, and it's certainly not mobile- and touch-first. Also, when authoring mobile apps, I don't like responsive UIs. For any moderately complex app, responsive UIs end up being as much work, if not more, than just rewriting the view of a properly architected model view controller architecture - which AngularJS provides. So the next step is to install Ionic. In order to install ionic, run the command below in terminal:
sudo install -g ionic cordova
Once ionic is installed, in terminal, cd (change directory) into a folder where you wish to build your app, and run the command below to give yourself a starter project:
ionic start O365App blank
Ionic comes with a few project templates. I started with the blank template because I intended to completely rip out the UI that the Ionic starter project gave me and replace it with my own. Now, change directory into your app directory:
cd O365App
and then run:
ionic serve
This launches a development Web server and launches your default browser with the starter project loaded in it. It probably says “Ionic blank app” and doesn't look impressive quite yet! Don't worry, you'll fix that soon. With the basic app created, let's start thinking of what the app needs to do.
First, I need to think of the app's structure. Since this is an authenticated app, I'll definitely need a login page. And since the functionality of my app is to show the title of my Office 365 app, I'll need a functionality page that shows me the title of my Office 365 site. I am going to call the login page “signin” and the functionality page “home”.
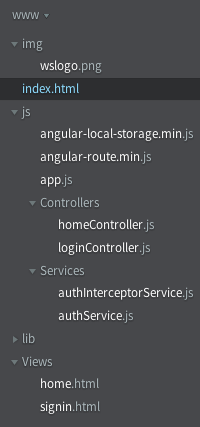
I intend to use an AngularJS SPA app, so it looks like I'll need a total of three controllers, one for the index.html page, one for the login page, and one for the home page where the functionality lives. I'll need views called home.html and signin.html. Create these two html files in your project called “Views”. Also under the js folder, add two controller files called homeController.js and loginController.js.
Additionally, I'll also be using some standard JavaScript libraries. Specifically, I intend to use localStorage to save user credentials. I also intend to use angular routing capabilities. So, go ahead and include angular-route.min.js (https://github.com/angular/bower-angular-route) and angular-local-storage.min.js (https://github.com/grevory/angular-local-storage).
In a real-world application, you probably want to encrypt the locally stored credentials.
Finally, for authentication purposes, I want to isolate the complexity of OAuth etc. in a clean and separate area. I don't want my business logic to worry about how to authenticate and yet I want all my calls to be secure. In order to do so, I'll utilize an interceptor on the $http service. And to reuse authentication logic across controllers, I'll use a service. So, under the js folder, create a folder called services, and create two JavaScript files called authInterceptorService.js and authService.js.
Your final basic structure should look like Figure 1.
With the basic project setup done, it's time to write some code. I intend to divide and conquer, and solve the problem in three steps:
- I intend to get the basic shell of my application working - no authentication or functionality yet. Just the basic navigation and UI.
- I'll add authentication portions.
- I'll add the final actual functionality that you need to be authenticated for.
The Basic Shell
The basic shell is comprised of the user interface that I wish to offer the user. So far, I've already dropped some hints of what the application will look like. I intend to use an Angular SPA, and therefore I will need three html files, and associated controllers.
- The
index.htmlfile which is the “container” of other screens - The
views\Home.htmland thejs\Controllers\homecontroller.js - The
views\signin.htmland thejs\Controllers\loginController.js
The index.html is as shown in Listing 1.
Listing 1: The starter index.html
<!DOCTYPE html>
<html>

<head>
    <meta charset="utf-8">
    <meta name="viewport"
          content="initial-scale=1, maximum-scale=1, user-scalable=no,
              width=device-width">
    <title></title>
    <link href="lib/ionic/css/ionic.css" rel="stylesheet">
    <script src="lib/ionic/js/ionic.bundle.js"></script>
    <script src="cordova.js"></script>
</head>

<body ng-app="O365App">
    <ion-nav-bar class="bar-positive nav-title-slide-ios7">
        <ion-nav-back-button class="button-icon ion-arrow-left-c">
        </ion-nav-back-button>
    </ion-nav-bar>
    <ion-nav-view animation="slide-left-right"></ion-nav-view>

    <script src="js/angular-route.min.js"></script>
    <script src="js/angular-local-storage.min.js"></script>

    <script src="js/app.js"></script>

    <!-- Services -->
    <script src="js/Services/authService.js"></script>
    <script src="js/Services/authInterceptorService.js"></script>

    <!-- Controllers -->
    <script src="js/Controllers/homeController.js"></script>
    <script src="js/Controllers/loginController.js"></script>
</body>
</html>
There are a number of things to note in the index.html file:
- I'm using an angular app called O365App; I'll add this later in the
app.jsfile. - I've added references to all my JavaScript files, controllers, services, Angular routing, and Angular local storage.
- For the main user interface, I'm using
ion-nav-barfor the header, andion-nav-viewfor the container where thesignin.htmlandindex.htmlwill go.
Before you dive into the other html files, let's write the supporting code in the app.js file also. This can be seen in Listing 2.
Listing 2: The starter app.js file
var app = angular.module('O365App',
    ['ionic', 'ngRoute', 'LocalStorageModule'])
    .config(function ($stateProvider, $urlRouterProvider) {
        $stateProvider.state('signin', {
            url: '/signin',
            templateUrl: 'views/signin.html',
            controller: 'loginController'
        })
        .state('home', {
            url: '/home',
            templateUrl: 'views/home.html',
            controller: 'HomeCtrl'
        });

        $urlRouterProvider.otherwise('/signin');
    });
    app.run(function($ionicPlatform) {
        $ionicPlatform.ready(function() {
            if(window.cordova && window.cordova.plugins.Keyboard) {
                cordova.plugins.Keyboard.hideKeyboardAccessoryBar(true);
            }
            if(window.StatusBar) {
                StatusBar.styleDefault();
            }
        });
    })
There are a number of interesting things going on in the app.js file:
- I've set up the O365App angular module, which I referenced as ng-app in my index.html above.
- This module depends on Ionic, ngRoute, and LocalStorageModule services.
- Inside this module, I'm setting routing with the associated controllers, navigation URLs, and their respective html files. So when I visit
/#homeor/home, theviews/home.htmlfile will get loaded in theion-nav-viewof theindex.htmletc. The default page loaded is thesignin.htmlfile. - The code you see at the very bottom is standard Ionic code, unmodified as of now, but you will cut-and-slash that very shortly when I talk about authentication.
Next, it's time to write the user interfaces. The code for home.html is shown in Listing 3 and is quite straightforward.
Listing 3: The home.html file
<ion-view title="Site Title">
    <ion-content>
        <div class="card inset">
            <span class="item"
                style="text-align:center">{{siteTitle}}</span>
        </div>
        <div class="padding">
            <button class=
                "button button-block button-positive ion-log-out"
                ng-click="logOut()">
                Sign Out
            </button>
        </div>
    </ion-content>
</ion-view>
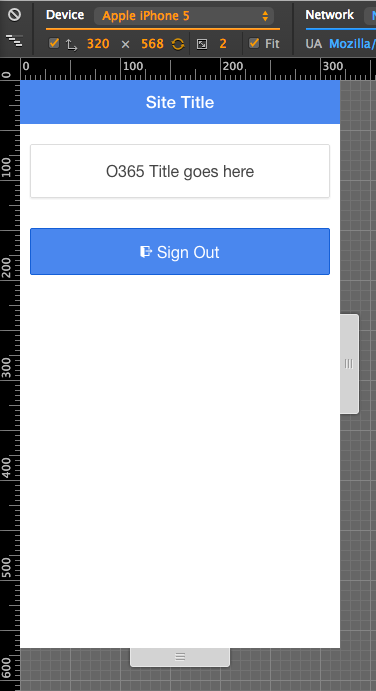
This is where the application's functionality goes. I'm showing the siteTitle property in a span, which I will set as a hardcoded value for the controller. I'll later modify that method to call my backend service, and get the actual Office365 site title. Also, I have a signout button, which calls a method called logOut() in the associated controller. The controller as specified in our routing is homeController.js, so let's flush that out as well. The code for homeController.js can be seen in Listing 4.
Listing 4: homeController.js the logic for our home view
app.controller('HomeCtrl',
    ['$scope', '$location', 'authSettings', '$http', 'authService',
    function ($scope, $location, authSettings, $http, authService) {
        var serviceBase = authSettings.apiServiceBaseUri;
        $scope.logOut = function () {
            authService.logOut();
            $location.path('/signin');
        };

        $scope.init = function () {
            $scope.siteTitle = "Office 365 site title goes here";
        };
        $scope.siteTitle = "";
}]);
This finishes the homeController basic structure, but you still need to add application logic. Before you can do that, you must figure out authentication, etc. I'll get to that in a minute. First, let's finish the basic structure of the application by also finishing signin.html as shown in Listing 5.
Listing 5: The sigin.html file, our login page.
<ion-view title="Sign-In">
    <ion-content>
        <div class="list">
            <div class="list card">
                <div class="item item-avatar">
                    <img src="img/wslogo.png" />
                    <h2>Office 365 and SharePoint</h2>
                    <p>Demo iOS App</p>
                    <p>www.winsmarts.com</p>
                </div>
            </div>
            <label class="item item-input">
                <input type="text" placeholder="username" required autofocus>
            </label>
            <label class="item item-input">
                <input type="password" placeholder="password"required>
            </label>
        </div>
        <div class="padding">
            <button class="button button-block button-positive"
                ng-click="login()">
                Sign-In
            </button>
        </div>
        <div data-ng-hide="message == ''"
            class="item bar bar-footer bar-assertive">
            <h1 class="title">{{message}}</h1>
        </div>
    </ion-content>
</ion-view>
The code for signin.html is also quite straightforward. Minus the Ionic details, it's a simple login page that accepts a username and password, and a big sign in button, below which is a big red-colored message where I wish to show errors. That message remains hidden until there is a message to show. Obviously, you will also need a loginController, so next let's write that out. Remember, this is just the basic structure, so no actual authentication and logic are in this yet! The loginController.js file looks like Listing 6.
Listing 6: The loginController.js, logic for our signin page
app.controller('loginController', ['$scope', '$location',
    function($scope, $location) {
        $scope.loginData = {
            userName: "",
            password: "",
            client_id:""
        };

        $scope.message = "";
        $scope.login = function () {
            $location.path('/home'); // hardcoded for now
        };
}]);
At this point, the dummy app without authentication or application logic is set up. It's time to show the client a demo. So go to terminal and run the following command:
ionic serve
This command starts up a development Web server and launches your default browser. If you are targeting iOS, I prefer to use either Chrome or Safari. I like Safari for its fidelity and debugging tools when running inside the simulator or an actual physical device. But Chrome's dev tools are simply amazing. Since you're still strictly in development mode, run the site in Chrome, open developer tools, and enable mobile device emulation.
To test, I am using Chrome. Your app should look like Figure 2 and Figure 3. Go ahead and play around with it. Use the back button, use sign in, use sign out, etc.
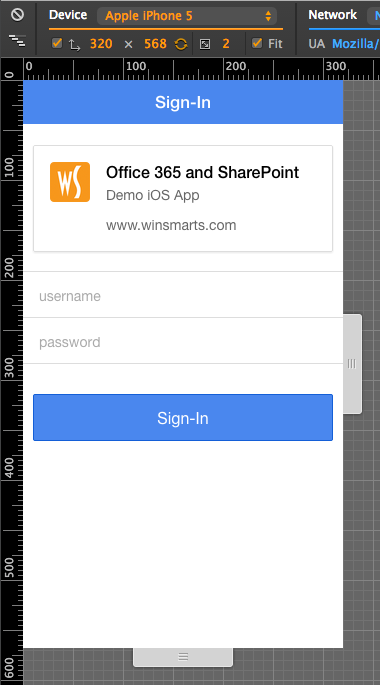
At this point, the app already feels like a real app. The user interface is there, dummy data is there, the navigation is perfect, and the screens look great; it's just that the app doesn't do anything yet! Let's fix that by adding authentication.
Authentication Logic
Before you add authentication, jog your memory a bit with how you built OAuth authentication into the mobile backend in my previous CODE magazine article. To keep things short and “article friendly,” I took some shortcuts:
- I didn't implement refresh tokens, although in real-world applications you would.
- I didn't use app plus user identity; I'm using only app identity. This means that you can't use certain features such as search. But I did mention how you can add user identity into the picture as well.
- In my app itself, I'm using HTML5 localstorage, which is a terrible idea for storing access tokens or refresh tokens. In a real-world app, you'd want to use client-side encrypted storage with a key derived from either a client-side profile or some derivation of the user's password. To keep this article short and focused, I'll leave that for another day.
So, let's talk about authentication and authorization with only access tokens. This was already built in the previous article, but to recap:
- I need an access token as an HTTP header on every request going into my mobile backend. This access token is sent as the “Authorization” header in a format that looks like "Bearer
". - In order to get the access token, I do an HTTP POST request to
/token. This is a cross-domain request. And the request is like a form submit with username, password, and a grant_type of password.
Now, let's get started writing the authentication logic. First, let's flush out the authService. The purpose of the authService is to provide reusable authentication logic that can be used all over the app. You need some constants, such as where the service is located. Remember, the intention here is to write a hybrid app, because this app is going to load and run entirely from pure HTML. And the HTML is NOT served out of the website providing the functionality; the HTML is part of the application. So you need some constants to add in the app.js as shown below:
app.constant('authSettings', {
    apiServiceBaseUri: 'http://172.16.1.9:81/', clientId: 'O365App'
});
It's time to start working on the authService.js file. The authService.js file is responsible for login and logout functionality, and will make use of localStorageService to cache credentials. Caching credentials almost goes hand-in-hand with OAuth since users expect refresh tokens to last for a very long time. Even though you don't have refresh tokens in your implementation, you do have long-lived access tokens that need to survive the app being hydrated and rehydrated from the springboard. So you must use localStorageService. Also, you'll need to use promises because the login request is made over AJAX. And most definitely, you need authSettings and $http. The authService looks like Listing 7, but note that I haven't put in any logic yet. This is just the bones of the service.
Listing 7: The bones of the authService
app.factory('authService', ['$http', '$q', 'localStorageService', 'authSettings',
    function ($http, $q, localStorageService, authSettings) {
        var serviceBase = authSettings.apiServiceBaseUri;
        var authServiceFactory = {};

        var _authentication = {
            isAuth: false,
            userName: ""
        };

        var _login = function (loginData) {
        };

        var _logOut = function () {
        };

        var _fillAuthData = function () {
        };

        authServiceFactory.login = _login;
        authServiceFactory.logOut = _logOut;
        authServiceFactory.fillAuthData = _fillAuthData;
        authServiceFactory.authentication = _authentication;

        return authServiceFactory;
}]);
Now let's start filling in the logic. Starting with fillAuthData, as shown below, you use a variable stored in localStorageService called authorizationData.
var _fillAuthData = function () {
    var authData = localStorageService.get('authorizationData');
    if (authData) {
        _authentication.isAuth = true;
        _authentication.userName = authData.userName;
}};
The logout function clears out the authorizationData variable and is shown below:
var _logOut = function () {
    localStorageService.remove('authorizationData');
    _authentication.isAuth = false;
    _authentication.userName = "";
};
Next, let's work on the login function. The login function makes an XHR POST request to authenticate to the mobile backend and gets the access token. Alternatively, on an error, it raises an error. This can be seen in Listing 8.
Listing 8: The Login function
var _login = function (loginData) {
    var data ="grant_type=password&username=" + loginData.userName +
        "&password=" + loginData.password + "&client_id=ngAuthApp";
    var deferred = $q.defer();
    $http.post(serviceBase + 'token', data, {
        headers: {
            'Content-Type': 'application/x-www-form-urlencoded'
        }
    }).success(function (response) {
        localStorageService.set('authorizationData', {
            token: response.access_token,
            userName: loginData.userName
        });
        _authentication.isAuth = true;
        _authentication.userName = loginData.userName;
        deferred.resolve(response);
    }).error(function (err, status) {
        _logOut();
        deferred.reject(err);
    });
    return deferred.promise;
};
So far so good! You have the meat of your authentication service done. But you want every single request to respect authentication, and you want to do it without dirtying up the business logic. In order to do this, I'll push an interceptor. In app.js, add the following code:
app.config(function ($httpProvider) {
    $httpProvider.defaults.useXDomain = true;
    $httpProvider.interceptors.push(
        'authInterceptorService');
})
This bit of code does two things:
- It enables cross-domain requests.
- It pushes an interceptor, which adds the “authorization” header if you are authenticated, and if you are NOT authenticated, it redirects you to the sign-in page.
The code for the authInterceptor.js is shown in Listing 9.
Listing 9: The authInterceptor service
app.factory('authInterceptorService', ['$q',
    '$location', 'localStorageService',
    function ($q, $location, localStorageService) {
    var authInterceptorServiceFactory = {};
    var _request = function (config) {
        config.headers = config.headers || {};
        var authData = localStorageService.get('authorizationData');
        if (authData) {
            config.headers.Authorization = 'Bearer ' + authData.token;
        }
        return config;
    }

    var _responseError = function (rejection) {
        if (rejection.status === 401) {
            $location.path('/signin');
        }
        return $q.reject(rejection);
    }

    authInterceptorServiceFactory.request = _request;
    authInterceptorServiceFactory.responseError = _responseError;
    return authInterceptorServiceFactory;
}]);
That's it! Everything is now authentication-protected. And my business logic can now only worry about business logic and nothing else. There are no open security issues or endpoints to protect; it's security through simplicity. There is, however, one more thing to do. You haven't actually hooked in the login page to make use of the authService. So you need to finish the loginController.
In views\signin.html, locate the username and password fields, and add ng-model attributes as shown below. Note that I removed some code with “..” for brevity.
<label class="item item-input">
    <input .. ng-model="loginData.userName" ..>
</label>
<label class="item item-input">
    <input .. ng-model="loginData.password" ..>
</label>
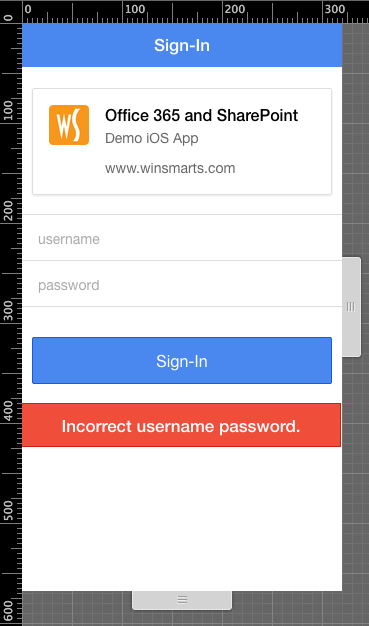
At this point, go ahead and run “Ionic serve” once again, load the application in the browser, and go ahead and enter invalid credentials. You should see a message greeting you appropriately, as shown in Figure 4.
You can also try debugging the mobile backend you wrote in the previous article. You should see username and password being sent, and your usual debugging should work. Next, try entering valid credentials, and the application redirects you to /home where you can write your application logic. And this is the easy part!
App Functionality
Because every request is already authenticated, and the crummy details of sign in, sign out, and navigation are out of your way, all you need to do is flesh out the homeController. The home.html file is already done. Give it a glance and you'll see that there's a variable called siteTitle that you need to set. And you need to do this in the init method of the controller. Fill out the init method, as shown in Listing 10.
Listing 10: The init function in loginController
$scope.init = function () {
    $http({
        method: 'GET',
        url: serviceBase + "api/spweb/title"
    }).then(function (results) {
        $scope.siteTitle = results.data;
        });
};
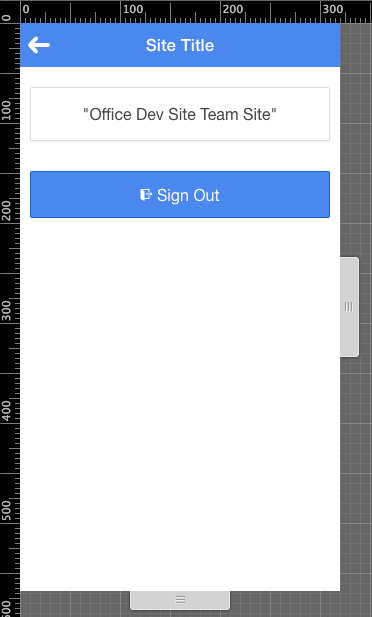
That's all you need to do. Now run your application again. You should be able to fully test it within your browser-based development environment, as shown in Figure 5.
With the app more-or-less done, there's one last step. You need to package the app and make it native.
Packaging up the App
In order to package the app as an Xcode project, open Terminal and issue the following command to add support for iOS:
ionic platform add ios
Next, build your project using the command shown below:
ionic build
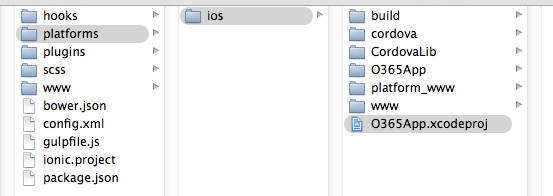
Open Finder and find your Xcode project at the path shown in Figure 6. Double-click it to open it in XCode.
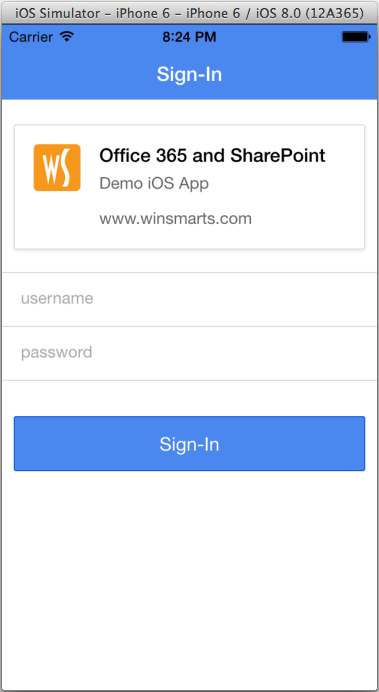
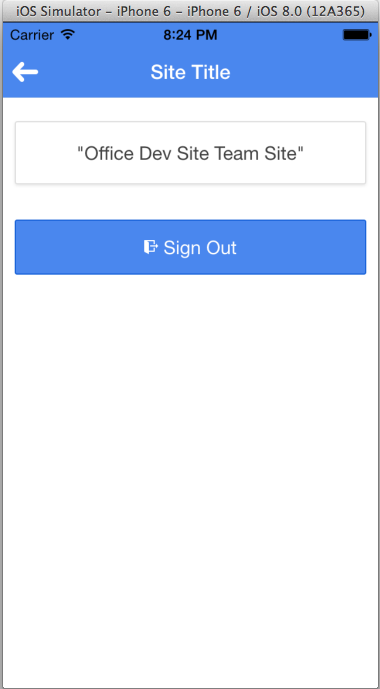
Build and run your project. You should see a fully functional running iOS App, as shown in Figure 7 and Figure 8. If you have a developer license (Apple charges $99 per year for this), you can also test this on a physical device. It should work very nicely. Go ahead and show it to your friends. See if they can tell if it's native or not. You can now easily extend this app to show list items from a task list, perform basic editing, etc.
Summary
Mobile is confusing, complicated, and fabulous. The potential of this supercomputer in your pocket is beyond anything we have seen before. But the overwhelming setup and complicated authentication, along with very rapidly changing technology and many platforms to juggle, can make things very difficult to deal with from a time-and-money investment point of view. Hybrid apps give you a very good alternative to all these problems. Many common business apps are absolutely fine being hybrid or even just HTML5.
However, there are many situations where you must roll up your sleeves and start writing some Java, ObjectiveC, Swift, or C# code. This may include corporate security policies where device-management products are installed. Or security requirements where data in your app should be wipe-able without affecting a device that your company may not own. Or perhaps you want to tap into some interesting native-only capabilities, such as iOS extensions, that you otherwise cannot do in pure HTML or JavaScript.
There will be more on that in future articles.