by Joel Murach and Anne Boehm, Published May 2013, ISBN 978-1-890774-72-1 http://www.murach.com/books/cs12/index.htm
How to design a Windows Forms application
In the last chapter, you learned the basic skills for working with Visual Studio, you toured a Windows Forms application, and you tested an application with three Windows forms. Now, in this chapter, you’ll learn how to use Visual Studio to design the user interface for a Windows Forms application.
- How to set options and create a new project ..............36
- How to set the Visual Studio options ...........................36
- How to change the import and export settings ...........36
- How to create a new project.........................................38
- How to design a form....................................................40
- The design of the Invoice Total form ............................40
- How to add controls to a form ......................................42
- How to set properties....................................................44
- Common properties for forms and controls..................46
- How to add navigation features....................................48
- The property settings for the Invoice Total form .........50
- How to use Document Outline view..............................50
- How to name and save the files of a project ................52
- How to name the files of a project................................52
- How to save the files of a project .................................52
- Perspective ...................................................................54
How to set options and create a new project
Before you start your first Windows Forms application with Visual Studio 2012, you probably should change a few of the Visual Studio options. That will make it easier for you to create a new project. You may also want to change the import and export settings.
How to set the Visual Studio options
To set the options for Visual Studio, you use the Options dialog box shown in figure 2-1. Once this dialog box is open, you can expand the Projects and Solutions group by clicking on the !> symbol to the left of that group, and you can click on the General group to display the options shown in this figure.
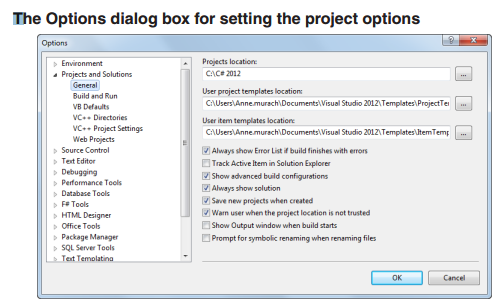
You can set the default project location by typing a path directly into the text box, or you can click the button to the right of the text box to display a dialog box that lets you navigate to the folder you want to use. This will set the default location for new projects, but you can always override the default when you create a new project.
By default, most of the options available from this dialog box are set the way you want. However, if you want Visual Studio to work the way it’s described in this book, you should check the Always Show Solution and the Save New Projects When Created options. Beyond that, it’s worth taking a few minutes to review the other options that are available. Then, you can change them if Visual Studio isn’t working the way you want it to. For instance, you may want to use the Startup group within the Environment group to change what’s displayed when Visual Studio starts.
How to change the import and export settings
The first time you start Visual Studio 2012, you’re asked what Default Environment Settings you want to use. You can choose from several options including Visual Basic, Visual C#, Visual C++, and Web. Among other things, your choice affects what items are available from some menus and what buttons are available from the Standard toolbar. If, for example, you choose the Visual C# settings, you open a project with the File->Open->Project/Solution command. But if you choose the Visual Basic settings, you open a project with the File->Open Project command.
To change these settings, you use the Import and Export Settings Wizard as described in this figure. In the first step of the wizard, choose the Reset All Settings option. In the second step, choose the Yes, Save My Current Settings option. And in the last step, if you want your menus to work as described in this book, choose the Visual C# Development Settings option. Later, if you switch to
Visual Basic, C++, or web development, you can change the settings again.
How to use the Options dialog box
- To display the Options dialog box, select the ToolsèOptions command.
- To expand and collapse a group of options, you can use the w and y symbols to the left of each group. To display the options for a group, click on the group.
- To set the default location for all projects that you start from Visual Studio, you can change the Projects Location as shown above.
- If you want Visual Studio to work as described in this book, you should check the Always Show Solution and Save New Projects When Created options.
- To change the color theme for Visual Studio, select the General category in the Environment group and then select an option from the Color Theme drop-down list.
- Although most of the options should be set the way you want them, you may want to familiarize yourself with the options in each category so you know what’s available.
How to set the Import and Export Settings
- The first time you start Visual Studio 2012, you are asked to choose the default environment settings. These settings affect how the menus work and what buttons are displayed on the Standard toolbar.
- To change the settings to the ones used for this book, use the Tools->Import and Export Settings command to start the Settings Wizard. Then, choose the Reset All Settings option, the Save My Current Settings option, and the Visual C# Development Settings option as you step through the wizard.
Express Edition note
- With the Express Edition, there is no third step to the Import and Export Settings Wizard because only one collection of settings is available.
How to create a new project
To create a new project, you use the New Project dialog box shown in figure 2-2. This dialog box lets you select the type of project you want to create by choosing one of several templates. To create a Windows Forms application, for example, you select the Windows Forms Application template. Among other things, this template includes references to all of the assemblies that contain the namespaces you’re most likely to use as you develop a Windows application.
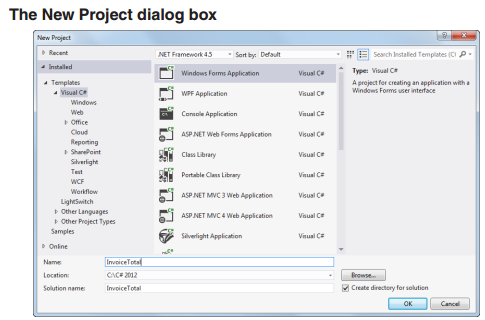
Note that you can select a template from the Installed category as shown here. You can select a template from the Recent and Online categories. Or you can search for an installed template using the search text box in the upper right corner of the dialog box.
The New Project dialog box also lets you specify the name for the project, and it lets you identify the folder in which it will be stored. By default, projects are stored in the Visual Studio 2012\Projects folder under the My Documents folder, but you can change that as shown in the previous figure.
If you want to change the location that’s shown in the New Project dialog box, you can click the Browse button to select a different location; display the Location drop-down list to select a location you’ve used recently; or type a path directly. If you specify a path that doesn’t exist, Visual Studio will create the necessary folders for you.
When you click the OK button, Visual Studio automatically creates a new folder for the project using the project name you specify. In the dialog box in this figure, for example, InvoiceTotal is the project name and C:\C# 2012 is the location. By default, Visual Studio also creates a new folder for the solution, using the same name as the project. As a result, Visual Studio will create one folder for the solution, and a subfolder for the project. Then, you can add another project to the same solution by selecting Add To Solution from the Solution drop-down list in the New Project dialog box. (This list is displayed only if a solution is open.)
If a solution will contain a single project, though, you may want to store the project and solution in the same folder. To do that, you can deselect the Create Directory For Solution check box. Then, the solution is given the same name as the project. In the applications for this book, the project and solution files are typically stored in separate folders even though most solutions contain a single project.
Incidentally, the terms folder and directory are used as synonyms throughout this book. With the introduction of Windows 95, Microsoft started referring to directories as folders. But most of the Visual Studio documentation still uses the term directory. That’s why this book uses whichever term seems more appropriate at the time.
By default, the new projects you create target .NET Framework 4.5 so you can use the features it provides. If you use any of these features, however, any computer that you want to run the application on must also have .NET Framework 4.5. If that’s not the case, you can change the target framework using the drop-down list at the top of the New Project dialog box. Then, only the features of the framework you choose will be available from Visual Studio.
How to create a new C# project
- Use the File->New->Project command to open the New Project dialog box.
- Choose Visual C# from the Installed->Templates category, and choose the Windows Forms Application template for a Windows Forms application.
- Enter a name for the project, which will enter the same name for the solution. Then, enter the location (folder) for the project (and solution).
- Click the OK button to create the new project.
Description
- The project template that you select determines the initial files, assembly references, code, and property settings that are added to the project.
- If the Create Directory For Solution box is checked, Visual Studio creates a folder for the solution and a subfolder for the project. Otherwise, these files are stored in the same folder.
- If the Save New Projects When Created option is on as shown in the previous figure, the project is saved right after it’s created. Otherwise, the New Project dialog box asks only that you select a template and enter a name for the project. Then, when you save the project, the Save Project dialog box asks for the other information shown above.
- If you want to target a version of the .NET Framework other than version 4.5, you can select the version from the drop-down list at the top of the dialog box.
Express Edition differences
- Use the File->New Project command to open the New Project dialog box.
- You can’t change the version of the .NET Framework that’s used.
How to design a form
When you create a new project, the project begins with a single, blank form. You can then add controls to this form and set the properties of the form and controls so they look and work the way you want.
The design of the Invoice Total form
Before I show you how to add controls to a form and set the properties of the form and controls, I want to describe the Invoice Total form that I’ll use as an example throughout this chapter and the next chapter. This form is presented in figure 2-3. As you can see, the form consists of ten controls: four text boxes, four labels, and two buttons.

The Invoice Total form lets the user enter a subtotal into the first text box, and then calculates the discount percent, discount amount, and total for that order when the user clicks the Calculate button. For this simple application, the discount percent is based upon the amount of the subtotal, and the results of the calculation are displayed in read-only text box controls.
After the results of the calculation are displayed, the user can enter a different subtotal and click the Calculate button again to perform another calculation. This cycle continues until the user clicks the Close button in the upper right corner of the form or clicks the Exit button. Then, the form is closed and the application ends.
This application also provides keystroke options for users who prefer using the keyboard to the mouse. In particular, the user can activate the Calculate button by pressing the Enter key and the Exit button by pressing the Esc key.
The user can also activate the Calculate button by pressing Alt+C and the Exit button by pressing Alt+X.
In the early days of computing, it was a common practice to sketch the user interface for an application on paper before developing the application. That’s because a programmer had to enter the code that defined the user interface, and the task of writing this code would have been error prone if the interface wasn’t planned out first. As you’ll see in this chapter, however, the Form Designer makes it easy to design a form at the same time that you implement it. Because of that, you usually don’t need to sketch the layout of a form before you design it in Visual Studio.
As you use the Form Designer, Visual Studio automatically generates the C# code that’s needed to define the form and its controls. In other words, the form that you see in the Form Designer is just a visual representation of the form that the C# code is going to display later on. Then, all you have to do is write the C# code that gives the form its functionality, and you’ll learn how to do that in the next chapter.
Description
- A text box is used to get the subtotal from the user. Read-only text boxes are used to display the discount percent, discount amount, and total. And label controls are used to identify the values that are in the text boxes on the form.
- After entering a subtotal, the user can click the Calculate button to calculate the discount percent, discount amount, and total. Alternatively, the user can press the Enter key to perform the calculation.
- To calculate another invoice total, the user can enter another subtotal and then click the Calculate button or press the Enter key again.
- To close the form and end the application, the user can click the Close button in the upper right corner of the form or click the Exit button. Alternatively, the user can press the Esc key to exit from the form.
- The user can press Alt+C to access the Calculate button or Alt+X to access the Exit button. On most systems, the letters that provide the access to these buttons aren’t underlined until the user presses the Alt key.
Three types of controls
- A label displays text on a form.
- A text box lets the user enter text on a form.
- A button initiates form processing when clicked.
How to add controls to a form
Figure 2-4 shows how you can use the Toolbox to add controls to a form. The easiest way to do that is to click on the control in the Toolbox, then click the form at the location where you want to add the control. In this figure, for example, the button control is selected in the Toolbox, and the mouse pointer is positioned over the form.
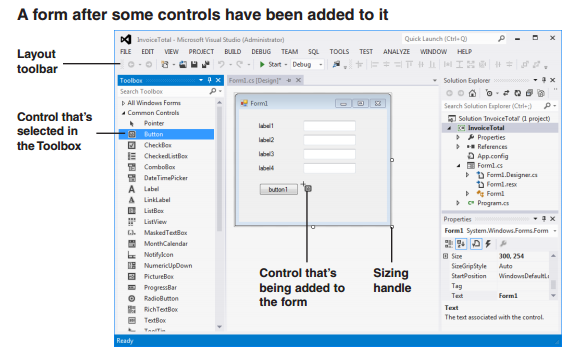
Once you add a control to a form, you can resize the control by selecting it and dragging one of its handles, and you can move the control by dragging the control to a new location on the form. If you prefer, you can place and size the control in a single operation by clicking the control in the Toolbox, then clicking and dragging in the form.
A second way to add a control is to drag the control from the Toolbox to the form. The control is placed wherever you drop it. You can then resize the control.
A third method for adding controls is to double-click the control you want to add in the Toolbox. This places the control in the upper left corner of the form. You can then move and resize the control.
If the AutoHide feature is activated for the Toolbox and you click on the Toolbox tab to display it, the display frequently obscures some or all of the form. This makes it difficult to add controls. As a result, it’s a good idea to turn off the AutoHide feature when you’re adding controls. To do that, just click the pushpin button in the upper right corner of the Toolbox.
After you have added controls to the form, you can work with several controls at once. For example, let’s say that you have four text box controls on your form and you want to make them all the same size with the same alignment. To do that, first select all four controls by holding down the Ctrl or Shift key as you click on them or by using the mouse pointer to drag a dotted rectangular line around the controls. Then, use the commands in the Format menu or the buttons in the Layout toolbar to move, size, and align the controls relative to the primary control. If you select the controls one at a time, the primary control will be the first control you select. If you select the controls by dragging around them, the primary control will be the last control in the group. To change the primary control, just click on it. (The primary control will have different color handles so you can identify it.)
Although these techniques may be hard to visualize as you read about them, you’ll find that they’re relatively easy to use. All you need is a little practice, which you’ll get in the exercise for this chapter.
How to set properties
After you have placed controls on a form, you need to set each control’s properties. These are the values that determine how the controls will look and work when the form is displayed. In addition, you need to set some of the properties for the form itself.
To set the properties of a form or control, you work with the Properties window as shown in figure 2-5. To display the properties for a specific control, click on it in the Form Designer window to select the control. To display the properties for the form, click the form’s title bar or any blank area of the form.
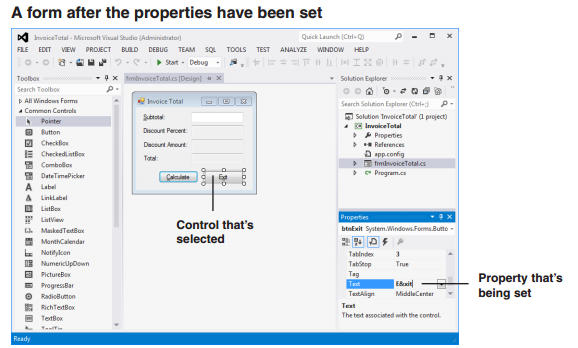
In the Properties window, you can select a property by clicking it. When you do, a brief description of that property is given at the bottom of the Properties window. (If you can’t see this description, you can drag the bottom line of the window upward.) Then, to change a property setting, you change the entry to the right of the property name by typing a new value or choosing a new value from a drop-down list.
To display properties alphabetically or by category, you can click the appropriate button at the top of the Properties window. At first, you may want to display the properties by category so you have an idea of what the different properties do. Once you become more familiar with the properties, though, you may be able to find the ones you’re looking for faster if you display them alphabetically.
As you work with properties, you’ll find that most are set the way you want them by default. In addition, some properties such as Height and Width are set interactively as you size and position the form and its controls in the Form Designer window. As a result, you usually only need to change a few properties for each object.
Description
- The Properties window displays the properties for the object that’s currently selected in the Form Designer window. To display the properties for another object, click on that object or select the object from the drop-down list at the top of the Properties window.
- To change a property, enter a value into the text box or select a value from its drop-down list if it has one. If a button with an ellipsis (…) appears at the right side of a property’s text box, you can click on the ellipsis to display a dialog box that lets you set options for the property.
- To change the properties for two or more controls at the same time, select the controls. Then, the common properties of the controls are displayed in the Properties window.
- When you click on a property in the Properties window, a brief explanation of the property appears in a pane at the bottom of the window. For more information, press F1 to display the help information for the property.
- You can use the first two buttons at the top of the Properties window to sort the properties by category or alphabetically.
- You can use the plus (+) and minus (-) signs displayed to the left of some of the properties and categories in the Properties window to expand and collapse the list of properties.
Note
- If a description isn’t displayed when you click on a property in the Properties window, right-click on the window and select Description from the shortcut menu.
To finish this chapter click here: http://www.murach.com/books/cs12/index.htm