


Visual Studio LightSwitch applications consist of three tiers: presentation, logic and data. This article discusses the logic tier and its save pipeline. The save pipeline is where developers write business logic that runs as changes are processed on the logic tier and saved to the data storage tier. The save pipeline is automatically generated with every LightSwitch application. Understanding the processing done in the save pipeline is not required to successfully build and deploy applications with LightSwitch, but adding save pipeline business logic provides additional flexibility and control when data is saved.
What Is the Save Pipeline?
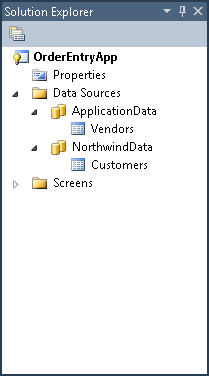
When a LightSwitch application is built and deployed, one data service is generated on the logic tier for each data source specified in the application. For example, in Figure 1 there are two data sources specified. One is the built-in data source which contains Vendors and one is an attached data source which contains Customers. When Vendors are saved, changes will be sent to the data service that was generated for ApplicationData. When Customers are saved, changes will be sent to the data service that was generated for NorthwindData. Two data sources result in two generated data services.
Each generated service has a SaveChanges operation, among others. The save pipeline is responsible for handling calls to SaveChanges. It processes the changes in sequence and inserts, updates or deletes data stored on the data tier.
Calling the Save Pipeline
The caller to SaveChanges can be a LightSwitch client or another save pipeline. Screens generated with LightSwitch automatically call SaveChanges when the Save button is clicked. The following code snippet shows a call to SaveChanges from LightSwitch code, which saves all changes that have been made on the ApplicationData data source. (Changes to other data sources remain uncommitted and must be saved explicitly by calling SaveChanges on them.)
// Save changes on the ApplicationData data source
this.DataWorkspace.ApplicationData.SaveChanges();
Understanding Change Sets
As changes are made to entities within a data source, those changes are tracked in a change set. When SaveChanges is called, this change set is serialized, sent to the data service’s SaveChanges operation and de-serialized into a server-side data workspace. The save pipeline operates on those changes and any additional changes made on the logic tier.
Client and server code can inspect the change set for a data source and determine which entities have been changed. The GetChanges method on the data source’s Details member is the accessor for the change set. The change set has members for accessing inserted, deleted and modified entities separately. The following code shows how to access the modified entities in a change set and generate a string that contains the names of the entities.
string changeString = "";

// Get the change set
EntityChangeSet changes =
  this.DataWorkspace.MyData.Details.GetChanges();

// Loop over only modified entities
foreach (IEntityObject item in
  changes.ModifiedEntities)
{
  changeString +=
    string.Format("Entity {0} has changes.\n",
    item.ToString());
}
Coding within the Save Pipeline
So far, everything we’ve discussed has been generated as part of the LightSwitch application with no coding required. But what if you want to control what happens within the logic tier? What if you want to reserve inventory every time an order is placed and then allocate that inventory once the order is fulfilled? What if you want to provide a simple workflow that tracks the state of a document and creates related entities as the document moves through a process? How can this be accomplished with the save pipeline? This section discusses where code can be added to a LightSwitch application to be executed within the save pipeline.
Two types of code are executed within the save pipeline. The first is common entity code, which belongs to the entity and is executed on both the client and logic tiers. Common entity code is used to keep the entity in a valid state or calculate other values on the entity. It includes entity created code, property changed code, property read-only code, calculated properties and validation logic. This code is called “as-needed” on the logic tier. So, if a calculated property is never accessed from the logic tier that calculated property will never be called.
The second type of code executed within the save pipeline is the pipeline interception methods, which are executed at specific points along the save pipeline. The available methods are unique to the different phases of the save pipeline. They are as follows (organized by phase):
Pre-processing
-
SaveChanges_CanExecute: Called to determine whether or not SaveChanges can be executed. -
SaveChanges_Executing: Called before the operation is processed.
Validation
- EntitySet_CanRead, CanInsert, CanUpdate, CanDelete: For each entity in the change set, permissions are checked to see if the requested changes can be performed.
- Entity Validation: Common property validation is called for each modified or inserted entity (the same validation code that runs on the client). This includes any built-in LightSwitch validation based on model properties such as MaxLength on a string or MaxValue on an integer.
- EntitySet_Validate: Called for each modified or inserted entity.
Pre-process Entities
- EntitySet_Inserting: Called for each inserted entity.
- EntitySet_Updating: Called for each updated entity.
- EntitySet_Deleting: Called for each deleted entity.
Execution
LightSwitch passes all of the changes to the underlying provider for processing. There are no interception methods in this phase.
Post-process Entities
-
EntitySet_Inserted: Called for each inserted entity. -
EntitySet_Updated: Called for each updated entity. -
EntitySet_Deleted: Called for each deleted entity.
Post-processing
-
SaveChanges_Executed: Called after a successful processing of SaveChanges. -
SaveChanges_ExecuteFailed: Called after a failure in processing.
The save pipeline looks rather simple. Each changed entity in the change set gets processed once through the pipeline. However, if code in the data service makes additional changes, LightSwitch ensures that newly inserted, modified or deleted entities also pass through the pipeline. This ensures that business logic is applied uniformly to all entities and entity sets. Changes made to an entity from within its own pre-process pipeline interception methods do not cause the entity to be re-processed by the save pipeline. They are only re-validated. If the change causes the entity state to change, however (for example, from updated to deleted), the appropriate pre-process entity method will be called.
Changes to the data source on which the pipeline is executing will be automatically processed by the save pipeline and do not need to be explicitly saved by calling SaveChanges. Changes made to a different data source must be saved by calling SaveChanges to initiate the save pipeline for that data source; otherwise those changes will be lost.
Imagine the following code being called inside the save pipeline for ApplicationData. This code will make changes to the NorthwindData data source from within the ApplicationData save pipeline.
// Make changes to NorthwindData entities
...

// Save changes to the NorthwindData data source
this.DataWorkspace.NorthwindData.SaveChanges();
Figure 2 shows how the save pipeline processes a change set and how changes impact the pipeline.
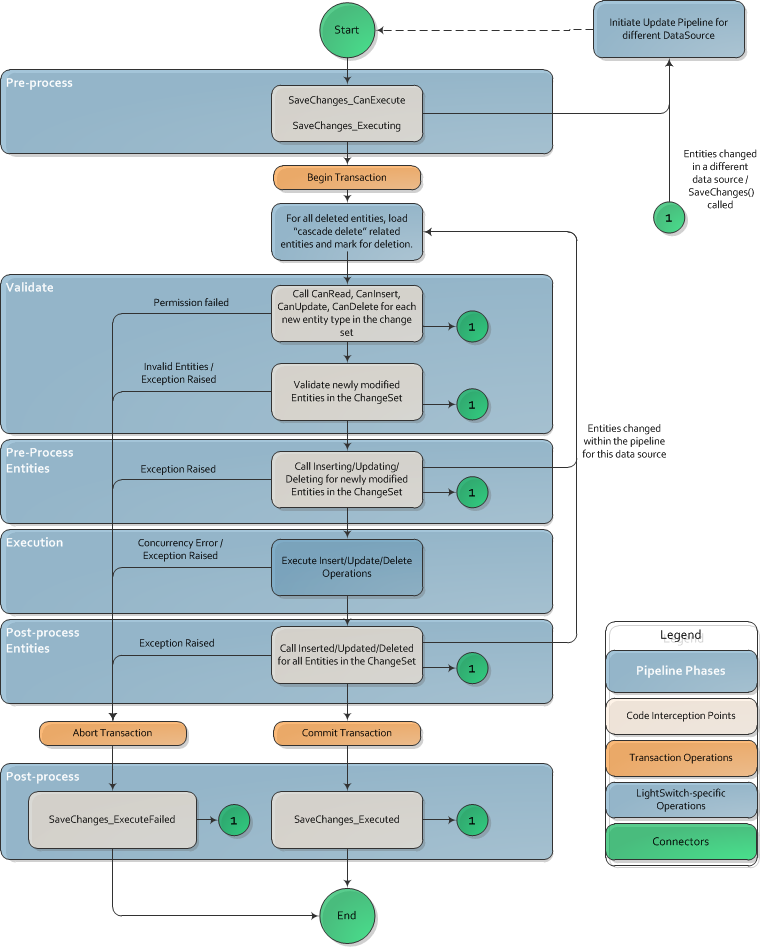
When the processing within the save pipeline succeeds, any changes made to entities in the original change set are serialized back to the client. In this way, the client can get updated IDs, or observe any other changes made by the data service code. Any entities added to the change set on the service tier are not serialized back to the client.
The pipeline interception methods listed above are available in the Write Code dropdown in the LightSwitch entity designer. The General Methods section contains entity-specific methods as well as the entity pipeline methods. Entity-specific methods are prefixed with the entity name while entity pipeline methods are prefixed with the entity set name. The Access Control Methods section contains the methods that are called to check if calling SaveChanges is permitted and to check if the changes that are being attempted in the change set are permitted. The SaveChanges pre- and post-processing methods are listed under the Data Source Methods section.
Returning to the question posed at the beginning of this section, let’s see how to reserve inventory every time an order is placed and then allocate that inventory once the order is fulfilled. Our application has an Order entity with related OrderLine entities and each OrderLine refers to an inventory Item. The following code reserves inventory on a new Order.
public partial class ApplicationDataService
{
  partial void Orders_Inserting(Order entity)
  {
    foreach (OrderLine line in entity.Lines)
    {
      line.Item.Quantity -= line.Quantity;
      line.Item.ReservedQuantity += line.Quantity;
    }
  }
}
The code is on the ApplicationDataService class. All save pipeline code that is specific to that data service resides on this class.
The second part of the above question is how to allocate inventory once the order is fulfilled. For this, we need to run code when an Order is updated and check to see if the State has changed to “Fulfilled*.”*
partial void Orders_Updating(Order entity)
{
  if (entity.Details.Properties.State.IsChanged &&
    entity.State == "Fulfilled")
  {
    foreach (OrderLine line in entity.Lines)
    {
      line.Item.ReservedQuantity -= line.Quantity;
    }
  }
}
Transactions in the Save Pipeline
In the normal case, transactions in the save pipeline are automatically handled for the developer. This section describes the default behavior and how a developer can tune it for advanced scenarios. This assumes some knowledge of the System.Transactions library in .NET.
Transactions in the save pipeline are scoped per data service. In the default case, each data service uses its own transaction and its own database connection. However, if the save pipeline is initiated from within another save pipeline, it is possible for transactions to nest.
If an ambient System.Transactions transaction is available, the save pipeline will use it and thus compose with other transactions within that transaction scope. By default, there is no ambient transaction. LightSwitch was designed to not require Distributed Transaction Controller (DTC) by default.
It is possible to transact changes to multiple data sources simultaneously, but LightSwitch does not do this by default. LightSwitch only saves changes to a single data service, and thus to a single data source. If you need to save changes to a different data source within the current save pipeline, you can make changes to entities from the alternate data source in the current data workspace, and call the data source’s SaveChanges method. You can control the default transaction scope, including enrollment in a distributed transaction, by creating your own transaction scope in the Pre-processing phase of the pipeline within the SaveChanges_Executing method, and then commit and close it in the Post-processing phase of the pipeline within the SaveChanges_Executed method. In cases where you manage your own transaction scope to transact changes between multiple data sources, you will need to make sure that DTC is configured for the sources that you want to be included.
Data sources that do not support transactions (such as Microsoft SharePoint) will ignore any ambient transactions or LightSwitch created transactions. This means that change sets sent to non-transactional sources are not saved as an “all or nothing” operation. If an error occurs with one of the changes requested in a change set, the exception will cause the save pipeline to abort its operation, but any previous changes made within the pipeline remain committed. In this way, change sets can be partially saved on a non-transactional source.
Returning Exceptions from the Save Pipeline
When an unhandled exception occurs in the save pipeline, the transaction is aborted (if one was created) and the ExecuteFailed method is called. The ExecuteFailed method is a place to clean up any resources that may have been allocated as part of the pipeline. The save pipeline can return one of several exceptions:
-
ConcurrencyException: Changes conflict with previous changes made to the same data. See the Update Conflicts within the Save Pipeline section below. -
ValidationException: Entities did not pass validation. -
PermissionException: A “Can” method returned false, indicating that an operation was not allowed.
All other exceptions are returned as a DataServiceOperationException, whose inner exception is the original exception that occurred. By default, the inner exception information is not serialized back to the client. Instead, it is logged on the server and only the DataServiceOperationException is returned. The message of the DataServiceOperationException is the original message of the exception that was caught.
Within your pipeline logic, exceptions can be caught and handled by using try/catch logic. If an exception is caught and handled, the pipeline continues processing and no exceptions are returned. Exceptions cannot be caught in the ExecuteFailed method. Once this method is called, the pipeline is ending and the exception that will be returned has already been determined.
Querying Data within the Save Pipeline
Queries can be used within the save pipeline to read additional data to use within your pipeline processing. There are a couple of things to remember when using queries within the save pipeline. First, data that is queried within the save pipeline uses the RepeatableRead isolation level on data sources that support transactions. This means that read locks on the data rows involved are held until the transaction completes. If you are attempting to use multiple data sources to read data from the same data store within different transactions, this can lead to the later query being blocked by the previous. The pipeline will wait until a timeout occurs.
The second thing to keep in mind when querying data within the save pipeline is how LightSwitch manages data within a data workspace. There is one active data workspace per save pipeline. Once an entity instance is loaded within a data workspace, it is cached and remains until the data workspace ends. If the same entity is returned by a query later in the save pipeline, the values on that entity will not be updated because it has already been loaded. When a query returns entities, only previously un-cached entities are added to the entity cache.
Security in the Save Pipeline
There are two areas in LightSwitch that affect the security of the save pipeline and determine who can call it. The first is authentication. If authentication is turned on in a LightSwitch application with either Windows or Forms authentication, the service can only be called by users who are authenticated and setup as users in the system.
If finer-grained control is desired over individual operations in a service, there are Access Control methods where you can write code to allow or disallow access for specific users. The SaveChanges_CanExecute method controls access to the whole save pipeline. If the result parameter of this method is set to “false”, any attempt to call SaveChanges will return a PermissionException. Individual data operations for each entity set offer four methods to control the available actions. They are CanRead, CanUpdate, CanInsert and CanDelete. If the method’s result parameter is set to “false” the associated type of change is not allowed and attempting to call SaveChanges with that change for that entity set will return a PermissionException. These four methods are interrogated when a LightSwitch screen is loaded and behavior is disabled to prevent end-users from making disallowed changes. An example of code used to check a user’s permissions within the CanUpdate method is shown below.
partial void Customers_CanUpdate(ref bool result)
{
  result = this.Application.User.HasPermission(
    Permissions.CustomerUpdatePermission);
}
Update Conflicts within the Save Pipeline
By default, all properties on a LightSwitch entity are used for concurrency checking when an update is attempted, with the exception of doubles, binaries and images. This means that before updating the property, LightSwitch checks the value of the property on the data store. If the value has been changed from what was previously read, a ConcurrencyException is generated. The ConcurrencyException contains the entity that is in error. From the Entity.Details, you can access the EntityConflict member to get information about what is causing the conflict. The EntityConflict contains a collection of the ConflictingProperties. There is also a flag indicating if the entity has been deleted on the server. Each conflicting property has the OriginalValue and the ServerValue. Conflicts can be resolved by calling ResolveConflicts with a value of ServerWins or ClientWins, depending on which value you want to keep.
The paragraph above shows how you can handle conflicts programmatically. The good news is that if you don’t want to deal with them, LightSwitch screens provide an automatic mechanism for dealing with ConcurrencyExceptions. When an unhandled ConcurrencyException occurs, the conflict resolution dialog shows the original, current and server values and allows the user to choose one of them to resolve the conflicts and continue.
Diagnostics in the Save Pipeline
When running a LightSwitch application, it may be necessary to diagnose what code is running on the server and how the save pipeline is processing requests or to see details about exceptions that may have occurred on the server. LightSwitch provides a built-in Diagnostics facility to allow you to get this information. LightSwitch Diagnostics is built on ASP.NET Tracing, so the way to view trace information is the same as when viewing ASP.NET Trace logs.
Diagnostics is configured using the web.config file for the data service. Within the web.config file there are five Diagnostic-specific settings. They are key/value pairs under the <appSettings> tag. They are:
- Microsoft.LightSwitch.Trace.Enabled: Specifies whether diagnostic tracing is enabled for this application. Values are true or false.
- Microsoft.LightSwitch.Trace.LocalOnly: Specifies if the trace log can be viewed by remote machines or if you need to be on the server machine to view the log. The value for this and the configuration/system.web/trace/localOnly setting both need to be true to allow viewing by remote machines. Values are true or false.
- Microsoft.LightSwitch.Trace.Level: Specifies at what level to log actions. Values are None, Error, Warning, Information or Verbose. A setting of Verbose causes LightSwitch to log all potential method calls, whether you have code implemented in them or not. This is a good way to see how the pipeline processes requests. A setting of Information causes LightSwitch to log only calls to those methods in which you have implemented code.
- Microsoft.LightSwitch.Trace.Sensitive: Specifies whether to log sensitive information or not. Sensitive information includes any data from entities processed in the pipeline. Values are true or false.
- Microsoft.LightSwitch.Trace.Categories: Specifies which categories to log trace messages for. Generally, this is only used if custom code is used which logs to a different category. Values are a comma-separated list of categories. Default is Microsoft.LightSwitch.
With these configuration settings set to enable tracing, running your application will result in trace logs being generated. Access and view your trace logs at http://<ApplicationServiceURL>/Trace.axd. This will contain trace entries for all service calls. The entries titled “SubmitChanges” contain the calls made to the save pipeline.
Conclusion
As you can see, there is a lot going on in the save pipeline. The basic save pipeline is there executing saves on your behalf while providing concurrency checking and transactional consistency. At the same time, the save pipeline interception methods allow you to add server code that influences how changes are made on the server. Hopefully this article will help you leverage the save pipeline to make your LightSwitch application richer and more robust.
