


Caching is an important cornerstone of high-performance web sites. You can use it to accomplish the following:
- Reduce round-trips: Content cached at the client or in proxies can eliminate web server round-trips. Content cached at the web server can eliminate database round-trips.
- Move content closer to clients: The farther away from clients content is located, the longer it takes to retrieve.
- Avoid time-consuming processes of regenerating reusable content: For content that takes a lot of time or resources to generate, system performance and scalability are improved if you can generate content once and then reuse it many times.
- Optimize state management: Caching state information at the client is more scalable than storing it in a central location (within certain bounds, as discussed later).
In this chapter, I’ll cover how and when to use caching in all tiers of your application:
- Browser cache
- ViewState
- Cookies
- Silverlight isolated storage
- Proxy cache
- Web server cache
- SQL Server caching
- Distributed caching
- Cache expiration times
Caching at All Tiers
As discussed in Chapter 1, the end-to-end system called a web application contains a number of layers, or tiers, where caching is possible. See Figure 3-1.
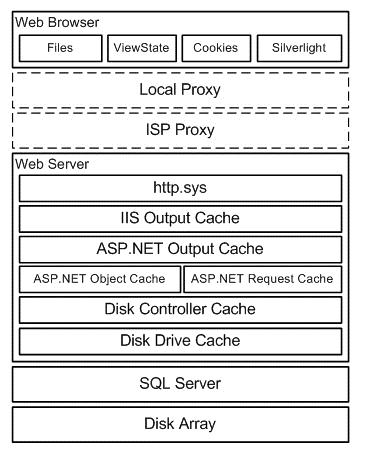
Boxes at the same horizontal level in the figure are mutually exclusive content stores, and their vertical location gives a rough sense of how far away they are from each other, in terms of relative access time. For example, you wouldn’t normally store the same data in both the ASP.NET object cache and in the ASP.NET request cache, or in both cookies and ViewState, and the browser can retrieve content cached by http.sys faster than content from SQL Server.
Although you can (and should) cache certain resources in multiple tiers, some types of data should be stored only in a single location. For example, state information stored in a cookie might be stored only there, or a pre-calculated result might exist only in the ASP.NET object cache.
You should consider caching in all tiers, though, and take relative content uniqueness and access frequency into account when deciding whether to cache in a particular tier. For example, content that is unique per user is generally not a good candidate to cache at the web server tier, since it is relatively unlikely to be reused, particularly in an environment with a large number of load-balanced servers. However, it might be perfectly acceptable to have the user’s browser cache it.
You can configure caching in four different ways:
- Using IIS Manager (a GUI front-end to the underlying XML configuration files)
- By directly editing an XML configuration file
- Declaratively, in an ASP.NET page or control
- Programmatically, in code-behind or in an HttpModule
I will describe each approach in the following sections.
Browser Cache
Files that the browser retrieves from the server should be stored in the browser’s cache as long as possible to help minimize server round-trips. If a page and all the resources it requires are in the browser’s cache, no server round-trips at all are required; the browser can render the page using only the cached content. Since that presents no load on the network or the server, it is obviously very good for scalability!
Caching Static Content
Every object stored in the browser cache includes an expiration time, beyond which the browser considers the content stale or invalid. You can manage those expiration times with the Cache-Control: max-age HTTP header. The Expires header performed the same function with HTTP 1.0, but Cache-Control overrides Expires when both are present. I prefer to use only Cache-Control when possible, thereby avoiding the confusion that might arise when you have two headers that specify the same thing.
If neither the Expires nor Cache-Control: max-age HTTP headers is set, then IE still stores the content in its cache, although it’s marked stale.
Avoiding Conditional GETs
For stale content, IE does a conditional GET when it is referenced the second and subsequent times (only once per page), asking the server to confirm that the content hasn’t changed since the last time it was retrieved. Here’s what a conditional HTTP request looks like:
GET /check.png HTTP/1.1
Accept: */*
Accept-Language: en-us
UA-CPU: x86
Accept-Encoding: gzip, deflate
If-Modified-Since: Sat, 10 May 2008 10:52:45 GMT
If-None-Match: "80fc52fa8bb2c81:0"
User-Agent: Mozilla/4.0 (compatible;
  MSIE 7.0; Windows NT 6.0; SLCC1;
  .NET CLR 2.0.50727; Media Center PC 5.0;
  InfoPath.2; .NET CLR 3.5.21022;
  .NET CLR 1.1.4322; .NET CLR 3.5.30428;
  MS-RTC LM 8; .NET CLR 3.5.30729;
  .NET CLR 3.0.30618;
  OfficeLiveConnector.1.3;
  OfficeLivePatch.0.0)
Host: www.12titans.net
Connection: Keep-Alive
IE has included the If-Modified-Since and If-None-Match headers to ask the web server whether the content has changed since the last time it was requested. Here’s the response:
HTTP/1.1 304 Not Modified
Cache-Control: max-age=1
Last-Modified: Sat, 10 May 2008 10:52:45 GMT
Accept-Ranges: bytes
ETag: "80fc52fa8bb2c81:0"
Server: Microsoft-IIS/7.0
Date: Mon, 16 Mar 2009 04:07:01 GMT
IIS responds with 304 Not Modified, indicating that the content hasn’t changed. It also includes headers with the current values of Cache-Control, Last-Modified, and ETag.
Even though the responses to conditional GETs are short, the round-trips alone can have a big effect on performance. Until the interval that you specify with Cache-Control: max-age passes, the content will remain active in the cache, and the browser won’t make those extra server round-trips.
Setting Cache-Control: max-age
You can set Cache-Control: max-age for static content using IIS Manager. First, select HTTP Response Headers. Then click Set Common Headers on the upper right, and select Expire Web content, as in Figure 3-2.
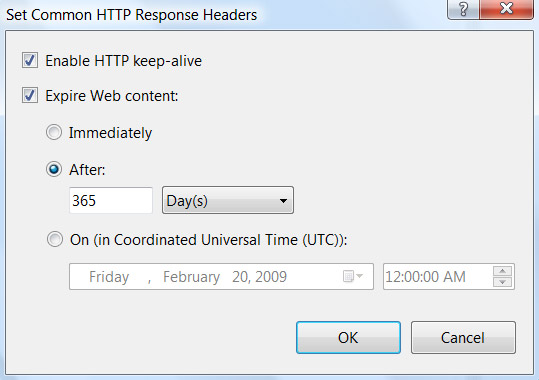
The HTTP 1.1 standard recommends one year in the future as the maximum expiration time. You should use that as the default for all static content on your site, as in Figure 3-2. Since max-age is specified in seconds, that will result in the following HTTP header:
Cache-Control: max-age=31536000
You can also apply this configuration setting in your web.config file, as follows:
<configuration>
  . . .
  <system.webServer>
    . . .
    <staticContent>
     <clientCache cacheControlMode="UseMaxAge"
      cacheControlMaxAge="365.00:00:00" />
    </staticContent>
  </system.webServer>
</configuration>
Once you’ve established a site-wide default, you can then set shorter expiration times for specific static files or folders if needed.
Disabling Browser Caching
You can disable browser caching for a particular static file or folder by selecting it first in the left-hand panel in IIS Manager, then bringing up the same dialog box shown in Figure 3-2, and finally selecting Expire Web Content and Immediately. This results in the following HTTP header:
Cache-Control: no-cache
You can also disable static file caching in web.config. For example, for a file called image.jpg in the top-level folder of your site, you’d have the following:
<configuration>
  . . .
  <location path="image.jpg">
    <system.webServer>
      <staticContent>
        <clientCache cacheControlMode="DisableCache" />
      </staticContent>
    </system.webServer>
  </location>
</configuration>
As implied by the name of the previous <staticContent> XML element, this approach works only for static content. You will need to set client cache expiration times for dynamic content declaratively in the .aspx file or set it programmatically.
Caching Dynamic Content
In general, dynamic content should have an expiration time of between 1 and 30 days, depending on the details of your application. An example of doing that declaratively is to place an OutputCache directive at the top of your .aspx page (see dyn-client.aspx):
<%@ Page . . . %>
<%@ OutputCache Duration="86400" Location="Client"
    VaryByParam="None" %>
That tells the runtime to generate HTTP headers that ask the browser to cache the page for 86,400 seconds (one day). You must include VaryByParam, or the parser will generate an error. A value of None means that multiple versions of the page do not need to be cached independently. The resulting HTTP headers are as follows:
Cache-Control: private, max-age=86400
Expires: Tue, 17 Mar 2009 01:34:17 GMT
Cache-Control: private prevents proxies from caching the response. ASP.NET also includes an Expires header, even though it’s technically redundant.
Note: In this example, the page will not be cached on the server.
You can also generate the same headers programmatically, either from code-behind or from an HttpModule. Here’s an example (see dyn-client2.aspx):
protected void Page_Load(object sender, EventArgs e)
{
    this.Response.Cache.SetExpires(
        DateTime.Now.AddDays(1.0));
    TimeSpan ds = new TimeSpan(1, 0, 0, 0);
    this.Response.Cache.SetMaxAge(ds);
}
Cache-Control: private is the default and does not need to be set explicitly.
In some versions of the .NET Framework, if the runtime detects that the page can be cached by http.sys, it will remove the max-age header, due to a bug that prevents the header from aging correctly. In those cases, the Expires header will be retained and used instead.
If your content changes more often than once per day, even short client-side expiration times (1 to 10 minutes) can be useful to prevent extra round-trips when users click the Back button in the browser to go back to one of your pages.
Using Cache Profiles
When you’re using OutputCache directives, it’s also a good idea to use centralized cache profiles to help ensure consistency and to minimize the effort needed to make subsequent changes. The first step is to define a cache profile in your web.config file. Using the previous example, define a profile called Cache1Day:
<system.web>
  <caching>
    <outputCacheSettings>
      <outputCacheProfiles>
        <add name="Cache1Day" duration="86400"
             location="Client" varyByParam="none" />
      </outputCacheProfiles>
    </outputCacheSettings>
  </caching>
</system.web>
After you define the profile, just reference it from the OutputCache directive (see dyn-client3.aspx):
<%@ OutputCache CacheProfile="Cache1Day" %>
Disabling Caching
You should disable browser caching of dynamic content only in cases where data must always be the absolute latest, where it can change in response to the user’s state (such as whether they are logged on), or where the page contains sensitive data that should not be stored on the browser.
Unfortunately, you can’t disable browser caching declaratively with the OutputCache directive. Instead, it requires a programmatic approach. Here’s an example (see dyn-disable.aspx):
protected void Page_Load(object sender, EventArgs e)
{
    this.Response.Cache.SetCacheability(
        HttpCacheability.NoCache);
}
HttpCacheability.NoCache will disable caching on both the client and the server. The resulting HTTP headers are as follows:
Cache-Control: no-cache
Pragma: no-cache
Expires: -1
The runtime includes the Pragma and Expires headers even though they aren’t needed in HTTP 1.1 and are therefore redundant in most cases. You can eliminate the Expires header as follows (see dyn-disable2.aspx):
this.Response.Cache.SetAllowResponseInBrowserHistory(
    true);
The Expires: -1 header is supposed to prevent the page from being placed on the browser’s history list so that you can’t use the browser’s Back button to navigate to it again. However, in my testing with IE7, it doesn’t work that way; the page is always present in the history list. Perhaps it has some effect in other browsers.
ViewState
ViewState is a collection of information generated by controls on an .aspx page that’s used by the controls to restore their state during a postback. State in this context can include the values of control properties, results of data binding, or input from users. The specifics vary by control.
As I mentioned in Chapter 1, there are a few places where technologies that help improve performance interact strongly with security. ViewState is one example. Using it correctly is important for both performance and security, and the issues on both fronts are compounded by the fact that it is visible to end users and is therefore subject to manipulation and abuse.
ViewState does not re-create custom controls on the page or restore posted values to controls, and you should not use it for session data, since it’s specific to a page, not a session. It cannot be used for server-only objects, such as database connections, and it is not valid after you do a server-side redirect with Server.Transfer().
Unlike vanilla HTML, controls do have their posted values restored during an ASP.NET postback, but the mechanism doesn’t use ViewState. For example, let’s say that you have a page with ViewState disabled that contains an <asp:DropDownList>. If the user selects a value from the list and then submits the form, the runtime will restore the value on the page that it generates for the postback. The same is not true for static HTML.
ViewState is useful from a caching perspective because it allows you to cache information that is associated only with a particular page as part of the page itself.
For example, let’s say you have a page that displays a list of strings, along with a link that allows the user to alternate between sorting the list either ascending or descending. How do you keep track of that? One way would be with a query string. Although that’s appropriate in some circumstances, it means that search engines would see multiple versions of the page, which might not be desirable. It also exposes a string in the URL that hackers could change and that you would therefore need to write additional code to validate.
As an alternative to using the query string, you can store the current sort order in ViewState. Here’s an example (see view.aspx):
    private const string SortStateKey = "SO";
    private const string SortAscending = "a";
    public bool IsSortAscending { get; set; }

    protected void Page_Load(object sender, EventArgs e)
    {
        if (IsPostBack)
        {
            string prevSort =
              (string)this.ViewState[SortStateKey];
            this.IsSortAscending =
                prevSort == SortAscending;
        }
        else
        {
            this.ViewState[SortStateKey] = SortAscending;
            this.IsSortAscending = true;
        }
    }
If the current page request is not a postback, the code stores a value into the ViewState object to indicate that the default sort order is ascending. If the request is a postback, you retrieve the previously stored value. Elsewhere in the code, when the user clicks a link or a button to alternate between ascending and descending sort order, you would use this information to determine which sort order to use and then change the value to indicate that you should do the opposite next time.
ControlState is similar to ViewState, in that it also contains page-specific, control-specific state information. However, unlike with ViewState, you can’t disable ControlState. It contains information that is required in order for a control to work at all. I will walk you through an example of using ControlState in Chapter 8.
As part of the page-rendering process, the runtime serializes ViewState and ControlState, encodes them in base-64, and stores them together as a single hidden <input> field on the page called __VIEWSTATE. To be serialized, the objects stored in ViewState must be marked with the [Serializable] attribute or have a custom TypeConverter.
The browser sends the hidden field back to the server when the <form> is submitted, as it does with all <input> fields. When the runtime receives the field, it is decoded, deserialized, and used to restore the state of the controls. ViewState can be read and written only after the Page_Init() event and before Page_PreRender().
Note: The presence of the __VIEWSTATE hidden field in an HTTP POST is how ASP.NET determines the value of Page.IsPostBack.
For example, consider the following ASP.NET markup:
<form id="form1" runat="server">
</form>
Here’s the corresponding HTML that the runtime generates:
<form name="form1" method="post" action="viewstate1.aspx" id="form1">
<div>
<input type="hidden" name="__VIEWSTATE" id="__VIEWSTATE"
    value="/wEPDwULLTE2MTY2ODcyMjlkZExM0iM
        4ebB6mDGwogfzmhu/Ur0P" />
</div>
</form>
You can see the <input> tag containing the __VIEWSTATE field.
Protecting ViewState Data Integrity
Since ViewState contains a collection of serialized objects that will be reconstituted on the server, it presents the possibility of abuse, including hacking and denial-of-service attacks. To prevent tampering and help ensure data integrity, the runtime can generate a message authentication code (MAC). The runtime can also encrypt the field in the event you need to use it to store sensitive data.
The default setting for ViewState validation uses the SHA-1 algorithm to generate a MAC, with an automatically generated validationKey. Using the MD5 algorithm instead is a little faster and generates a few less bytes in your pages. The extra cryptographic strength of SHA-1 would reduce the chances (very slightly) that an attacker could find some other random string that would result in the same hash code, but that’s not something that you care about in this case; protecting against injection of arbitrary text is more important, and MD5 does that just fine.
In an environment with multiple web servers, be sure to configure the validationKey to be the same on all servers. Otherwise, with the default automatically generated keys, ViewState generated on one server will not be valid on other servers, since the MACs would be different. Even in single-server environments, it’s a good practice to set a specific validationKey. That helps avoid surprises down the road, including things such as inadvertently invalidating form-containing web pages that are cached by search engines in the event you move to a new server or reload the operating system. Here are the relevant settings in web.config:
<system.web>
  . . .
  <pages enableViewStateMac="true">
    . . .
  </pages>
  <machineKey
    validationKey="50B3847462938741422FF158A
        5B42D0E8DB8CB5CDA174257"
    validation="MD5" />
</system.web>
The validationKey is a random hex string, between 40 and 128 characters long.
You should generally not require site-wide encryption of ViewState. If you need to store sensitive information in ViewState, you can encrypt it separately. If you need to protect the structure of the objects, then you can write a custom serializer, or you can serialize into memory first and encrypt the result.
Other Uses of ViewState
To understand more thoroughly how ViewState works and how to avoid several potential pitfalls, I’ve found that it’s helpful to cover a few security-oriented applications.
For example, you can use ViewState to prevent one-click attacks. The way they usually work is that an attacker creates HTML that includes a form and a link, which, when clicked, submits the form to the server being attacked. The form might do something like register a new user that the attacker will subsequently use to spam the target site. The power of the technique stems from the forms being submitted from IP addresses that aren’t directly associated with the attacker. The HTML is often sent to third parties using e-mail, along with socially engineered link text, such as “click here to claim your prize.”
One way to use ViewState to prevent one-click attacks is to set the ViewStateUserKey property on a Page. That value is stored in ViewState when the runtime initially renders the page. Then, during a postback, the runtime checks the stored field to make sure that it’s equal to the current ViewStateUserKey. If it isn’t, then the runtime throws an exception, and the page is aborted. You should choose ViewStateUserKey so that it is unique per user. Here’s an example that sets the user’s IP address as the key (see view2.aspx):
    protected void Page_Init(object sender, EventArgs e)
    {
        this.ViewStateUserKey = Request.UserHostAddress;
    }
The result is that the __VIEWSTATE hidden field will be different for each different IP address, and users who submit the form from an IP address that’s different from the one that the containing page was originally sent to will receive an error. That prevents attackers from copying the hidden field from one form and using it in a one-click attack.
Note: ViewStateUserKey must be set in Page_Init(), which is before ViewState is restored.
If you’re using sessions, a session ID is another candidate for ViewStateUserKey, although you should be aware that with the standard implementation, the runtime doesn’t send a session cookie to the browser until you save something in the Session object (unless you have a Session_Start event defined). Session IDs won’t be repeatable until the cookie is set.
Minimizing ViewState Size
Some controls, such as GridView, can easily generate many kilobytes of ViewState. Since the browser sends ViewState back to the server as part of an HTTP POST, it can adversely affect page load times if it gets too large. See Figure 3-3 for graph of upload times for various data sizes and uplink speeds.
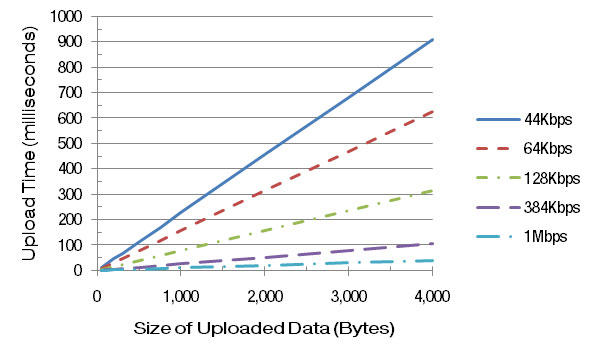
Keep in mind that it is sometimes faster to refetch data from the database for controls such as GridView than to have it sent back to the server as ViewState. From Figure 3-3 you can see that just 4KB of ViewState would take around 300ms to send over a DSL connection with a 128Kbps uplink. You can retrieve a lot of data from SQL Server in 300ms, particularly if it’s still in SQL Server’s RAM cache.
Because of the potentially large upload times, you should disable ViewState by default, on a per-page basis. You can do that by setting EnableViewState="false" in the Page directive (see view3.aspx):
<%@ Page Language="C#" EnableViewState="false"
    AutoEventWireup="true" CodeFile="view3.aspx.cs"
    Inherits="view3" %>
You can disable ViewState for your entire application in web.config:
<system.web>
  . . .
  <pages enableViewState="false">
    . . .
  </pages>
</system.web>
Unfortunately, you can’t override that setting in web.config at the page level, so you can’t selectively turn it back on when you need it. Therefore, disabling it on a per-page basis is more flexible.
Tip: You should enable ViewState only in pages that post back to the server; pages that don’t post back don’t need ViewState.
Many ASP.NET controls rely on ViewState to implement various features. When you need it, you should enable it at the page level, and then disable it for the controls where you don’t need it, using the EnableViewState property. Here’s an example:
<asp:GridView ID="mygrid" runat="server"
    EnableViewState="false" />
