Ink is a first-class citizen in the next generation of Microsoft® Windows® user interfaces.
Microsoft built ink functionality into all versions of the Microsoft Windows Vista™ operating system, and the new Windows Presentation Foundation (WPF) makes it easy to ink-enable your applications. Even using ink over moving video is easy in WPF!
Ink applications in WPF are similar in many respects to those in Windows Forms. You need to collect ink, display it over images, store and retrieve ink, and perform recognition on ink to find out what it says. In this article, I’ll look at the basics of performing each of these functions.
Enabling ink over video is just as easy as placing ink over an image. That’s because Microsoft built the basic functionality of media management into WPF. The InkCanvas control simply has another property, called MediaElement, to specify the media you want to use.
For the examples, I assume that you are working on Windows Vista. It is possible to configure a Windows XP system to integrate ink with WPF, and Eliot Graff talks about that in his article “The Proper Developer Environments for Mobile PC, Tablet PC, and Ultra-Mobile PC Applications,” elsewhere in this issue. In Windows Vista, Microsoft built in everything needed to do ink in WPF, except for the development tools.
You will need to install both Microsoft Visual Studio® 2005 and the Visual Studio 2005 extensions for .NET Framework 3.0. You can download the extensions from the Microsoft Web site. Start at http://msdn.microsoft.com/vista, and then look for the link for Windows Vista downloads.
The extensions include project templates for projects in WPF and in Windows Communication Foundation (WCF). This article is only concerned with WPF, so I won’t discuss WCF any further.
If you’re not working on a Tablet PC and you also don’t have a digitizer attached to your system, that’s OK. You can use your mouse as an ink input device on any Windows Vista system. All the examples will work on a vanilla Windows Vista system.
I’m not assuming that you know anything about WPF. However, I don’t go very deeply into the WPF concepts. I only introduce a few basics that are necessary to start working with ink.
I wrote the code examples in this article in Visual Basic®, and you only have to make minor changes in syntax to run them in C#. Only two examples use code. Most of the examples use the markup language for WPF called Extensible Application Markup Language (XAML). I’ll talk about that below.
Getting Started
If you have worked with ink before, you’ve probably used Windows Forms or direct access to COM objects for ink functions. WPF adds a new way to host ink functionality.
The easiest way to get started with ink in WPF is by using a new WPF control, the InkCanvas. This control combines all the things you would do with InkCollector, InkPicture, and InkOverlay controls when doing development on the classic Tablet PC.
You’ll find the InkCanvas control in the System.Windows.Controls namespace, along with all the other routine WPF controls. Other objects associated with ink manipulation are in the System.Windows.Ink namespace, including objects for holding ink and doing recognition from ink.
I’ll run through a simple example to show you just how easily you can get started with ink in WPF. After installing the Visual Studio extensions, start Visual Studio 2005, and then select the option to create a new project. You’ll see a new subfolder for .NET Framework 3.0 project templates just beneath the folder for Windows application project templates. Click that folder to see the project types available.
You’ll see a template for “Windows Application (WPF)”. This is similar to a Windows Forms application, except that WPF is the UI technology used. Select that template type, choose an appropriate folder to store your project, and then enter a project name of “InkInWPF1”.
You’ll see a design surface (called a WPF Window), which looks superficially similar to a form in Windows Forms. It has a default name, Window1. Even though it looks like a form, working with controls on the surface is different from the way it’s done with a Windows Form. I won’t spend a lot of time explaining how WPF positions things; others will write a complete article on that subject.
The visual designer for WPF in the Visual Studio 2005 Extensions is a placeholder until the next version of Visual Studio is ready. That means it’s not as polished as the Windows Forms designer. When working with controls, you’ll need to work a bit harder to position and size them than you did in Windows Forms.
Drag an InkCanvas control from the Toolbox onto the window. You should position and size the InkCanvas to be roughly the same size as the WPF window.
To make sure the designer doesn’t restrict the area in which you can input ink, select the InkCanvas control and set the Margin property to all zeros. To do this, right-click the Margin property and select Reset, which sets the Margin property to its default value of all zeros.
Press F5 to run the program. Use your stylus (or mouse) to scribble in the window.
Using XAML to Create Ink-Enabled Surfaces
Now I’ll show you an alternate way to quickly get an InkCanvas on a WPF window by editing the XAML markup that Visual Studio uses to define the window. You’ve probably already noticed that the XAML shows up in an editor window just under the Window1 design surface.
XAML is an XML-based markup language for declaring object trees. Since the visual elements that make up a window are just such a tree, XAML is one of the ways you can define a WPF Window. XAML is very flexible, and many of the tasks you might expect to accomplish in code are instead done in XAML in WPF.
I’ll run through modifying XAML directly. Delete your current Window1, and then select Project > Add New Item. Select the item type of Window (WPF) and click Add. You’ll get a new Window1 with no InkCanvas on it.
In the XAML for Window1, you’ll see the following element:
<Grid>

</Grid>
Edit the XAML and replace this element with the following:
<InkCanvas Name="InkCanvas1">

</InkCanvas>
Now press F5 to run and notice that the InkCanvas is functional, just as before.
Your applications will probably need more than bare ink, of course. Many applications require ink to be on top of an image, as an annotation to the image. In WPF, that requires setting the Background property of the InkCanvas.
Notice that I said “Background” property, not “BackgroundImage”. An InkCanvas doesn’t have a BackgroundImage property. Instead, the Background property is a WPF brush, which means you can base it on various visual elements, such as a color, an image, or a gradient fill.
The visual designer for WPF at this point does not let you set a background image for an InkCanvas control in the Properties window. But you can edit the XAML to specify a background brush based on an image. Change the XAML for the InkCanvas to look like this:
<InkCanvas Name="InkCanvas1">
  <InkCanvas.Background>
    <ImageBrush
      ImageSource="C:\Dev\Images\Creek.jpg"/>
  </InkCanvas.Background>
</InkCanvas>
You’ll need to supply a valid image file name on your system, of course. I copied the “Creek.jpg” image from the Sample Pictures that Windows Vista installs.
This is a typical example of how XAML allows properties to be set for a WPF control. Because the designer for WPF is still rather primitive, I’ll do several of my examples using XAML instead.
You can also change the ink color and width in XAML. You’re probably familiar with the DefaultDrawingAttributes property of the InkPicture control in Windows Forms. The WPF InkCanvas control has a property with the same name and it’s used the same way. You set the color and width of ink by setting the Color and Width properties of the DefaultDrawingAttributes for the InkCanvas. Here’s how the XAML would look if you enhanced the previous example to change the ink color to blue and the ink width to 4:
<InkCanvas Name="InkCanvas1">
  <InkCanvas.Background>
    <ImageBrush
      ImageSource="C:\Dev\Images\Creek.jpg"/>
  </InkCanvas.Background>

  <InkCanvas.DefaultDrawingAttributes >
    <DrawingAttributes
     Color = "Blue" Width = "4" />
  </InkCanvas.DefaultDrawingAttributes>

</InkCanvas>
Ink Over Media
Up to now, I’ve looked at functionality that’s about the same as what you could achieve in Windows Forms. Now I’ll move on to something that’s close to impossible in Windows Forms-ink over video.
Enabling ink over video is just as easy as placing ink over an image because Microsoft built the basic functionality of media management into WPF. The InkCanvas control simply has another property, called MediaElement, to specify the media you want to use.
I took the video for my sample from the Sample Videos folder installed with Windows Vista. Sample Videos is available in the Videos folder, which is another user folder. You can use your own video, or you can grab the same video I used at “C:\Users{username}\Videos\Sample Videos\Bear.wmv”. In my example, I’ve copied the “Bear.wmv” file to another directory to keep the path short.
To view this video, you’ll want to expand the size of Window1. You should highlight Window1, and then resize it to be about three times as wide and twice as high as it was originally.
Change the XAML for your InkCanvas to look like this:
<InkCanvas Name="InkCanvas1">
  <MediaElement Source="C:\Dev\Images\Bear.wmv" />
  <InkCanvas.DefaultDrawingAttributes >
    <DrawingAttributes
     Color = "Blue" Width = "4" />
  </InkCanvas.DefaultDrawingAttributes>
</InkCanvas>
Notice that I removed the brush used for the background image.
Now run the program and you’ll be able to write ink directly on the video. It’s really that easy in WPF to create a “chalk-talk” type of application!
Storing Ink
If you’ve worked with ink in Windows Forms, you’re probably familiar with the Save method of an Ink object. The Save method returns a stream of bytes that represents the ink. The Load method can take such a stream of bytes and recreate the ink.
Storing ink is a bit harder in WPF than Windows Forms, but not much. I’ll show you an example in which I save the ink that I drew over the bear video above.
I’ll use code instead of XAML to save the ink because I need to respond to a user clicking a button. WPF can attach a control’s events to code, and it’s done the same way as in Windows Forms.
For my example, I’ll need two buttons for the user to press. One will save the ink and the other will restore it to the screen.
Drag two buttons from the Toolbox into Window1. Position them close to the bottom of the window. In the respective Properties windows, change the first button’s Content property to “Save Ink”, and then change the second button’s Content property to “Restore Ink”.
Because of a glitch in the beta version of the designer, you’ll need to execute the program before you add any code. (Otherwise, the buttons may not show up in the drop-down list of objects that appears in the code window.) Right-click Window1.xaml in the Solution Explorer, and then select View Code.
In the code editor for Window1, click the left drop-down list and select Button1. Then click the right drop-down list and select the Click event for Button1. You’ll get an empty Click event routine, just as you would for Windows Forms.
Place the code from Listing 1 in the Click event. The code displays a common dialog box and asks the user to provide a file name. The Save operation then places the bytes representing the ink into a stream object. (Notice that this is completely different from the equivalent Save operation in Windows Forms, which places the bytes into a byte array.) In this case, I’ll use a FileStream to receive the bytes, but any kind of stream will do. If you want to place the bytes in a database, for example, you would probably use a MemoryStream to get the bytes into a byte array, and then put them in the database.
The Save method of the Strokes collection on the InkCanvas places the bytes for the ink into the stream. The FileStream then writes those bytes to disk when the Close method runs.
I’ll set up the second button. In the code editor for Window1, click the left drop-down list and select Button2. Then click the right drop-down list and select the Click event for Button2. In the empty Click event routine, place the code from Listing 2.
This code performs the inverse of the previous Save Ink operation. This time, I’ll use a common dialog box for opening a file that contains ink. The FileStream based on that file feeds the bytes representing the ink into a new StrokeCollection, which is then assigned to the Strokes collection of the InkCanvas.
Basic Ink Recognition in WPF
WPF handles ink recognition a bit differently from Windows Forms on a Tablet PC. I don’t have enough space to cover recognition comprehensively, but let me show you an example that does basic recognition. First I need to add a reference to the DLL that contains the InkAnalyzer class, which is the class needed for ink recognition in WPF.
Right-click the InkInWPF1 solution, and then select Add Reference. Click the Browse tab, and then browse to the needed DLL. Assuming you have a typical system setup, WPF will name the file “C:\Program Files\ Reference Assemblies\Microsoft\Tablet PC\v1.7\ IAWinfx”.
Add another button to Windows1 from the Toolbox, and then change its Content property to Recognize. Create a Click event as you did for the earlier buttons, and then place the following code in the event routine for the new button:
Dim MyInkAnalyzer As New _
    System.Windows.Ink.InkAnalyzer()
MyInkAnalyzer.AddStrokes(InkCanvas1.Strokes)
MyInkAnalyzer.Analyze()
MsgBox(MyInkAnalyzer.GetRecognizedString)
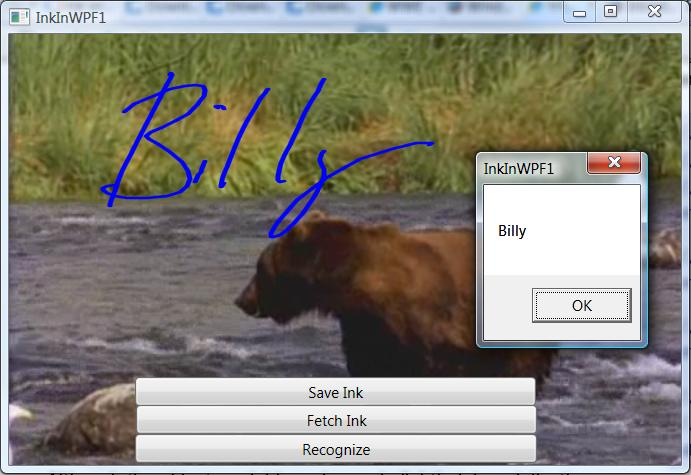
Run the program, input some ink, and then click the Recognizer button. You should get recognized text in a message box, as in Figure 1.
There’s quite a bit more functionality available in the InkAnalyzer object. You can get a tree structure of potential recognized results for example. Microsoft streamlined the recognition functionality for ink in WPF from that in Windows Forms, so I think you’ll find it easier to use. Check the MSDN Mobile PC Developer Center (msdn.microsoft.com/mobilepc) and the article by Frank Lavigne, “Exploring Ink Analysis” in this magazine for more information.
Conclusion
You have seen in this article just how nicely ink integrates with WPF, and how easy it is to ink-enable your WPF applications. I’ve covered input of ink, saving and restoring of ink, placing ink on top of images and videos, and simple recognition.
I don’t have space to go over all the changes to ink in Windows Vista, including better capability to position Tablet PC Input Panel, new auto-complete capabilities on Input Panel, better ways to give hints for ink recognition, and more control over events on the stylus.
Listing 1: Saving ink from an InkCanvas control to a file
Dim SaveFileDialog1 As New Microsoft.Win32.SaveFileDialog()
SaveFileDialog1.Filter = "isf files (*.isf)|*.isf"

If SaveFileDialog1.ShowDialog() Then
    Dim fs As New System.IO.FileStream(SaveFileDialog1.FileName, _
                  System.IO.FileMode.Create)
    InkCanvas1.Strokes.Save(fs)
    fs.Close()
End If
Listing 2: Fetching ink from a file and placing it in an InkCanvas control
Dim OpenFileDialog1 As New Microsoft.Win32.OpenFileDialog()
OpenFileDialog1.Filter = "isf files (*.isf)|*.isf"

If OpenFileDialog1.ShowDialog() Then
    Dim fs As New System.IO.FileStream(OpenFileDialog1.FileName, _
                  System.IO.FileMode.Open)
    InkCanvas1.Strokes = New Ink.StrokeCollection(fs)
    fs.Close()
End If