


Visual FoxPro 8 includes numerous new features that are a direct response to the requests of VFP developers.
Just reading through the “What's New” section of the documentation will take you quite a while due to large quantity of additional or changed features and commands. Let's take a brief look at just a few of the exciting new capabilities that you can put to use immediately.
Not only does the documentation of new features in VFP 8 take up a large number of pages, but there are more than 100 new keywords added to the language. These represent additional Commands, Functions, Class names, Properties, and Methods.
You will have to explore VFP 8 on your own to discover many of the great new additions, but I will give you a quick tour of some of the new feature highlights that have caught my attention.
Insert-SQL changes
The Insert-SQL command has gained two great new capabilities. It can now accept data that comes from an object or from a Select-SQL statement.
For example, if you have an object (very likely a business object) that among its PEMs has properties that match fields in a cursor, you can insert data into the cursor right from the object. The syntax is very trivial:
Insert into curProducts from name oProduct
Note that oProduct is the name of the business object that has the data. This feature lets you avoid the need to append a blank record to the cursor and then fill the fields with the gather command, as in:
Append Blank in curProducts
Gather from name oProduct
Here goes the other new feature: instead of having to get a resultset from a query and scan through it populating a cursor, now you can do all at once:
Insert into curProducts ;
 (ProductID, ProductName, UnitPrice);
   Select ProductID, ProductName, UnitPrice ;
      from Products Where UnitInStock > 20
An “Empty” object?
For a long time, developers have been looking for a lightweight class, mainly when they have to add and remove properties to an object on the fly. Some people have been using the Session or the Custom classes, but those are not really intended to be lightweight classes. Others use classes like Relation or Line, but that is kind of weird from an OOP point of view, because a Relation class is meant to abstract relations between tables, while a Line class is meant to be a visual line in a UI control. The Empty class enters the picture.
The Empty class does not have any intrinsic properties, methods or events (yes, that's why it is called empty). Not having any members, this class gets instantiated and destroyed very quickly. Of course, this class is useless as-is, because if it doesn't have a AddProperty method like all the baseclasses in VFP, how can we make any use of it?
The answer is two more new features: the AddProperty and RemoveProperty functions. Despite the fact that these functions can work with any object, their biggest role is to support the Empty class. The use of these functions and the Empty class is very trivial:
oCustomer = CreateObject("Empty")
AddProperty(oMonths, "LastName")
AddProperty(oMonths, "FirstName")

oCustomer.LastName = "Lassala"
? oCustomer.LastName
For removing a property, it goes like this:
RemoveProperty(oMonths, "LastName")
Another use for the Empty class comes with using the Scatter command. The Scatter Name oObject command creates an object that has one property for each field in the cursor or table in the current work area, storing the values of the fields into the properties in the brand new object.
But, now we can create an Empty object beforehand, which has some additional properties besides the ones that match with the fields in the cursor, and then use the new ADDITIVE clause to the Scatter command, which will cause the use of an existing object, instead of a brand new one.
For example, if we still have in memory the oCustomer object for the previous sample, we can scatter fields from the customer table to it like this:
Use Customer
Scatter Name oCustomer Additive
An Empty class is a sealed class, which means that it cannot be sub-classed.
Putting some new features together
A practical use for an Empty object is getting rid of some of those public variables (or private variables in the main program) that some developers have spread through their applications, especially when they're not willing to move to an entirely OOP approach.
For example, usually some developers have a few public variables that store environment information, like the name of the Machine, the OS version, the user's name, and so on. This is a simple sample of how they could get rid of a few of those variables by using an Empty object:
Private poApp

*-- We create an "empty" object.
poApp = CreateObject("Empty")

*-- We add a few properties to the object.
AddProperty(poApp, "MachineName",;
            Substr(Sys(0),1,At("#",Sys(0))-1))
AddProperty(poApp, "OSVersion", Os(1))
AddProperty(poApp, "UserName",;
            Substr(Sys(0),At("#",Sys(0))+1))
You can see that we create just a single property that will store a reference to an Empty object, and then we use the new AddProperty function to add a few properties to the object (MachineName, OSVersion and UserName). We are using the AddProperty function to also initialize the values of the properties, but we could assign values to the properties in an Object.Property approach, like:
poApp.OSVersion = Os(1)
Then, you can use this object anywhere:
MessageBox("User Name: "+poApp.UserName+Chr(13)+;
   "Machine Name: "+poApp.MachineName+Chr(13)+;
   "OS Version: "+poApp.OSVersion)
Let's now see a sample that plays with the new features both in the Insert-SQL and the Scatter commands.
Often, we need to keep track of the size and location of forms as they were the last time they were destroyed (the user runs a form, changes its size and location, then closes the form). The next time the user runs the form, he expects that it will be shown the same way.
Doing that now is a piece of cake. Basically, we need a simple table that has numeric fields for keeping the size of a form and its position (Top, Left, Width, and Height). In the Destroy event method of the form, we put this line of code:
Insert into Settings from name Thisform
Of course, we need to apply some logic to check whether we already have a record in the table keeping track of these values. If that's the case, we can just update the record with this line of code:
Gather name Thisform
Both lines of code will take the Thisform reference to the form object, and then grab the value of its Top, Left, Width and Height properties to replace in the table.
Now, in the Init event method, we grab the values stored in the table and then update our object properties with this line of code:
Scatter name Thisform additive
DataEnvironment Class and Builder
Let's picture a common situation: you have a form with a beautiful (read “complex”) DataEnvironment defined, with lots of tables, relations, ordering, and so forth. Then you face a new need where you'll have another form that requires the same settings of the first one. Until VFP 7, you had two choices: recreate everything again from scratch manually or create the DataEnvironment programmatically. That was because we weren't able to define and subclass the DataEnvironment class. Now we are!
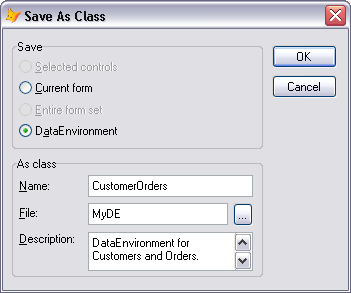
Now, with VFP 8, we can just go to the form that has the DataEnvironment defined, and then select Save As Class from the File menu. In the dialog box you'll find a new “DataEnvironment” option. Then, it's just a matter of typing the name of the class, where it should be stored and a description for it (see Figure 1)
The Form baseclass was changed for supporting the DataEnvironment class. Two new properties were added: DEClass and DEClassLibrary (where you type the name of the Class and the Class Library file where the class is located, respectively).
You can define DataEnvironment classes both in the Visual Class Designer (stored in VCX files), or programmatically (stored in PRG files). Of course, the Form is able to work with both equally well. A sample of a PRG-based DataEnvironment class can be found in Listing 1.
Sure enough, you are not limited to just using DataEnvironment classes within Forms. You could use the class defined in Listing 1 anywhere with something like this:
oDE = CreateObject("CustomersOrders")
oDE.OpenTables()
You can run those lines of code and then go to the Data Session window, and see the results (Figure 2).
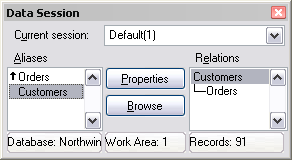
Table changes
One of the long-waited features that now is present in VFP 8 is the AutoIncrementing field for tables (usually used for keeping primary keys in a table). VFP has a new field type called Integer (AutoInc) that addresses this issue.
There is also a minor enhancement for the indexes of a table: a collating sequence can be defined individually for every single index tag.
Another very neat new feature is that an expression can be defined as the Caption of a field in the Table Designer. This expression is evaluated every time a Browse window is opened. However, there's something much cooler about this. In earlier versions, we could drag a field from a DataEnvironment and drop it onto a form, and that would create a label with its Caption property set to the caption of the field.
In VFP 8, the caption of the label will be evaluated at run-time, which give us the flexibility for data-driven labels in our forms. For example, I could set the Caption of the CompanyName field to the following expression:
=Localize("CompanyName")
“Localize” is just a Stored Procedure I have that will return the localized version (in this sample, the Portuguese version) of “Company Name”, according to the Regional Settings running on this computer (the implemenation doesn't matter here). In Figure 3, you see the label that's evaluated every time the form runs.
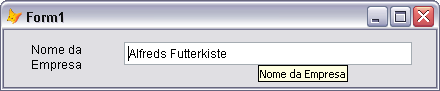
The Field() function supports this new feature, by means of a parameter that dictates whether the return of the function will be the physical name of the field or the evaluated expression of the Caption. Looking again at Figure 3, you see a ToolTip close to the Textbox. In the Init method of that Textbox I have this line of code:
This.ToolTipText = Field("CompanyName", "Customers", 1)
The value “1” in the third parameter says that the return of the function will be its evaluated expression on the Caption property.
Grid Enhancements
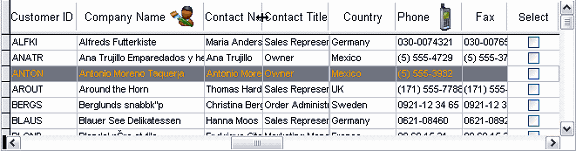
It is common knowledge that VFP's Grid is one of the most powerful and most used controls. It is easy to use and provides great functionality. However, VFP developers have always dreamed of some enhancements to the Grid to make it even better. In VFP 8, several dreams have come true. Figure 4 shows some of the features that I will explain below.
Acting like MS-Excel
Everyone who uses MS-Excel is used to the way it works in regarding to resizing columns (auto-fitting the columns to match their largest content), which can be done by double clicking in the line that divides one column from another, causing the column at the left to be resized. Alternatively, we can double click the square at the left-top of the spreadsheet and that will cause all the columns to be resized.
VFP's Grid now behaves just the same. You can see in Figure 4, between the “Contact Name” and “Contact Title” columheaders, the mousepointer indicating the divider line. After double clicking, the “Contact Name” column is resized.
Not just that: we can also Auto-fit columns in the grid programmatically:
*-- Resize second column of the grid
Thisform.grdCustomers.AutoFit(2)

*-- Resize fourth column of the grid
Thisform.grdCustomers.AutoFit(4)

*-- Resize all of the columns at once
Thisform.grdCustomers.AutoFit(0)
This feature (and some other new features) also works with the BROWSE command. For example:
BROWSE Name oMyBrowse NoWait
oMyBrowse.AutoFit(0)
Another Excel-like feature is the ability to freeze columns. In Figure 4 we see a thicker line dividing the “Contact Title” and the “Country” columns. That line indicates that all the columns at the left side of it are frozen. When scrolling to the right side of the grid, we will never lose sight of them. Here is the the code required to freeze the first four columns of the sample grid:
Thisform.grdCostumers.LockColumns(4)
Grid Highlighting
VFP developers have always had trouble working with highlighted rows in a grid. End-users want the ability to select a row in a grid and keep track visually of which row is selected, even when the focus is in another place (see the third line of the grid in Figure 4). We usually end up writing a whole bunch of code to make that work. Now, this line of code is all we need:
Thisform.grdCustomer.HighlightStyle = 2
Also, we have two properties to configure the backcolor and forecolor of the highlighted row: HighlightBackColor and HighlightForeColor.
A Grid as a Listbox
Previously, if we clicked in a row of the grid, the row would be highlighted and the cursor would be blinking inside the cell (usually in a textbox). Sometimes we do not want the user to have access to the cell. Rather, we just want the user selecting a record, imitating a Listbox (remember that a Listbox does not has the Grid's capabilities to bind to data, among other things).
To address that, there is another welcomed new property to the Grid: AllowCellSelection.
*-- Do not allow the user to select cells.
Thisform.grdCustomers.AllowCellSelection = .F.
Hiding and Showing Columns
Another feature that used to require several lines of code is hiding and showing columns in a grid. There was not a single straight-forward way to do that. Now, all it takes is:
*-- Hide second Column
Thisform.grdCustomers.Columns(2).Visible = .F.

*-- Show fourth Column
Thisform.grdCustomers.Columns(4).Visible = .T.
This makes it very easy to show or hide columns depending on the user rights to see certain data, for example.
Centering Checkboxes
Often, grids are used to allow the user to select one or multiple records (look at the “Select” column in Figure 4). In those situations, we insert a Checkbox in a column of the Grid, and guess what? We cannot make the Checkbox center itself within the column. The workaround was to insert the Checkbox centered in a Container, and then insert the container into the column.
Once again, we can reduce that now to a single line of code by using the Centered property of the Checkbox (I did split it here in three lines to fit the layout of the magazine):
*-- Centralize the Checkbox the eighth column.
With Thisform.grdCostumers
    .Columns(8).chkSelect.Centered = .T.
EndWith
Images on the Headers
Last but not least, we see that two columns have images on their headers (columns “Company Name” and “Phone”). To add an image to a header we set the Picture property:
With Thisoform.grdCustomer
    .Columns(2).Header1.Picture = "Customer.ico"
    .Columns(6).Header1.Picture  = "Phone.ico"
EndWith
You may have noticed that I am using an ICO file (which is an icon image) instead of a BMP or other graphics image. See the sidebar “GDI+ Support” for more information about this.
Summary
Although I could go on and on with dozens more examples of new features, space is limited in this magazine. So, get your hands on a copy of VFP 8 and dig right in. You'll soon be as excited as I am.
Listing 1: A DataEnvironment class definition
DEFINE CLASS CustomersOrders AS dataenvironment

   Name = "dteCustomersOrders"

   ADD OBJECT crsCustomers AS cursor WITH ;
      Alias = "Customers", ;
      Database = "northwind.dbc", ;
      CursorSource = "Customers"

   ADD OBJECT crsOrders AS cursor WITH ;
      Alias = "Orders", ;
      Database = "northwind.dbc", ;
      CursorSource = "Orders"

   ADD OBJECT relCustomersOrders AS relation WITH ;
      ParentAlias = "Customers", ;
      RelationalExpr = "customerID", ;
      ChildAlias = "Orders", ;
      ChildOrder = "customerID"

ENDDEFINE
